Dynamics 365 Business Central – How to prevent the Template pop up window when creating new Customers or Vendors

Introduction

Templates can be used to make adding static data quicker and easier however I found that after creating templates I was then forced to use one for any new customers or vendors I added. This post shows one way you can get around this.

The Issue

To highlight the issue when I click “New” in the customer list I’m presented with the template pop up.

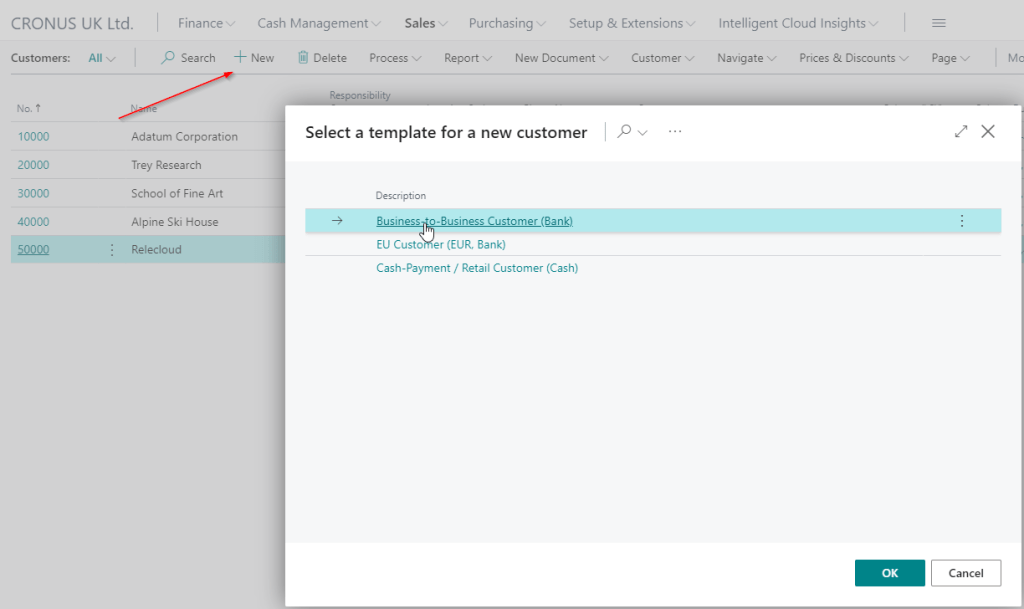
The only options I have here are “OK” and “Cancel”. If I click “Cancel” I’m taken back to the Customer List and if I hit “OK” a new customer is created using the template defaults.

So how do I create a new customer without a template?

The Workaround

Firstly, if I check the Sales Setup window I can see the number series CUST is used for new Customers

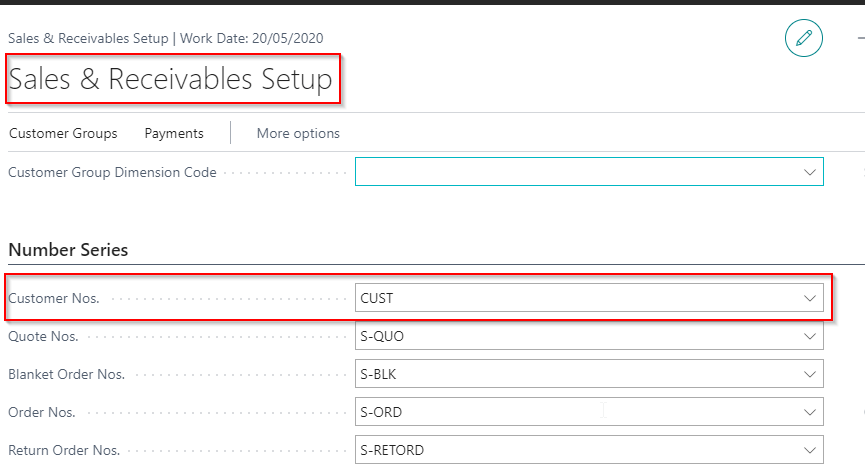
If I go to the Number Series page and check the Number Series for CUST its currently set to “Default Nos.”.

If I untick “Default Nos.” and go back to the “Customer List” I’m no longer prompted for a Template.

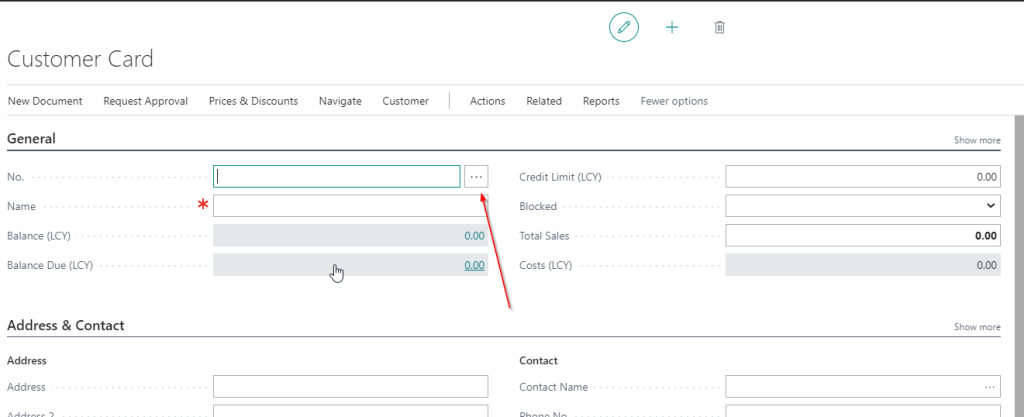
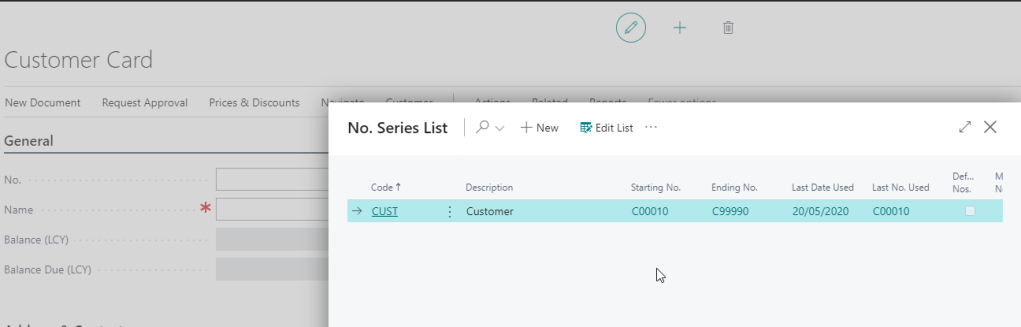
I can still use the Number Series by clicking the ellipse button as highlighted above and selecting the CUST number series. This is shown below:

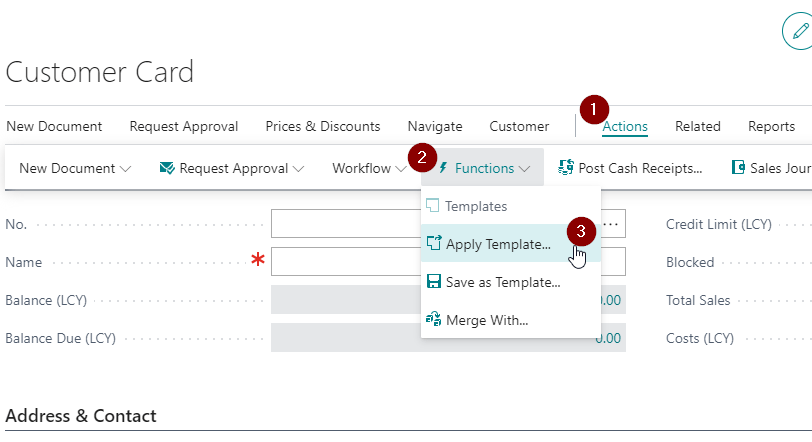
I can also apply a template by click “Actions > Functions > Apply Template” as per below

I can use the same technique on the Purchasing side by editing the number series used for Vendors.

Conclusion

There may be scenarios where you have templates but don’t necessarily want to use them when first creating the customer. This is one way of avoiding this.

Thanks for reading!

Dynamics 365 Business Central – Create Payments quickly and easily in the Vendor Ledger Entries page using the Create Payment function

Introduction

This post highlights a great way to pay multiple invoices, on multiple suppliers quickly and easily from the Vendor Ledger Entry page.

Creating payments

There are numerous ways to pay vendors quickly and easily in Dynamics 365 Business Central.

You can do this manually by going directly to a payment journal and entering the payment as per below

Alternatively you can use the “Suggest Vendor Payments” function from the Payment Journal to have the system build and suggest a list of payments based on criteria you enter. (I’ve covered this in more detail here)

However there’s also another method for creating payments directly from the “Vendor Ledger Entry” page which often goes unnoticed.

Create Payments in Vendor Ledger Entries

The “Create Payment” action you can use directly from the “Vendor Ledger Entries” and is a great tool for creating ad hoc payments.

You first open the “Vendor Ledger Entries” page and add a filter for “Open” items.

** I find the easiest way to do this is to select an invoice that is open and then click drop down on the “Open” column and choose “Filter to this value”

Once you have your list of open documents you can select multiple documents you wish to pay by clicking the ellipse button and selecting “Select more” from the menu:

Once you have selected all the invoices you wish to pay click “Create Payment”

** Please note you can select credit memos as well and the system will create a refund.

Next select the template, batch and other information as per below:

This will open and pre populate the payment journal with the payments which you can review and post.

Conclusion

There are many ways to create payments for your suppliers this is just another way Dynamics 365 Business Central makes this task that little bit easier 🙂

Thanks for reading!

Dynamics 365 Business Central – Why do you need to specify posting groups on G/L codes?

Introduction

Since I’ve been working with Dynamics 365 Business Central I’ve loved the concept of posting groups. As a way of a very brief background, posting groups are used by Dynamics 365 Business Central to gather the required G/L codes when you post a transaction. Therefore you add posting groups to entities like Customers, Vendors, Bank Accounts, Item and also more interestingly G/L codes.

Coming from a Dynamics GP background I could understand why posting groups where needed on all entities, with the exception of G/L codes? Surely if I specify a G/L code on a transaction or journal, this is the G/L code I want to post to?

In this post I hope to shed some light on why the system still requires posting groups on G/L Codes.

A Sales Transaction using a G/L Code

As way of an example lets imagine we are adding the Sales Invoice using a G/L code as per below:

This transaction looks fairly straight forward. We are posting a Sales Invoice with a revenue code of 10100 therefore we expect G/L entries of Debit Debtors and Credit this Revenue code. With this in mind why would we need posting groups defined on the G/L code?

Ok, that’s a fair point, so let’s change the transaction ever so slightly and add some line discounts.

So now we have added line discounts we need a posting to the “Sales Discount” G/L code. However how is the system going to select the correct G/L code?

You guessed it, the answer is using Posting Groups.

So, if we look at the G/L card for G/L code 10100 we can find the product posting groups:

As this is SERVICES the system will use this, in combination with the “General Business Posting Group” from the Customer card, to select the relevant discount code using the “General Posting Setup” window, in this case 10300.

Without this information the transaction would fail to post. This is why the system is requiring you to enter posting groups onto G/L codes. They are needed so the system has a method of gathering other G/L codes that might be needed on the transaction.

Conclusion

This is likely obvious to seasoned Dynamics NAV and BC users however its something that took me a little while to fully grasp so I thought it worth sharing.

Hopefully anyone new to Dynamics 365 Business Central found this useful. (you can also read more about posting groups in this post)

Thanks for reading!