Dynamics 365 Business Central – How to proportionally split costs across Dimensions using Statistical Accounts and Allocation Accounts

Introduction

When posting certain expenses in Business Central, you may want to split the costs proportionally over several cost centres using a specific value or metric. For example you may want to split a heating expense across the Factory and Office cost centres based on the square footage that each occupies.

In this post, I’ll show how this can be achieved by combining Statistical Accounts and Allocation Accounts to automatically distribute costs across dimensions.

Scenario

In our demo scenario we want to split the heating costs of the business automatically across our department cost centre based on the square footage they occupy.

The heating costs are recorded via the Purchase Invoice from our supplier. When keying this into the system we want to be able to simply select one Allocation account, enter a total amount of the invoice, and then the system to automatically post this to one heating GL account but split across the Department dimension.

This will seamlessly record the heating costs more accurately across the Department dimension.

This post assumes you have a dimension called “Department” already configured with the relevant values.

Statistical Account Configuration

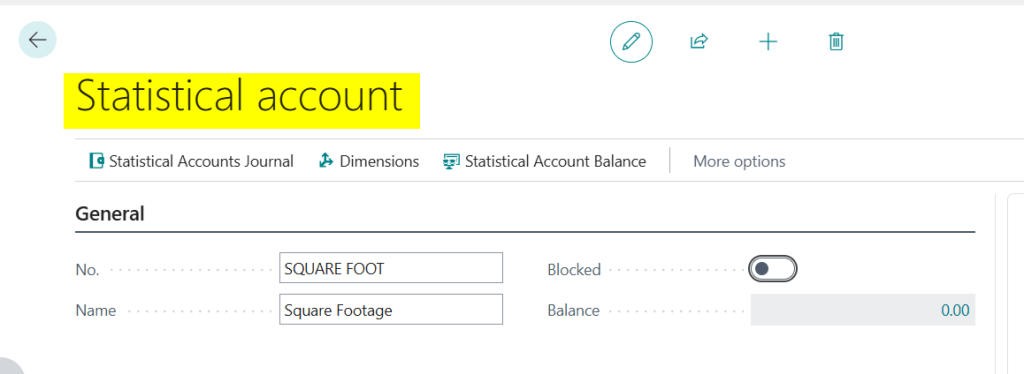
First, we need to create a statistical account. But before that, a quick introduction to why they are useful 😊.

Statistical accounts allow you to store non-financial information such as square footage or employee count. You can then use this information in multiple ways, such as in calculations in financial reports or allocating costs.

For this scenario I’m going to create one called SQUARE FOOT and configure it as per below:

Next, I’ll click “Statistical Accounts Journal” and post the entries to record the square footage for each department.

I’ve done this as per below:

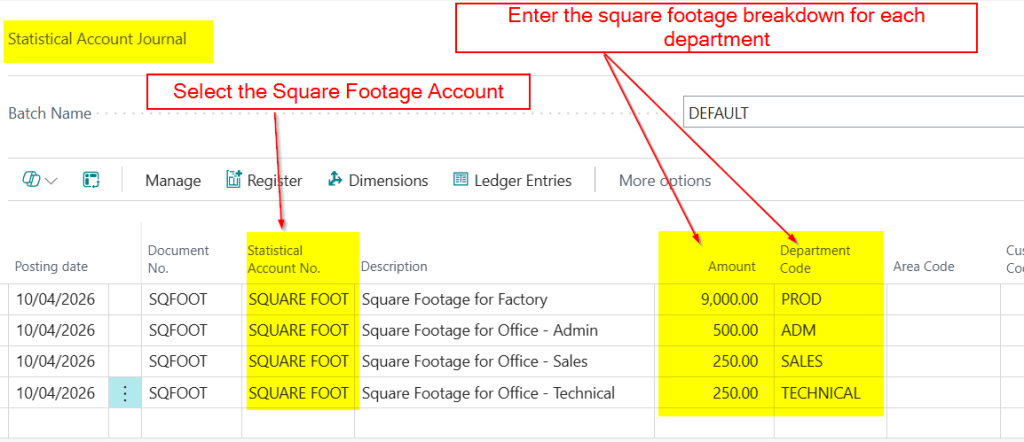
In reality, the square footage figures are unlikely to be this straightforward, but I’ve kept them simple here so the calculations are easier to follow when posting the Purchase Invoice 😊

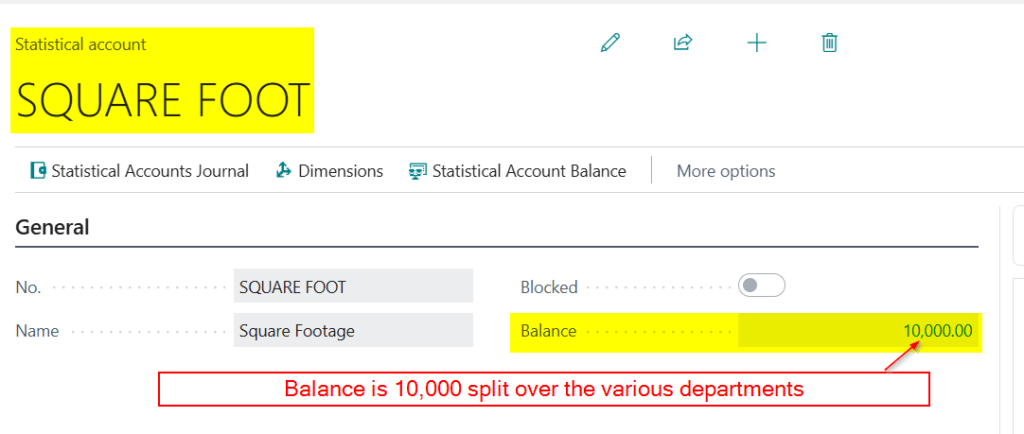
The balance on the Statistical Account is now 10000 which is split as 9000 to the PROD (Factory) department, 500 to the ADM department, 250 to the SALES department, and 250 to the TECHNICAL department.

Allocation Account Configuration

Now we have configured the Statistical Account we need to create the Allocation Account and use the Statistical Account in the breakdown 😊.

We will therefore go to “Allocation Account” page and set this up. We’ll go through in steps and explain each one as we go.

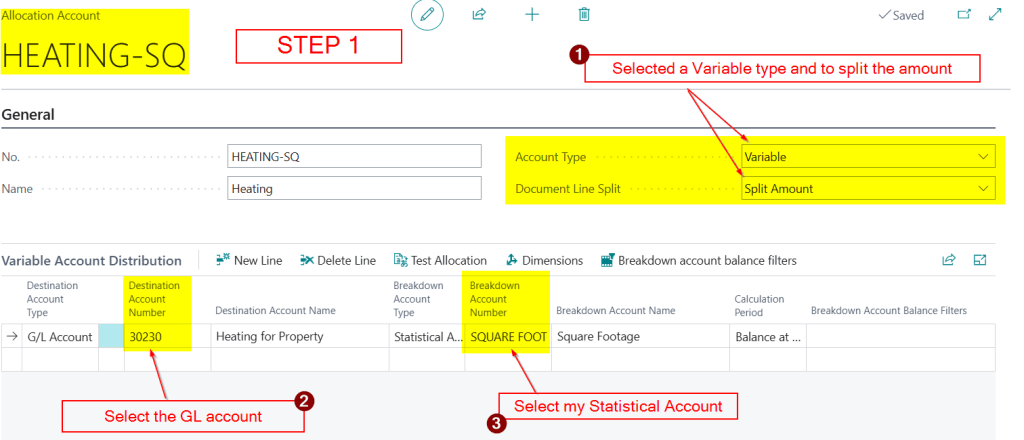
The first step is to add the “Allocation Account” and select the GL account we want to break the costs over and what the breakdown account will be.

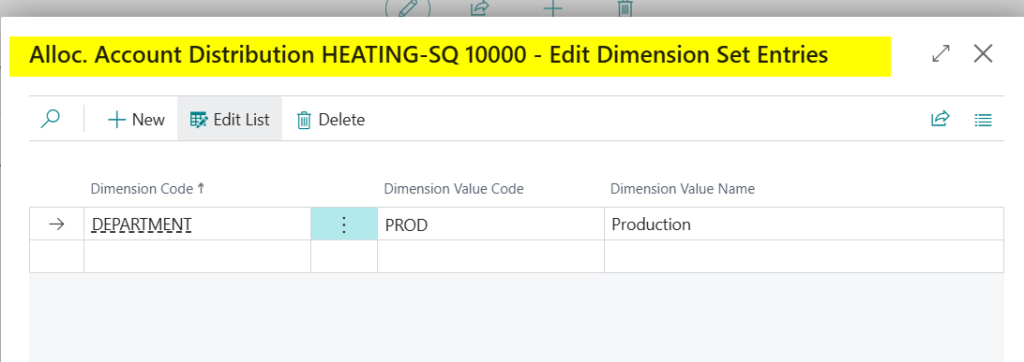
Next, while on the line, I’ll click “Dimensions” and select the Department dimension and the dimension value PROD.

Now, back on the main Allocation Account screen I’ll click “Breakdown account balance filters” and enter the Department of PROD.

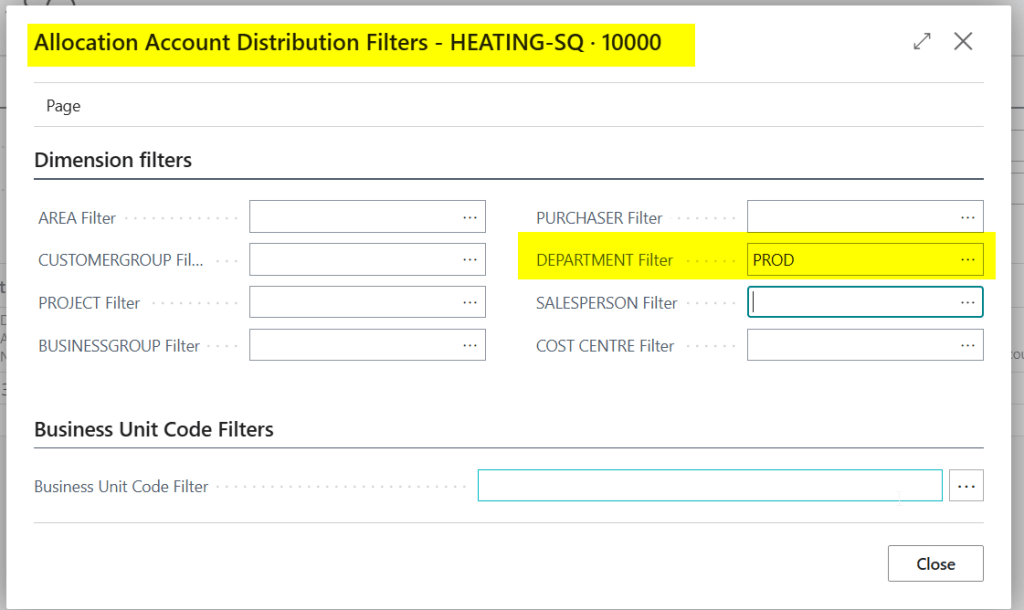
Returning back to the “Allocation Account” and you can see this line is filtered for the balances posted to the PROD dimension value.

I need to repeat this process for all the dimensions in the statistical account I want to break the costs down over.

Therefore my final configuration looks like the below.

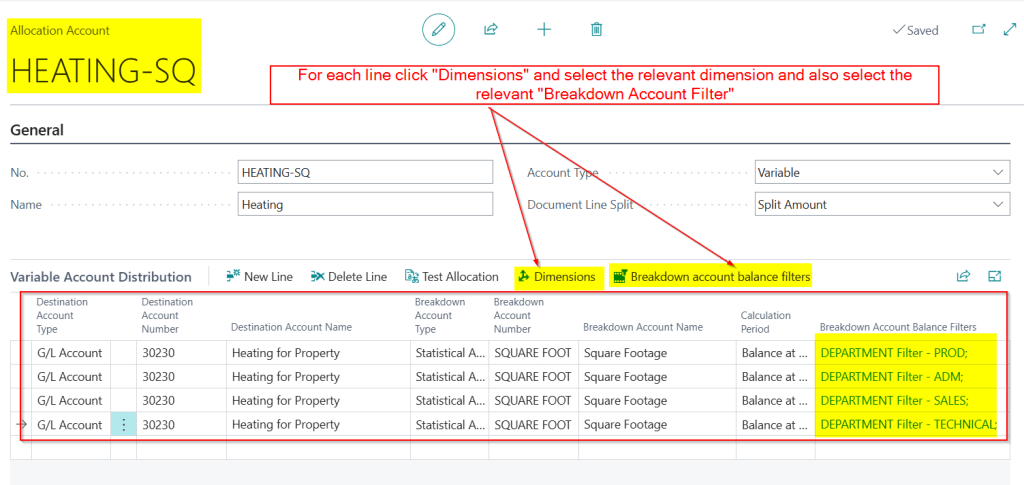
For example, on the second line I selected the ADM dimension value under “Dimensions” and then applied the same value within the breakdown account filters. On the third line, I repeated this process for the SALES dimension, and on the fourth line for TECHNICAL.

I’ve now completed the configuration 😊. Now, when I post a Purchase Invoice I should be able to select the HEATING-SQ “Allocation Account” and have the costs split across dimensions automatically based on the values in my Statistical Account.

Let’s give it a try 😊

Posting a Purchase Invoice to the Allocation Account

Now I’ve completed the configuration lets give it a try.

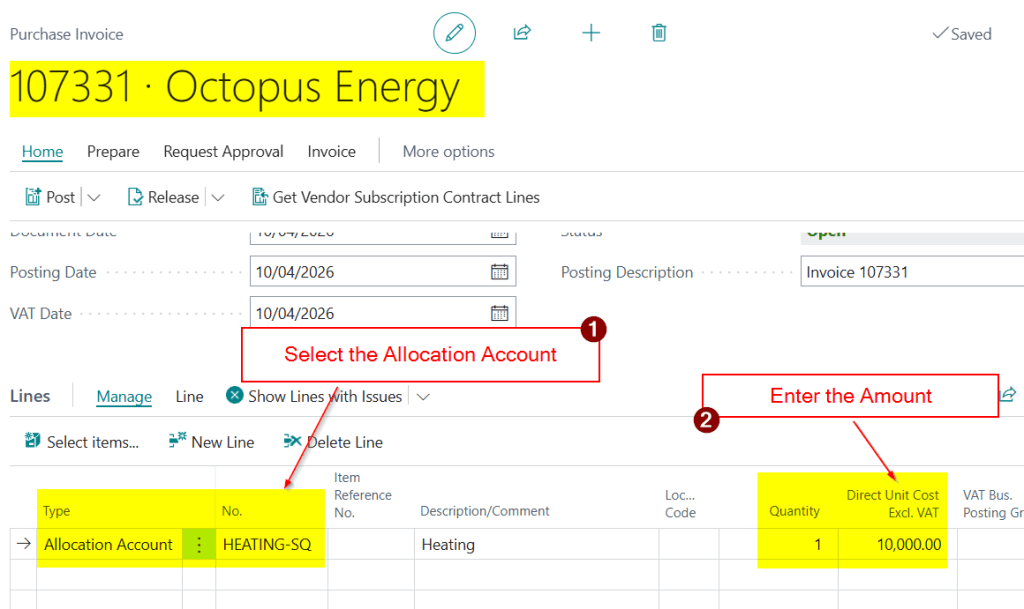
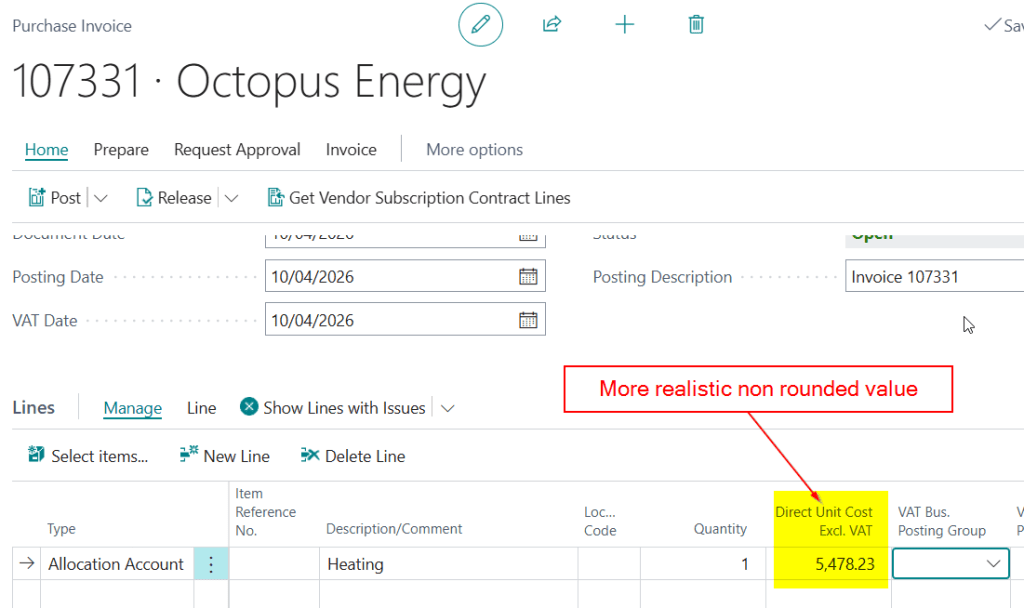
I now have a Purchase Invoice from my energy supplier for the total heating costs for our business premises. As discussed this includes a factory and office space.

I’ll therefore create the invoice for the total cost as per below ensuring I choose the Allocation Account called HEATING-SQ.

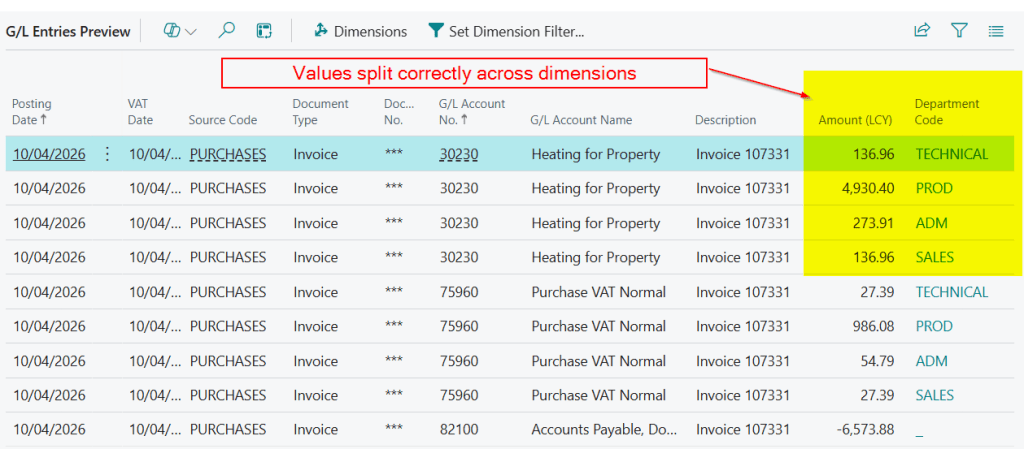
Then, when I select “Preview Posting” you can see the cost is being automatically split across the various dimensions using the statistical account

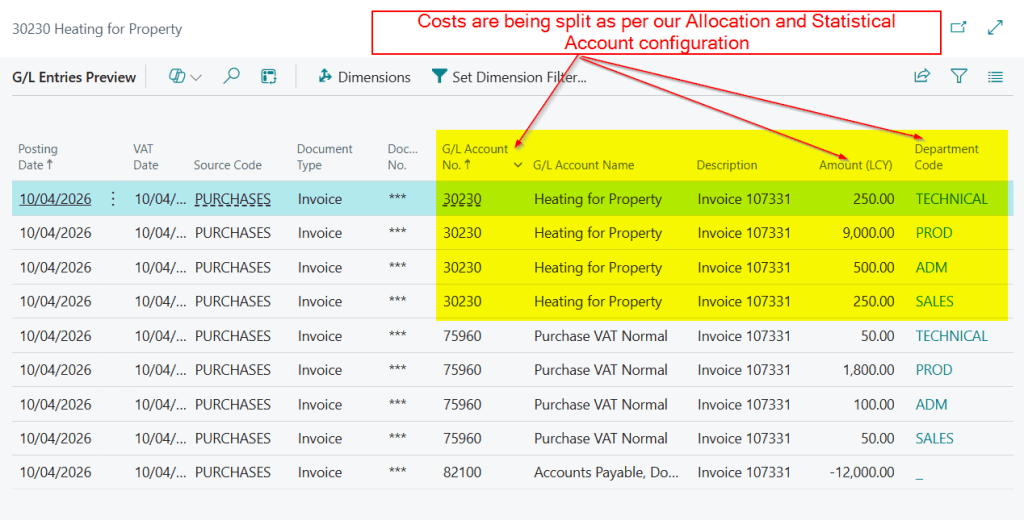
To make this more representative of a real scenario, I’ll use a non-rounded invoice value instead of 10,000.00 so you can see how the system calculates and splits the amounts more precisely across the dimensions.

And you can see the values split nicely across the dimensions

Conclusion

This blog goes through how you can automatically split costs across dimensions based on non-financial information like square footage. It goes through how to configure a Statistical and Allocation Account to acheive this.

What’s amazing about this feature is if the office space changes or the factory is expanded, you only have to post another Statistical Journal entry reflecting the updated figures and the system will automatically use the revised values the next time allocations are run, ensuring your cost distributions always stay accurate without any need to amend your allocation setup 😊

Thanks for reading!

Dynamics 365 Business Central – Handling the message “Only the Posting No. Series can be filled in on recurring journals” in Recurring Journals

Introduction

When entering a Number Series on a “Recurring General Journal” batch you receive the message “Only the Posting No. Series can be filled in on recurring journals”.

In this post we’ll take a quick look at the functionality of a Recurring General Journal, why I think the message appears, and look at two techniques you can use to ensure a unique document number is created each time the journal is posted, without the need to constantly update the document number before each posting.

A Brief Look at Recurring Journals

The Recurring Journal has unique features over and above a normal General Journal. Its designed for entries that are made regularly such as prepayments, depreciation or payroll journals etc.

The great thing about Business Central is there are many other features you can use for journals like prepayments and depreciation such as deferrals or standard journals however in this post we are focussing on recurring journals

One of the main features of the “Recurring General Journal” is that unlike a “General Journal”, after posting a Recurring General Journal the journal lines remain and the posting date is updated based on the recurring frequency. This means if don’t have to re-key the same journal every month.

However this also poses a question for what we do about the Document Number? Ideally we want to be presented with a unique document number after posting each iteration of the journal, so how can we accomplish this if this isn’t being updated?

The Error

The first thing we can try and do is use a “No. Series” on the batch, however when trying to select a “No. Series” on the “Recurring General Journal” batch you are presented with the error message below

So I guess the first question is…..why is the system preventing us from using a “No. Series” on the batch?

Although I can’t be certain, I assume its because after we post the batch the lines on the recurring journal will remain. If this is the case the number in that number series will be used over and over again (unless we change it). Therefore the system is preventing this.

So the next question is…..how can I get a unique document number on the journal line without having to update it every time its posted?

Using a “Posted No. Series” on the Journal Batch

Now, its worth noting we could just enter a descriptive document number on the unposted journal lines and fill in the “Posting No. Series” on the batch header. The document number on the lines wouldn’t then be carried through to the General Ledger Entries.

For example here I’ve populated the “Posted No. Series” on the batch header:

Now the document number I’ve entered on the lines on my Depreciation Journal below won’t be carried through to the “General Ledger Entries” when I post the batch

I’ve now posted the batch and you can see the document number being used has come from the “Posted No. Series” not the document number I used on the journal lines.

However, I want to use my own unique document number on the lines, but I don’t want to have to change it after each posting.

How can I achieve this?

Getting a Unique Document Number using Placeholders (Variables)

This is the final piece of the puzzle and its pretty cool 😊.

You can achieve unique document numbers by using placeholders right in the document number 😊

So going back to my Depreciation Journal, if I want the document number to include the date I can enter it as per below:

In the example above when I post the journal the system will replace the placeholder %1 with the Day number, %4 will be replaced with the Month name and %6 will be replaced with the year of the posting date of the journal.

The document number is then shown as per below in the “General Ledger Entries”

When I post this for May, there’s no need to update the document number. The system automatically replaces the placeholders using the posting date in the final document number in the posted entries.

If you’re curious about what other placeholders can be used. There is a full list below:

  • %1 = The day number of the period posting date
  • %2 = The week number of the period posting date
  • %3 = The month number of the period posting date
  • %4 = The month name of the period posting date
  • %5 = The accounting period name of the period posting date
  • %6 = The fiscal year of the period posting date

If anyone has used the deferral functionality they are exactly the same and more information on them can be found here https://learn.microsoft.com/en-gb/dynamics365/business-central/finance-how-defer-revenue-expenses

Conclusion

This post highlights the issue when using “Recurring General Journal”, in that you can’t use a “No. Series” on the journal batch.

We’ve looked at why I think that restriction exists, and how you can instead use the “Posting No. Series” on the batch header to ensure your posted entries receive a unique document number each time.

Alternatively, you can use placeholders within the Document No. field to dynamically generate meaningful document numbers without having to update them after every posting, which I find particularly useful 😊

Thanks for reading!

Dynamics 365 Business Central – A closer look at Registers in Business Central

When you post transactions in Business Central, as well as creating all the necessary entries in the system, various registers are also created which link the entries together.

These registers offer a valuable insight into how the system is working and are also a great tool to use when you want to track a transaction through the system.

I often find that registers don’t get the recognition they deserve with some users unaware of their existence.

In this post, we’ll shine a well deserved light on registers and explore why they are such a valuable feature in Business Central.

What is a Register

When you post transactions in Business Central, depending on the nature and type of the transaction, one or more registers are created.

For instance, posting a General Journal that solely impacts G/L accounts, results in the creation of “General Ledger Entries” and a “G/L Register”. (stay tuned for details of other registers the system can create 😊)

This “G/L Register” will have a record of all the entries involved in that journal.

For example, below is a manual depreciation journal entered via the “General Journal” page.

When I post this as well as the “General Ledger Entries”, I also get the G/L Register below.

As you can see the register is offering lots of very useful information. Its telling me who posted the transaction, when the transaction was posted, what batch was used, which module it originated in (via the Source Code), and the entry numbers created (“From Entry No” and “To Entry No” columns). Importantly, it also has a sequential number that is created by the system and can’t be changed. This offers a really good audit of the transactions moving through the system.

Navigate a Register

Now, by using the navigation options on the toolbar of the “G/L Register” page, I can explore the related entries for that G/L Register. For instance, as shown below, clicking the “General Ledger” button prompts the system to open the “General Ledger Entries” page, automatically filtered to the entry range specified in the G/L register (in this case, entries 3740 to 3741).

If you were to post a Sales Invoice, that has GL accounts on it, you would then get “General Ledger Entries” and “Customer Ledger Entries”. Therefore you would be able to navigate to the “Customer Ledger Entries” from the resulting “G/L Register” as well as the “General Ledger Entries”.

For example, I’ve now posted a Sales Invoice which has created a new G/L Register. From this register I can click “Customer Ledger” and “General Ledger” to view the relevant entries.

More Registers

So far, we’ve only just begun to explore registers 😊.

This time, let’s say we have a Sales Invoice that includes Inventory Items. In this case, we’ll get a “G/L Register” for the Customer and General Ledger Entries, but we’ll also get an “Item Register” for the entries related to the items.

The “Item Register” connects the “Item Ledger Entries” and the “Value Entries”. It serves as a useful record of how items are moving through the Inventory module.

For instance, I’ve posted a Sales Invoice for 5 Inventory Items, and below you can see the resulting “Item Register”. From this Item Register, I can view the associated Item Ledger Entries and Value Entries.

If we take things a step further, and I’d had been using a Location that has warehouse activities configured we’d have “Warehouse Entries” created and a “Warehouse Register” to keep track of activity in the warehouse 😊.

For example, I’ve now posted a Sales Invoice that generated movement in the warehouse through “Warehouse Entries”, resulting in the creation of a “Warehouse Register”. I can visit the “Warehouse Register” page to view this, alongside all other warehouse activities. By navigating to the Warehouse Entries, I can see the specific movement from the Bin.

Other registers

So what other registers do we have. You can see a list by searching “Register” in the Tell Me option but the common ones I use are as follows

  • G/L Register
  • Item Register
  • Warehouse Register
  • Fixed Assets Register
  • Project Register

Tip – Filtering Registers

As a final note, being a functional consultant, I find the “Source Code” field especially useful as it enables me to filter and track when specific routines have been run, such as the closure of VAT entries or the posting of the Adjust Exchange Rates process.

To do this, you simply apply a filter on the relevant “Source Code”. In the example below, I’ve filtered on the Source Code “VATSTMT” to check when the VAT was closed.

I must confess, during training and testing, I also use it to check how often users have been posting in the system 😊.

Conclusion

This post goes through how registers work in Business Central and just how useful they can be. They not only provide an audit from a financial perspective but also offer a glimpse into how the system is working with the various entries.

Thanks for reading!