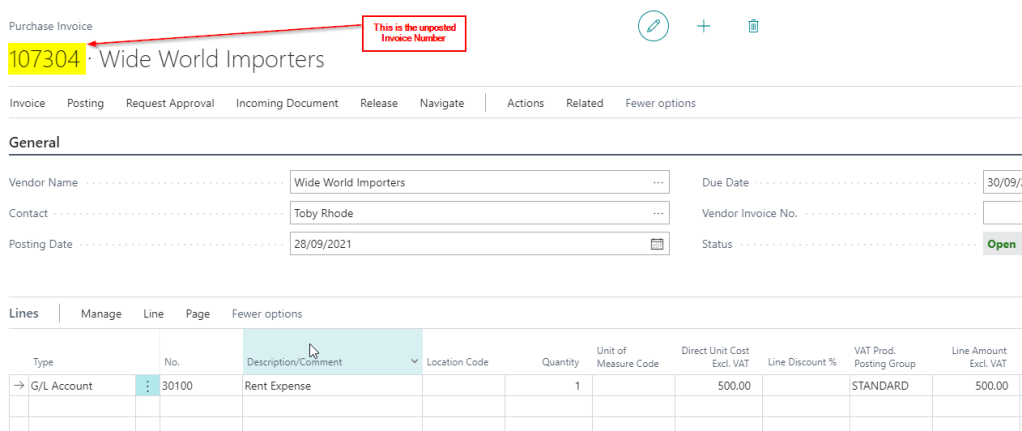
When posting a Purchase Invoice the description on the Vendor Ledger Entry defaults to the original unposted Invoice number.
For example when I post the Invoice below:
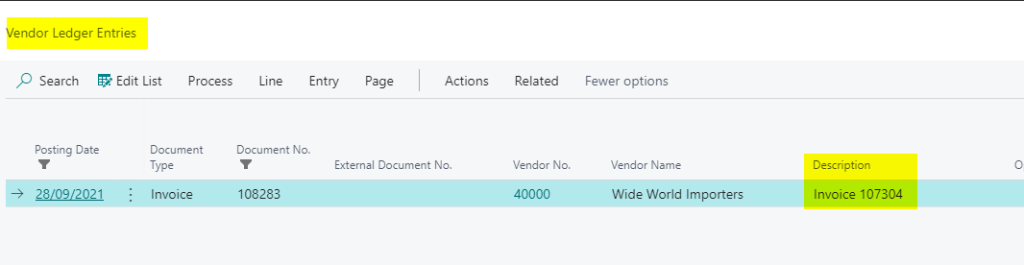
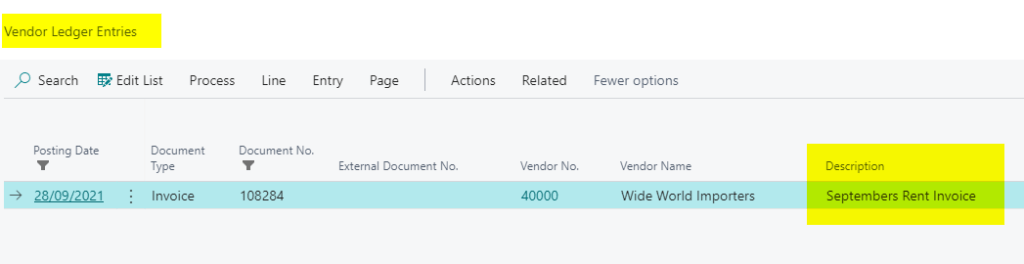
The Vendor Ledger Entries show the unposted Invoice number in the “Description” column:
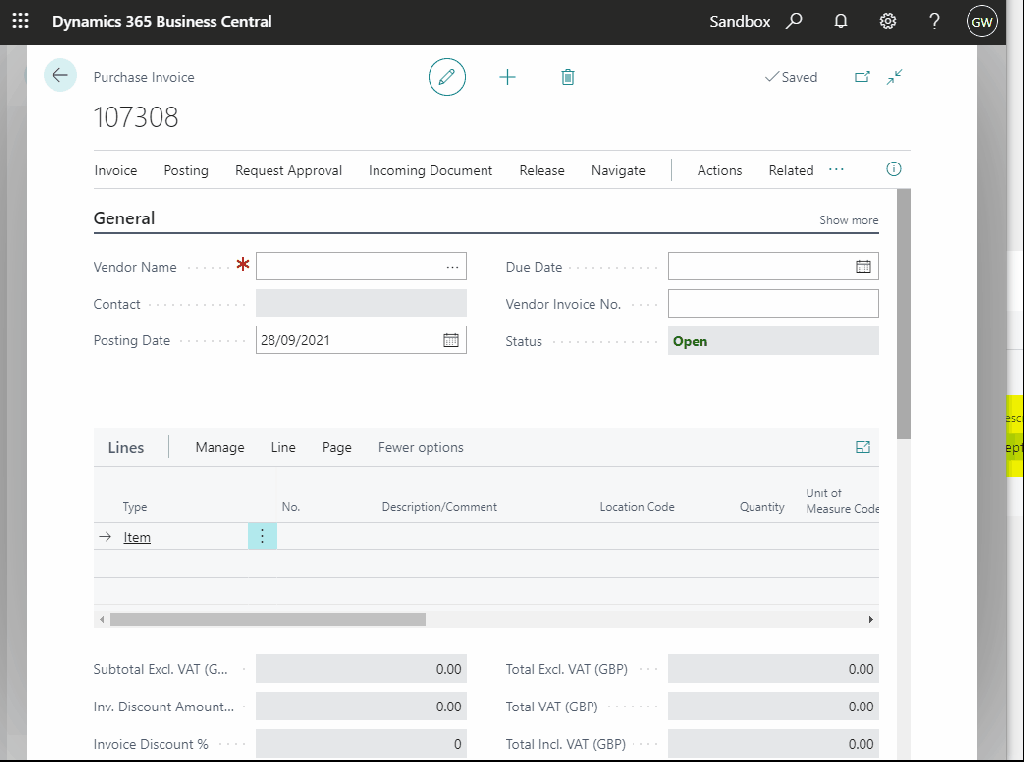
If you would like to have a specific description for the Purchase Invoice in the Vendor Ledger Entries page you can personalise the Purchase Invoice page and add the “Posting Description” field.
This is shown below:
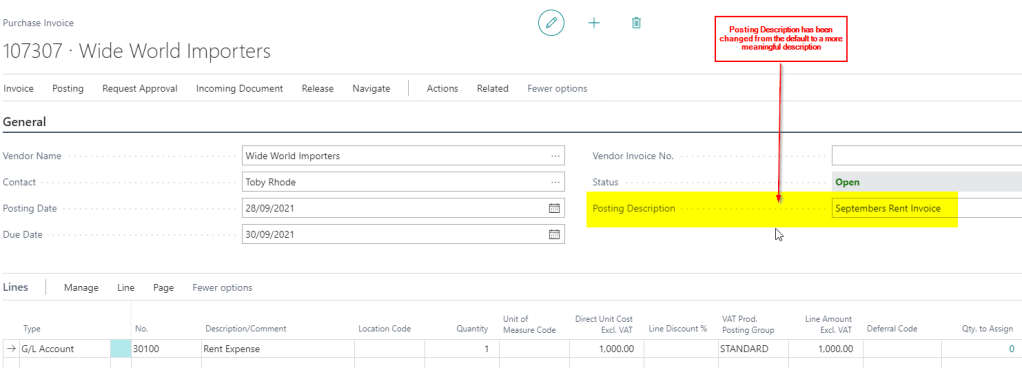
Now that we have access to the “Posting Description” on the Purchase Invoice page you can edit this and have a custom description when posting the Invoice.
For example I’ve changed the description below to “Septembers Rent Invoice”
This is another blog in a series I’ve been writing comparing functionality in Dynamics GP to Dynamics 365 Business Central.
In this post I’ll compare how purchase holds work in both Dynamics GP and Dynamics 365 Business Central. Both products offer solutions for applying holds at a document and Vendor level, however there are differences which we can explore.
Dynamics GP
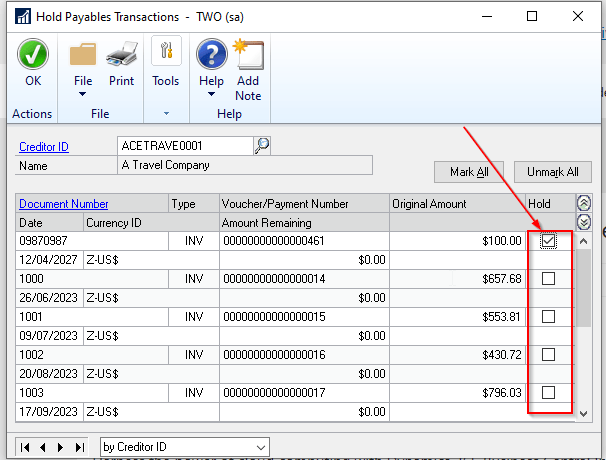
In Dynamics GP you apply holds to individual transactions via the “Transactions > Purchasing > Holds” window.
By placing the document on hold you won’t be able to pay this via a manual payment or the automated “Select Cheques” routine (the Dynamics 365 Business Central equivalent being “Suggested Payment” batch job).
Therefore you must remove the Hold via this window in order to pay the document.
You can also produce a list of documents on Hold via a Smartlist prior to creating a payment run to assist with the process.
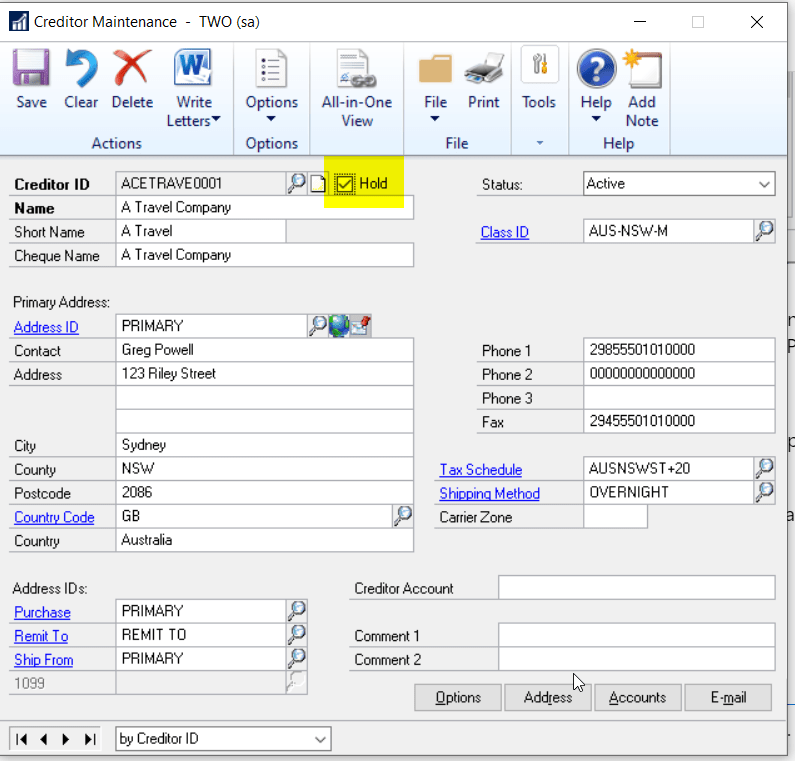
If you wish to prevent any documents from being paid on a particular Vendor you can tick the “Hold” flag on the Vendor Maintenance window as per below:
Placing the Vendor on Hold will prevent any payments being issued however you will still be able to enter and post transactions other than payments.
Dynamics 365 Business Central
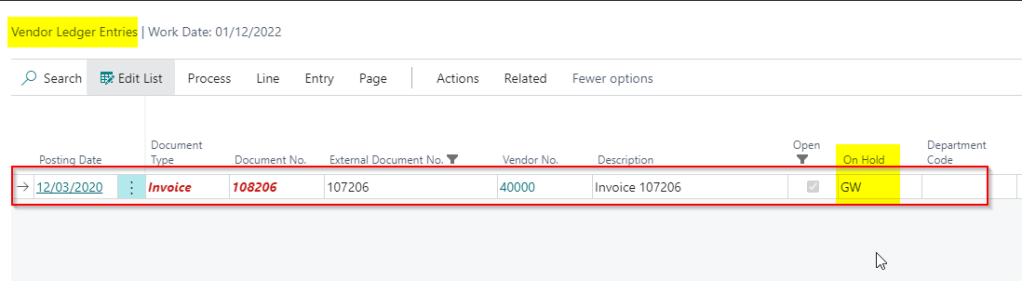
To place a document on hold you go to “Vendor Ledger Entries” and click “Edit List”.
You then enter any 3 characters in the “On Hold” field to indicate the document is on hold. For example below I’ve entered the characters “GW” in the On Hold column.
Although you can use any 3 characters we tend to suggest using users initials as this gives the added benefit of knowing who has placed the document on hold. You can also filter the “Vendor Ledger Entries” either on initials or whether the field is blank or not to identify which documents are on hold (i.e. add a filter for On Hold <>’)
When you add the 3 characters to the On Hold field this excludes the document from being picked up by the “Suggest Payments” batch job in the Payment Journal however you can still pay and apply the document manually. This is different to Dynamics GP which requires the Hold flag to be removed before it can paid.
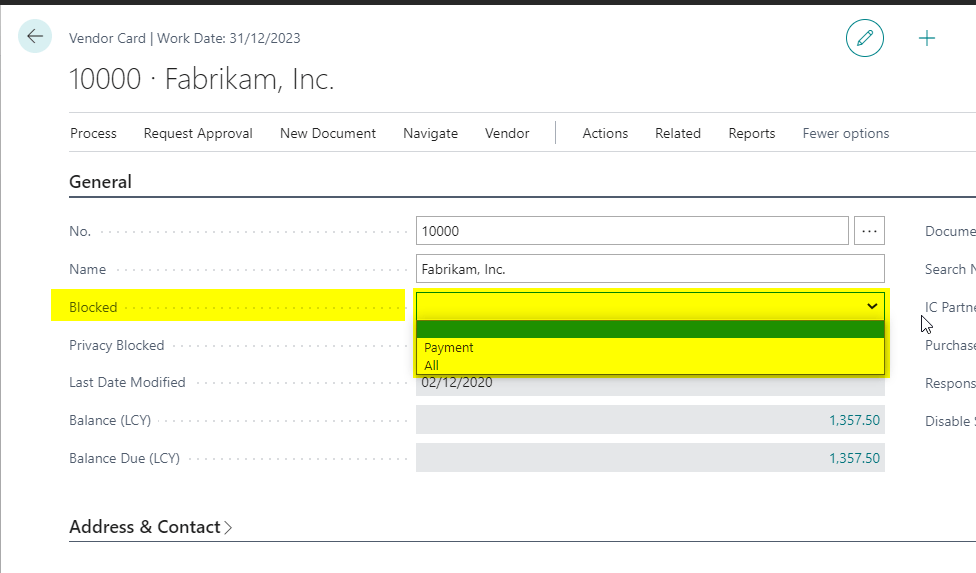
You can prevent any payment to the Vendor via the “Blocked” field on the Vendor Page.
You can prevent all payments from being made by selecting “Payment” or prevent any transaction from being posted on the Vendor by choosing “All”. This differs to Dynamics GP as even if a Vendor is placed on Hold you are only prevented from posting payments.
Conclusion
Both Dynamics products offer robust solutions for applying document and vendor holds. The main difference seems to be that Dynamics GP gives the user the ability to ensure a single document won’t be paid, even via a manual payment, and Dynamics 365 Business Central gives flexibility to prevent all document types being posted against a blocked Vendor.
Thanks for reading!
Thinking of making the move to Business Central? We can help
When posting Purchase Invoices you can sometimes encounter the error “The Posting Date is not within your range of allowed posting dates” even though the Posting Date on the Invoice is within your allowed range.
In this post I’ll briefly explain a method you can use to find out which Posting Date the system is trying to post into and also why you are getting this message.
** Please note I’ve also written about this here but cover more things in this post 🙂
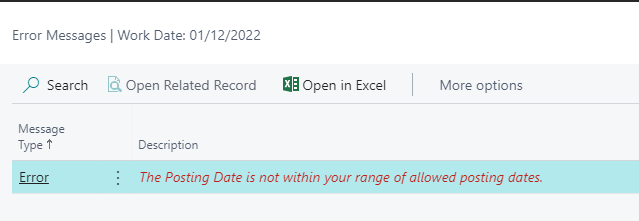
The Error
A common scenario is you are happily posting a Purchase Invoice that is matched to a Posted Purchase Receipt when you receive the error below:
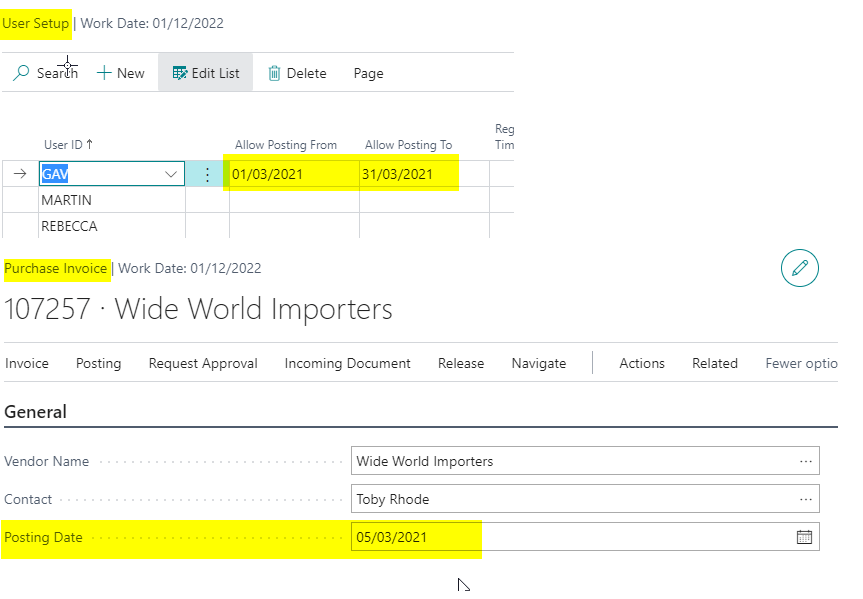
The first thing to do is check if the Posting Date of the Purchase Invoice does indeed fall within your allowed posting range. You can check your allow posting date range via “User Setup” and compare this to the Posting Date on the document.
As you can see the Posting Date of the document (05/03/21) falls within my allowed posting dates (01/03/21 – 31/03/21) so what’s the issue? Why is the system saying this posting falls outside my allowed range?
The Troubleshooting Method
Before we try and understand why this is happening its a good idea to figure out which date the system is trying to post into. I do this by following the method below:
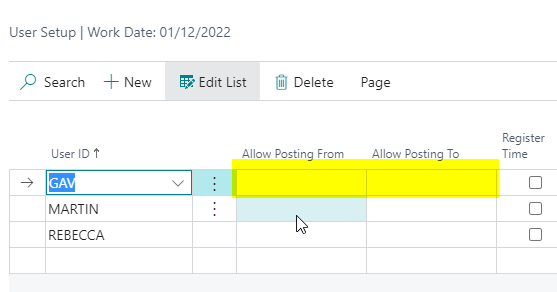
1) Blank out your posting range in the “User Setup”.
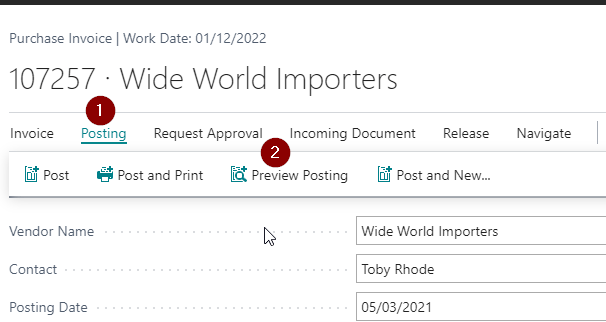
2) Rather than posting the document select to “Preview” the postings as per below. (if you did choose to post the document it would work so be sure to only Preview)
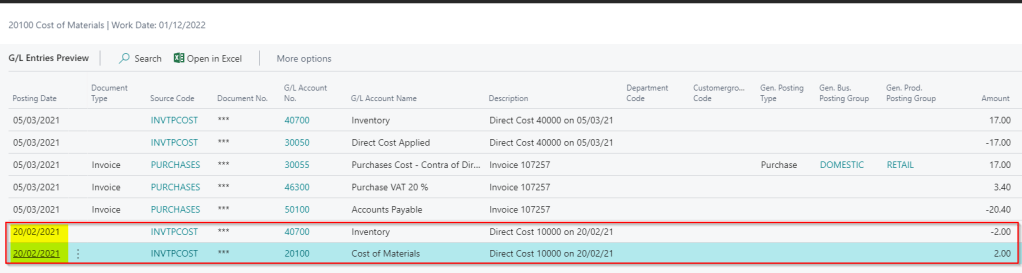
3) If you then drill down on the G/L Entries this will show you the Posting Date the system is trying to use which is outside of your range:
So, now we know the system is trying to post a portion of the GL entries to the date 20/02/21, which falls outside my range of Posting Dates, and this is why I’m receiving the error message. However, before we go changing our allowed posting dates and posting the document, let’s look into why the system is posting back to this date.
A Little background
Before we get into why this happens its useful to have some background on this example. In this example the Sales and Purchasing process followed the following steps:
1) The Item was purchase receipted at a cost of £15.00 on the 10/02/21.
2) The Item was sold on a Sales Invoice on the 20/02/21.
3) The Purchase Receipt is being Purchase Invoiced on the 05/03/21 but the cost changed from £15.00 to £17.00 on the Item.
The key point here is point 3. The costs of the Item have changed from when they were purchase receipted (point 1) and subsequently sold (point 2). When this happens a key piece of functionality called “Adjust Costs – Item Entries” makes adjustment postings but more on that later.
Digging deeper
In Business Central when posting a Purchase Invoice that involves Items you are essentially creating two separate postings (registers). This is standard behaviour to support the “Automatic Cost Posting” feature. (more on that here)
One posting is for the purchases side of the transaction, which includes the Account Payable G/L code, and the other is for the Inventory. If you take a look at the G/L entries window you can see these defined in groups by the “Source Code”. The PURCHASES source code is the entries related to purchases such as the Account Payables G/L code and the INVPTCOST is for the Inventory postings.
In our example one of the INVPTCOST set of postings is causing an issue. For some reason this has been back dated to the 20/02/21. So why have these entries been created?
Adjust Costs – Item Entries
These entries have been created by the “Adjust Cost – Item Entries” batch job that runs when you post the Purchase Invoice (assuming you have “Automatic Cost Adjustment” set to Always).
As the costs have changed from £15.00 on the Purchase Receipt (point 1) to £17.00 on the Purchase Invoice (point 3) adjustments need to be made as the Item was sold at a cost of £15.00 (point 2). Therefore the Cost of Goods Sold and Inventory postings need adjusting to the new Cost.
Choosing the Posting Date for the Adjustment
So why has the system selected the date of 20/02/21 for these postings?
The system determines the earliest date for Inventory adjustments based on the Allowed Posting Dates in the General Ledger Setup. (and also Inventory Periods if they are in use. You can read more about how the Posting Date is selected when Inventory Periods are involved via this Microsoft article.)
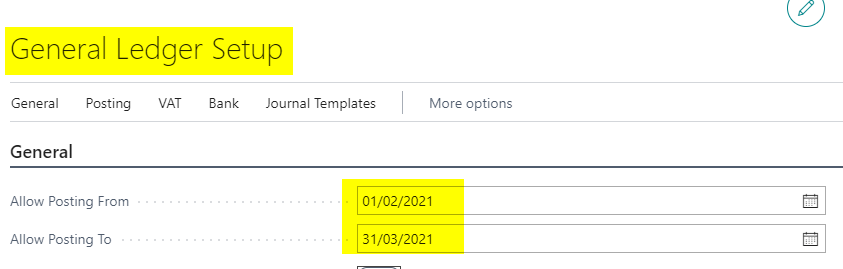
Therefore if we check our General Ledger Setup the Allowed Posting Dates are as follows:
In this configuration the earliest date we can post an adjustment is the 01/02/21.
In our scenario the Inventory we need to adjust on the Sales Invoice has a posting date of 20/02/21. Looking at our General Ledger Posting Setup we allow postings to this date so system creates adjustments with a posting date of 20/02/21 and as a consequence of this we receive the error “The Posting Date is not within your range of allowed posting dates” as our User Setup only allows postings between 01/03/12 and 31/03/21.
The Fix
Now we know why this is happening, and how the date is selected, we can choose to fix this by either adjusting our User Setup to allow posting in February or change the General Ledger Setup.
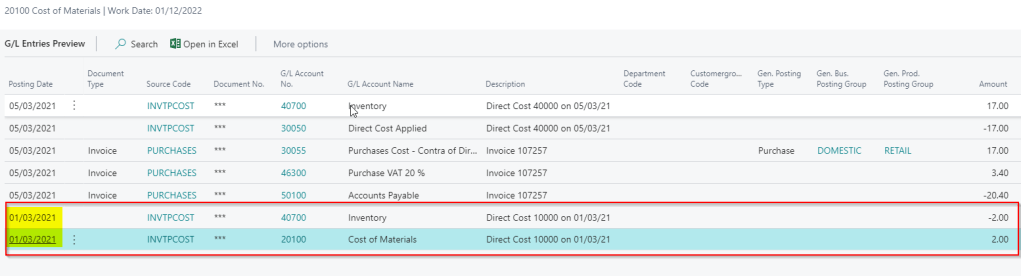
In my scenario I’ve changed the General Ledger Setup to only allow postings from 01/03/21 through to 31/03/21 which matches my User Setup. So now the earliest posting date that can be used for the Inventory Adjustment is 01/03/21.
If I now preview postings you can see the system will make the adjustment on the 01/03/21.
I will now be able to post this transaction as the Posting Dates on all entries are within my Allowed Posting Dates.
Conclusion
This error crops up a lot when people sell items prior to Purchase Invoicing them and costs change. Hopefully this article will help explain why this is happening and how you can troubleshoot it.