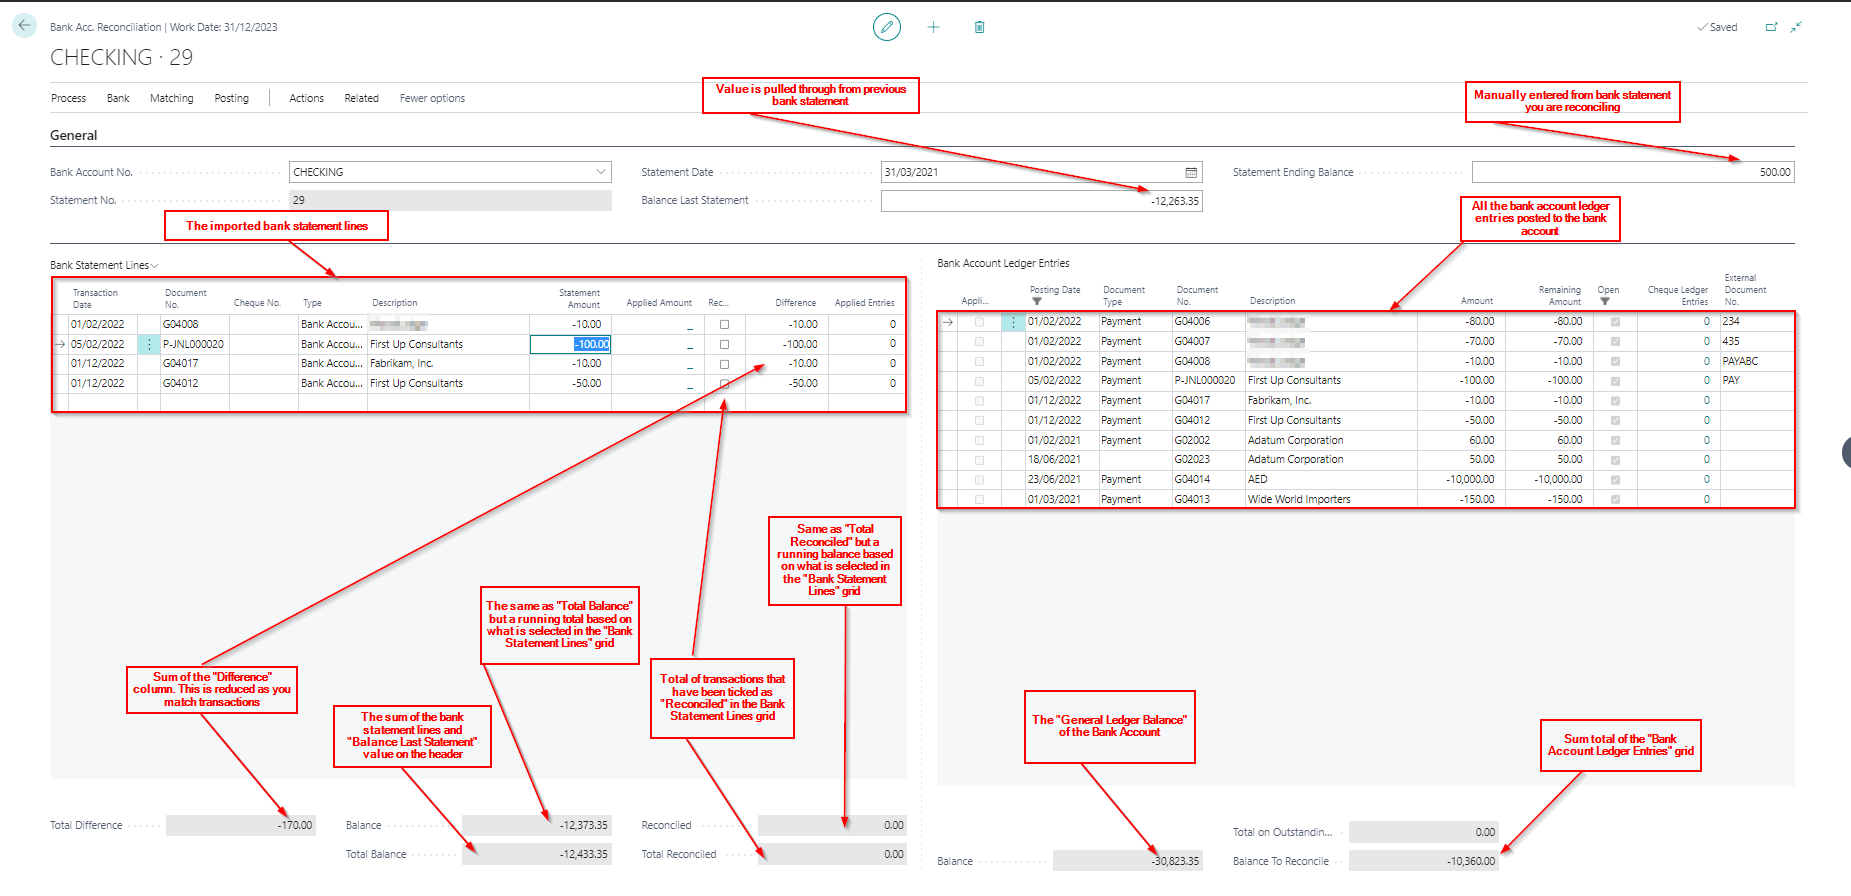
When performing a bank reconciliation in Business Central I tend to only ever reference a few of the fields on the reconciliation page however I’m often asked what others are used for and how they are calculated.
As a consequence I’ve created the cheat sheet below which highlights what most of the fields are and therefore how they can be used.
A client reported that when reversing a large journal via the “Reverse” option in the “General Ledger Entries” page only part of their original General Journal was reversed?
This stumped me and forced me to dig deeper into how the journal was posted. On investigation it seems the journal lines on the journal had been grouped, and each group has been given a different “Transaction No.” in the G/L Entry table. Then, when the reversal option had been selected, only those lines with the same “Transaction No” had reversed.
Its the first time I’ve come across this behaviour in one distinct journal, so in this post I’ll demonstrate how this happened and the correct way this should have been reversed. (i.e. I’d expect this for different document numbers but not the same document number)
The Journal
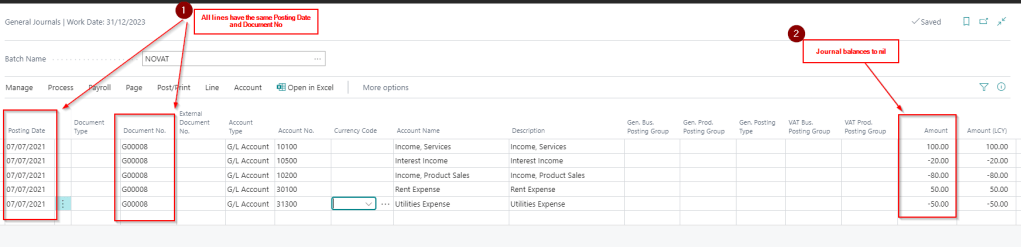
The clients journal contained many lines however I can recreate the scenario with a much simpler journal.
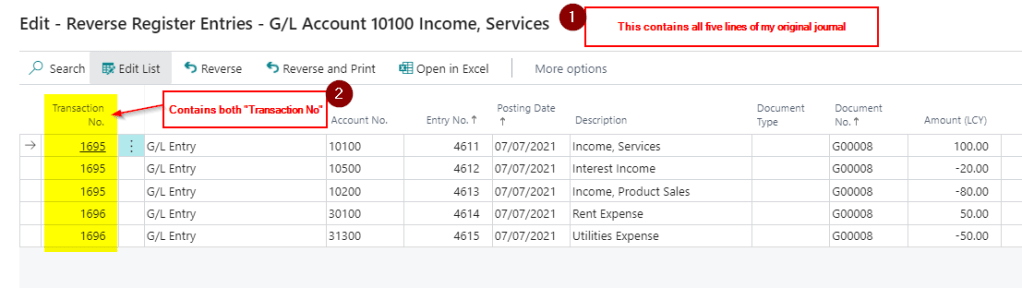
Below is a journal with five lines. All the lines have the same Posting Date and Document number and the journal balances to nil. This is essentially one journal which we want to post as one unit.
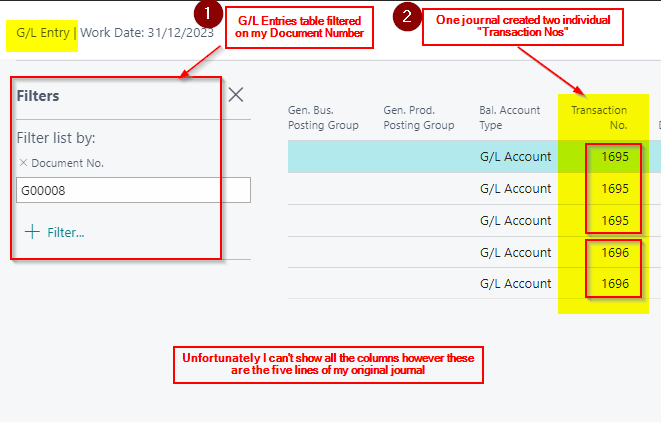
I’ll now post the journal and go and view this in the General Ledger Entries page. I filter on the document number and I can see the full journal. This is great and just what I expect 🙂
The Reversal
I now realise I’ve made a mistake and want to reverse the whole journal. Therefore, while still in the General Ledger Entries page, I select the top line and choose “Process > Reverse Transaction” from the menu however it only gives me the option to reverse a portion of the journal? (the first three lines of the original journal)
So what has happened here? Why is the system not offering to Reverse all the entries on this Document Number?
The Transaction No. column
As shown on the screen shot above it seems the “Reverse Transaction” option pulls back the G/L Entries based on a “Transaction No.”?
I’ve never seen this column before, and when I try and add this via personalisation to the “General Ledger Entries” page, its not an available column?
I’ll therefore dig deeper and look at this document number directly in the the G/L Entry table, and there I can see the journal has been grouped and each group has been given a separate “Transaction No.”
So now the question is why has a journal with the same Posting Date and Document Number been broken up and given two separate “Transaction No.”?
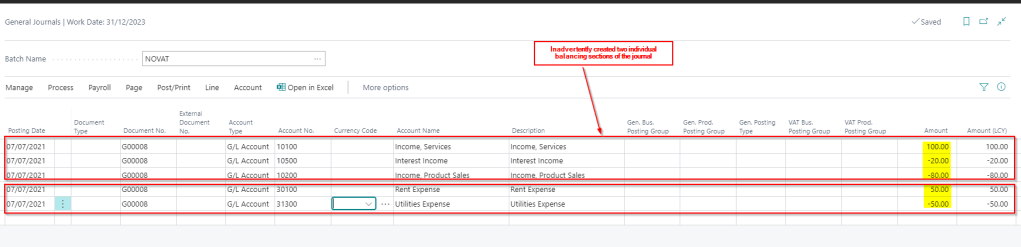
The answer lies in how I posted the journal. If I look back at my original journal I’d inadvertently balanced the journal in two sections.
It seems even though the journal lines have the same posting date, and more importantly the same document number, the system gave these a different “Transaction No” based on how its balanced part way through.
Finally, it seems the “Reverse Transaction” function pulls back the entries based on this “Transaction No.” which causes a complication if I wanted to reverse the whole Document Number.
Quickly Reverse all Entries
So how do I reverse all the lines?
In my example its quick and easy as the journal is small. I could stay in the “General Ledger Entries” page and select one of the first three lines, and click “Reverse Transaction” and then select the fourth line and use the same “Reverse Transaction” option. However what happens if the journal contained many lines that had been grouped into lots of different “Transaction No.”?
In this scenario you can reverse via the G/L Registers page.
As the G/L Register contains all the G/L entries in my journal I just click click “Reverse > Reverse Register” as per below
This gives me all the G/L Entries in my journal that I can then reverse.
Conclusion
It was great investigating and finding out more about how Business Central works in the background. In some ways you could argue this behaviour is advantageous, as you have the opportunity to only reverse part of one huge journal.
My biggest takeaway from this is when reversing an entry via the “Reverse Transaction” in the “General Ledger Entries” page ensure all the expected lines are being reversed.
Also, if you do want to reverse all the journal lines consider using the “Reverse Register” function on the “G/L Register” page rather than “Reverse Transaction”.
Although not a regular occurrence, from time to time users need to post a VAT only invoice onto the sales or purchase ledger. If this happens below are the steps you can take to do this:
Please note these steps are specifically for a Purchase Invoice however it should work the same for a Sales Invoice.
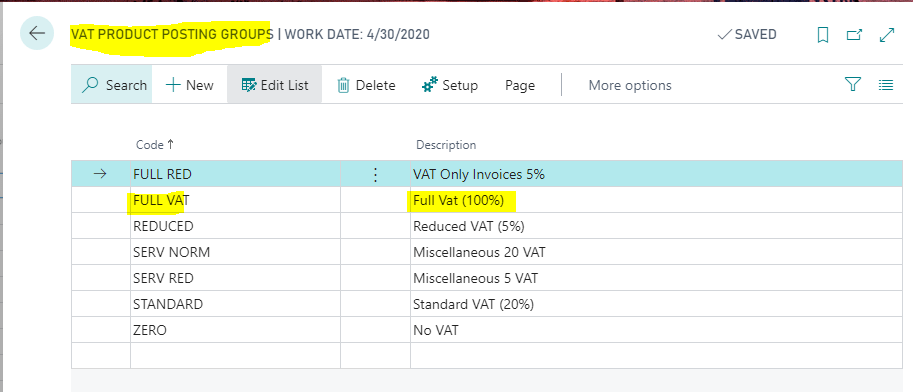
Step 1: Add a new VAT Product Posting Group
First go to “VAT Product Posting Group” and add a new VAT Product Posting group for FULL VAT as per below
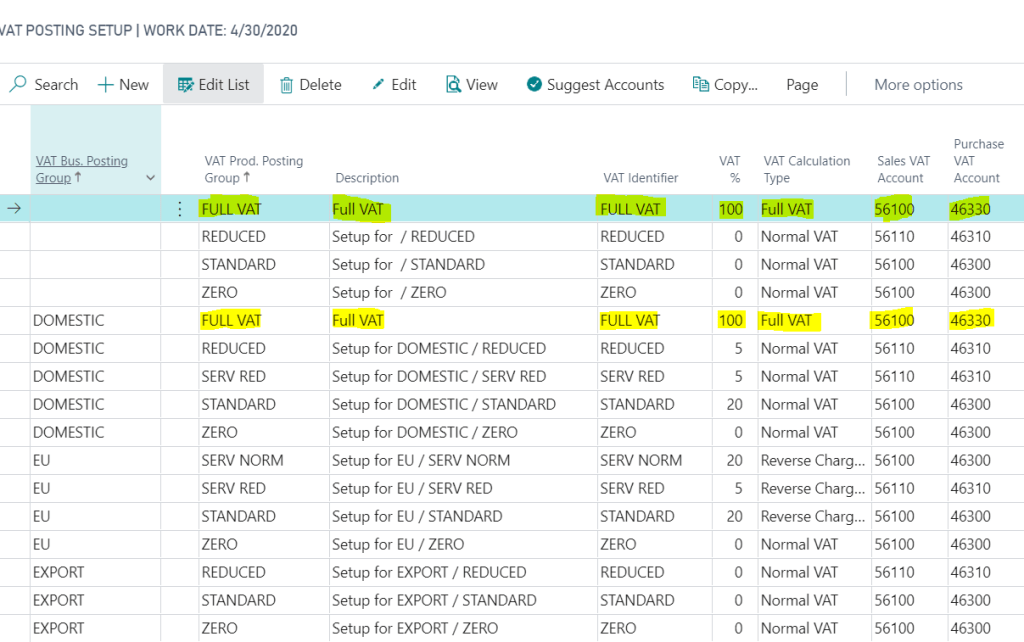
Step 2: Configure VAT Posting Setup
Next we need an additional FULL VAT entry in the “VAT Posting Setup” matrix as per the screen shot below. I’ve included FULL VAT twice, once with a blank “VAT Bus. Posting Group”, and once with a “VAT Bus. Posting Group” of DOMESTIC.
Please note I’ve set the system up this way so if entering a VAT only invoice via a “Purchase Journal” I only have to populate the “VAT Prod. Posting Group” whereas if I were to enter the invoice via “Purchase Invoice” its likely the supplier would have a “VAT Bus. Posting Group” of DOMESTIC. Setting the system up this way covers both scenarios.
Step 3: Entering the VAT only invoice via a “Purchase Journal” window.
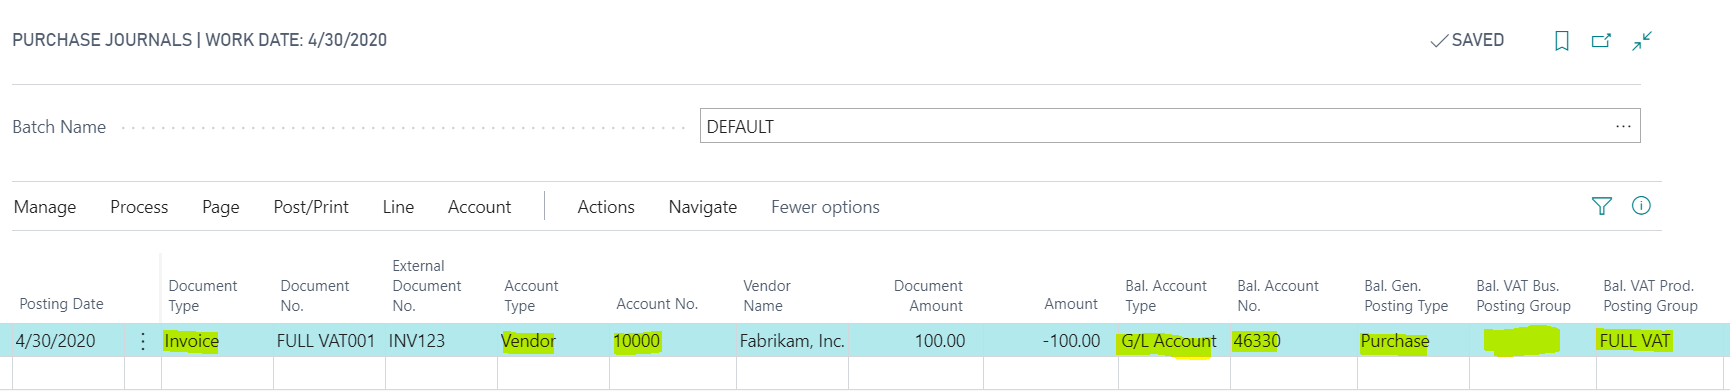
In this example I’m entering a £100.00 VAT only invoice via the “Purchase Journal” window.
To do this I’ve entered the invoice details as follows:
Just to confirm, I’ve selected a document type of “Invoice” and the Vendor account of “1000”. Then for the “VAT only” element to work I’ve selected the following for the various columns:
Bal. Account Type = G/L Account
Bal Account No. = 46330 (this is the VAT account specified in the VAT Posting Setup)
Bal. Gen Posting Type = Purchase
Bal. VAT Bus. Posting Group = BLANK (I could select DOMESTIC as well if I like)
Bal. VAT Prod. Posting Group = FULL VAT
Please note using the “VAT Posting Group” setup outlined in my screen shot above a combination of a blank “VAT Bus. Posting Group” and a “VAT Prod. Posting Group” of “FULL VAT” equates to 100% full VAT
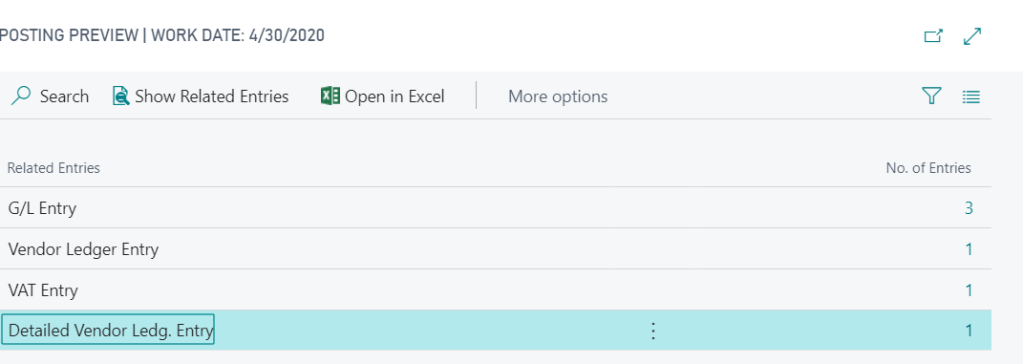
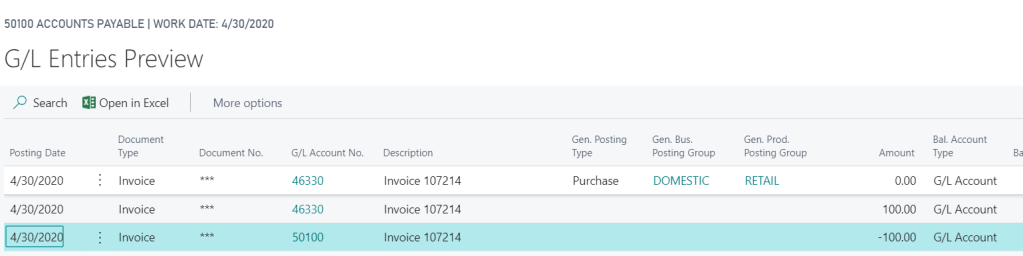
If I now preview the posting on this transaction I can see 3 G/L Entries and one VAT entry:
If I drill down on the G/L Entries this shows the full amount posting to the VAT control account specified in the VAT Posting Setup. (as this is a Purchase Invoice the credit side goes to the Creditors Control Account):
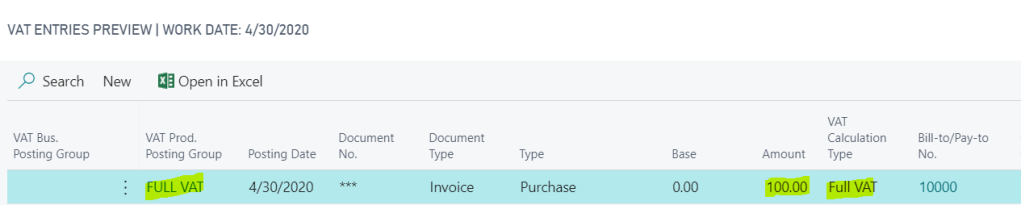
And when I drill back on the VAT entries I can see a VAT entry for the full amount:
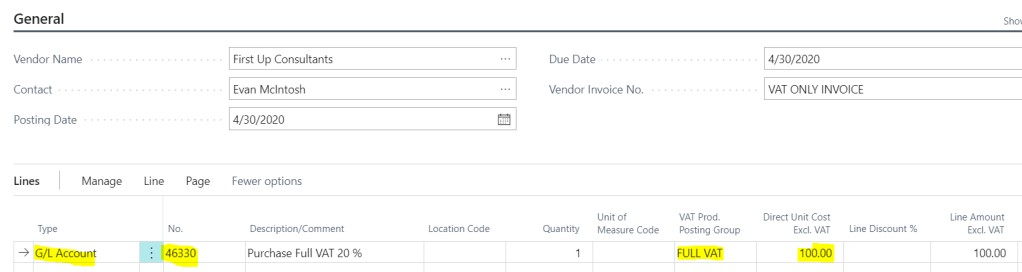
Step 4: Entering the VAT only invoice via the “Purchase Invoice” option
Once in the “Purchase Invoice” page I enter the invoice line as per below.
To confirm, I’ve entered the line as per below:
Type = G/L Account
No. = 46330 (this is the VAT account specified in the VAT Posting Setup)
Vat Prod. Posting Group = FULL VAT
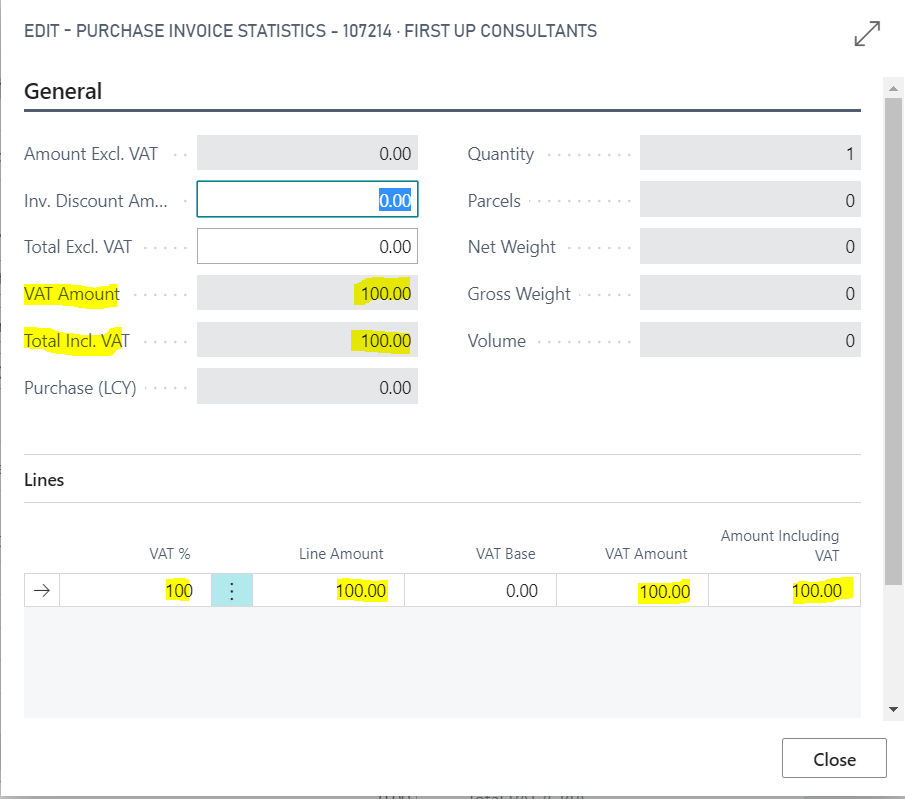
Now when I check the “Statistics” on the invoice it shows the full amount to VAT:
Also, when I preview the posting I can see G/L entries to the VAT account and a VAT Entry of the full amount:
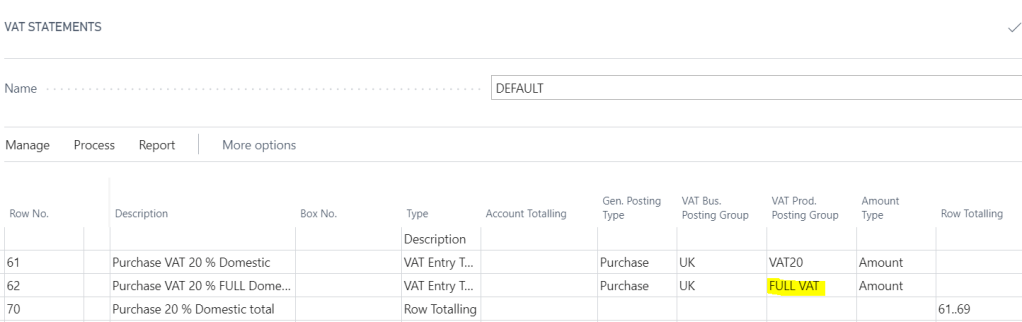
Step 5: Ensure FULL VAT is included on the VAT Statement
Once you have posted the transaction you should also ensure the new “VAT Prod. Posting Group” (i.e. FULL VAT) is included on the VAT statement so any transactions posted to this are picked up correctly when reporting the VAT.
As you can see below I’ve included this in the Purchases section:
I hope this helps anyone who needs to post a VAT only invoice in Dynamics 365 Business Central.