Dynamics 365 Business Central – Some Considerations when Changing Standard Cost on an Item Card

Introduction

If you use the Standard Costing method for your items, then on occasion you will want to update it to reflect your current costs. For example the standard cost might be factoring in duty and freight costs. As these fluctuate the standard cost might need revising.

In this post I’ll cover changing the Standard Cost directly on the Item Card and some important considerations to be aware of when doing so. 😊

Changing the Standard Cost on the Item Card

One method you could use when changing your standard cost is to simply change it on the Item card. However before doing this we must understand the outcomes of this.

In my example below I have Item 1074 which has a standard cost of £10 and I have 5 in stock. I’m going to change this to £12 and post an Item Journal to register some more inventory at the new standard cost.

On changing the Standard Cost I’m prompted with the message below:

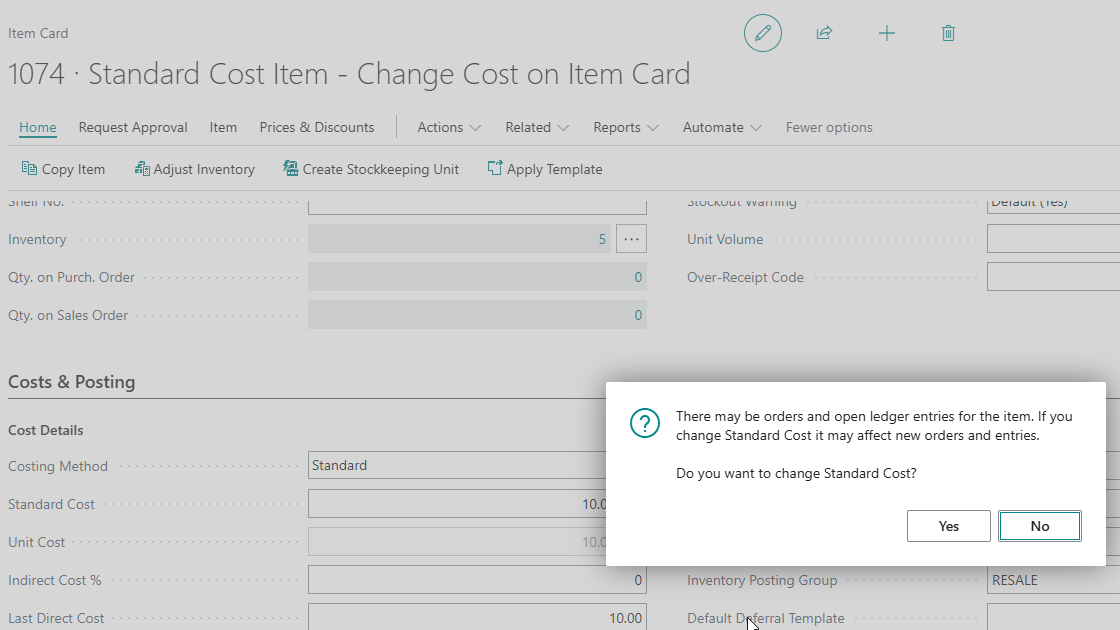
This is giving me a clue as to a potential issue. The message states changing the Standard Cost will affect new orders and entries. So how will the change affect existing inventory? We’ll come back to that shortly 😊.

I’ve selected “Yes” and I’ll now go to the “Item Journal” and post some additional inventory.

I enter the Item Number and at first glance the correct Standard Cost is pulled through

However I want to post the stock into the MAIN location, which has its own Stock Keeping Unit, so I’ll select “MAIN” for the location and this pulls through the old cost.

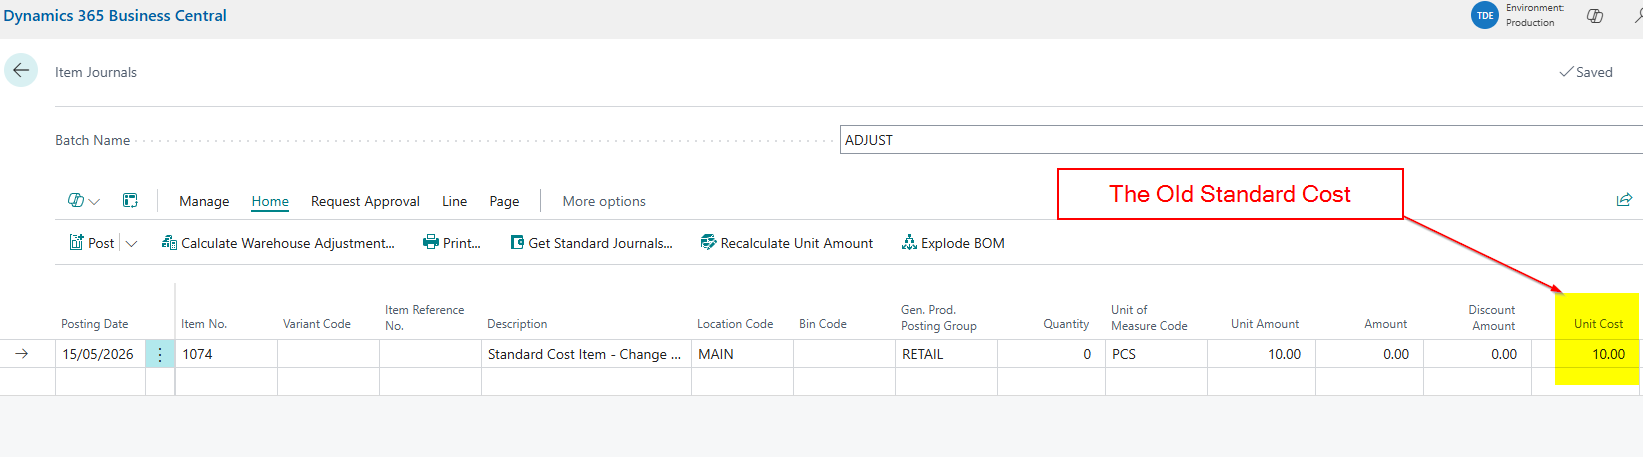
This highlights the first important consideration when changing the Standard Cost on the Item Card. The system doesn’t update the standard cost of any Stock Keeping Units.

Please note, when you have Stock Keeping Units for your locations, you can think of changing things directly on the Item Card as changing settings for the blank location.

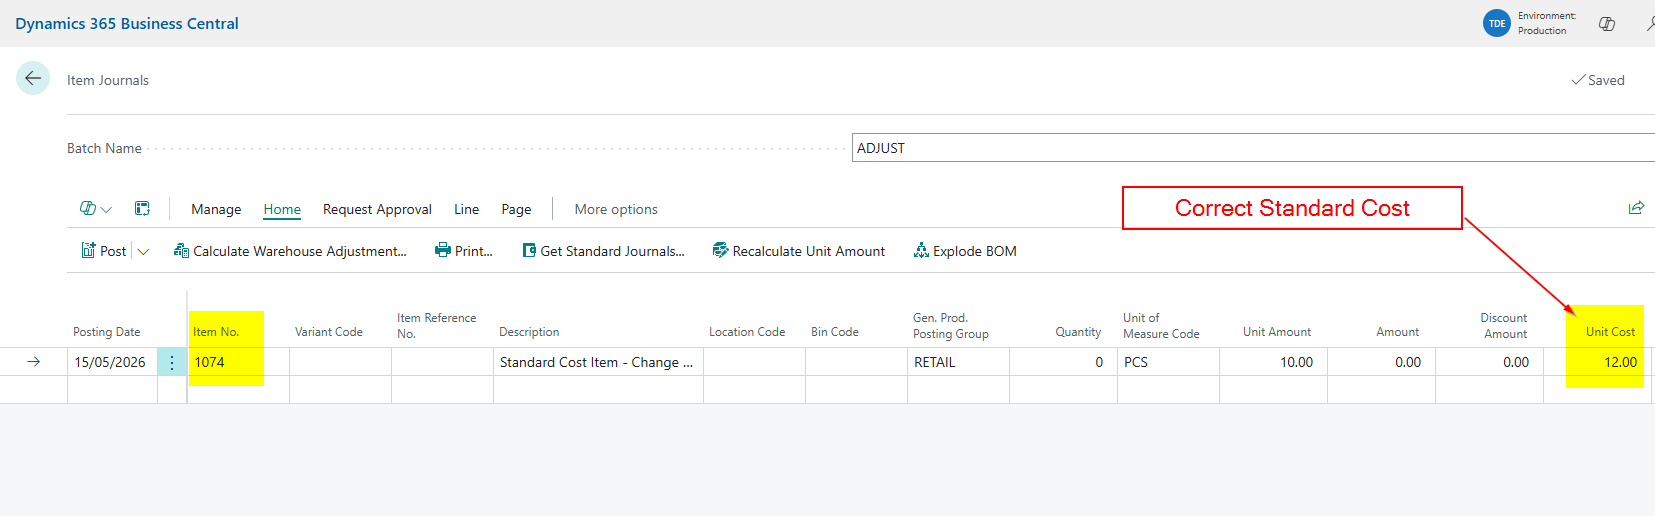
Therefore I must now go to the Stock Keeping Unit and change the Standard Cost

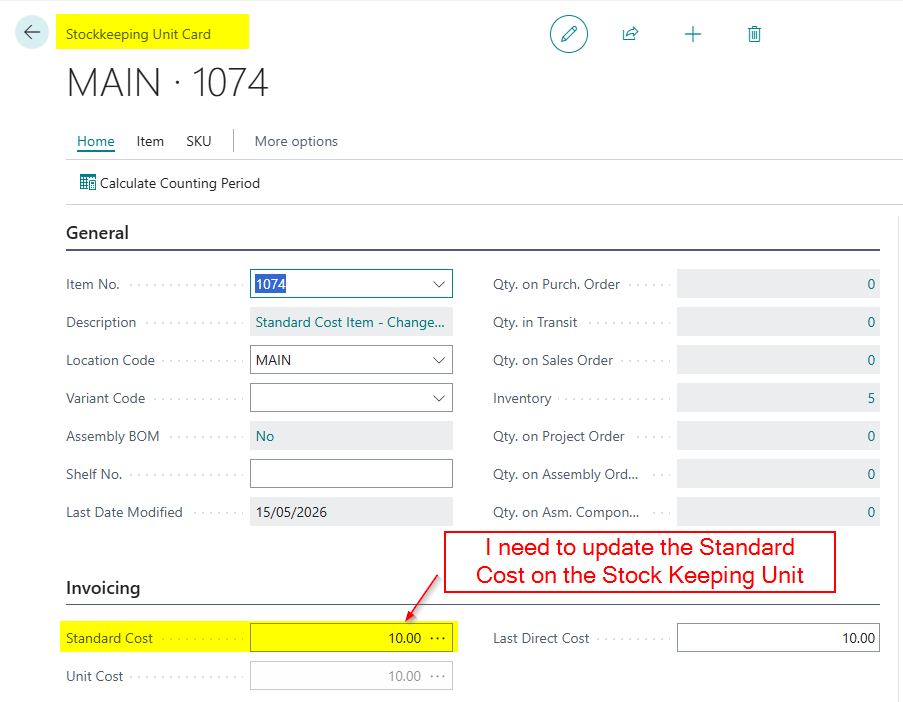
Now I’ve updated the Stock Keeping Unit I can go back to my Item Journal and post an entry to register 5 pieces at the new Standard Cost

Selling the Inventory after changing the Standard Cost

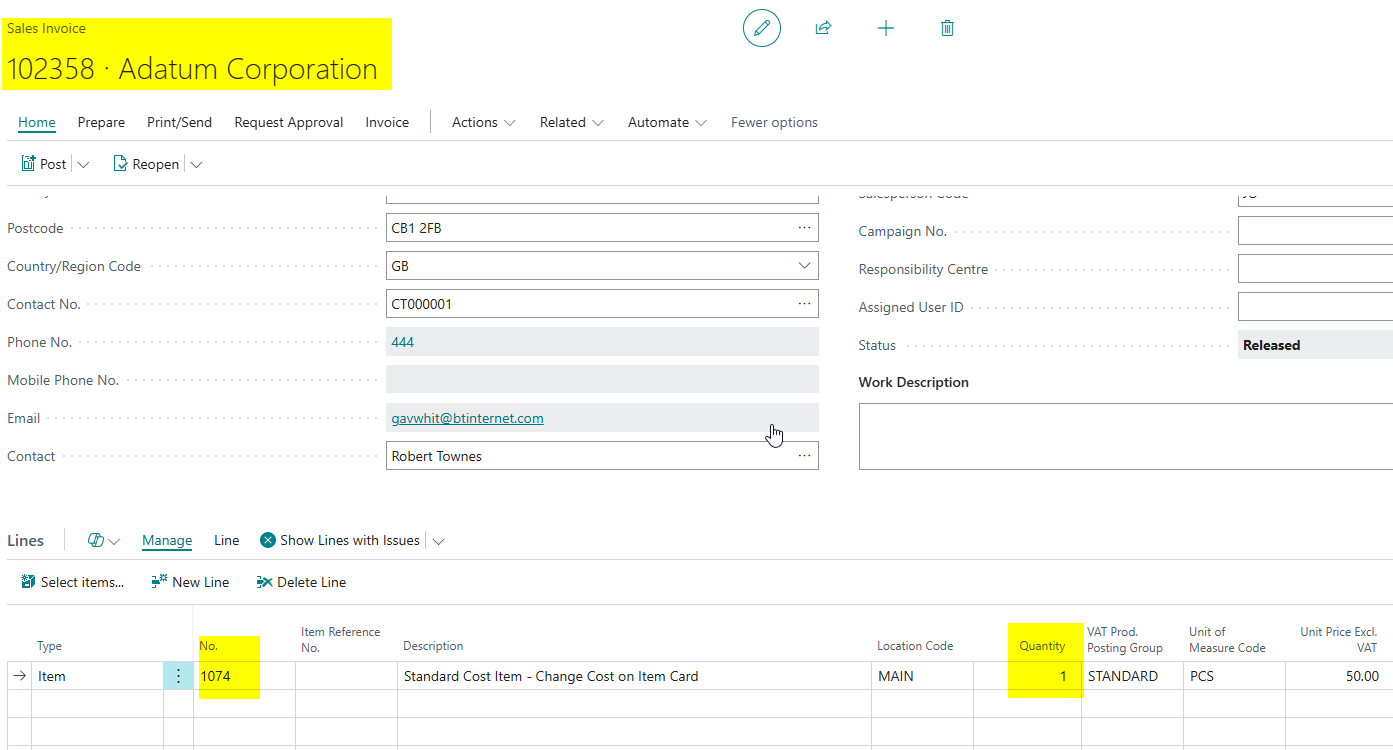
Now I’ve posted the new stock, let’s go and sell some of the Items 😊.

In this case I’m raising a Sales Invoice for one of the Items.

I’ll now go and check my General Ledger Entries to ensure the new Standard Cost has been used. However as you can see below this isn’t the case.

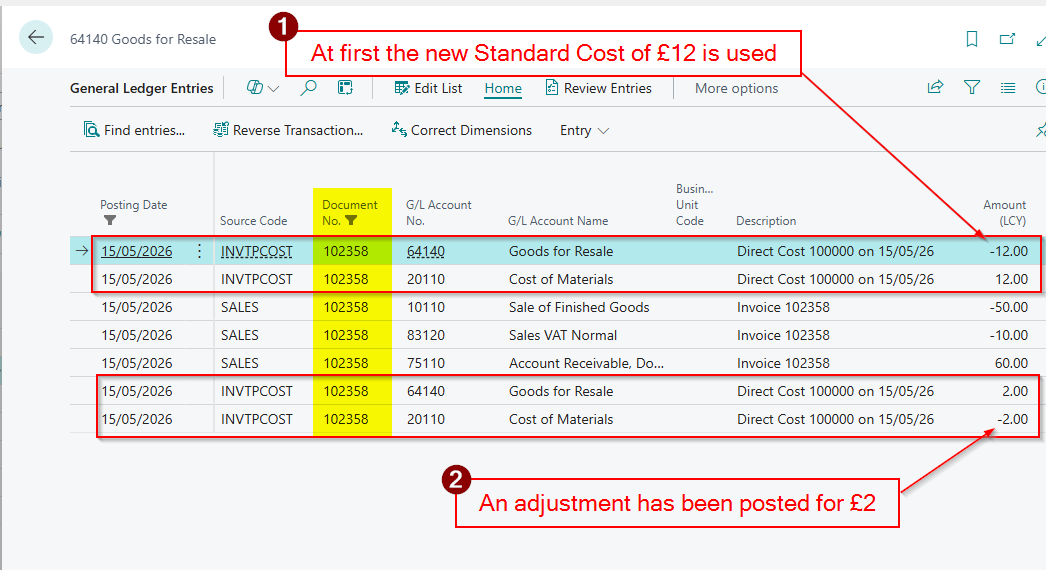
The system has initially used the new Standard Cost of £12, and recorded the Cost of Goods Sold as £12, however its then been adjusted by £2 back to £10? Why is this if our Standard Cost has been changed to £12?

The answer lies in the Item Ledger Entries and Value Entries. This item had remaining Inventory from a previous receipt and this was valued at the old Standard Cost. (see below)

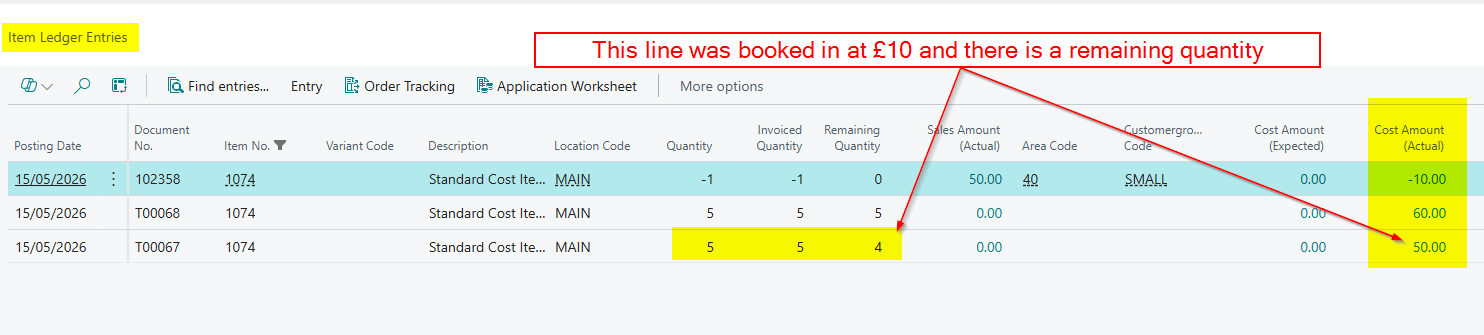
This brings us to the second important consideration. Existing on-hand inventory is not revalued when you change the Standard Cost on the Item Card.

Therefore when you sell the Item the system uses the Standard Cost, however when Cost Adjustment kicks in this is adjusted based on the Value Entries for that Item Ledger Entry, in this case £10.

Please note, you might not see this automatically happen if you dont have the option “Automatic Cost Adjustment” switched to “Always” in Inventory Setup. You may have to run “Adjust Cost – Item Entries”.

Conclusion

This post highlights two important considerations when changing the Standard Cost directly on the Item Card. The system doesn’t automaticlaly update your Stock Keeping Units, and it won’t revalue any existing inventory. If you need your on-hand stock revalued to the new cost, the Standard Cost Worksheet is the tool for the job, which we’ll cover in a future post. 😊

Thanks for reading!

Dynamics GP to Business Central Migration Post – Part 1: What do my migrated Opening Balances look like in Business Central

Introduction

If you are thinking of moving from Dynamics GP to Business Central, Microsoft provide an absolutely amazing tool that can migrate your Dynamics GP data to Business Central 😊

This tool will not only migrate your master data, but also some opening balances, and crucially your historical data.

In this two part blog series, we’ll take a closer look at what gets migrated and how it appears in Business Central.

In Part 1 (this post) we’ll focus on opening balances, in particular your Customer and Vendor transactions and your General Ledger opening balance.

In Part 2 will take a look at how the historical data is migrated, and what it looks like once it’s in Business Central.

What do my Sales and Purchasing Opening Balances look like in Business Central?

The migration will transfer Customer and Vendor unapplied transactions currently in the OPEN tables in Dynamics GP.

Customer and Vendor opening balances are posted in separate batches during the migration. After the migration has finished, The first place I usually review them is on the G/L Register page, which provides a complete view of all the opening balance G/L Registers.

You can learn more about Registers and how they function in Business Central in my blog post here

From here I can I highlight one of the batches and click the “General Ledger Entries” button which will show me the General Ledger Entries for the highlighted batch.

As you can see the General Ledger Entries post in and out of the Debtors Control account. This is because the balance for the Debtors and Creditors is migrated as part of the General Ledger Opening Balance.

I can follow the same steps to view the General Ledger entries related to the Vendors by simply highlighting the G/L Register from the Vendors

You can then click “Customer Ledger Entries” to view a list of the OPEN unapplied Sales transactions. The sum of this should match your outstanding Sales transactions in Dynamics GP.

If I want to see the “Customer Ledger Entries” on the actual Customer, I can simply go to the Customer List and drill down on the Balance as per below

If I then drill down on the balance for “Adam Park Resort” I can see how the OPEN transactions in Dynamics GP have created Customer Ledger Entries in Business Central

When you go live with Business Central these entries will show on the “Aged Accounts Receivable” report that you should reconcile back to the “Historical Aged Trial Balance” in Dynamics GP.

If can follow the same process to view my migrated purchasing transactions. In this case the General Ledger Entries will have posted in and out of the Creditors control account and I can view and total my Vendor Ledger Entries as well.

Please note you can also migrate paid transactions however this is performed as part of the historical data migration which we’ll cover in Part 2

What do my General Ledger Opening Balances look like in Business Central?

Now we have seen the Customer and Vendor opening balances, let’s have a look at the General Ledger opening balances.

The first thing to note is that you can specify how many years of General Ledger opening balances you wish to migrate via the “GP Company Migration Configuration”. A screen shot of this is below:

Please note that every single year will then be migrated as an Open Year. So you’ll have to run the “Close Income Statement”, which is Business Central General Ledger Year End process, for those years that have been closed. This will close the Income Statement General Ledger balances to the retained earnings account.

Now we know we can migrate multiple years, lets have a look at how this appears in Business Central 😊.

Before we look at the opening balances its important to understand how the Chart of Accounts differ between Dynamics GP and Business Central.

Dynamics GP uses a segmented General Ledger account, whereas Business Central uses a single General Ledger account and Dimensions for extra analysis. Therefore the migration splits the Dynamics GP General Ledger code and uses the “Main Segment” for the General Ledger code and the other segments as dimensions. You can read more about this in my blog post here and here.

Therefore my migrated Fabrikam Chart of Accounts appears as per below in Business Central.

Again, I find the best place to start to look at how the balances have transferred, is the G/L Register page.

Here we can see that we have a register per Year-Period.

If I drill down on the “General Ledger Entries” for GP2025-1, you can see that we get a summarised total for each Dynamics GP General Ledger Code, rather than the individual detailed entries for the period.

Furthermore, we can match this back to Dynamics GP. So taking the highlighted row below for GL Code 5170 and Division Code 200 and Department Code 00, which is 200-5170-00 in Dynamics GP, we can see we have a balance that has migrated of £3,803.77.

If we have a look in Dynamics GP at code 200-5170-00 we can see the same monthly balance for period 1 of 2025

Taking this a step further, if I go straight to the “General Ledger Entries” page to see all migrated entries, and then filter to the GL code 5170, Division of 200 and Department 00, I can match every single period amount to that Dynamics GP summary shown above:

This proves that my migration has worked. All balances have been migrated on a month by month basis.

Whats also great, is now my GL code is seperate from my Division and Department, I can easily get a sum total at GL Code level and dimension level 😊

Conclusion

As we have seen, your opening balances from Dynamics GP migrate cleanly into Business Central, with Customer and Vendor OPEN transactions and summarised General Ledger balances brought across in a clear and reconcilable way.

In Part 2, we’ll take a closer look at historical data and how it appears in Business Central after migration.

Thanks for reading!

Dynamics 365 Business Central – How to use the Reconciliation Account feature to view the balances of your GL Codes prior to posting

Introduction

When posting journals there may be times when it would be helpful to see what affect the journal would have on balances prior to posting the entries.

In this post we’ll walk through how this can be achieved by using the “Reconciliation Account” feature on the GL account page.

Configure the GL Codes

The first thing you need to do is select the option “Reconciliation Account” on the GL code. You can do this by browsing to the “Chart of Accounts” and selecting a GL code and switching the option “Reconciliation Account” on.

In this example I’m switching the option on for 40500 Prepaid Rent and 30100 Rent Expense.

Create the Journal

Now I create a journal which is going to hit these two GL codes however before I jump in and click “Post” I want a sneak peak at what the balances would be if I were to post the journal.

Run the Test Report

In order to see what the balance of the GL codes would be I need to run the “Test Report” using the following selections:

Then, along with any posting errors, there’s an extra section showing the “Balance after Posting” for each GL code as per below:

In the scenario above this feature could have been especially useful, as I may have wanted the balance in my Pre Paid Rent account to be £0.00 after I’d posted this journal. If this was the case, I can now simply close the Test Report, change the amounts to £510.00 and then post. This would have then prevented an extra journal entry or a potential reversal entry.

Conclusion

This is a handy feature that is going to be espeically useful when posting accrual entries or correcting entries at a reporting period end. This is when accountants maybe checking balances and finalising accounts.

Thanks for reading!