Dynamics 365 Business Central – Some Considerations when Changing Standard Cost on an Item Card

Introduction

If you use the Standard Costing method for your items, then on occasion you will want to update it to reflect your current costs. For example the standard cost might be factoring in duty and freight costs. As these fluctuate the standard cost might need revising.

In this post I’ll cover changing the Standard Cost directly on the Item Card and some important considerations to be aware of when doing so. 😊

Changing the Standard Cost on the Item Card

One method you could use when changing your standard cost is to simply change it on the Item card. However before doing this we must understand the outcomes of this.

In my example below I have Item 1074 which has a standard cost of £10 and I have 5 in stock. I’m going to change this to £12 and post an Item Journal to register some more inventory at the new standard cost.

On changing the Standard Cost I’m prompted with the message below:
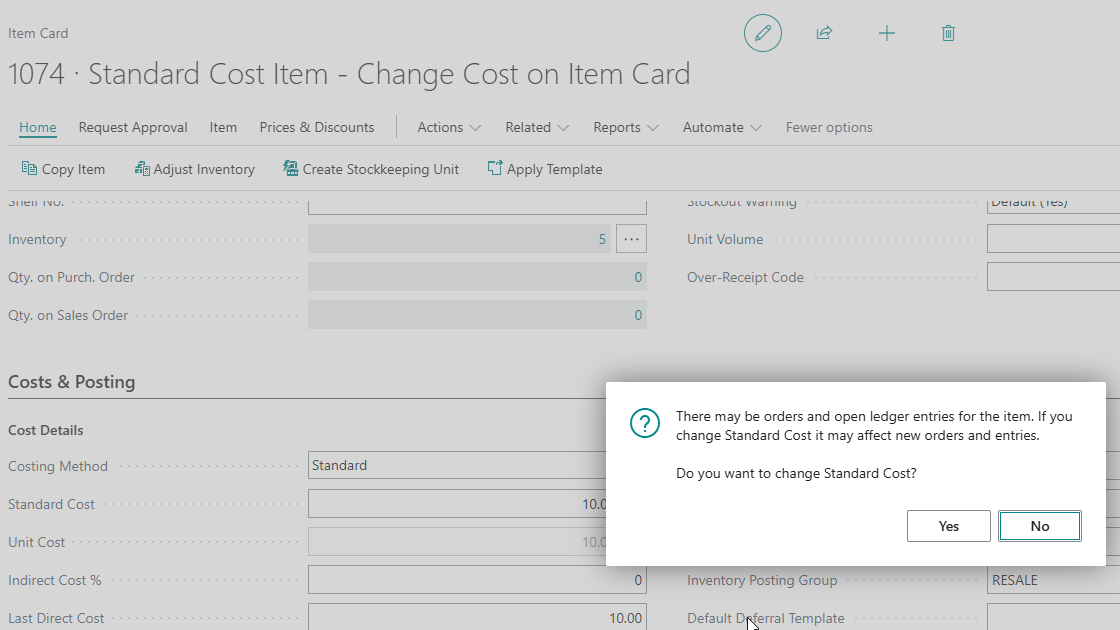
This is giving me a clue as to a potential issue. The message states changing the Standard Cost will affect new orders and entries. So how will the change affect existing inventory? We’ll come back to that shortly 😊.

I’ve selected “Yes” and I’ll now go to the “Item Journal” and post some additional inventory.

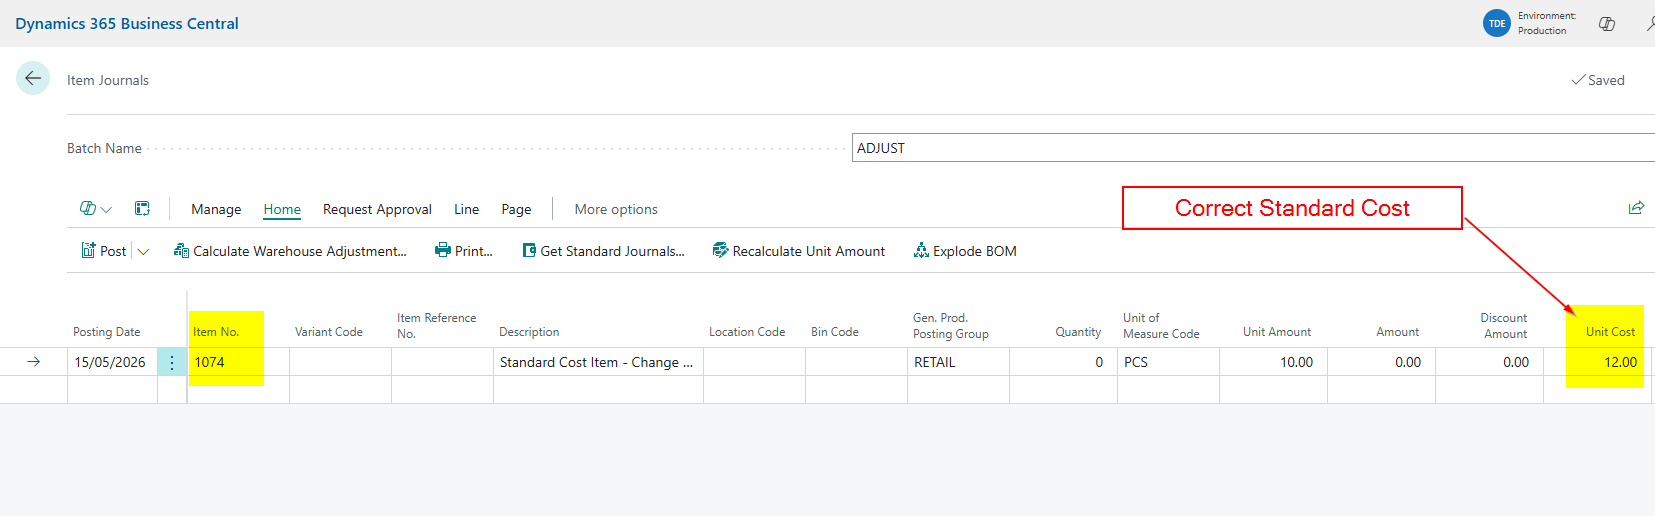
I enter the Item Number and at first glance the correct Standard Cost is pulled through
However I want to post the stock into the MAIN location, which has its own Stock Keeping Unit, so I’ll select “MAIN” for the location and this pulls through the old cost.
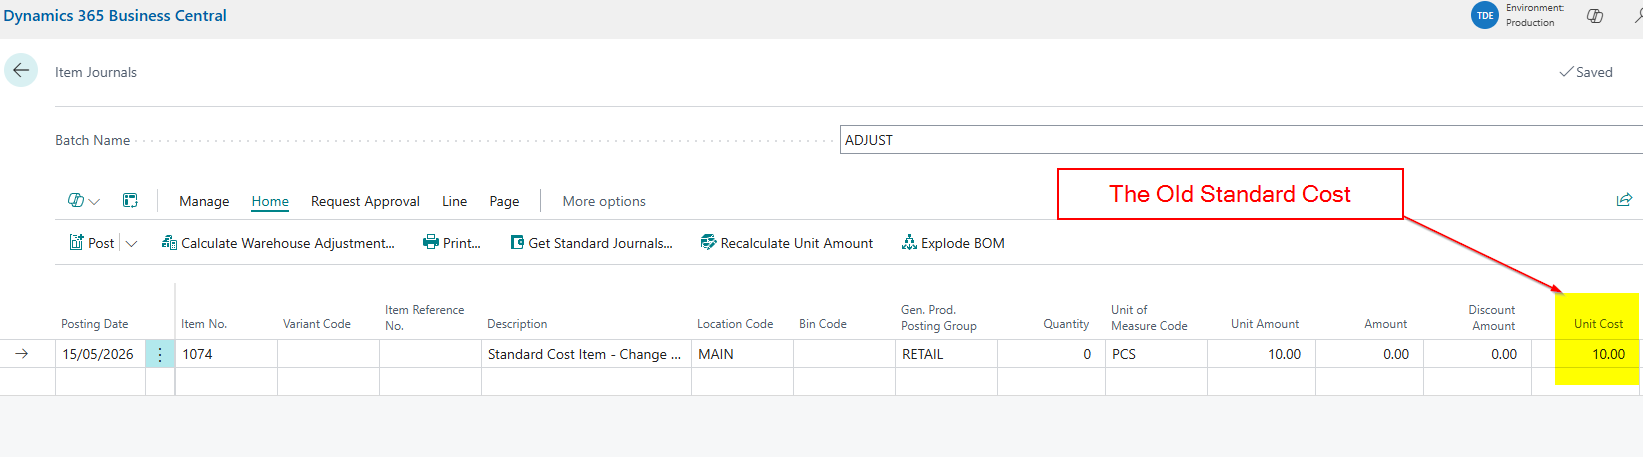
This highlights the first important consideration when changing the Standard Cost on the Item Card. The system doesn’t update the standard cost of any Stock Keeping Units.

Please note, when you have Stock Keeping Units for your locations, you can think of changing things directly on the Item Card as changing settings for the blank location.

Therefore I must now go to the Stock Keeping Unit and change the Standard Cost
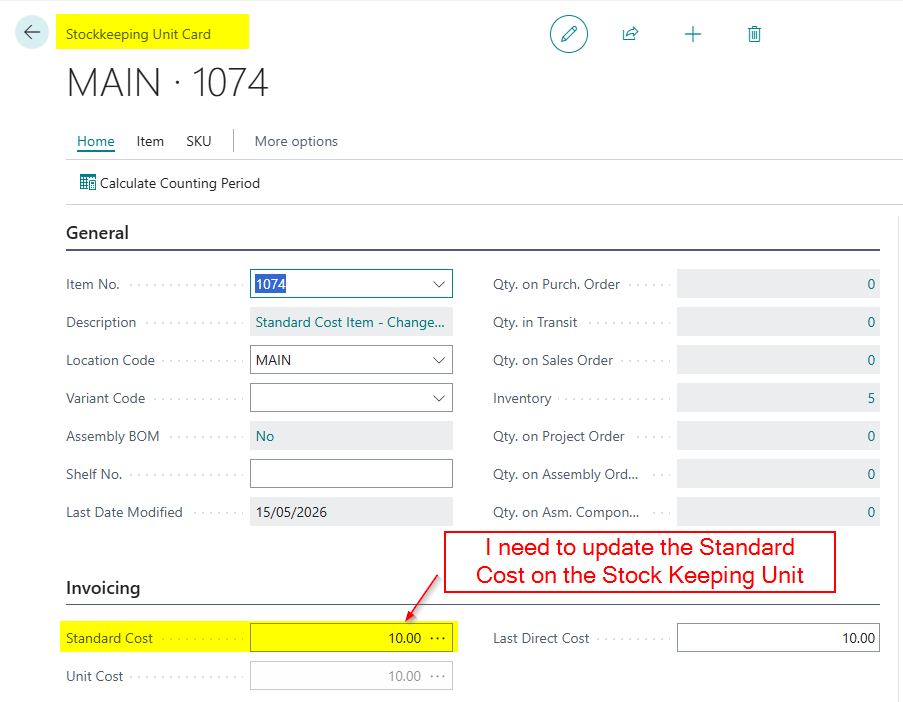
Now I’ve updated the Stock Keeping Unit I can go back to my Item Journal and post an entry to register 5 pieces at the new Standard Cost
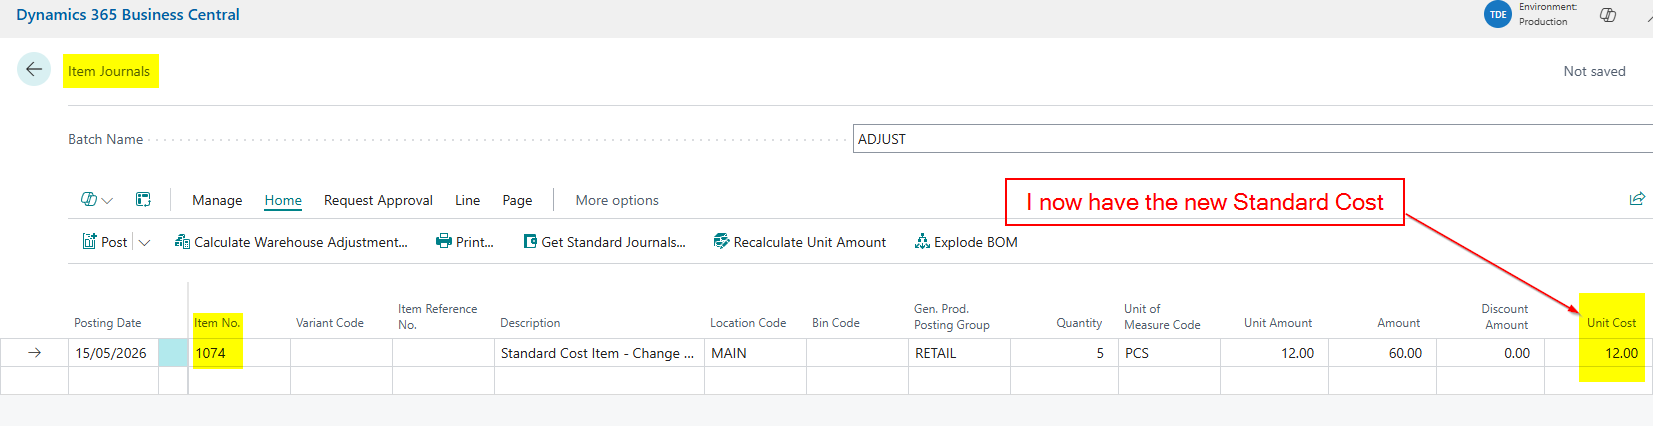
Selling the Inventory after changing the Standard Cost

Now I’ve posted the new stock, let’s go and sell some of the Items 😊.

In this case I’m raising a Sales Invoice for one of the Items.
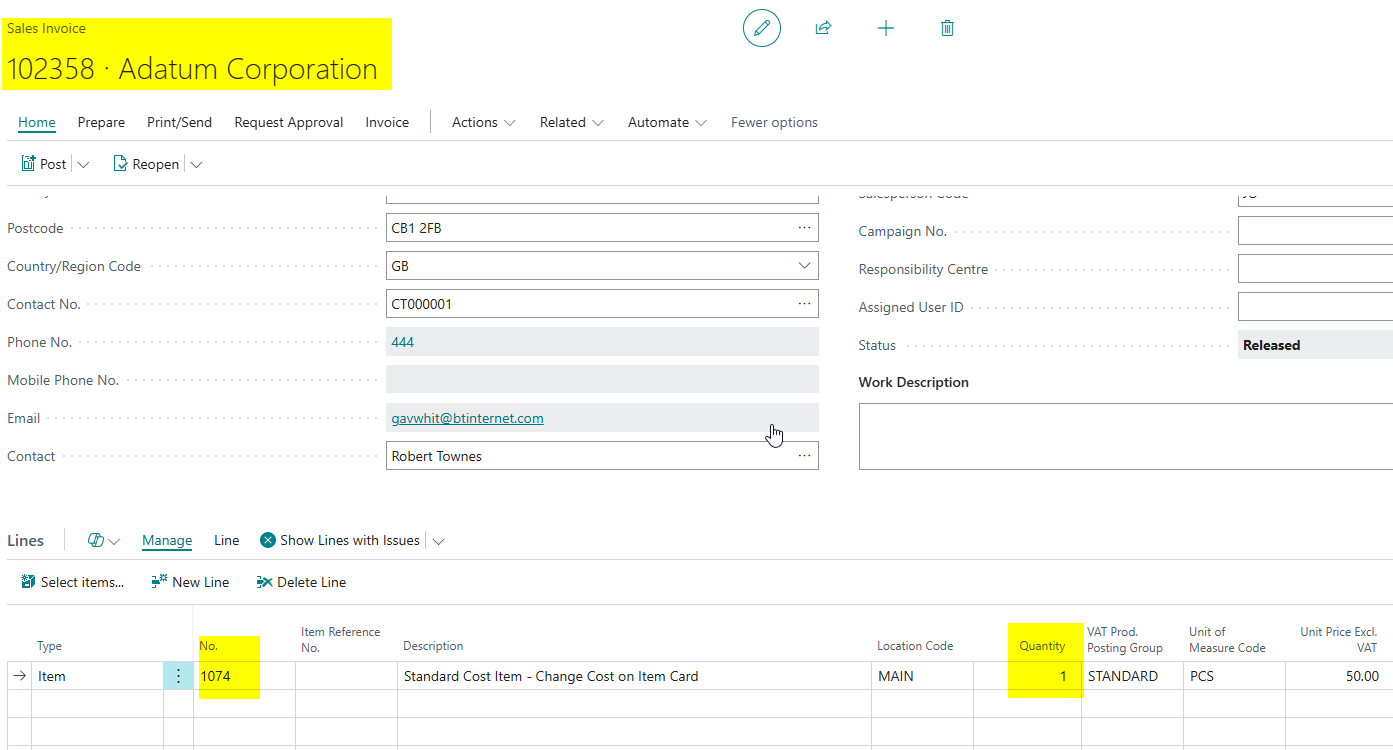
I’ll now go and check my General Ledger Entries to ensure the new Standard Cost has been used. However as you can see below this isn’t the case.
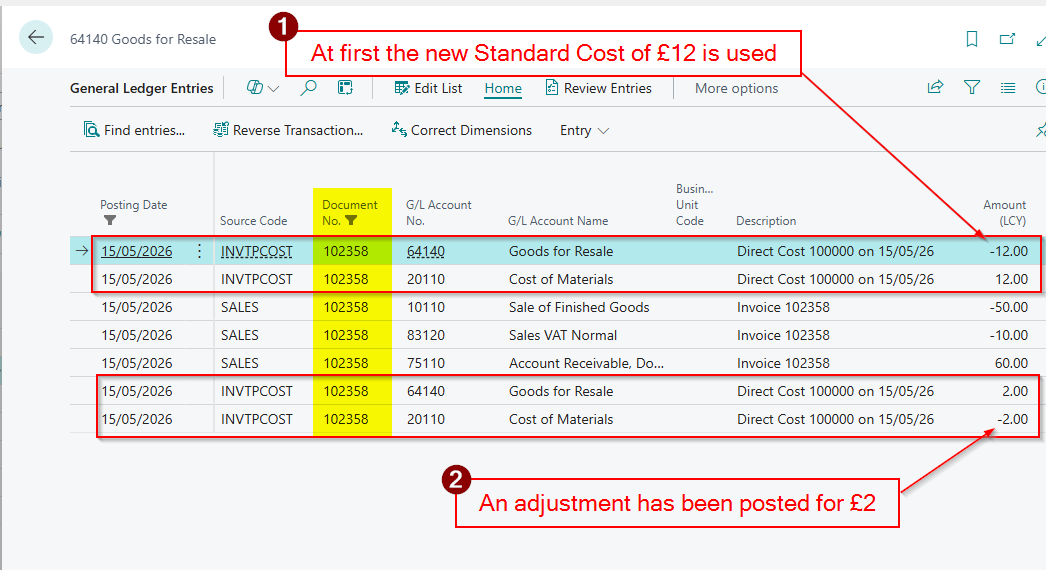
The system has initially used the new Standard Cost of £12, and recorded the Cost of Goods Sold as £12, however its then been adjusted by £2 back to £10? Why is this if our Standard Cost has been changed to £12?

The answer lies in the Item Ledger Entries and Value Entries. This item had remaining Inventory from a previous receipt and this was valued at the old Standard Cost. (see below)
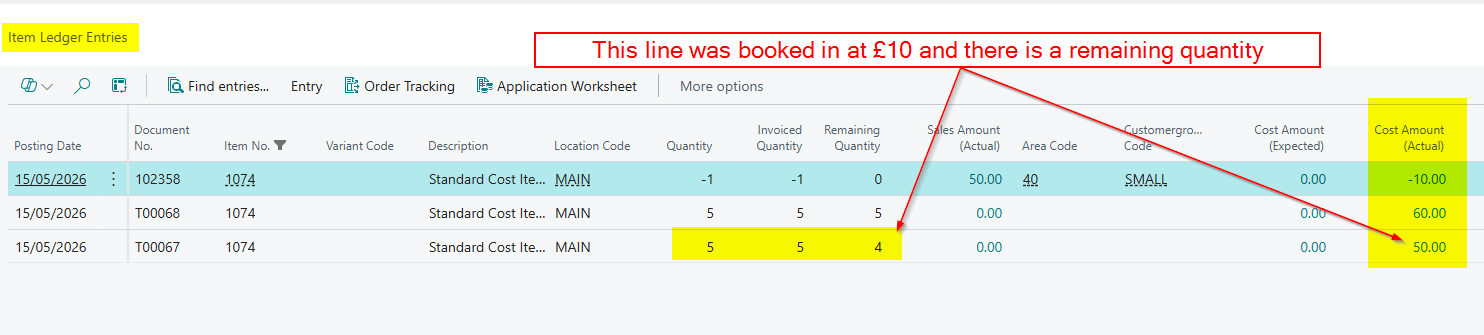
This brings us to the second important consideration. Existing on-hand inventory is not revalued when you change the Standard Cost on the Item Card.

Therefore when you sell the Item the system uses the Standard Cost, however when Cost Adjustment kicks in this is adjusted based on the Value Entries for that Item Ledger Entry, in this case £10.

Please note, you might not see this automatically happen if you dont have the option “Automatic Cost Adjustment” switched to “Always” in Inventory Setup. You may have to run “Adjust Cost – Item Entries”.

Conclusion

This post highlights two important considerations when changing the Standard Cost directly on the Item Card. The system doesn’t automaticlaly update your Stock Keeping Units, and it won’t revalue any existing inventory. If you need your on-hand stock revalued to the new cost, the Standard Cost Worksheet is the tool for the job, which we’ll cover in a future post. 😊

Thanks for reading!
Dynamics 365 Business Central – How to proportionally split costs across Dimensions using Statistical Accounts and Allocation Accounts

Introduction

When posting certain expenses in Business Central, you may want to split the costs proportionally over several cost centres using a specific value or metric. For example you may want to split a heating expense across the Factory and Office cost centres based on the square footage that each occupies.

In this post, I’ll show how this can be achieved by combining Statistical Accounts and Allocation Accounts to automatically distribute costs across dimensions.

Scenario

In our demo scenario we want to split the heating costs of the business automatically across our department cost centre based on the square footage they occupy.

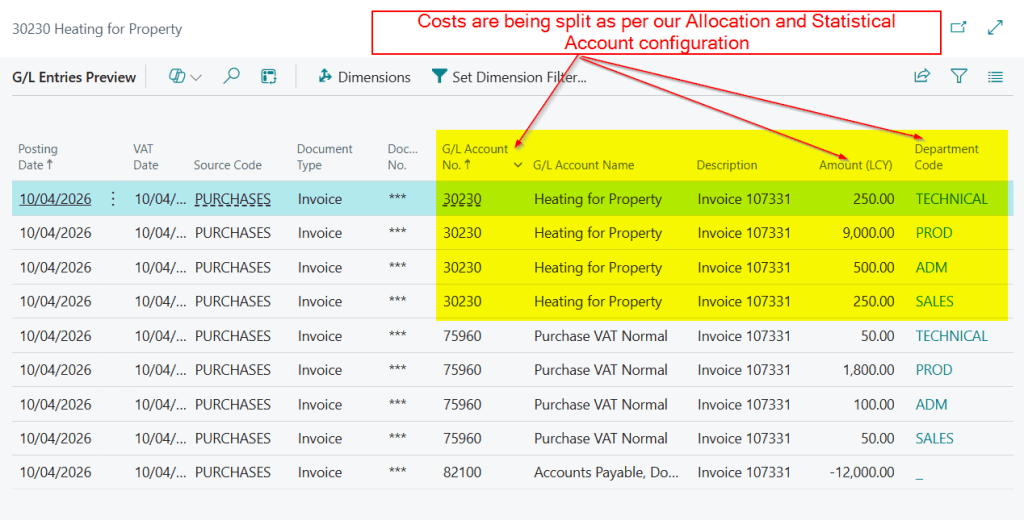
The heating costs are recorded via the Purchase Invoice from our supplier. When keying this into the system we want to be able to simply select one Allocation account, enter a total amount of the invoice, and then the system to automatically post this to one heating GL account but split across the Department dimension.

This will seamlessly record the heating costs more accurately across the Department dimension.

This post assumes you have a dimension called “Department” already configured with the relevant values.

Statistical Account Configuration

First, we need to create a statistical account. But before that, a quick introduction to why they are useful 😊.

Statistical accounts allow you to store non-financial information such as square footage or employee count. You can then use this information in multiple ways, such as in calculations in financial reports or allocating costs.

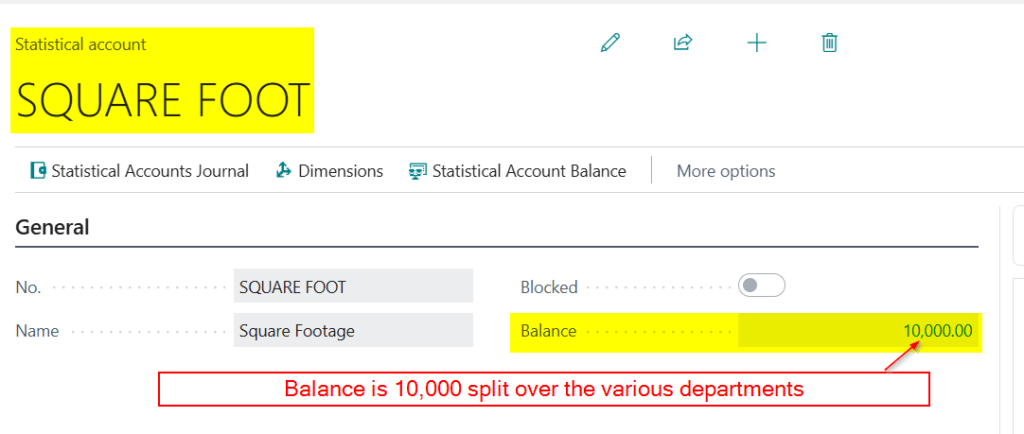
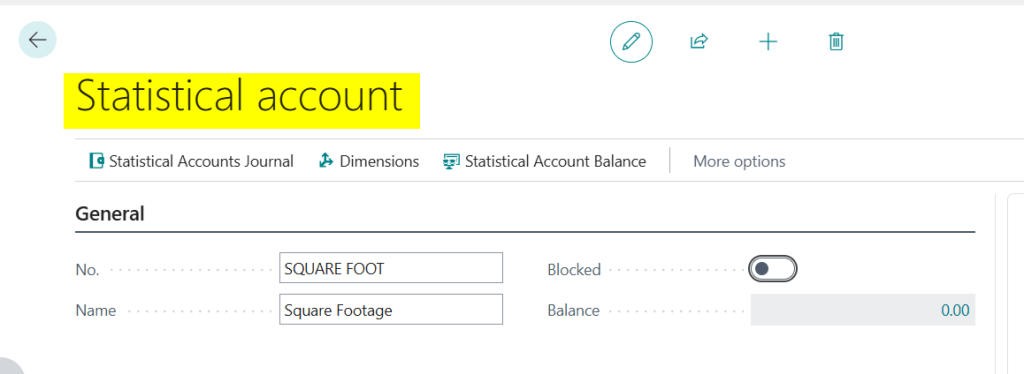
For this scenario I’m going to create one called SQUARE FOOT and configure it as per below:

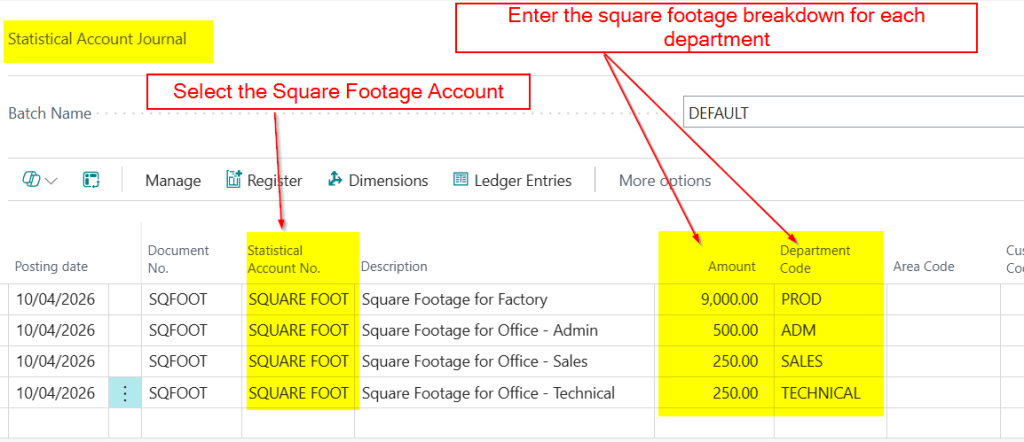
Next, I’ll click “Statistical Accounts Journal” and post the entries to record the square footage for each department.

I’ve done this as per below:

In reality, the square footage figures are unlikely to be this straightforward, but I’ve kept them simple here so the calculations are easier to follow when posting the Purchase Invoice 😊

The balance on the Statistical Account is now 10000 which is split as 9000 to the PROD (Factory) department, 500 to the ADM department, 250 to the SALES department, and 250 to the TECHNICAL department.

Allocation Account Configuration

Now we have configured the Statistical Account we need to create the Allocation Account and use the Statistical Account in the breakdown 😊.

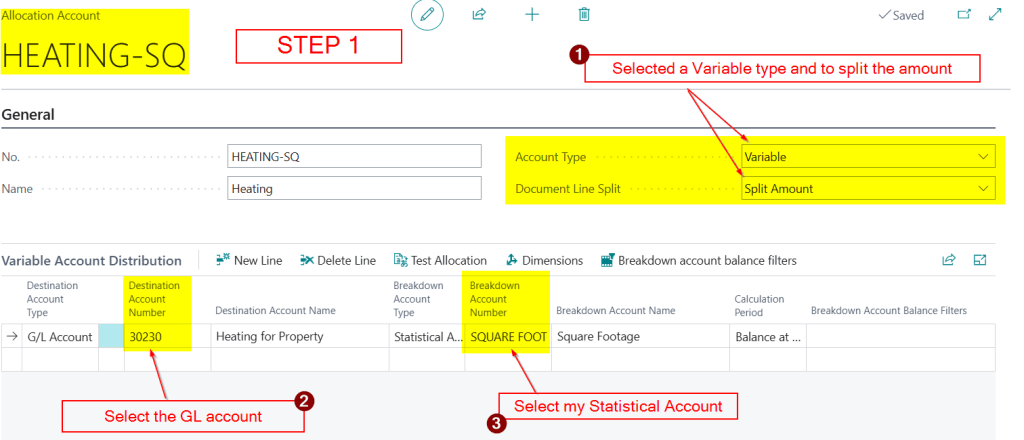
We will therefore go to “Allocation Account” page and set this up. We’ll go through in steps and explain each one as we go.

The first step is to add the “Allocation Account” and select the GL account we want to break the costs over and what the breakdown account will be.

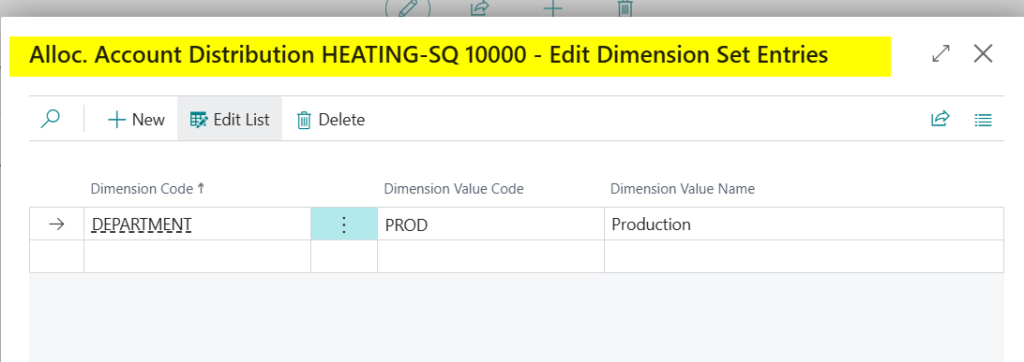
Next, while on the line, I’ll click “Dimensions” and select the Department dimension and the dimension value PROD.

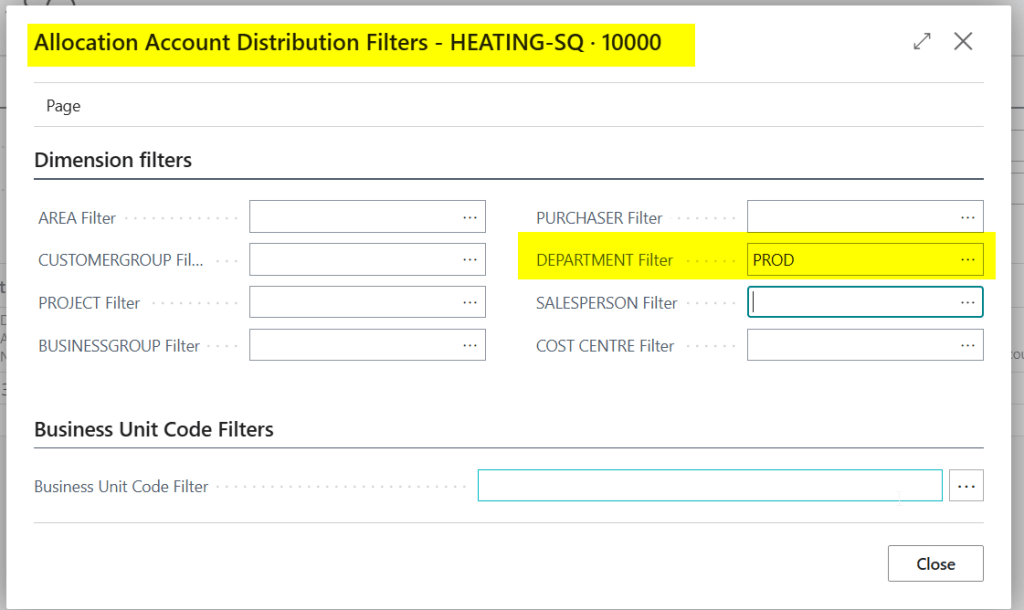
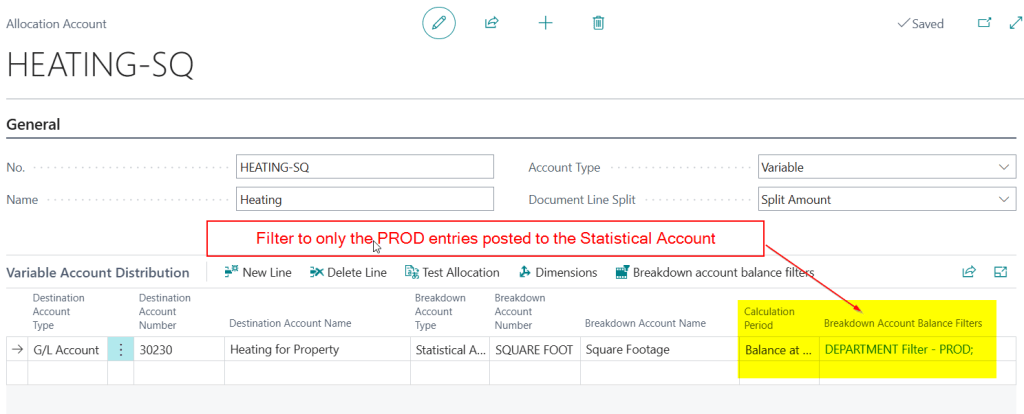
Now, back on the main Allocation Account screen I’ll click “Breakdown account balance filters” and enter the Department of PROD.

Returning back to the “Allocation Account” and you can see this line is filtered for the balances posted to the PROD dimension value.

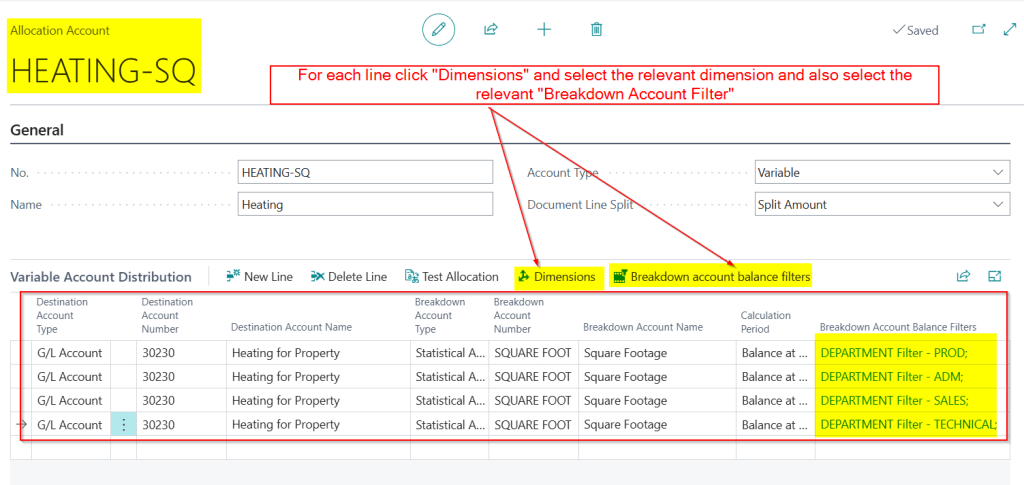
I need to repeat this process for all the dimensions in the statistical account I want to break the costs down over.

Therefore my final configuration looks like the below.

For example, on the second line I selected the ADM dimension value under “Dimensions” and then applied the same value within the breakdown account filters. On the third line, I repeated this process for the SALES dimension, and on the fourth line for TECHNICAL.

I’ve now completed the configuration 😊. Now, when I post a Purchase Invoice I should be able to select the HEATING-SQ “Allocation Account” and have the costs split across dimensions automatically based on the values in my Statistical Account.

Let’s give it a try 😊

Posting a Purchase Invoice to the Allocation Account

Now I’ve completed the configuration lets give it a try.

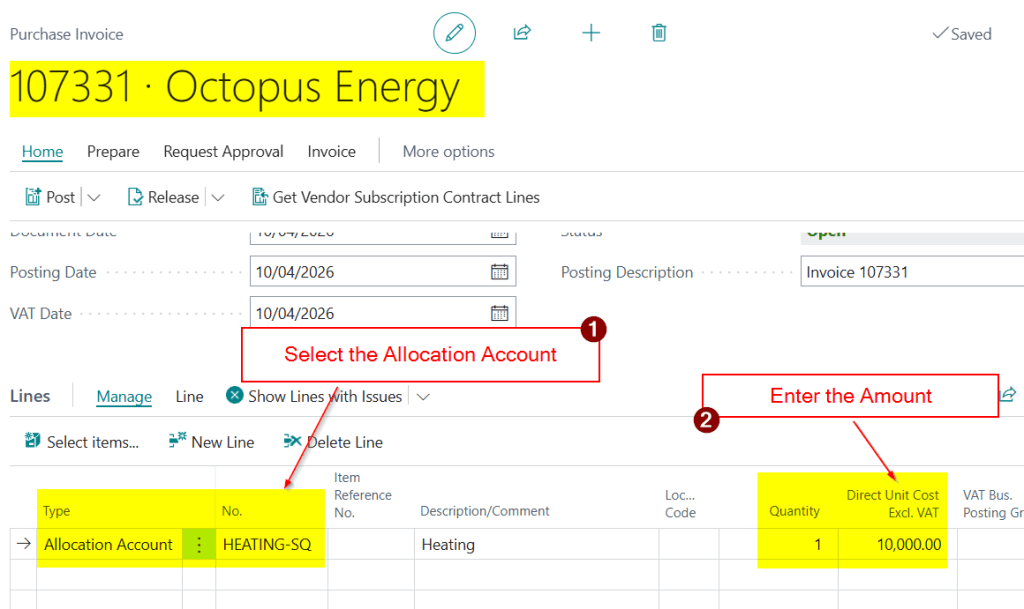
I now have a Purchase Invoice from my energy supplier for the total heating costs for our business premises. As discussed this includes a factory and office space.

I’ll therefore create the invoice for the total cost as per below ensuring I choose the Allocation Account called HEATING-SQ.

Then, when I select “Preview Posting” you can see the cost is being automatically split across the various dimensions using the statistical account

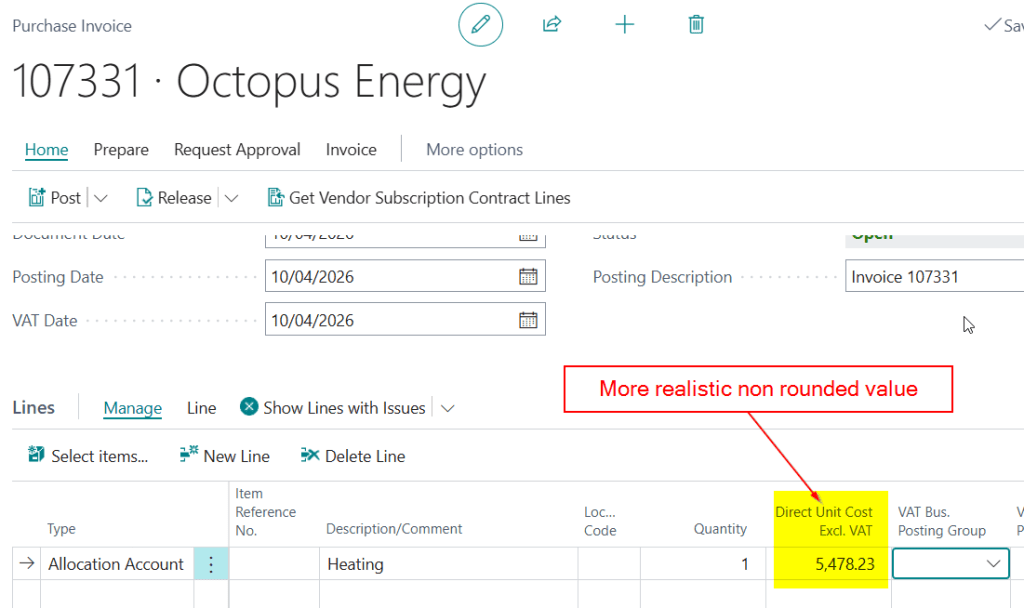
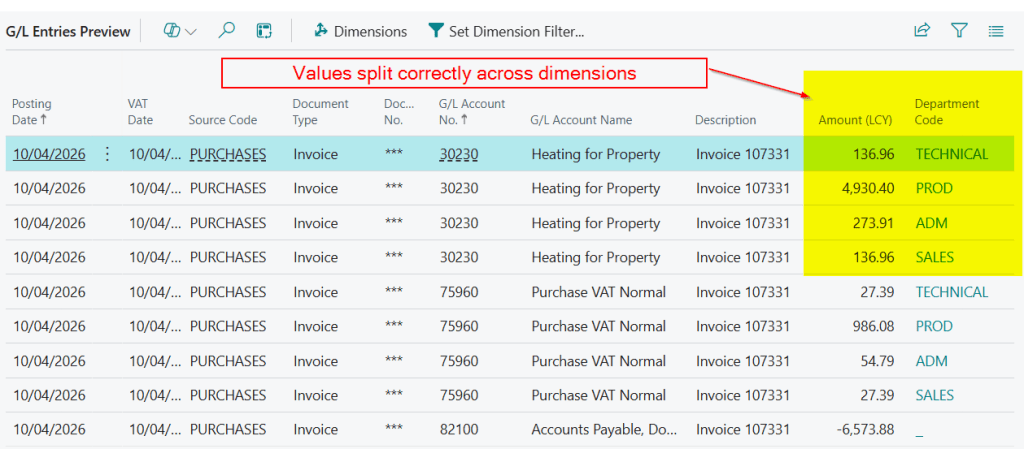
To make this more representative of a real scenario, I’ll use a non-rounded invoice value instead of 10,000.00 so you can see how the system calculates and splits the amounts more precisely across the dimensions.

And you can see the values split nicely across the dimensions

Conclusion

This blog goes through how you can automatically split costs across dimensions based on non-financial information like square footage. It goes through how to configure a Statistical and Allocation Account to acheive this.

What’s amazing about this feature is if the office space changes or the factory is expanded, you only have to post another Statistical Journal entry reflecting the updated figures and the system will automatically use the revised values the next time allocations are run, ensuring your cost distributions always stay accurate without any need to amend your allocation setup 😊

Thanks for reading!
Dynamics 365 Business Central – Why isn’t Payment Tolerance being taken automatically in the Cash Receipt Journal?

Introduction

Sometimes customers may not pay the full amount of invoices which can leave small balances on their account. At this point we can either chase our customers to pay the balances or alternatively we can write off those small amounts.

Business Central provides functionality called “Payment Tolerance” that allows you to write off the small balances when you are applying the invoices. However in order for this to work the cash receipt must be entered and posted in a specific way, otherwise the payment tolerance won’t be taken automatically.

In this post we’ll walk through a payment tolerance scenario showing the conditions where Business Central won’t automatically take the payment tolerance

Some Setup

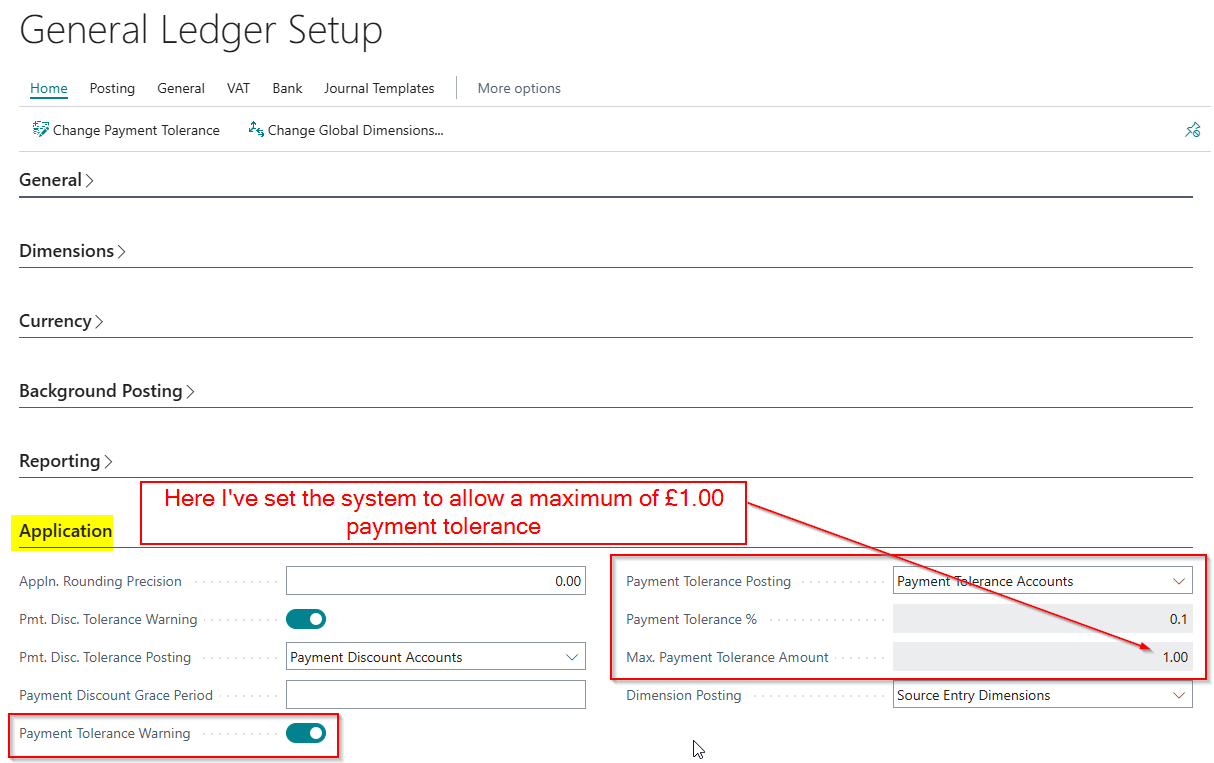
You can setup payment tolerances via the General Ledger Setup.

As per below I’ve set the system to allow the payment tolerance of 0.1% of the invoice value with a maximum tolerance of £1.00. Therefore if I were to post a Sales Invoice for £10,000.00 we’d still only be allowed a payment tolerance of £1.00.

Sales Invoice with Payment Tolerance

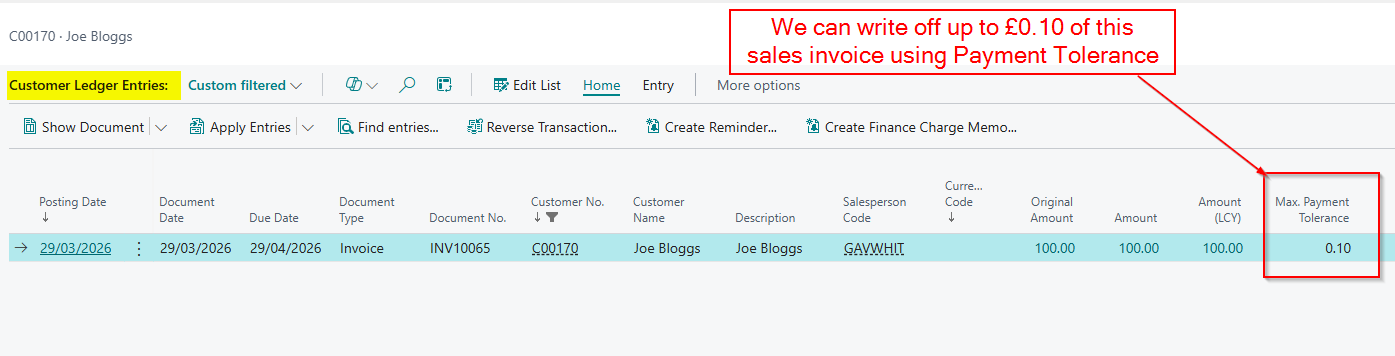
Next, I’ll post a Sales Invoice for £100.00 and as you can see this has a payment tolerance of £0.10 meaning if the customer were to pay anything up to £99.90 we can write off the difference automatically using payment tolerance.

Taking the Payment Tolerance (including the common mistake)

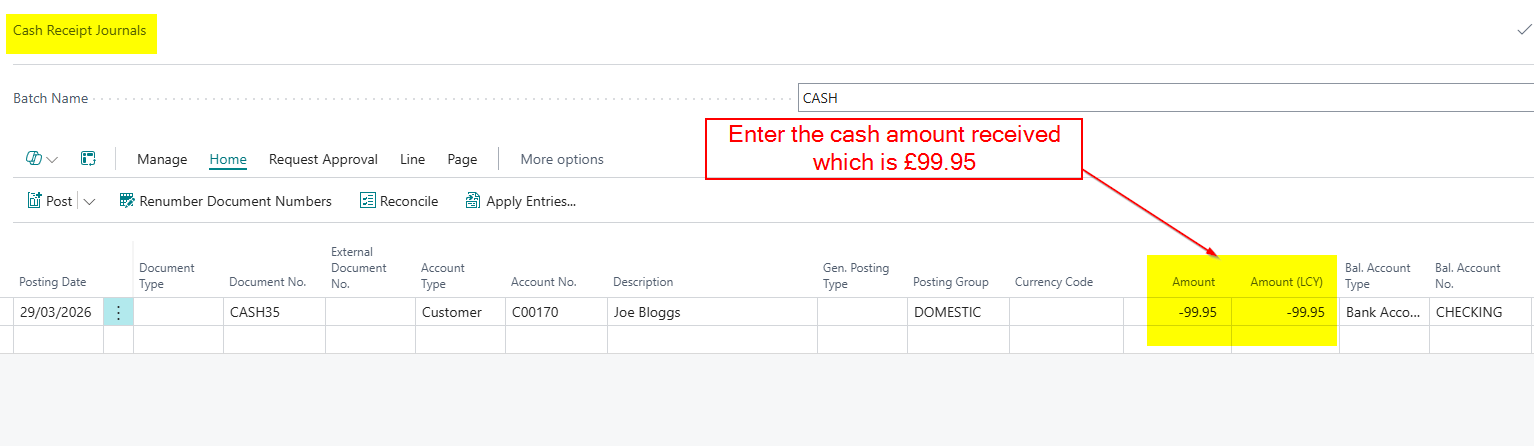
Now we receive payment from our customer however they have only paid us £99.95. As the balance is so small, we don’t want the hassle or potential harm to customer relationship, of chasing the remaining amount. Therefore we wish to automatically write off this amount.

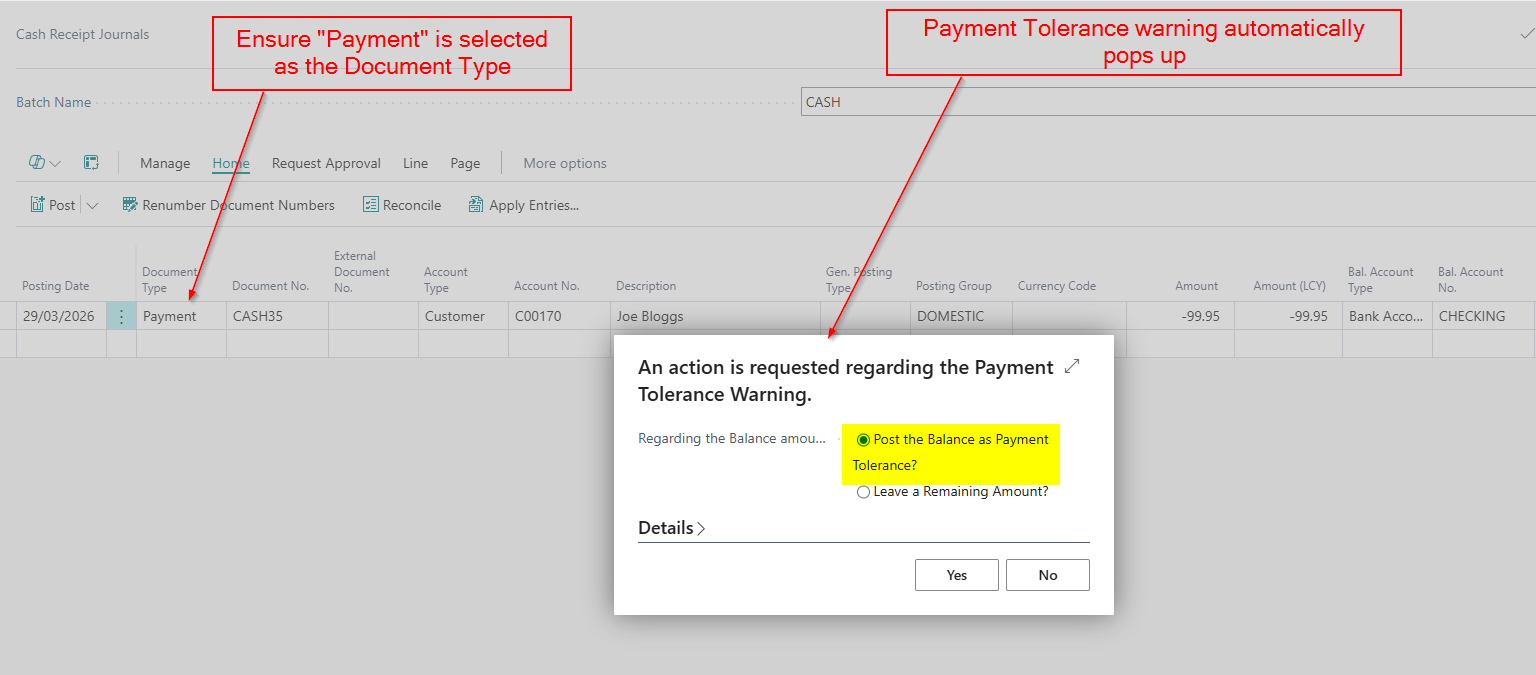
To do this I’ll go to Cash Receipt Journal and enter the payment as per below:

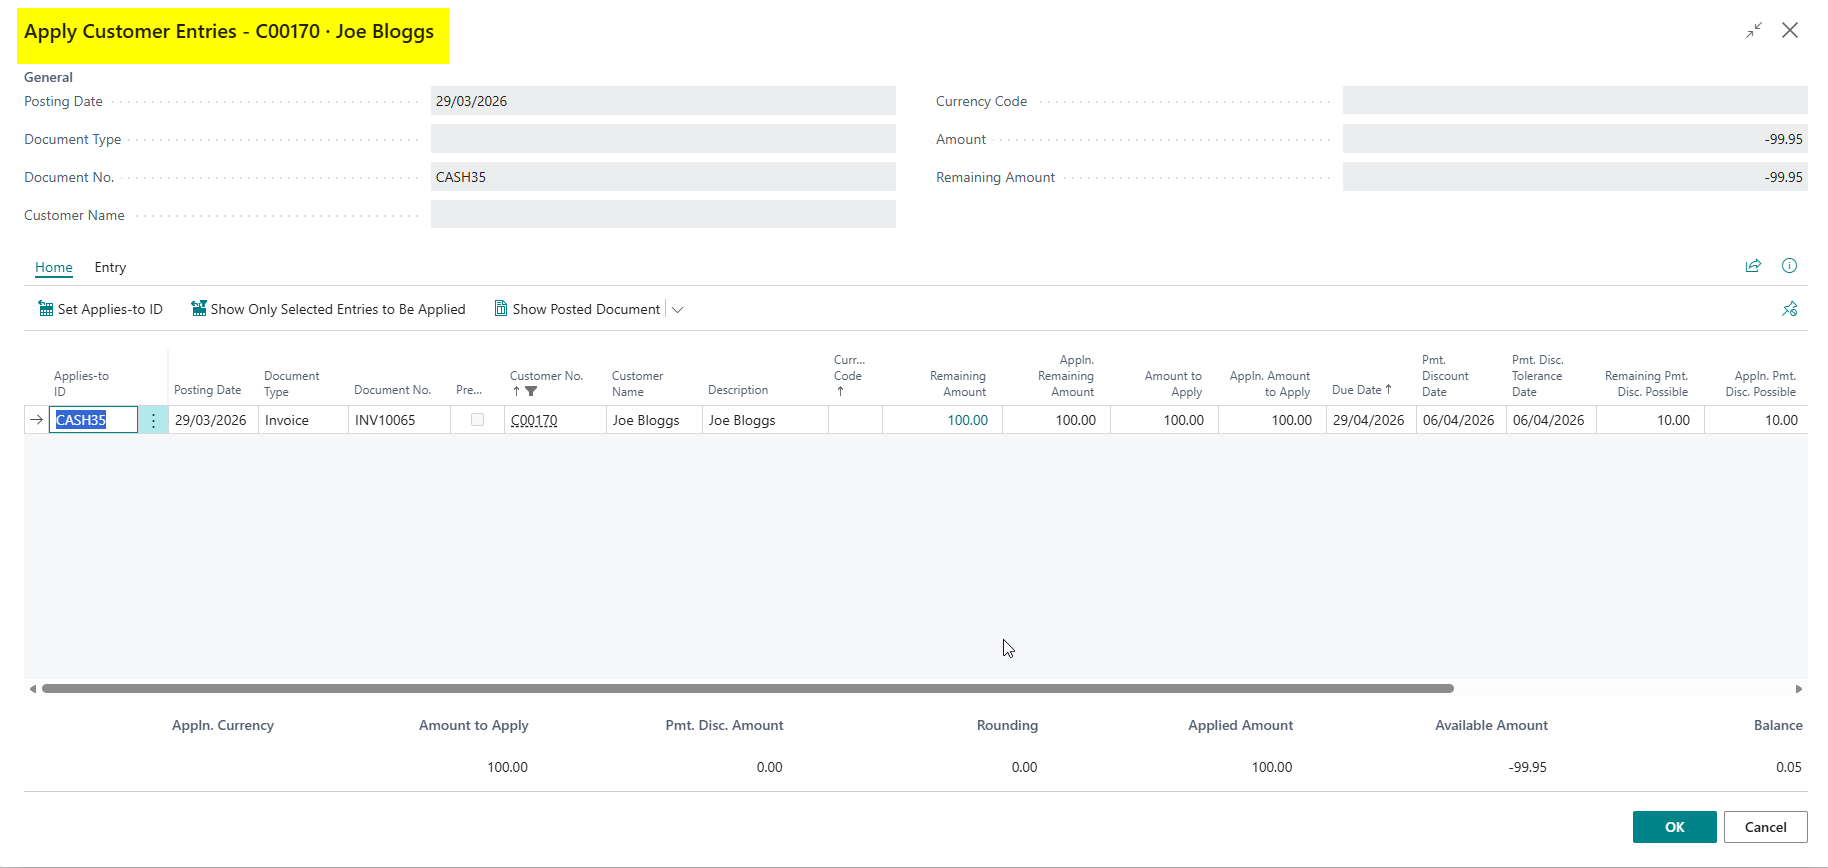
Next, we’ll apply the payment to the invoice.

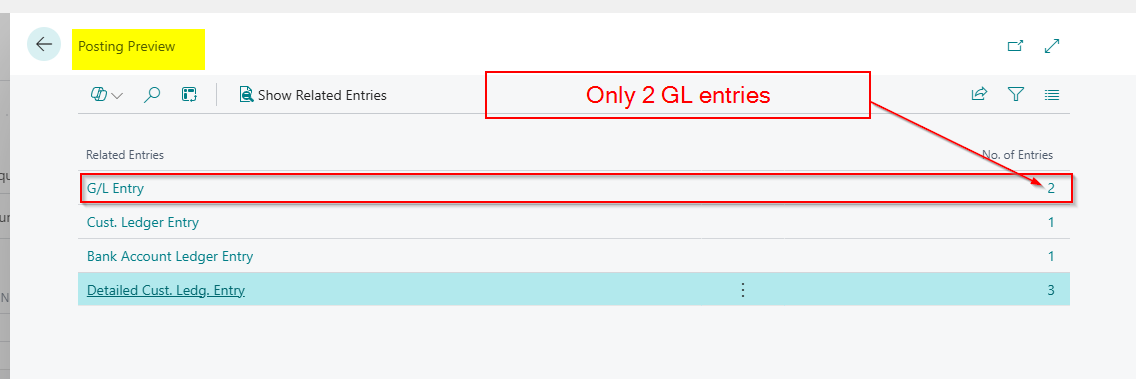
However after clicking OK, there is no payment tolerance message, and the GL entries don’t show a posting to the payment tolerance account?

We appear to have done everything correctly, so why hasn’t the payment tolerance functionality worked?

Its a very subtle issue……have you spotted it? 😊.

The issue is when I applied the cash in the first instance, I didn’t select “Payment” as my document type, and this must be selected in order for the functionality to work.

I’ll therefore delete and re-enter the cash receipt ensuring I select “Payment” as the document type and now I get the tolerance message.

I’m getting this warning because I toggled “Payment Tolerance Warning” in the General Ledger Setup. I can switch this off if I like.

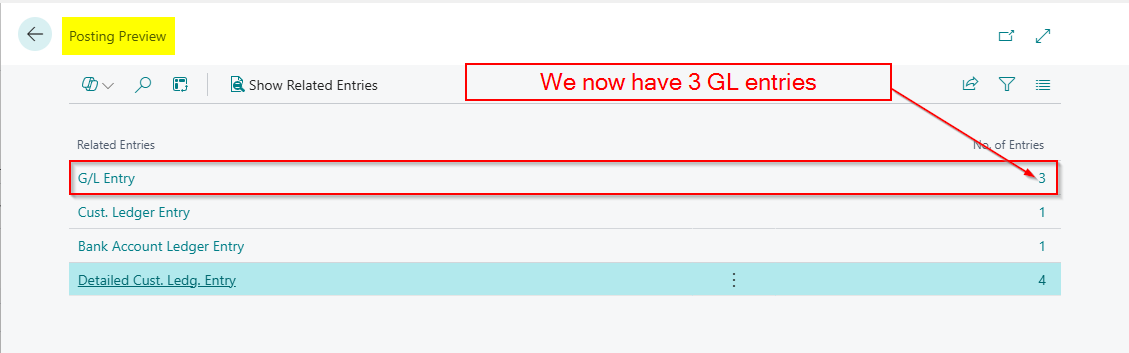
And crucially when posting the Cash Receipt I now have an extra GL entry for the payment tolerance.

Conclusion

This blog goes through the extremely useful payment tolerances functionality in Business Central.

It in particular highlights why, when you have seemingly configured payment tolerances correctly, the payment tolerance isn’t taken.

Thanks for reading!