Dynamics 365 Business Central – Walkthrough of GL Consolidation with Different Currency Business Units

Introduction

Business Central provides functionality to consolidate companies, enabling reporting at a group level. This consolidation feature also supports combining companies that operate with different local currencies.

In this post, we’ll explore how consolidation works when integrating one company that uses the same local currency as the consolidation company, and another company that uses a different local currency.

We’ll cover various setup aspects, including General Ledger (GL) code configurations in both companies. Then, we’ll consolidate transactions over two months and review the resulting GL entries.

It’s important to note that in my configuration, all companies share the same chart of accounts. In reality, this is often not the case, so we’ll also discuss how to map GL accounts from source companies to the consolidation company.

My Configuration

To walkthough this, I’ve created two trading companies in Business Central, both based on the Cronus demo data.

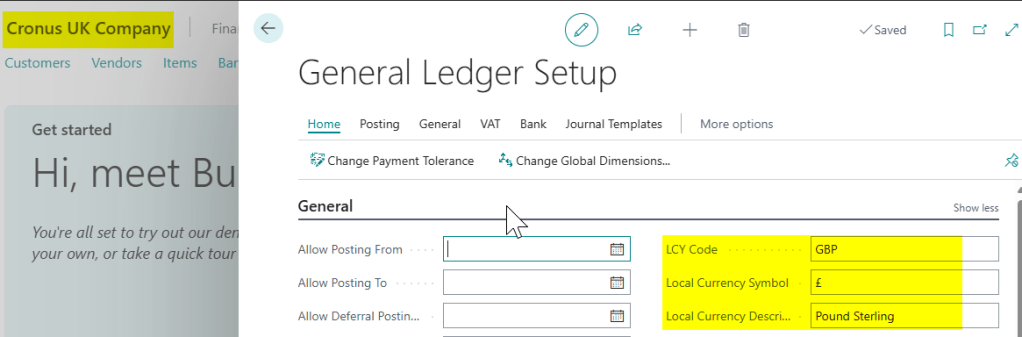
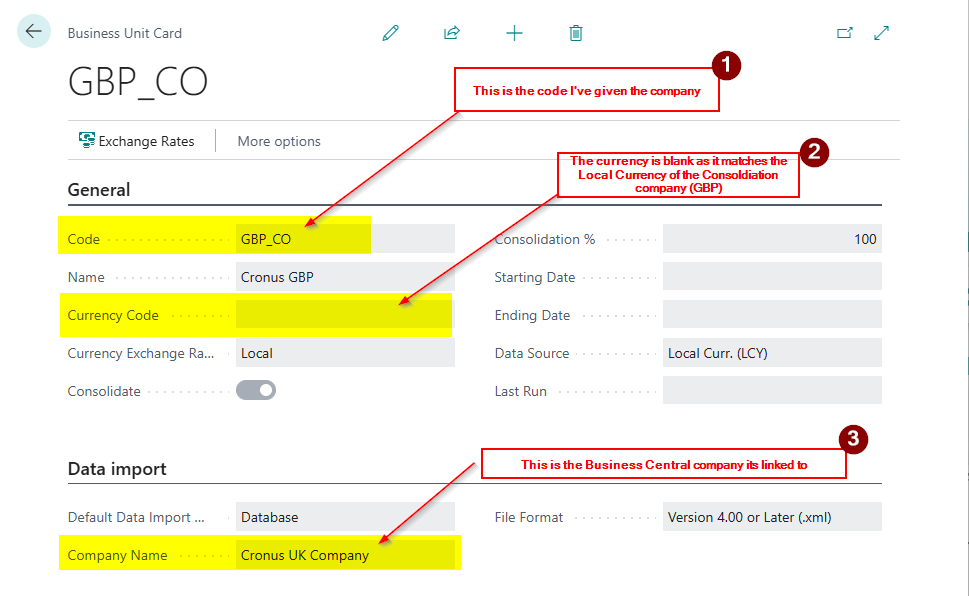
One company is a UK-based entity called “Cronus UK Company,” which uses GBP as its local currency (set in the General Ledger Setup page). 

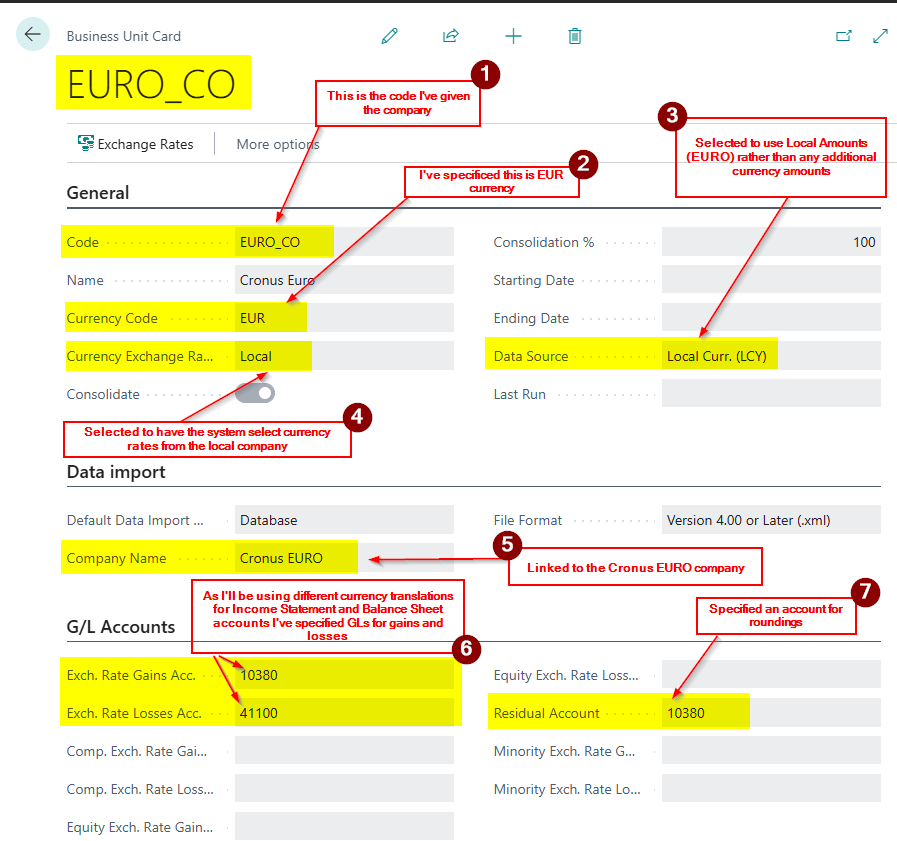
The other company is called “Cronus EURO Company,” and it uses Euros as its local currency.

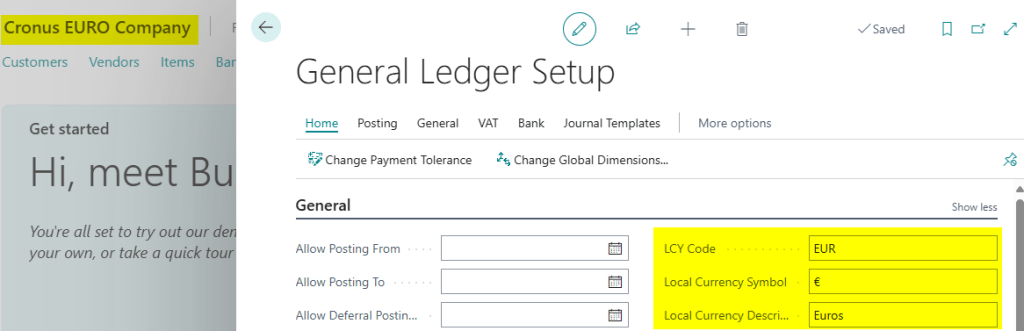
** Both companies are created using evaluation data in the same way. I’ve just changed the currency in the General Ledger Setup

Finally, I’ve been through the assisted setup to create a “Consolidation Company” that I’ll be consolidating the data from both companies into.

**The purpose of the post to look at the multi currency aspect of the consolidation so I won’t be going through this part, however its a fairly simple wizard to follow 😊

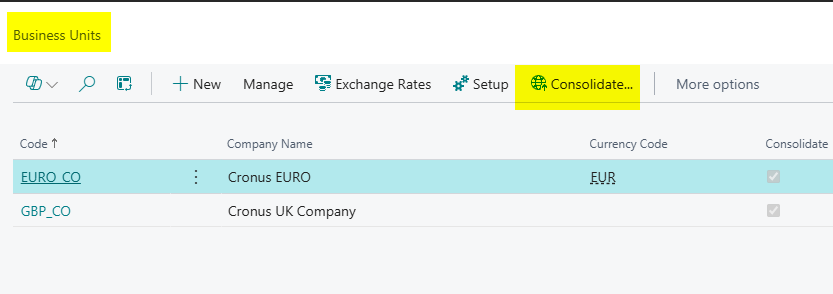
This has created me the following Consolidation Company, which is also GBP, adding both my trading companies as “Business Units”. (for more information on setting up a Consolidation Company see this link)

Chart of Account Configuration

Before we run the consolidation there are a couple of setting on the Chart of Accounts I want to focus on in each trading entity which are shown below:

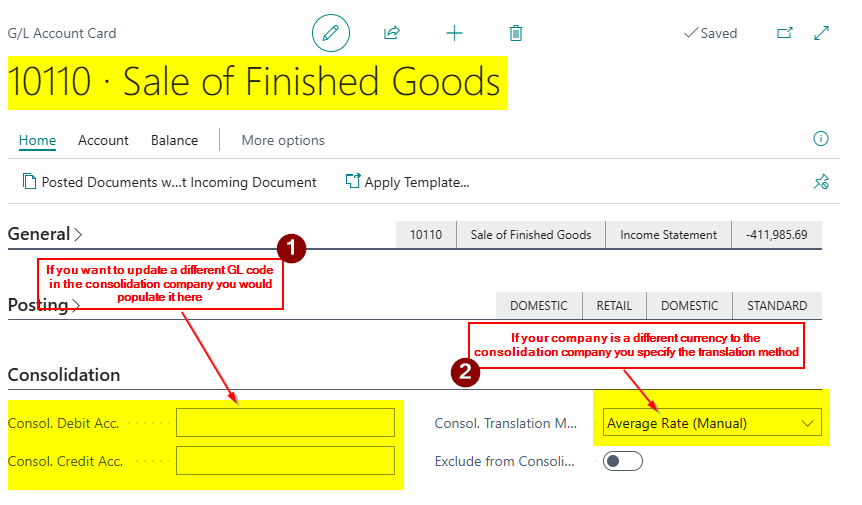
With regards the “Consol Debit Acc.” and “Consol Credit Acc.“, these fields are used if you want to consolidate the balance in a General Ledger (GL) account to a different account in the consolidation company. Since all my companies use the same Chart of Accounts, as mentioned in the introduction, I will leave these fields blank so that the balances consolidate into the same GL accounts.

For the “Consol Translation Method“, if the company you are consolidating operates in a different currency than the consolidation company, it’s necessary to set a translation method. I will use “Average Rate (Manual)” for my Income Statement accounts and “Closing Rate” for my Balance Sheet accounts.

There are other translation method you can use which can be found here however in my experience Average Rate is typically used for Income Statement to smooth out rate differences over a period and closing rate is used for balance sheet to reflect the value at the end of the reporting period

Business Unit Configuration in the Consolidation Company

Now that we have configured the Chart of Accounts in each company, let’s take a closer look at the Business Units that have been set up in the Consolidated company using the Assisted Setup.

You can add these manually via the “Business Units” page in the consolidation company if you choose to setup the Consolidation company manually.

The Cronus UK company business unit configuration is below:

The Cronus EURO company business unit configuration is below.

Test Transactions

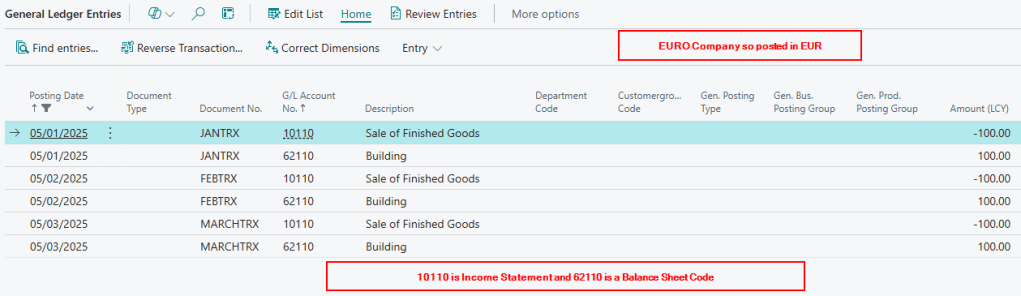
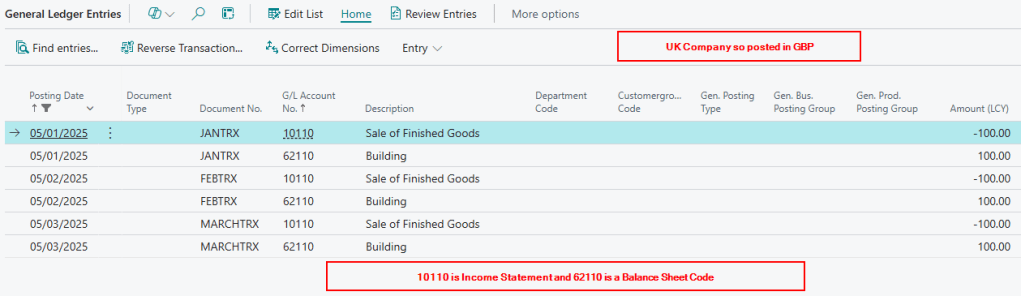
In each trading entity I’ve posted a series of General Journals to create the following General Ledger Entries

Cronus EURO Company: The GL account 10110 is an Income Statement Account and therefore is going to be consolidated with an Average Rare and the GL account 62110 is a Balance Sheet Account which is going to be consolidated using a Closing Rate. (more on how we set the rates when consolidating below)

Cronus UK Company :- As per above he GL account 10110 is an Income Statement Account and the GL account 62110 is a Balance Sheet Account. (rates are irrelevant for this company as its the same currency as the consolidation company)

Run Consolidation

Now we have configured the Chart of Accounts, the Business Units, and posted some transactions, we can run the consolidation and then review the resulting General Ledger Entries.

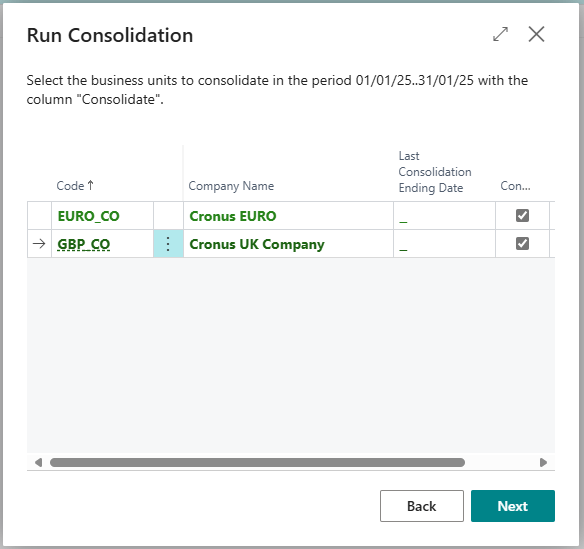
To do this we’ll need to go to the “Business Unit” page and click “Consolidate”

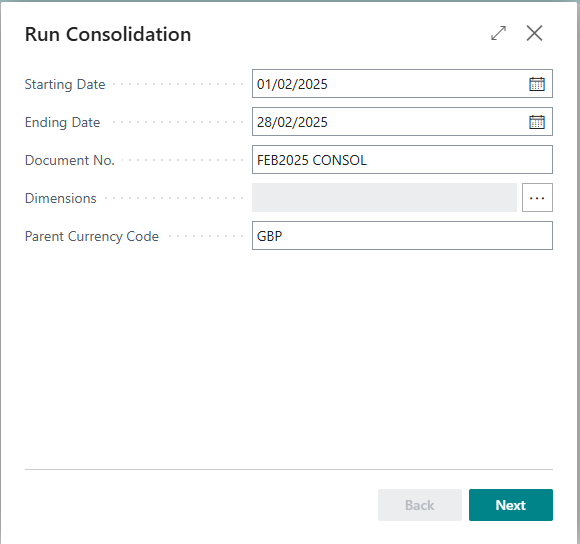
Next I enter the dates I want to consolidate, fill out the Document No, and click Next. (in this case I’m consolidating January first)

Then I tick the companies I wish to Consolidate and click “Next”

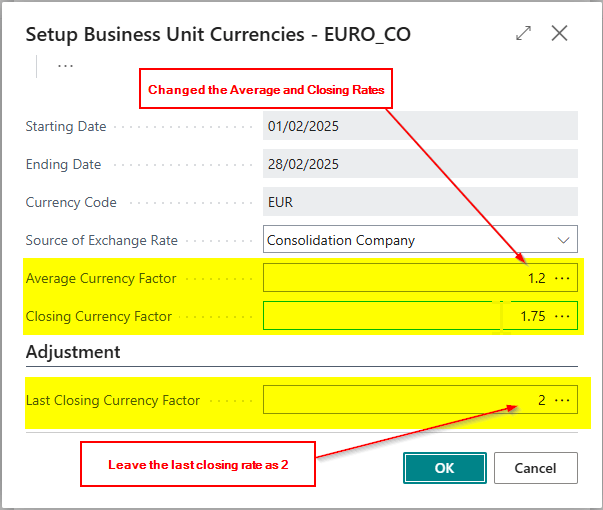
Now I’ll set the Average and Closing Rates for the EURO company. (the system will suggest a rate as well however I’m going to overtype this). To do this drill back on the “Average Currency Factor” as per below

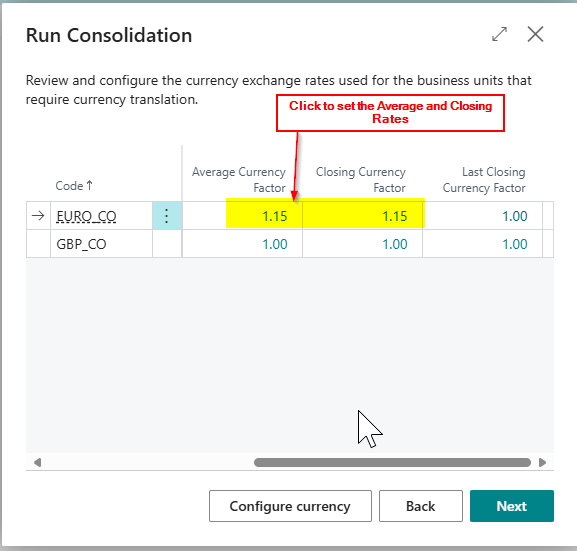
This opens the “Setup Business Unit Currencies” page, where I can adjust the “Average” and “Closing” rates and then click OK. (I have used rates of 1.5 and 2 to simplify the calculations when we review the General Ledger Entries.)

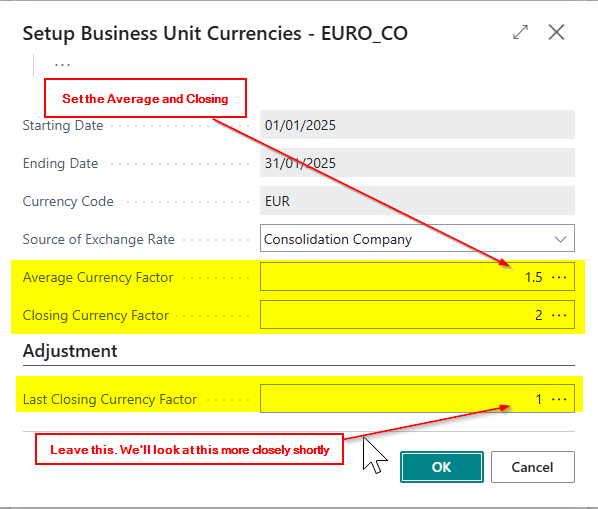
** Therefore the balances on account 10110 will use a rate of 1.5 and the balances on account 62110 will use a rate of 2

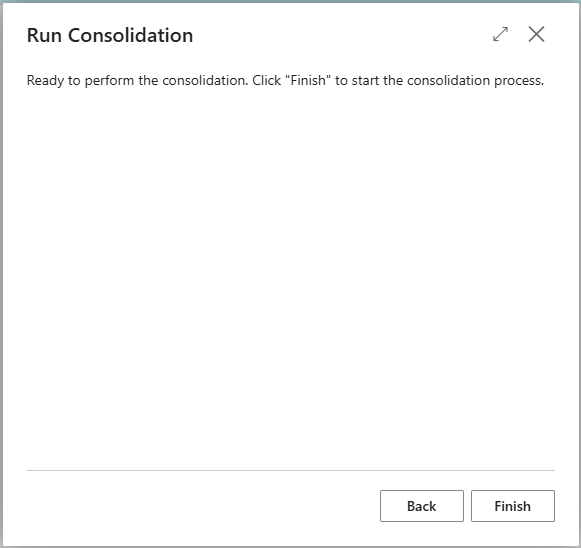
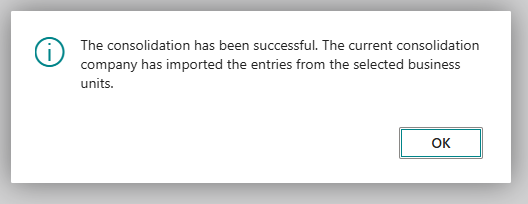
Now this has all been set we can click “Next” and “Finish” to complete the Consolidation.

The Consolidation Entries

Now we have consolidated let’s have a look at the “General Ledger Entries” that have been produced by the consolidation process. (click to enlarge)

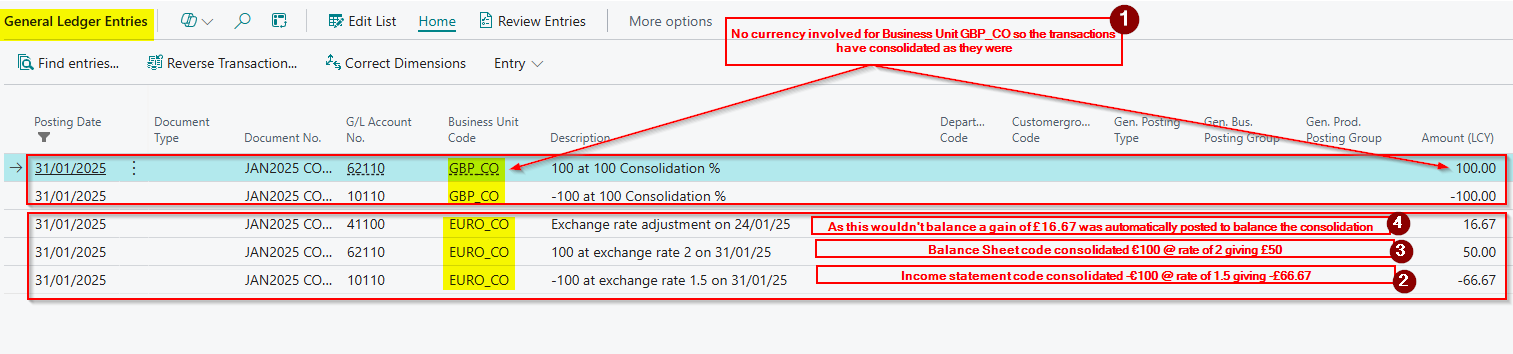
As you can see, the GBP_CO business unit has consolidated all the transactions exactly as expected with no adjustments.

However as we had different rates for Income Statement (Average) and Balance Sheet (Closing) we have an additional entry thats been post automatically. This is to balance the consolidation as we are using different rates.

This also shows nicely on the G/L Register, as a G/L register is created for each Business Unit that is consolidated

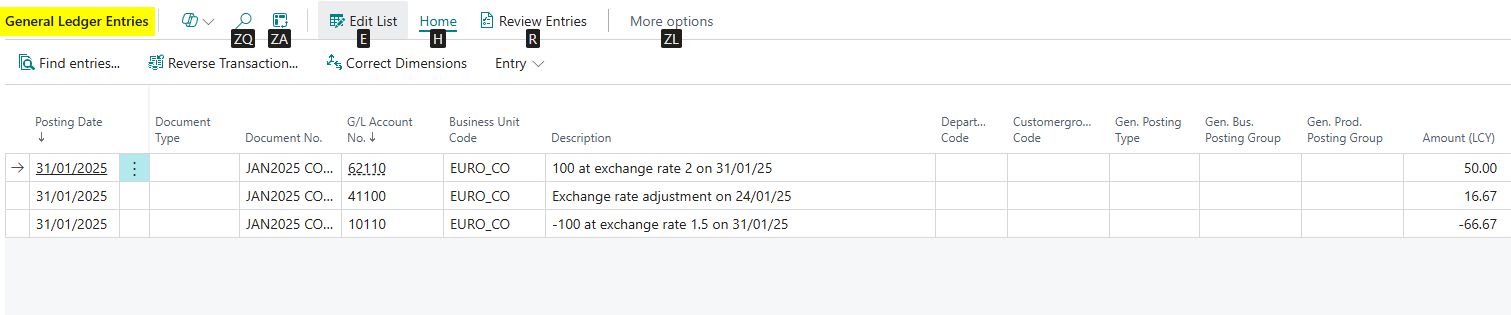
Here you can see the General Ledger Entries for the EURO_CO business unit

Consolidation for the next month

Let’s see what happens when we consolidate the next month using different rates again.

Enter the new Rates:

And then Consoldiate

Now let’s look at the General Ledger Entries (click to enlarge)

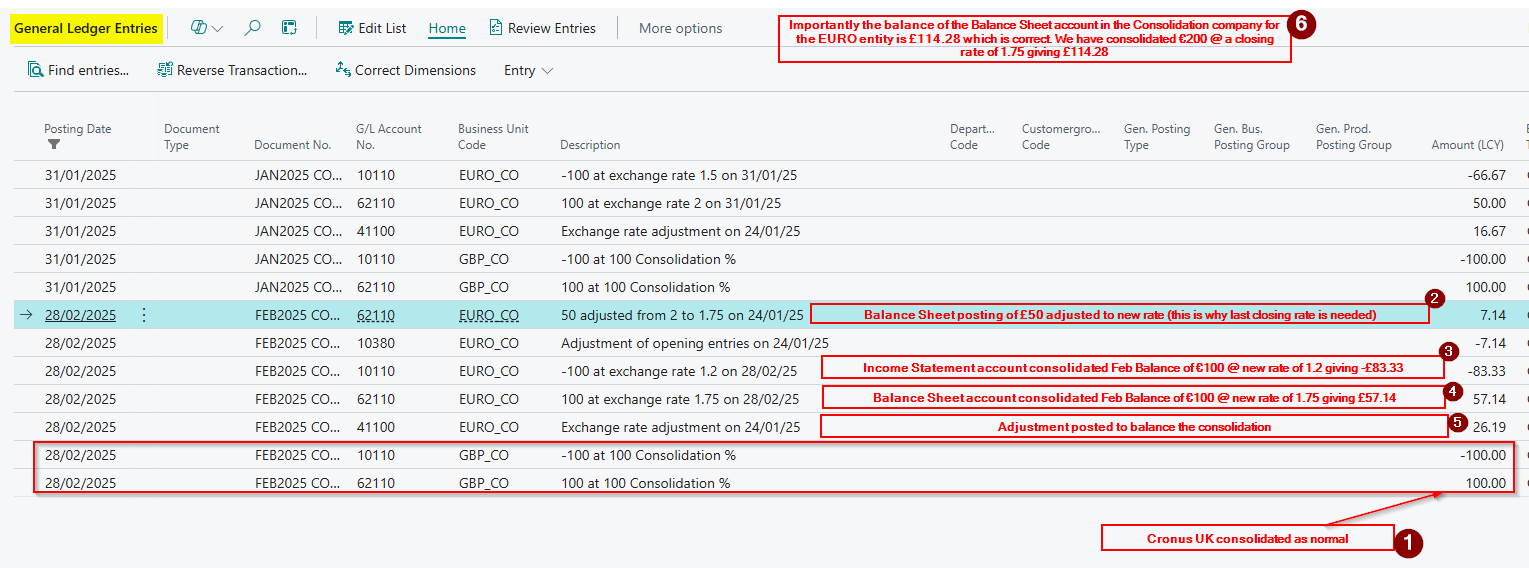
One important point here is we needed to leave the “Last Closing Rate” at 2 as the system first posted an adjustment recalculating the balance of the Balance Sheet account for the EURO_CO business unit to match the new rate of 1.75. (this is shown in point 2 in the screen shot above). This ensures the balance at the end of February reflects the Balance Sheet transactions at a “Closing Rate” of 1.75. i.e.

Prior to the February consolidation, the balance of the balance sheet account (62110) for the EURO_CO business unit was £50. The system then used the “Last Closing Rate” to calculate this equates to €100 using the “Last Closing Rate” of 2. It then calculated the GBP at the new “Closing Rate” of 1.75 as £57.14 (€100/1.75=£57.14). Therefore as the GBP balance was £50.00 an adjustment was posted for £7.14 (point 4 on the screen shot above)

Conclusion

This post walks through a consolidation process that involves business units with different currencies showing the different posting and adjustments that are made when using different translation methods.

Thanks for reading!

Dynamics 365 Business Central – Exploring the Different Options when running the “Close Income Statement” Routine

Introduction

In this post, we’ll explore the various options available when running the “Close Income Statement” routine in Business Central, and we’ll also look at the outcomes of running each option.

This routine is used to close the income statement General Ledger accounts and transfer the balances to the retained earnings account as part of the General Ledger year end routine.

Depending on your needs, Business Central offers several ways to customise how these accounts are closed, and in this post, we’ll walk through each of these options, showing the results when the routine is run using the different settings.

Please note this post assumes you have followed any year end processes such as ensuring all General Ledger accounts are correctly set as either Income Statement or Balance Sheet and the Financial Year has been closed via the “Accounting Periods” page.

Option 1 – Post to Retained Earnings in Summary with no Dimensions

With option 1 we select the following options in the “Close Income Statement” page

  1. Post to Retained Earnings Acc. = Balance
  2. Dimensions = None Selected

Using the options above the system closes each income statement at GL account level, without any breakdown by dimension. Therefore is I were to have multiple postings to an income statement GL account, and each posting had different dimension analysis, I’d just get one entry in my closing journal for the total balance of the income statement account, rather than a posting per dimension combination.

Additionally, as we have selected “Balance”, the system will make a single entry to the retained earnings account, consolidating all income and expense balances into one summarised posting.

The outcome of using these options in my demo data is shown below.

Option 2 – Post in Detail to the Retained Earnings but no Dimension Analysis

With option 2 we select the following options in the “Close Income Statement” page

  1. Post to Retained Earnings Acc. = Detail
  2. Dimensions = None Selected

When you run the “Close Income Statement” process in Business Central and select “Detail” rather than “Balance,” the system posts an entry to the Retained Earnings account for each individual income statement GL account its closing. I’ll therefore get multiple entries (“Detail”) to the retained earnings account rather than a “Balance”.

However, as I’ve still not selected “Dimension”, I’d still only get one posting per income statement account, regardless of any dimension postings.

The outcome of using these options in my demo data is shown below.

To highlight the additional “detail” posting to the Retained Earnings account, if I preview post this journal I can see the 5 posting to the Retained Earnings account rather than one entry.

Option 3 – Post in Summary to Retained Earnings and close by Dimension

With option 3 we select the following options in the “Close Income Statement” page

  1. Post to Retained Earnings Acc. = Summary
  2. Dimensions = All Selected

With “Balance” and dimensions enabled as per the above screen shot, we are now back to posting a summarised entry to retained earnings account, however we will now have breakdown of the GL posting by dimension for each income statement, creating separate entries per dimension.

The outcome of using these options in my demo data is shown below.

There are now multiple entries to the GL accounts per dimension combination all balanced to one entry to the Retained Earnings account

Option 4 – Post in Detail to Retained Earnings and close by Dimension

With option 4 we select the following options in the “Close Income Statement” page

  1. Post to Retained Earnings Acc. = Detail
  2. Dimensions = All Selected

The final option we’ll look at when running the “Close Income Statement” process is to select “Detail” and tick “Dimension” as per the screen show above.

Having these options selected will post a separate entry to the retained earnings account for each income statement GL account (Detail) and further breaks down for each entry by dimension. (as we have ticked the Dimensions). This provides the highest level of detail.

The outcome of using these options in my demo data is shown below.

Conclusion

As we can see the “Close Income Statement” routine in Business Central offers several options to customise how income statement balances are posted to retained earnings.

Whether you choose to post a single summarised entry to the Retained Earnings account, or want more detailed posting, each method allows for different levels of analysis and reporting.

Thanks for reading!

Dynamics 365 Business Central – How to quickly split the balance of a General Ledger account across Dimensions using a Recurring General Journal

Introduction

At the end of a period it maybe necessary to split the balance of an General Ledger account across dimensions. This might be useful if you accumulate costs in a General Ledger account and only split those across cost centres at the period end.

In this post I’ll go through how this can be achieved quickly and easily using the Recurring Journal.

Recurring Journal

The recurring journal in Business Central provides the means of handling repetitive journals that occur on a regular basis.

One example might be a monthly depreciation journal or recurring revenue and expenses. (although I’d hope anyone would be using the Fixed Assets module for monthly depreciation 😊). Typically you’d be using the same or very similar amounts so would use a “Recurring Method” of “Fixed” or “Variable” for those journals.

However there is a “Recurring Method” of “Balance” that provides the ability to transfer the balance of an General Ledger account to another General Ledger account, or more interestingly, split the balance of an account across dimension values.

For example, let’s say I’ve been accumulating “Office Supplies” expenses under one General Ledger code and at the end of the month I want to split this by departmental cost centres.

This see how this works with a Recurring General Journal.

Worked Example

Through the month I’ve accumulated £1000 worth of costs in the “Office Supplies” account.

If I look at a “G/L Balance by Dimension” you can see I have no Dimensional analysis.

At month end I now want to split these costs across my departments. To do this I open the “Recurring General Journal” page, select the “Balance” recurring method, and pickup the “Office Supplies” account. (Note I don’t enter any amount in the journal)

Next we’ll allocate the balance across the “Department” dimension. I want to allocate 20% to the Sales department, 50% to Production and 30% to Admin.

To do this click “Allocations” in the ribbon and pickup the Office Supplies General Ledger account and enter 20% percentage and click “Dimensions”

I then select “Department” as the Dimension Code and “SALES” as the Dimension Value.

I repeat this for Dimension Values “ADM” and “PRODUCTION”, each time entering the Office Supplies General Ledger account, then clicking “Dimension” in the ribbon, and picking up the relevant dimension value.

I now have the allocations I require as per below.

Now when I preview post the journal I can see how this will now be split over the various departments

Finally when I view the “G/L Balance by Dimension” I can see the split across my Department dimension

Conclusion

Although I could have used a normal “General Journal” for this entry, this method shows how you can utilise the “Recurring General Journal” to split costs across dimensions, without needing to know the actual balance of the account therefore reducing errors and saving time.

Thanks for reading!