I came across a situation where a user needed to post a credit card payment via a payment journal with a VAT element so I thought I’d document on my blog 🙂
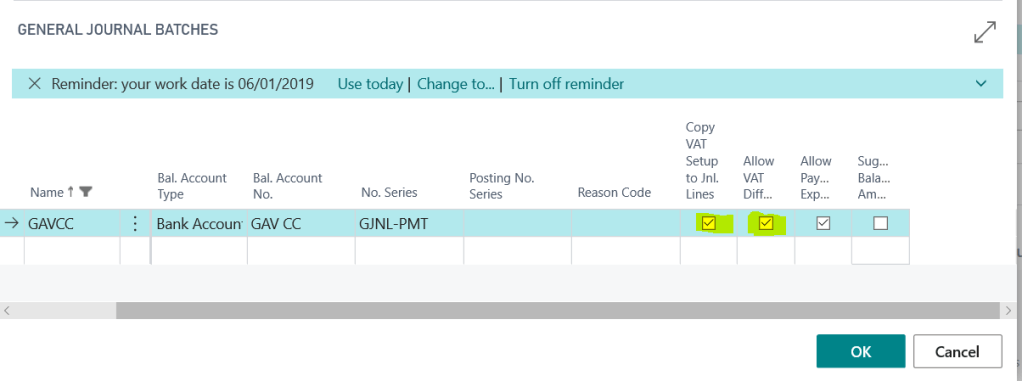
In order to do this first create a Payment Journal batch with the relevant balancing account, in my case a credit card, and also select the highlighted VAT options below:
** Please note you may have to go to the General Journal Template for Payments and tick these ON before you can select them for the batch.
With the option “Copy VAT Setup to Jnl. Lines” selected, the VAT posting groups will be copied from the GL code and VAT will be calculated.
With the option “Allow VAT Difference” selected, changes can be made to the calculated VAT amounts.
If you only have one G/L expense code to record VAT its fairly simple. You can pickup the relevant G/L code, which should default the “VAT Bus Posting Group” and “VAT Prod. Posting Group”, and the system will calculate the VAT for you. You can then just leave the “Bal Account No.” as the bank account.
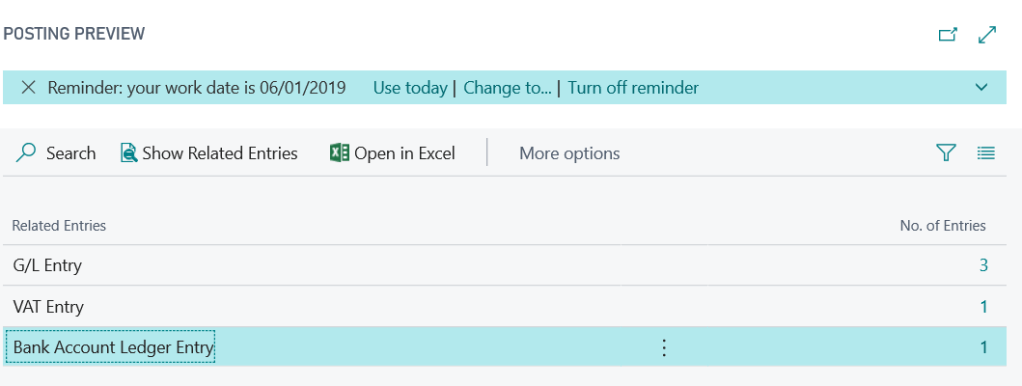
Now when you post the entry you will get VAT entries as well as G/L and Bank Account Ledger Entries:
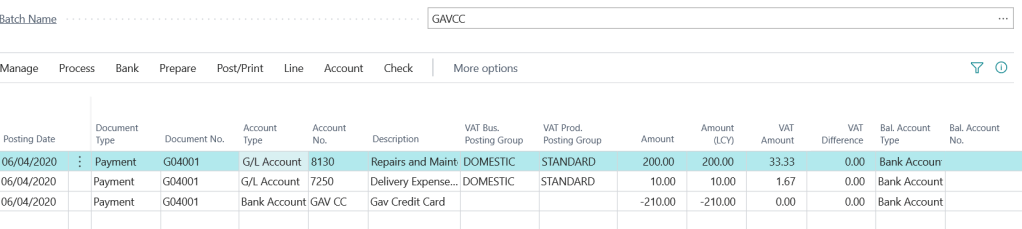
If you wish to record VAT for more than one G/L code you can list the expense codes and blank off the “Bal. Account No” on each line and then have the final line entry as the balancing credit card bank account as per below. (again the VAT posting groups have defaulted from the G/L code)
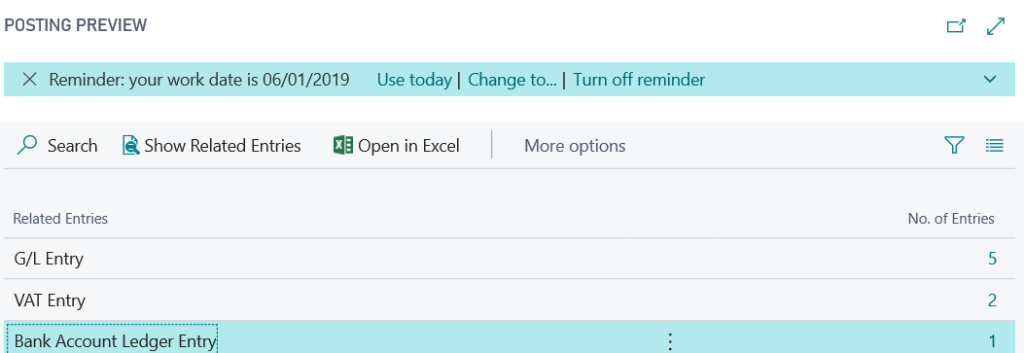
Now when you post the batch you’ll get the relevant VAT entries as well as G/L and Bank Account Ledger Entries:
If you have the “VAT Difference” option ticked on the batch you can change the “VAT Amount” at any time if this differs from the actual VAT you need to post.
I hope you find this useful if you ever need to post payments with VAT.
Although not a regular occurrence, from time to time users need to post a VAT only invoice onto the sales or purchase ledger. If this happens below are the steps you can take to do this:
Please note these steps are specifically for a Purchase Invoice however it should work the same for a Sales Invoice.
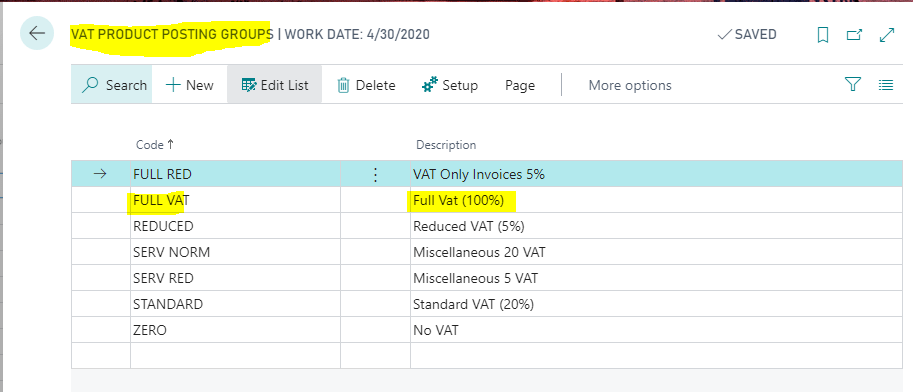
Step 1: Add a new VAT Product Posting Group
First go to “VAT Product Posting Group” and add a new VAT Product Posting group for FULL VAT as per below
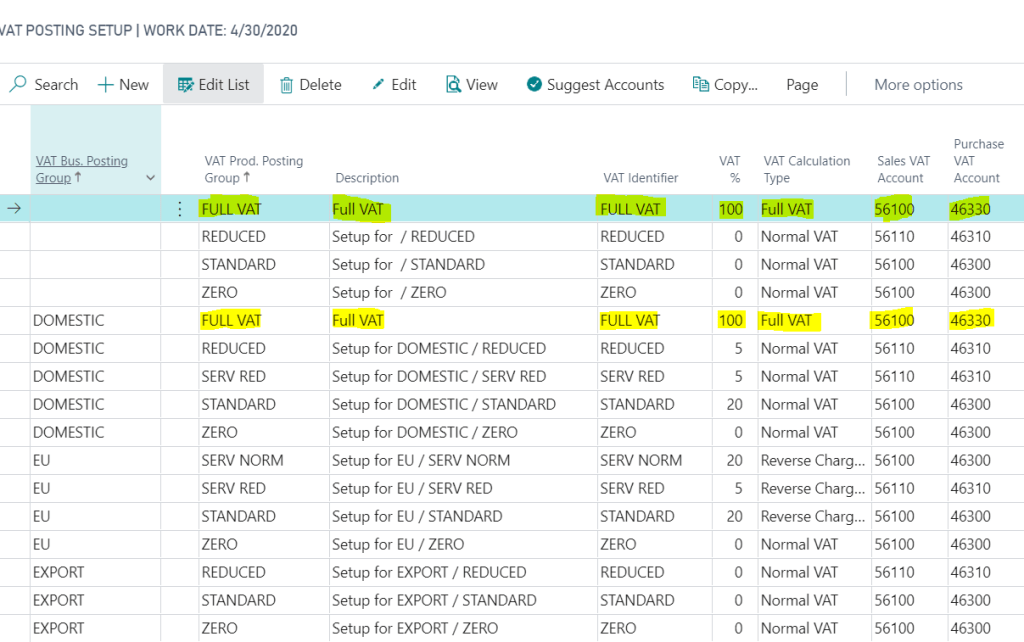
Step 2: Configure VAT Posting Setup
Next we need an additional FULL VAT entry in the “VAT Posting Setup” matrix as per the screen shot below. I’ve included FULL VAT twice, once with a blank “VAT Bus. Posting Group”, and once with a “VAT Bus. Posting Group” of DOMESTIC.
Please note I’ve set the system up this way so if entering a VAT only invoice via a “Purchase Journal” I only have to populate the “VAT Prod. Posting Group” whereas if I were to enter the invoice via “Purchase Invoice” its likely the supplier would have a “VAT Bus. Posting Group” of DOMESTIC. Setting the system up this way covers both scenarios.
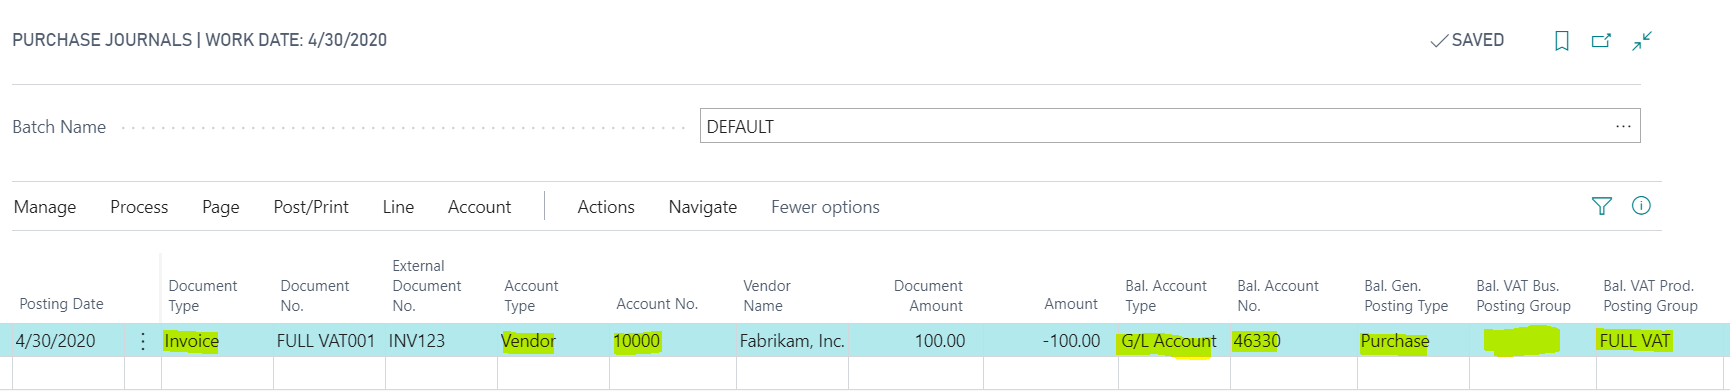
Step 3: Entering the VAT only invoice via a “Purchase Journal” window.
In this example I’m entering a £100.00 VAT only invoice via the “Purchase Journal” window.
To do this I’ve entered the invoice details as follows:
Just to confirm, I’ve selected a document type of “Invoice” and the Vendor account of “1000”. Then for the “VAT only” element to work I’ve selected the following for the various columns:
Bal. Account Type = G/L Account
Bal Account No. = 46330 (this is the VAT account specified in the VAT Posting Setup)
Bal. Gen Posting Type = Purchase
Bal. VAT Bus. Posting Group = BLANK (I could select DOMESTIC as well if I like)
Bal. VAT Prod. Posting Group = FULL VAT
Please note using the “VAT Posting Group” setup outlined in my screen shot above a combination of a blank “VAT Bus. Posting Group” and a “VAT Prod. Posting Group” of “FULL VAT” equates to 100% full VAT
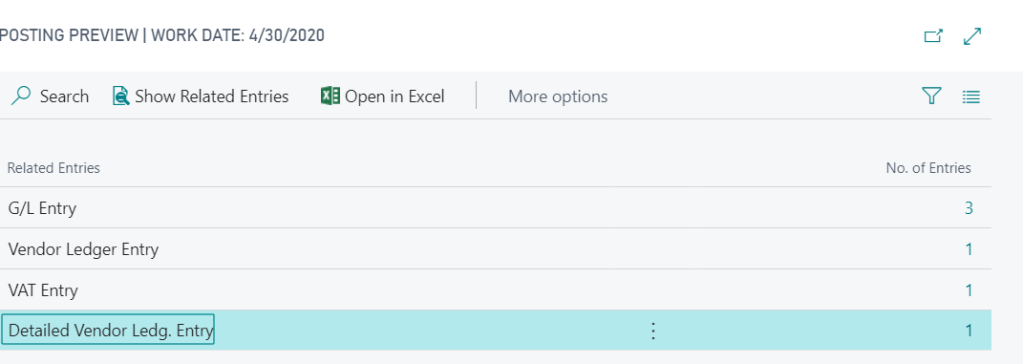
If I now preview the posting on this transaction I can see 3 G/L Entries and one VAT entry:
If I drill down on the G/L Entries this shows the full amount posting to the VAT control account specified in the VAT Posting Setup. (as this is a Purchase Invoice the credit side goes to the Creditors Control Account):
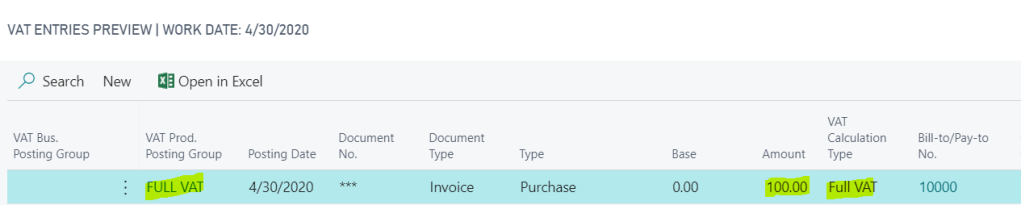
And when I drill back on the VAT entries I can see a VAT entry for the full amount:
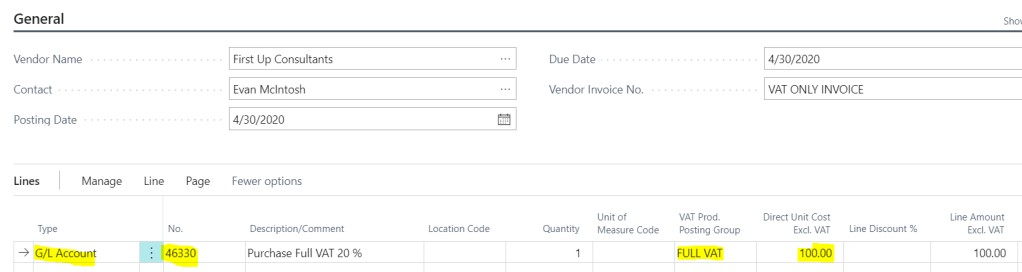
Step 4: Entering the VAT only invoice via the “Purchase Invoice” option
Once in the “Purchase Invoice” page I enter the invoice line as per below.
To confirm, I’ve entered the line as per below:
Type = G/L Account
No. = 46330 (this is the VAT account specified in the VAT Posting Setup)
Vat Prod. Posting Group = FULL VAT
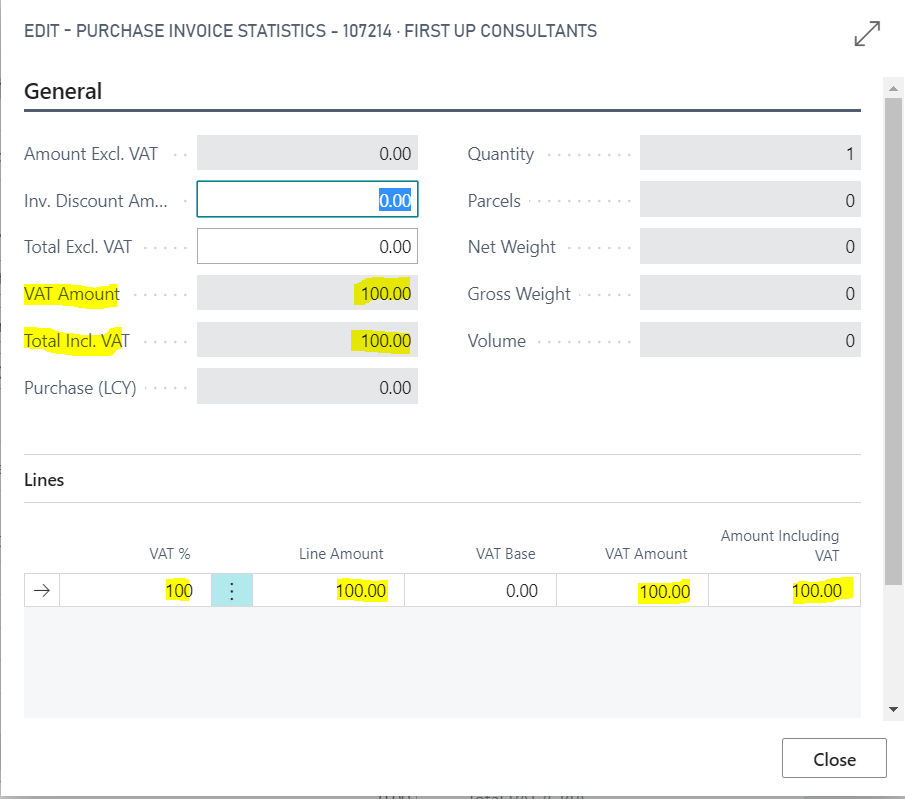
Now when I check the “Statistics” on the invoice it shows the full amount to VAT:
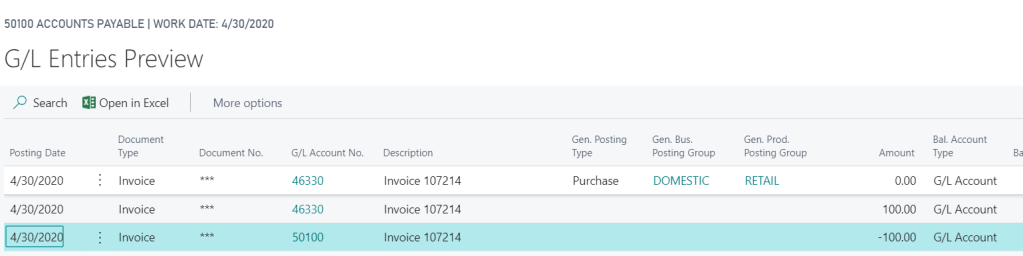
Also, when I preview the posting I can see G/L entries to the VAT account and a VAT Entry of the full amount:
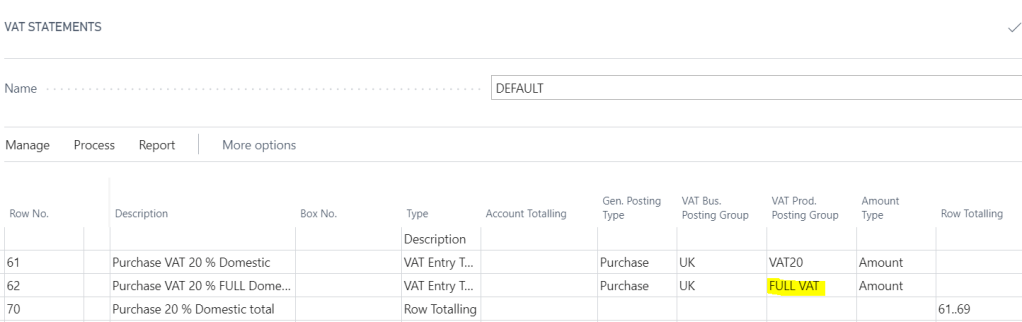
Step 5: Ensure FULL VAT is included on the VAT Statement
Once you have posted the transaction you should also ensure the new “VAT Prod. Posting Group” (i.e. FULL VAT) is included on the VAT statement so any transactions posted to this are picked up correctly when reporting the VAT.
As you can see below I’ve included this in the Purchases section:
I hope this helps anyone who needs to post a VAT only invoice in Dynamics 365 Business Central.