When you import goods into the UK, you have to pay VAT if the goods are over a certain amount. You can either pay this immediately, and then reclaim it later on your VAT return, or declare and recover on the same VAT return, using the postponed VAT method.
This post goes through how to setup Business Central if you use the Postponed VAT scheme. I’ll then post a journal to record the Postponed VAT and show it on the newly configured VAT statement.
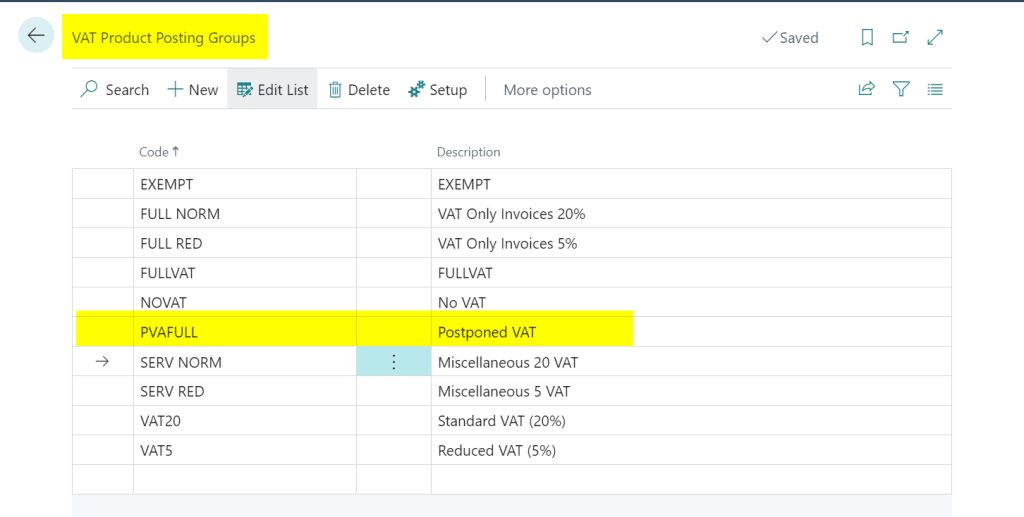
VAT Product Posting Group
The first thing to do is to configure a new VAT Product Posting Group. I’ve created one below called “PVAFULL” with a description of “Postponed VAT”
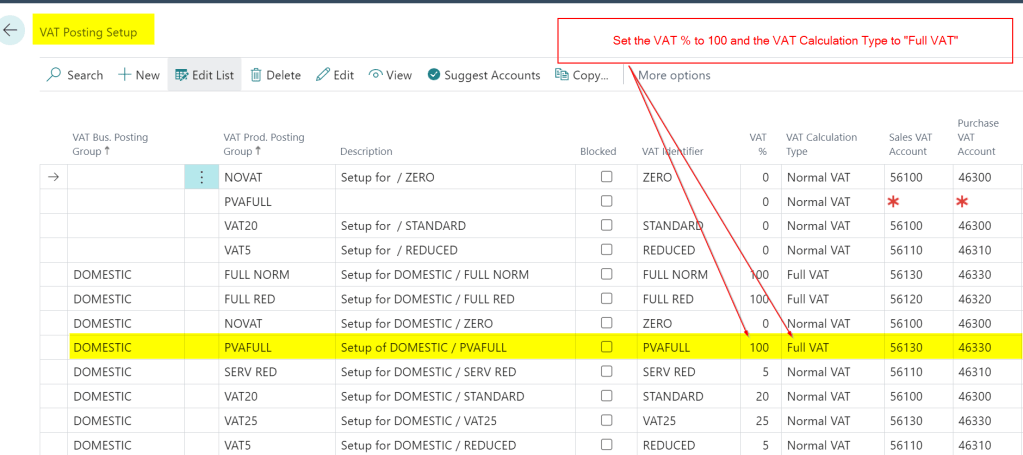
VAT Posting Setup
I then add the new VAT Product Posting Group into the “VAT Posting Setup” as per below. The key thing to note is that is set as 100% VAT and the VAT Calculation Type is “FULL VAT”
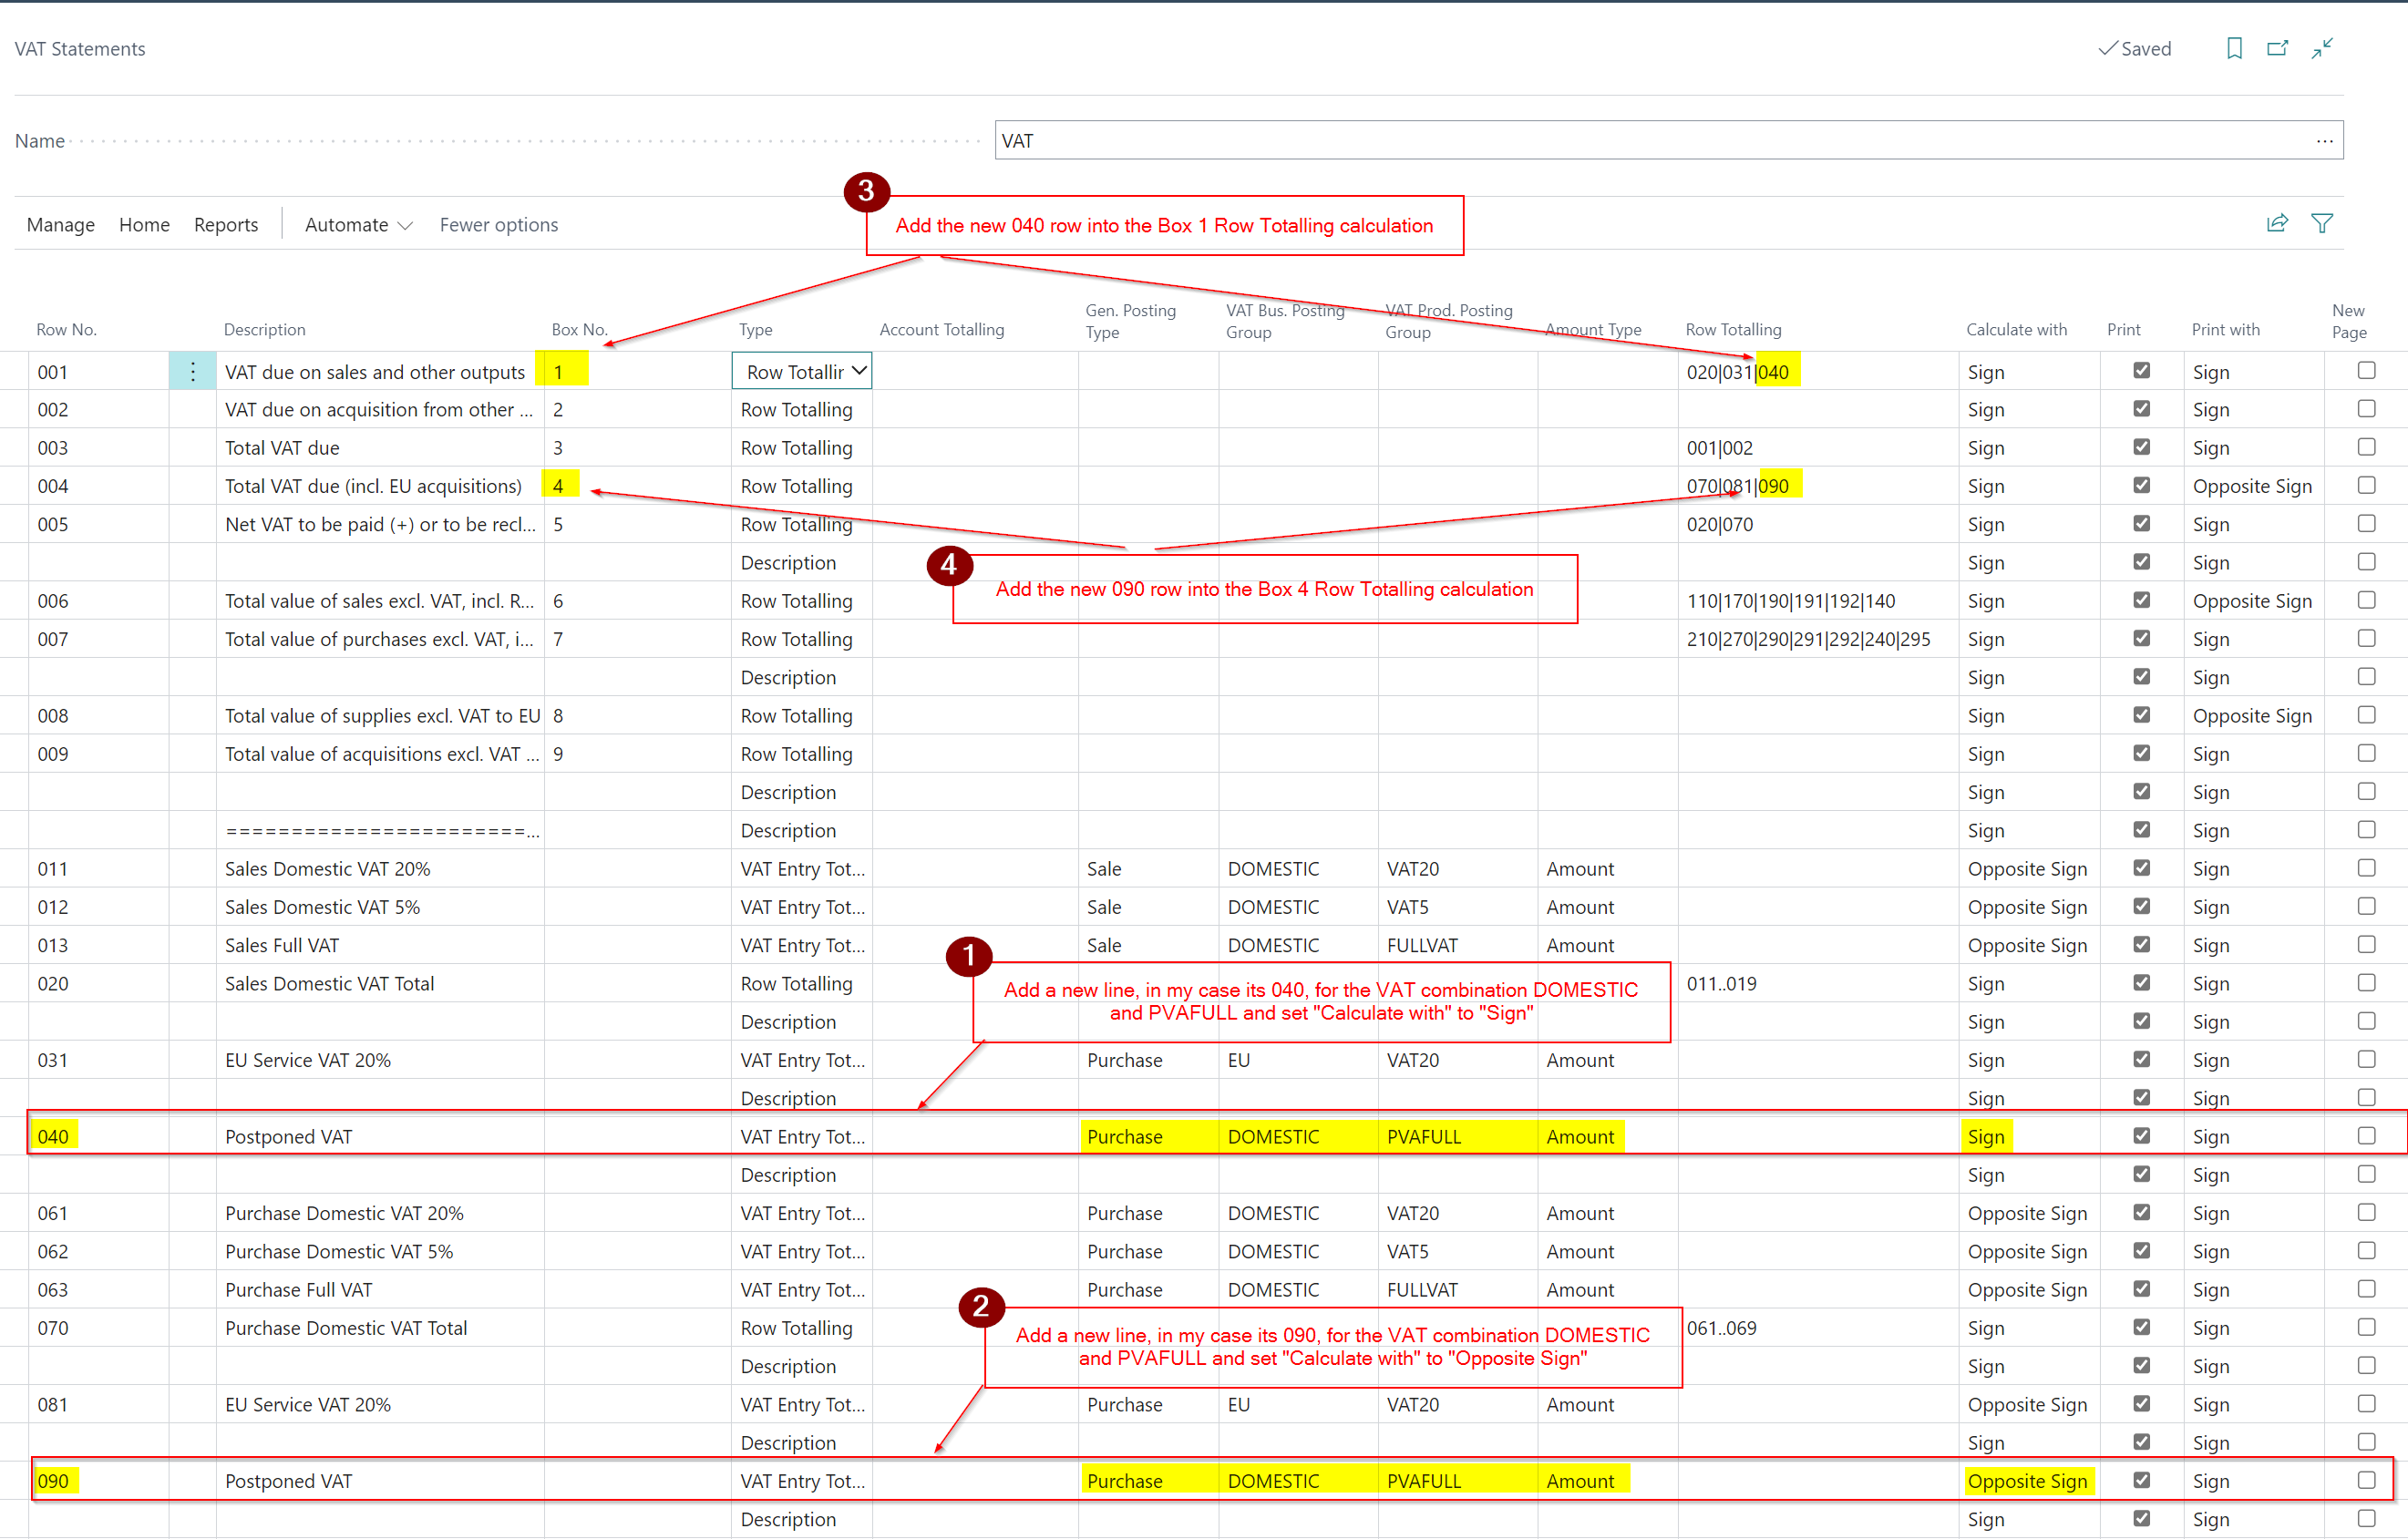
VAT Statement Configuration
The final thing to do is to add the new combination to the VAT Statement so any transactions posted to the PVAFULL posting group are recorded on the VAT return.
With postponed VAT you both declare this in Box 1 of the VAT return as an amount due, and also in Box 4 as an amount owed.
Therefore the VAT Statement is configured as per below
In the first and second step I add the new VAT combination to the detail of the report, and then in the third and fourth steps I included the added lines in the Box 1 and Box 4 calculations.
Test by posting a Postponed VAT Journal
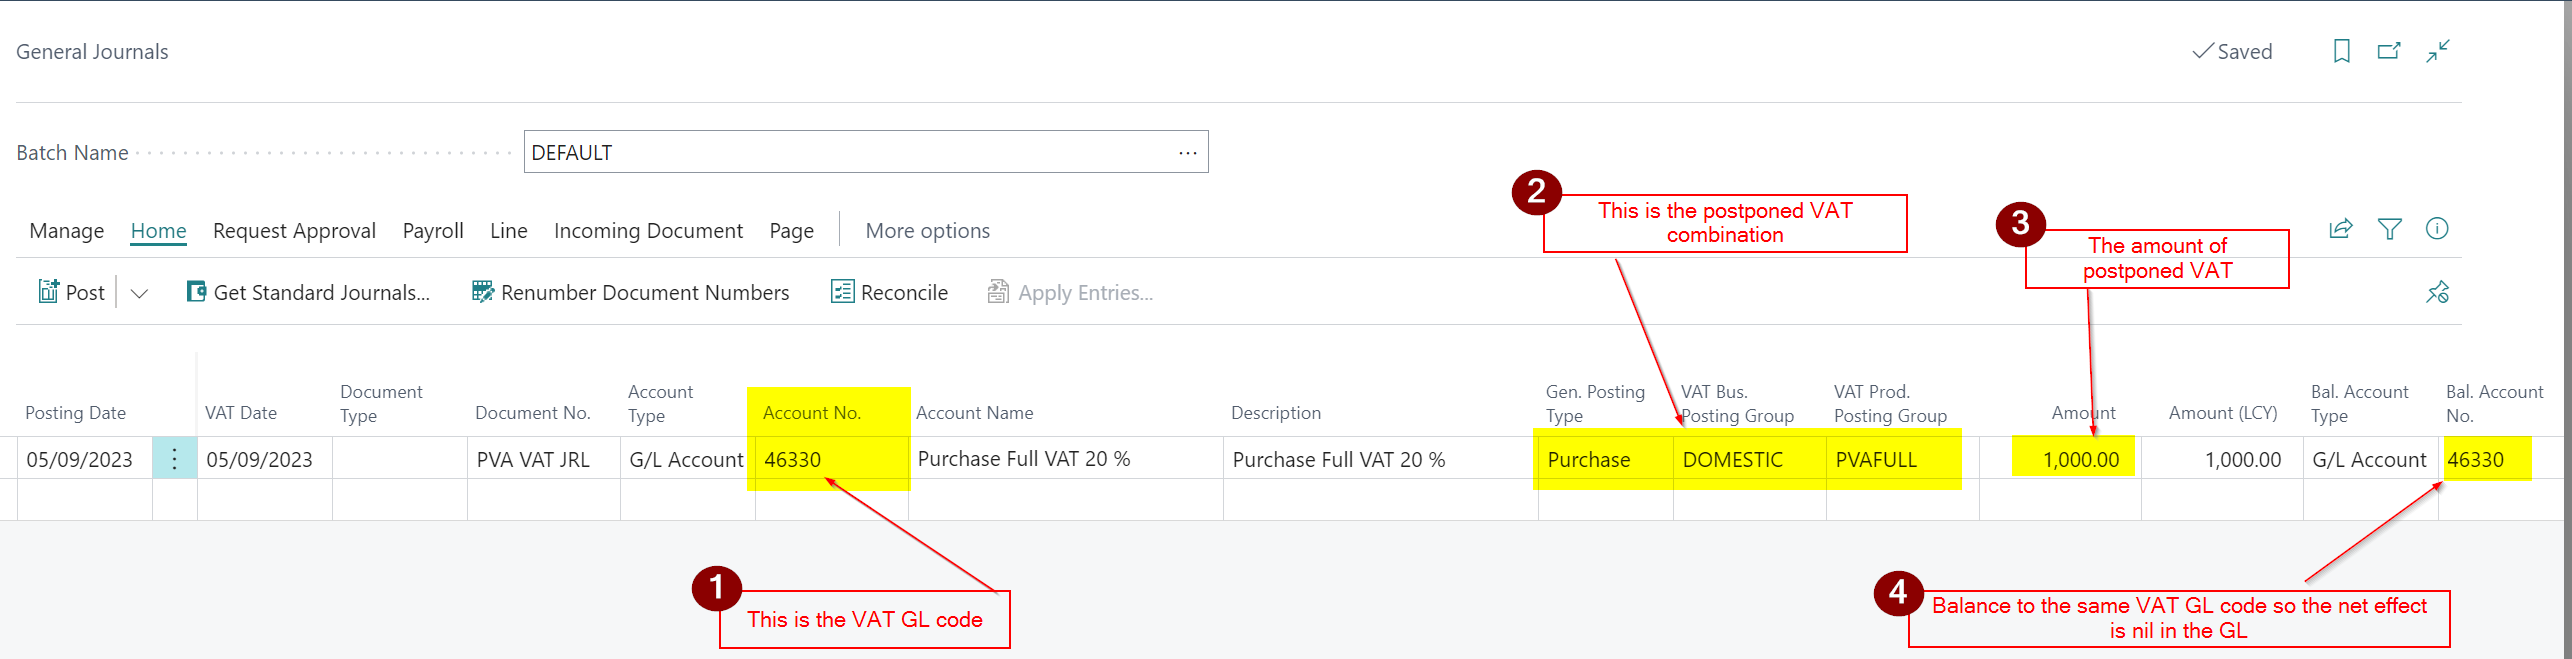
Now to test the configuration I’ll post a VAT only journal for Postponed VAT as per below
This gives the following GL entries which give a net effect of nil in the GL.
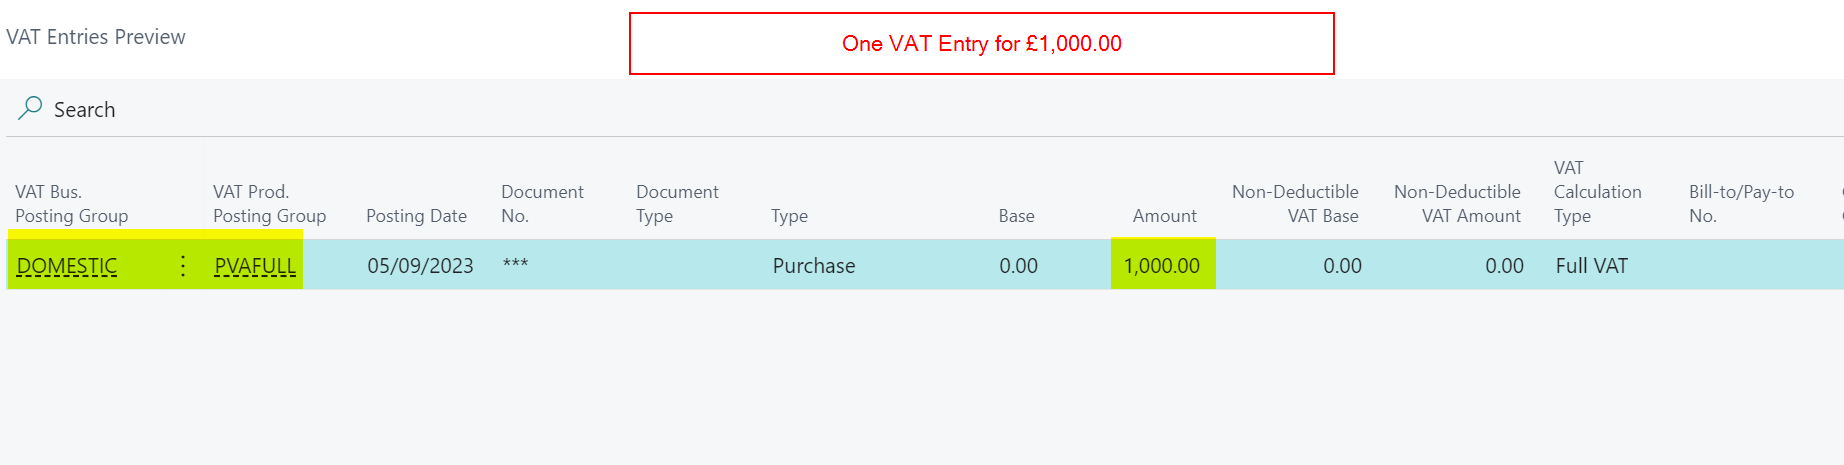
We also get the following VAT entry which is picked up the VAT statement.
Now when I test the VAT Statement I can see the £1000.00 amount appearing in both Box 1 and Box 4 and the amount owing to HMRC in Box 5 is £0.00
Conclusion
I hope this post helps anyone who needs to configure Business Central to work with Postponed VAT. As always please ensure you test thoroughly before implementing and then submitting the VAT return.
There may be occasions when customers overpay or underpay a particular invoice, and you’d like to write off the amount rather than leave it on their account. In this blog, I’ll walk through how you can automatically write off amounts when entering Cash Receipts using a Payment Tolerance. First, I’ll explain an underpayment write-off, followed by an overpayment write-off.
Setup
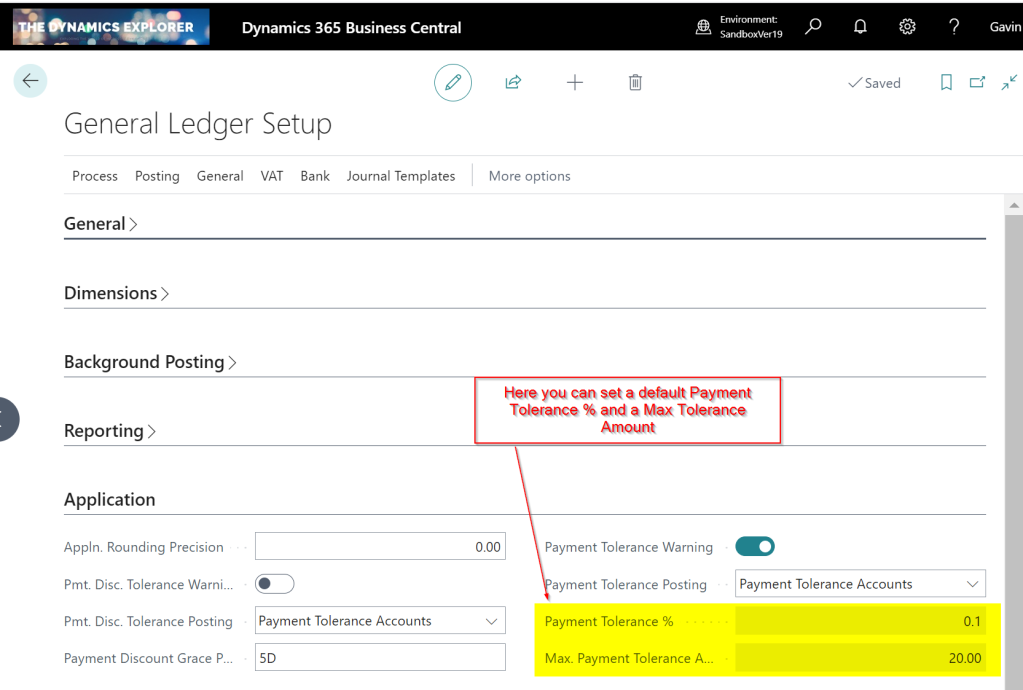
The setup for Payment Tolerance is located in the General Ledger Setup page.
The “Payment tolerance % amount” is the default amount that can be written off an invoice. Therefore, for example, if you had an invoice for £100.00, the default you could write off would be £0.10. (as we’ll see below this is a suggestion that can be over written when applying)
The Max. Payment Tolerance Amount is the maximum you’ll allow to be written off an invoice.
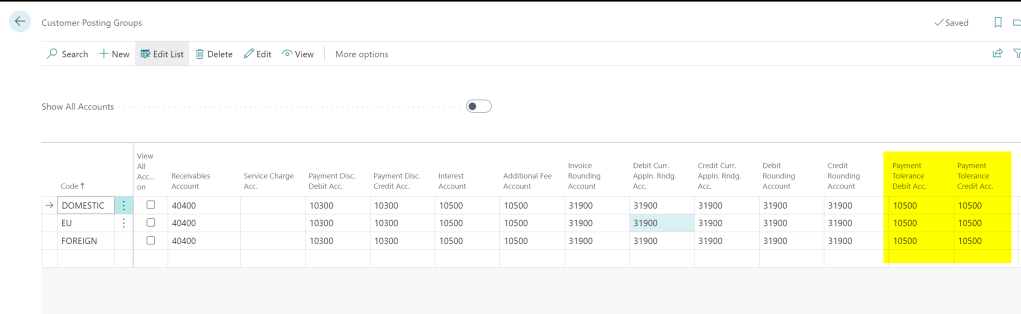
Finally, you also need to setup the Payment Tolerance General Ledger codes in the Customer Posting Group.
Under Payment Scenario
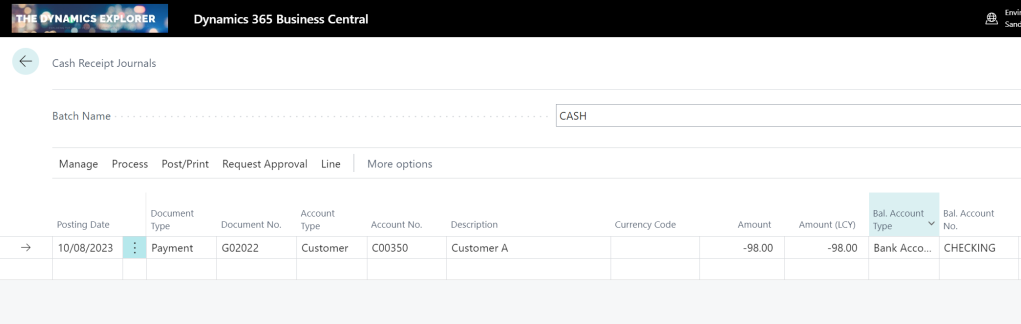
In this first scenario, we have a Sales Invoice for £100.00, but we have only received £98.00, and we wish to write off the £2.00.
The cash receipt is created for £98.00 as per below:
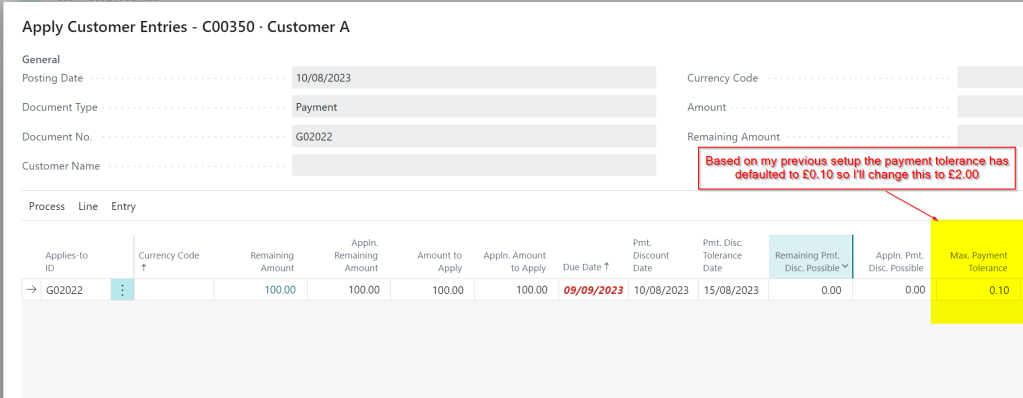
I then click “Process > Apply Entries” and find and apply the cash receipt to the invoice.
Once in the apply screen I can see the £100.00 and the Max Payment Tolerance has defaulted to £0.10 as per my setup. (this is 10% of the Sales Invoice Total)
Next I change this to 2.00 and then click “Process > Set Applies-to ID”
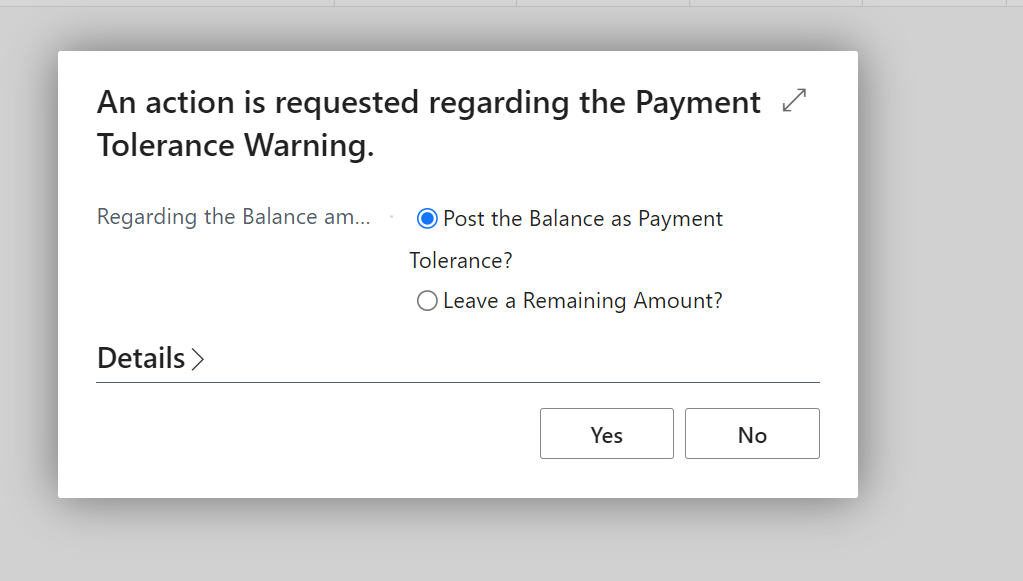
Now, when I click OK, I’m presented with the following message:
The default is “Leave a Remaining Amount?” however I change this to “Post the Balance as a Payment Tolerance?” and click “Yes”.
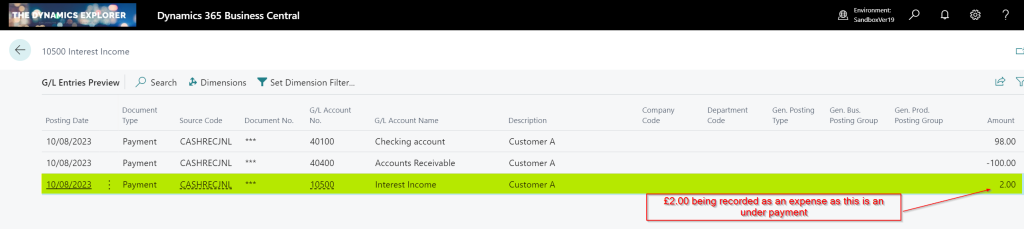
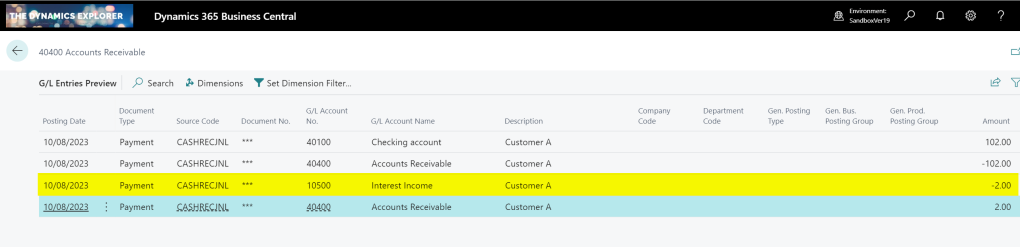
Now, when I preview the postings, I can see amounts being recorded in the Payment Tolerance GL accounts to account for the Payment Tolerance in the General Ledger. Additionally, there are Detailed Customer Ledger Entries to rectify the remaining amount on the Sales Invoice.
The General Ledger entries have an extra entry for the £2.00 underpayment, which is recorded as an expense. (i.e. a Debit amount)
There is also an extra detailed ledger entry to correct the remaining amount on the Sales Invoice
Over Payment Scenario
In the second scenario, we have a Sales Invoice for £100.00, and we have received £102.00. Instead of returning the £2.00 or leaving it on account, we opt to write off the £2.00 using payment tolerance.
Again we create a Cash Receipt for £102.00 as per below:
We then find the Sales Invoice and change the Payment Tolerance to £2.00 and select “Set Applies-to ID”
Again, we are prompted with the payment tolerance warning so select “Post the Balance as a Payment Tolerance?” and click “Yes”.
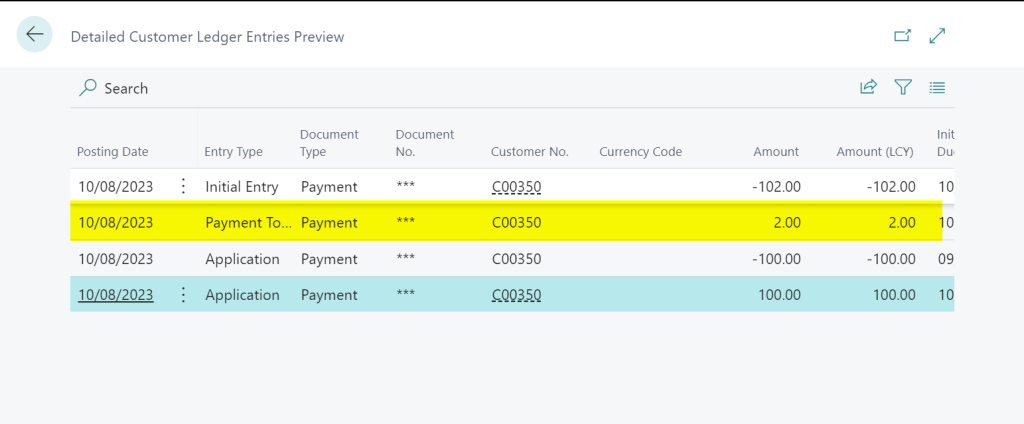
This posts additional General Ledger Entries for the £2.00 overpayment, but this time crediting the tolerance account. (as this is additional Income)
We also get additional Detail Customer Entries to correct the amount remaining on the Payment
Taking Payment Tolerance on Posted Documents
In the previous examples we walked through the process of applying the Payment Tolerance while posting the Cash Receipt. Now, let’s consider a scenario where the Cash Receipt has already been posted, and we aim to apply it to an invoice while also considering a payment tolerance.
Below is a posted sales invoice and a posted cash receipt. The sales invoice is for £100.00 and the cash receipt is £98.00. We will now apply them together and take the payment tolerance rather than leave £2.00 outstanding on the invoice.
First I go to “Customer Ledger Entries” and highlight the Cash Receipt and select “Process > Apply Entries”
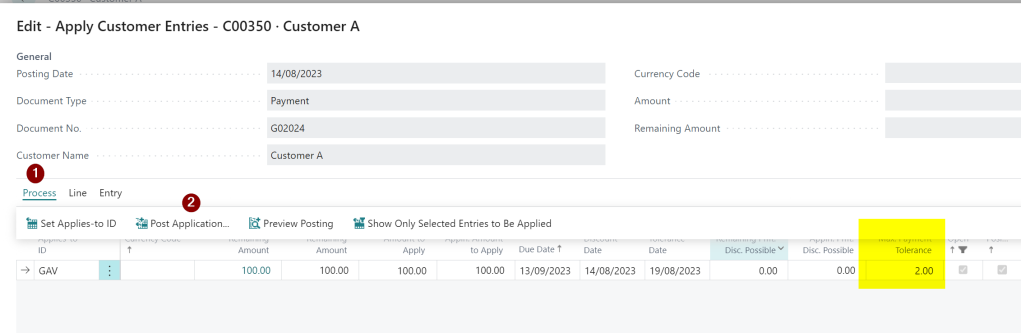
Next I change the “Max Payment Tolerance” amount to £2.00 and click “Process > Set Applies-to ID”
I then click “Process > Post Application” and click OK
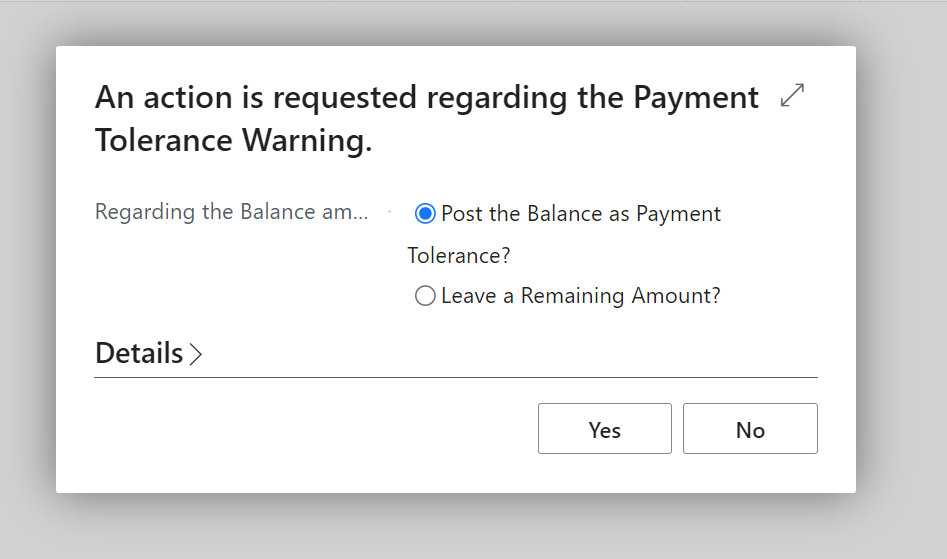
I’m then presented with the option of how to deal with the Payment Tolerance.
I select “Post the Balance as Payment Tolerance” and click “Yes” and the entries are posted and both documents will show an amount remaining of £0.00.
Conclusion
As you can see, the payment tolerance feature can be incredibly useful for writing off amounts when applying cash receipts.
If you encounter numerous instances of underpayments and overpayments, leveraging this functionality eliminates the need for manually entering adjustments to clear these minor sums.
When you reverse a journal entry using the standard “Reverse” feature there’s no option to change the posting date. By default the journal will automatically reverse on the same date as the original journal postings. This isn’t ideal if you have closed the period and want the reversal to post into a different period.
In this post I’ll show how you can reverse a journal and change the date using the “Posted General Journal” feature. I’m a big fan of this feature as it not only gives the ability to reverse a journal with a different date but you can also reverse multiple journals.
The Issue
As discussed, when reversing a journal using the standard functionality there’s no way to change the “Posting Date”. The field highlighted below isn’t editable.
If the financial period is closed, posting the reversal into a different period becomes necessary, which prevents the ability to use the standard feature.
Configuring Posted General Journal Functionality
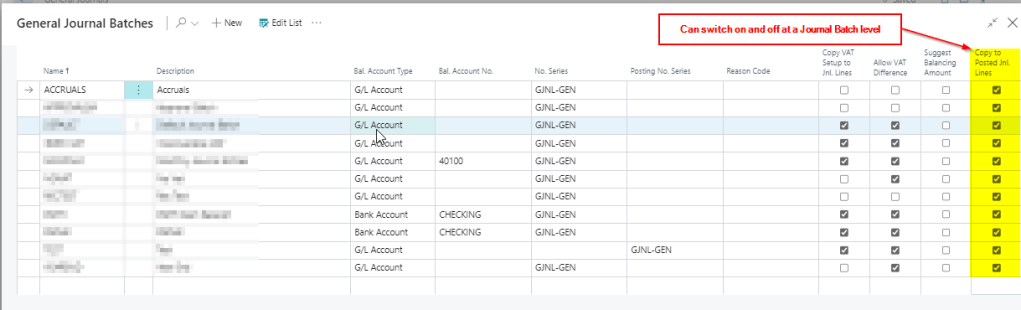
Before we can use the Posted General Journal functionality we first have to ensure its enabled on the various General Journal Templates.
Therefore search “General Journal Templates” and tick the option “Copy to Posted Jnl” as per below:
When the option has been selected on the General Journal Template, it can then be toggled off and on at a Journal Batch level as well:
With this option enabled any journal that’s subsequently posted creates “Posted Gen. Journal Lines” in addition to the usual General Ledger Entries.
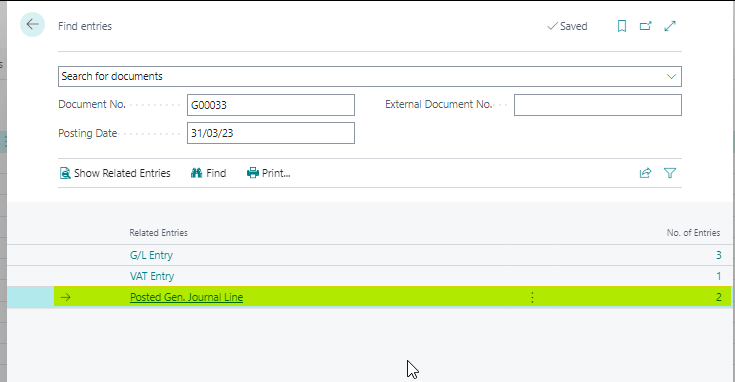
For example I clicked “Find Entries” on a General Ledger Entry and I can see additional “Posted Gen. Journal Lines”
I find this really useful as if you drill down on the “Posted Gen. Journal Line” it opens the Posted General Journal page which provides a snapshot of the journal that was posted.
This is very similar to how a snapshot of a Sales Invoice is taken and saved as a “Posted Sales Invoice” which you can refer back to.
Reversing a Journal using the Posted General Journal Page
Now we have the option switched on we can walk through how to reverse a journal.
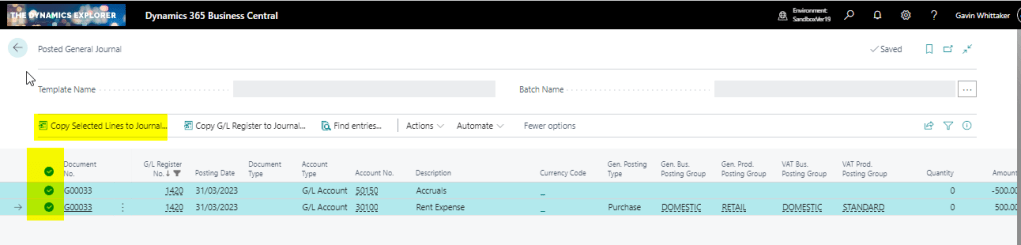
First open the “Posted General Journal” page. You can either search this directly or drill down from the “Find Entries” page.
Once in the “Posted General Journal” page locate the entry you wish to reverse. In my example I’m going to reverse document number G00033.
I therefore filter on this document number and select both lines and choose “Copy Selected Lines to General Journal” as per below:
** Please note you can also select “Copy G/L Register to General Journal Lines” **
Next I’ll choose to replace posting date with an April date and also to reverse the sign:
Now when I open the ACCRUALS batch its the reversing journal is ready to post.
You can also use this functionality to reverse more than one journal at once and I’ve also used it to find out the G/L Register number of a journal postings 🙂
Conclusion
As you can probably tell I’m a big fan of this functionality. I think this is because of my background using Dynamics GP which creates similar snapshots of posted journals.