Dynamics 365 Business Central – Write off overpayments and underpayments using Payment Tolerance

Introduction

There may be occasions when customers overpay or underpay a particular invoice, and you’d like to write off the amount rather than leave it on their account. In this blog, I’ll walk through how you can automatically write off amounts when entering Cash Receipts using a Payment Tolerance. First, I’ll explain an underpayment write-off, followed by an overpayment write-off.

Setup

The setup for Payment Tolerance is located in the General Ledger Setup page.

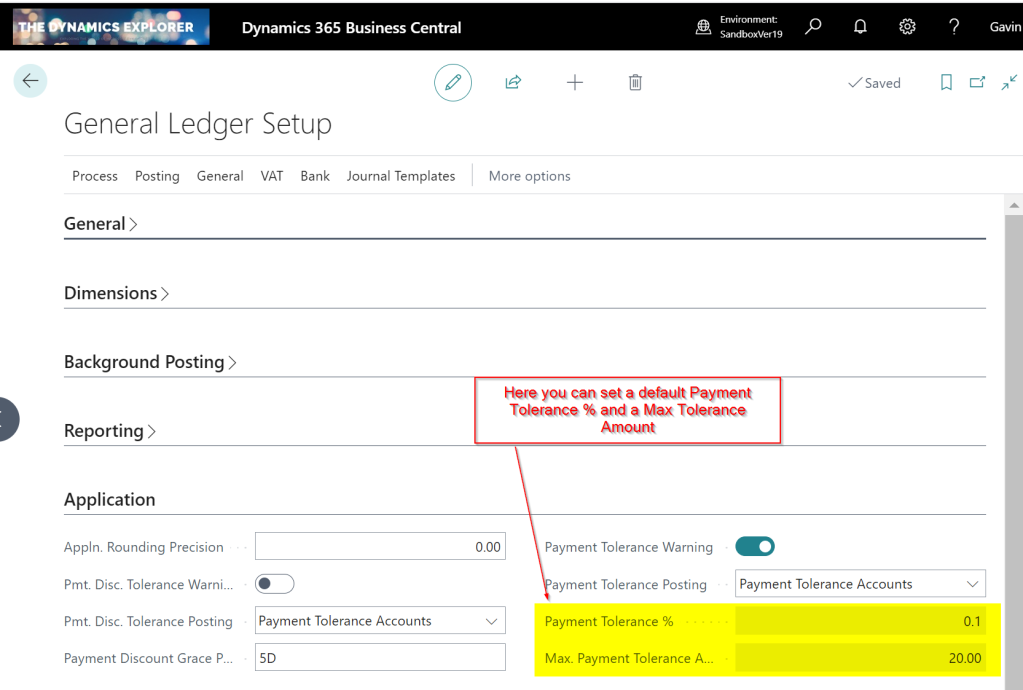
The “Payment tolerance % amount” is the default amount that can be written off an invoice. Therefore, for example, if you had an invoice for £100.00, the default you could write off would be £0.10. (as we’ll see below this is a suggestion that can be over written when applying)

The Max. Payment Tolerance Amount is the maximum you’ll allow to be written off an invoice.

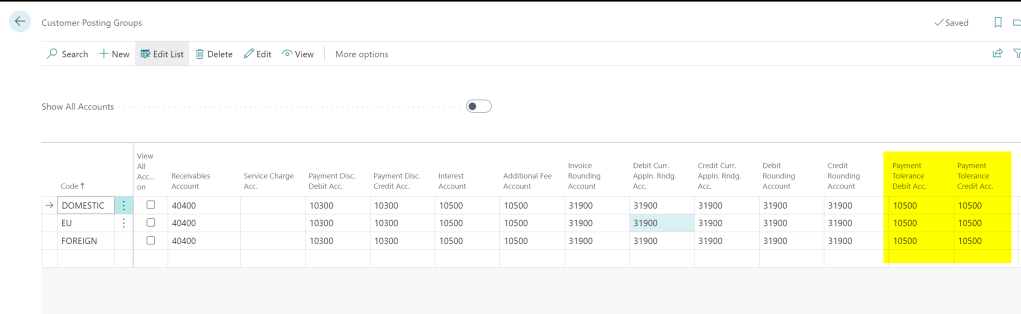
Finally, you also need to setup the Payment Tolerance General Ledger codes in the Customer Posting Group.

Under Payment Scenario

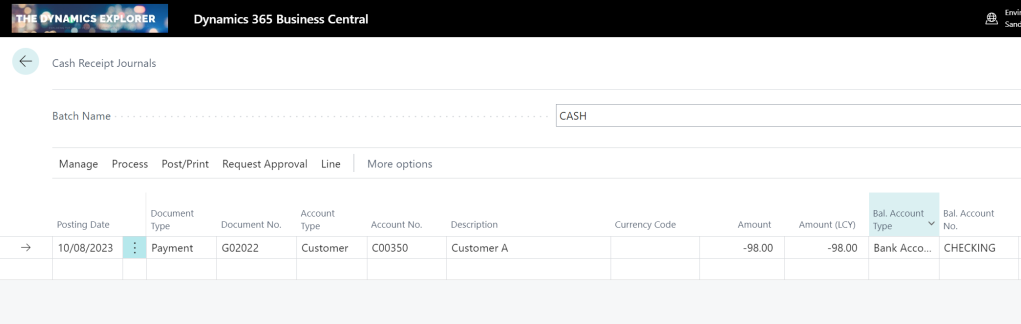
In this first scenario, we have a Sales Invoice for £100.00, but we have only received £98.00, and we wish to write off the £2.00.

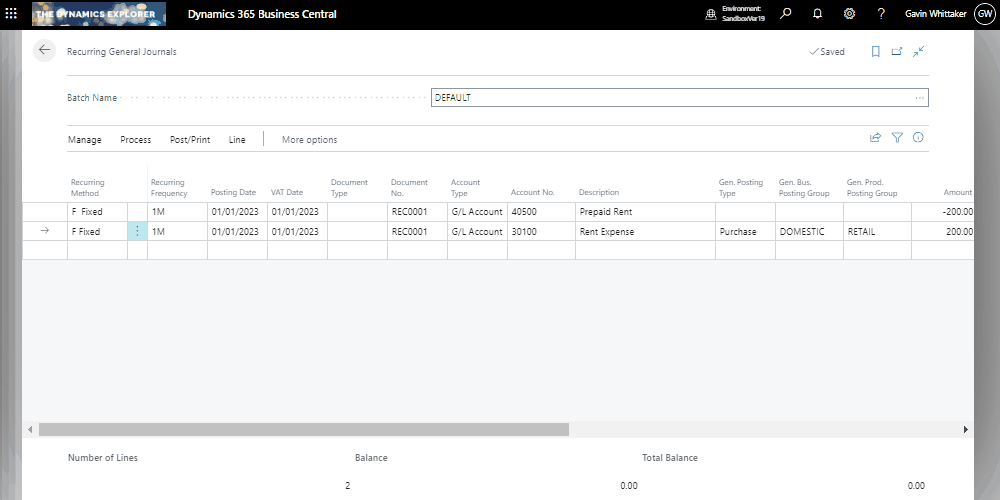
The cash receipt is created for £98.00 as per below:

I then click “Process > Apply Entries” and find and apply the cash receipt to the invoice.

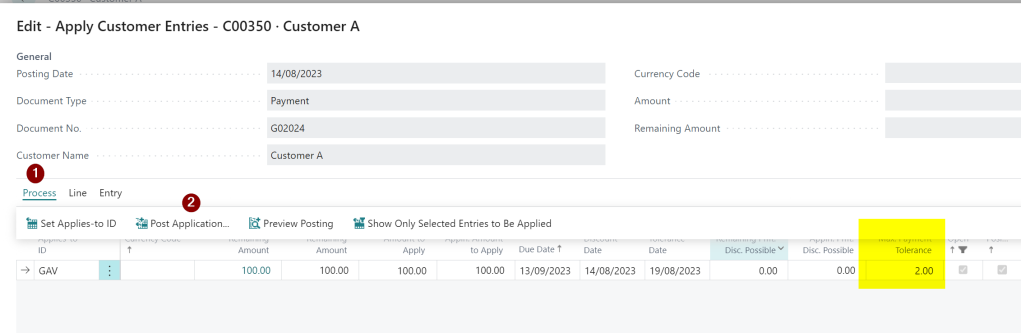
Once in the apply screen I can see the £100.00 and the Max Payment Tolerance has defaulted to £0.10 as per my setup. (this is 10% of the Sales Invoice Total)

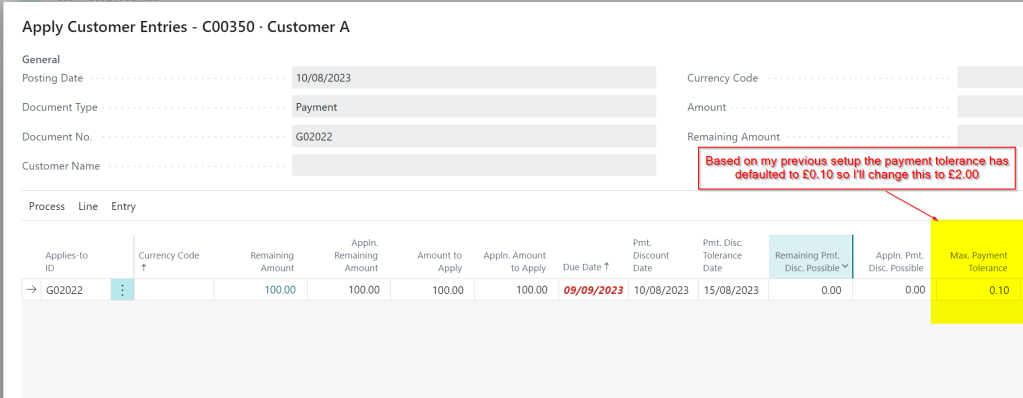
Next I change this to 2.00 and then click “Process > Set Applies-to ID”

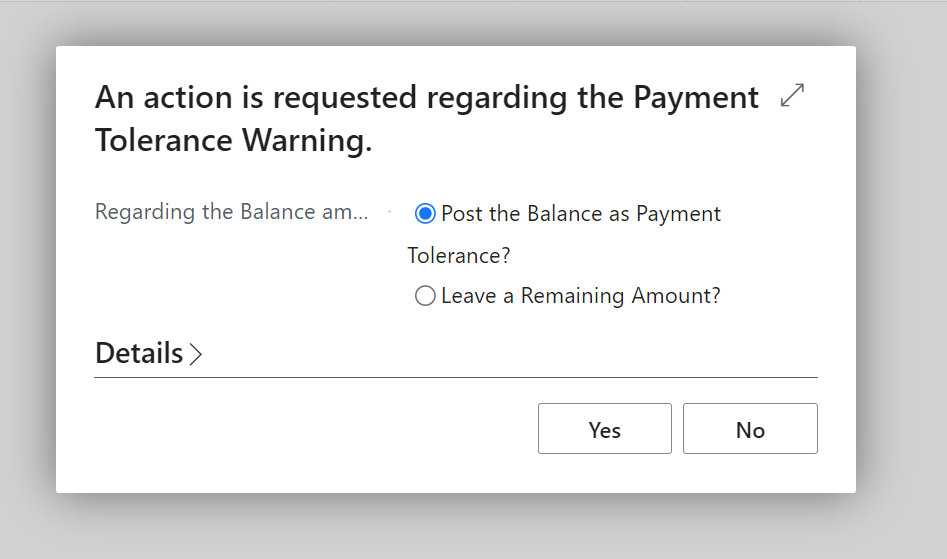
Now, when I click OK, I’m presented with the following message:

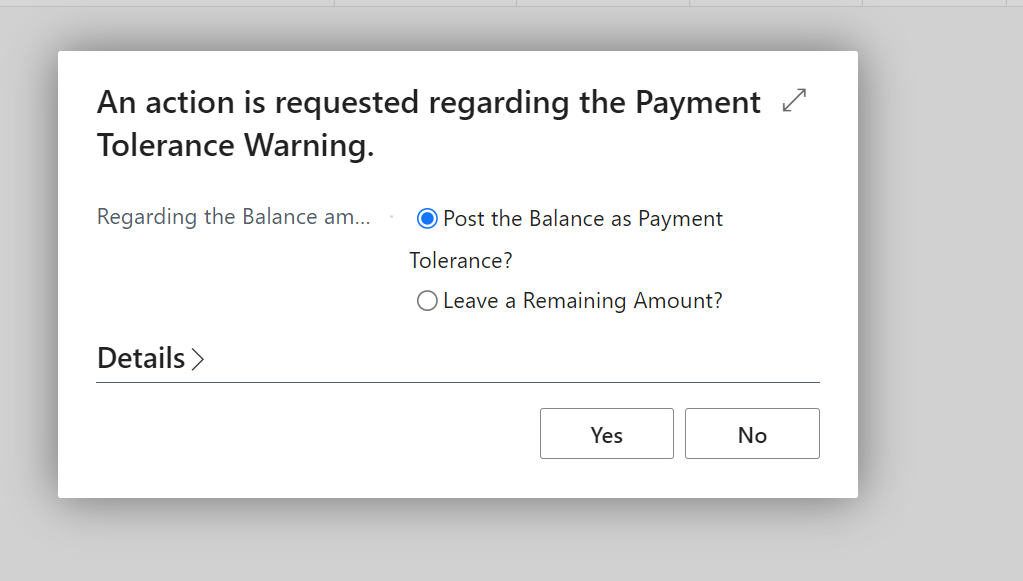
The default is “Leave a Remaining Amount?” however I change this to “Post the Balance as a Payment Tolerance?” and click “Yes”.

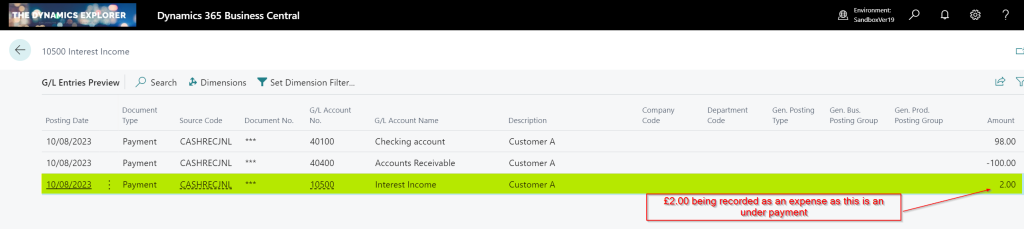
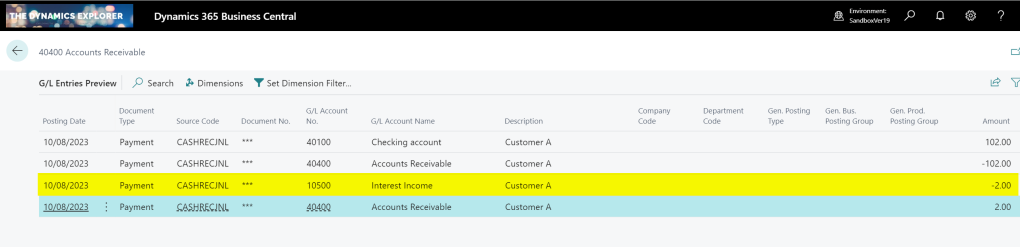
Now, when I preview the postings, I can see amounts being recorded in the Payment Tolerance GL accounts to account for the Payment Tolerance in the General Ledger. Additionally, there are Detailed Customer Ledger Entries to rectify the remaining amount on the Sales Invoice.

The General Ledger entries have an extra entry for the £2.00 underpayment, which is recorded as an expense. (i.e. a Debit amount)

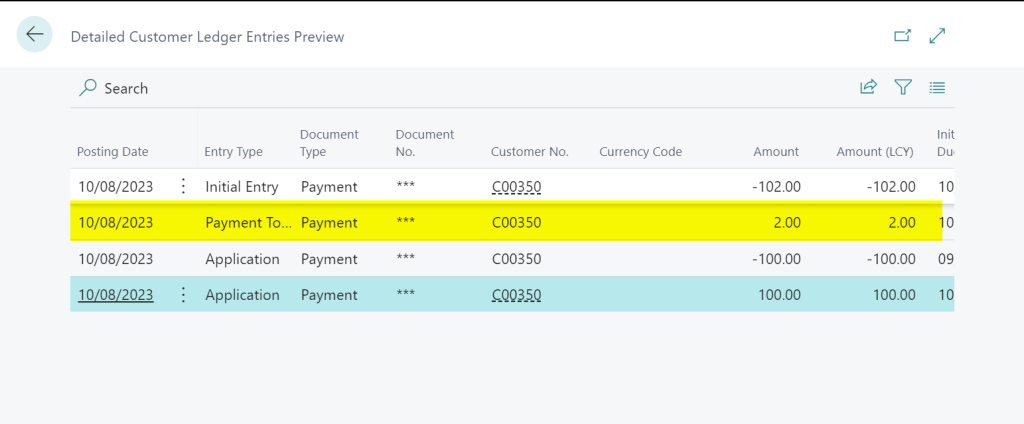
There is also an extra detailed ledger entry to correct the remaining amount on the Sales Invoice

Over Payment Scenario

In the second scenario, we have a Sales Invoice for £100.00, and we have received £102.00. Instead of returning the £2.00 or leaving it on account, we opt to write off the £2.00 using payment tolerance.

Again we create a Cash Receipt for £102.00 as per below:

We then find the Sales Invoice and change the Payment Tolerance to £2.00 and select “Set Applies-to ID”

Again, we are prompted with the payment tolerance warning so select “Post the Balance as a Payment Tolerance?” and click “Yes”.

This posts additional General Ledger Entries for the £2.00 overpayment, but this time crediting the tolerance account. (as this is additional Income)

We also get additional Detail Customer Entries to correct the amount remaining on the Payment

Taking Payment Tolerance on Posted Documents

In the previous examples we walked through the process of applying the Payment Tolerance while posting the Cash Receipt. Now, let’s consider a scenario where the Cash Receipt has already been posted, and we aim to apply it to an invoice while also considering a payment tolerance.

Below is a posted sales invoice and a posted cash receipt. The sales invoice is for £100.00 and the cash receipt is £98.00. We will now apply them together and take the payment tolerance rather than leave £2.00 outstanding on the invoice.

First I go to “Customer Ledger Entries” and highlight the Cash Receipt and select “Process > Apply Entries”

Next I change the “Max Payment Tolerance” amount to £2.00 and click “Process > Set Applies-to ID”

I then click “Process > Post Application” and click OK

I’m then presented with the option of how to deal with the Payment Tolerance.

I select “Post the Balance as Payment Tolerance” and click “Yes” and the entries are posted and both documents will show an amount remaining of £0.00.

Conclusion

As you can see, the payment tolerance feature can be incredibly useful for writing off amounts when applying cash receipts.

If you encounter numerous instances of underpayments and overpayments, leveraging this functionality eliminates the need for manually entering adjustments to clear these minor sums.

Thanks for reading!

Need help with Business Central? Contact us

Dynamics 365 Business Central- How to Reverse a Journal on a different date using the Posted General Journal Page

Introduction

When you reverse a journal entry using the standard “Reverse” feature there’s no option to change the posting date. By default the journal will automatically reverse on the same date as the original journal postings. This isn’t ideal if you have closed the period and want the reversal to post into a different period.

In this post I’ll show how you can reverse a journal and change the date using the “Posted General Journal” feature. I’m a big fan of this feature as it not only gives the ability to reverse a journal with a different date but you can also reverse multiple journals.

The Issue

As discussed, when reversing a journal using the standard functionality there’s no way to change the “Posting Date”. The field highlighted below isn’t editable.

If the financial period is closed, posting the reversal into a different period becomes necessary, which prevents the ability to use the standard feature.

Configuring Posted General Journal Functionality

Before we can use the Posted General Journal functionality we first have to ensure its enabled on the various General Journal Templates.

Therefore search “General Journal Templates” and tick the option “Copy to Posted Jnl” as per below:

When the option has been selected on the General Journal Template, it can then be toggled off and on at a Journal Batch level as well:

With this option enabled any journal that’s subsequently posted creates “Posted Gen. Journal Lines” in addition to the usual General Ledger Entries.

For example I clicked “Find Entries” on a General Ledger Entry and I can see additional “Posted Gen. Journal Lines”

I find this really useful as if you drill down on the “Posted Gen. Journal Line” it opens the Posted General Journal page which provides a snapshot of the journal that was posted.

This is very similar to how a snapshot of a Sales Invoice is taken and saved as a “Posted Sales Invoice” which you can refer back to.

Reversing a Journal using the Posted General Journal Page

Now we have the option switched on we can walk through how to reverse a journal.

First open the “Posted General Journal” page. You can either search this directly or drill down from the “Find Entries” page.

Once in the “Posted General Journal” page locate the entry you wish to reverse. In my example I’m going to reverse document number G00033.

I therefore filter on this document number and select both lines and choose “Copy Selected Lines to General Journal” as per below:

** Please note you can also select “Copy G/L Register to General Journal Lines” **

Next I’ll choose to replace posting date with an April date and also to reverse the sign:

Now when I open the ACCRUALS batch its the reversing journal is ready to post.

You can also use this functionality to reverse more than one journal at once and I’ve also used it to find out the G/L Register number of a journal postings 🙂

Conclusion

As you can probably tell I’m a big fan of this functionality. I think this is because of my background using Dynamics GP which creates similar snapshots of posted journals.

Thanks for reading!

Dynamics 365 Business Central – Message “There is nothing to post because the journal does not contain a quantity or amount” when posting a Recurring General Journal

Introduction

When attempting to post a recurring general journal you receive the message “There is nothing to post because the journal does not contain a quantity or amount” even though you have specified the General Ledger codes and the amounts and everything appears fine.

This is a common query that crops up, and also something I see from time to time in the forums, so I thought I’d write it up for reference and to hopefully help anyone else who receives this message.

The Recurring General Journal

Below is a recurring general journal. I’ve populated all the required fields however when I try and post it I get the message below:

The Solution

The reason I’m getting this message is because of the unique way in which a recurring general journal works. In a Recurring General Journal the “Posting Date” is compared to the “Work Date” and if the posting date is greater than the work date you receive this message.

I’ll therefore compare the Posting Date on my journal to my Work Date, and as you can see the Posting Date is in advance of my Work Date:

Therefore, in my case, the solution is to change the user date to a date of 01/01/23 (or a date in advance of 01/01/23) and try again:

After doing this my journal will now post 🙂

Conclusion

As far as I’m aware, this is the only journal that behaves this way. For example, I can post a General Journal and the system won’t check the Work Date against the Posting Date.

I suspect the primary reason for this behaviour is to prevent a user mistakenly posting a recurring general journal numerous times, as by default the lines remain on a recurring general journal after you have posted it, and the posting date automatically advances based on the “Recurring Frequency”. (i.e. if the recurring frequently in 1M the Posting Date changes by one month).

Therefore you could post the journal once and then post it again by accident. Having the system perform this simple check prevents this.

Thanks for reading!