Dynamics 365 Business Central – Handling the message “Only the Posting No. Series can be filled in on recurring journals” in Recurring Journals

Introduction

When entering a Number Series on a “Recurring General Journal” batch you receive the message “Only the Posting No. Series can be filled in on recurring journals”.

In this post we’ll take a quick look at the functionality of a Recurring General Journal, why I think the message appears, and look at two techniques you can use to ensure a unique document number is created each time the journal is posted, without the need to constantly update the document number before each posting.

A Brief Look at Recurring Journals

The Recurring Journal has unique features over and above a normal General Journal. Its designed for entries that are made regularly such as prepayments, depreciation or payroll journals etc.

The great thing about Business Central is there are many other features you can use for journals like prepayments and depreciation such as deferrals or standard journals however in this post we are focussing on recurring journals

One of the main features of the “Recurring General Journal” is that unlike a “General Journal”, after posting a Recurring General Journal the journal lines remain and the posting date is updated based on the recurring frequency. This means if don’t have to re-key the same journal every month.

However this also poses a question for what we do about the Document Number? Ideally we want to be presented with a unique document number after posting each iteration of the journal, so how can we accomplish this if this isn’t being updated?

The Error

The first thing we can try and do is use a “No. Series” on the batch, however when trying to select a “No. Series” on the “Recurring General Journal” batch you are presented with the error message below

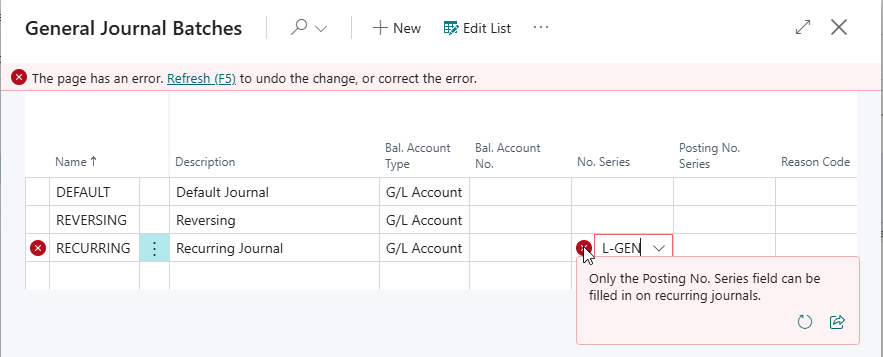
So I guess the first question is…..why is the system preventing us from using a “No. Series” on the batch?

Although I can’t be certain, I assume its because after we post the batch the lines on the recurring journal will remain. If this is the case the number in that number series will be used over and over again (unless we change it). Therefore the system is preventing this.

So the next question is…..how can I get a unique document number on the journal line without having to update it every time its posted?

Using a “Posted No. Series” on the Journal Batch

Now, its worth noting we could just enter a descriptive document number on the unposted journal lines and fill in the “Posting No. Series” on the batch header. The document number on the lines wouldn’t then be carried through to the General Ledger Entries.

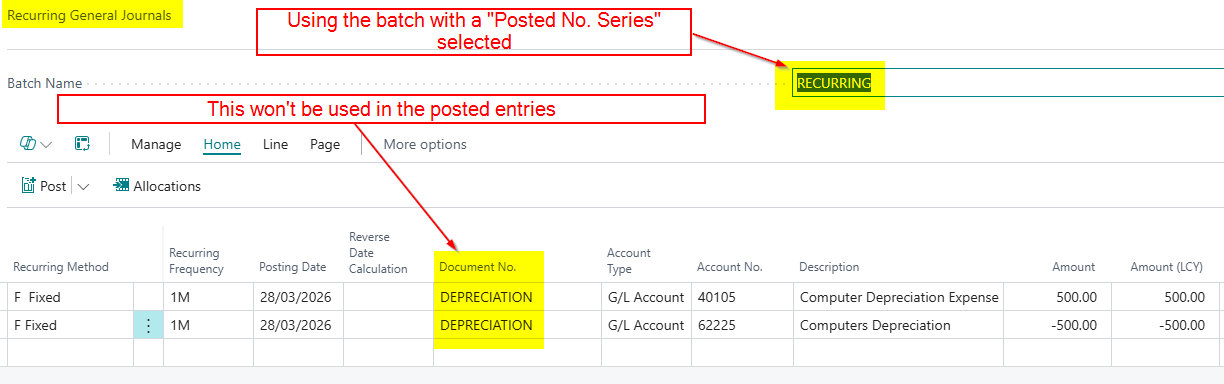
For example here I’ve populated the “Posted No. Series” on the batch header:

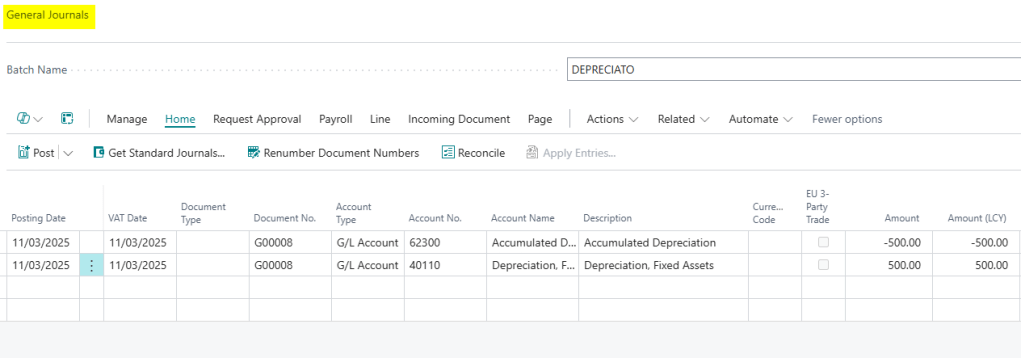
Now the document number I’ve entered on the lines on my Depreciation Journal below won’t be carried through to the “General Ledger Entries” when I post the batch

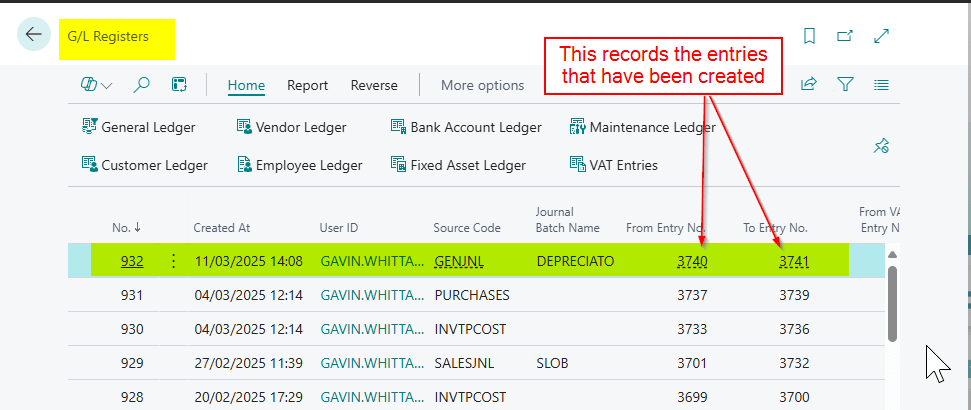
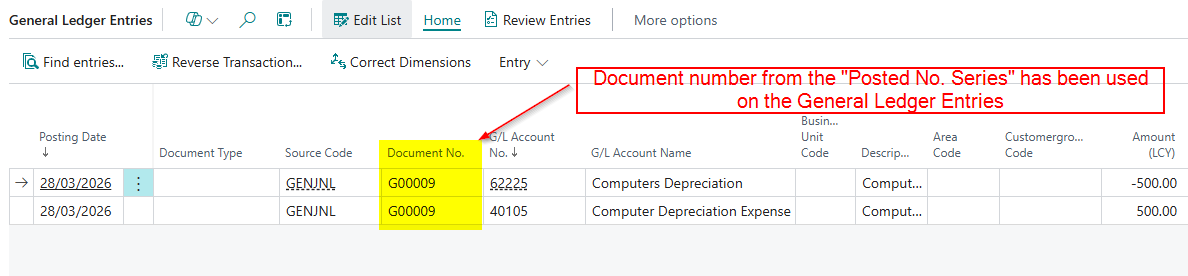
I’ve now posted the batch and you can see the document number being used has come from the “Posted No. Series” not the document number I used on the journal lines.

However, I want to use my own unique document number on the lines, but I don’t want to have to change it after each posting.

How can I achieve this?

Getting a Unique Document Number using Placeholders (Variables)

This is the final piece of the puzzle and its pretty cool 😊.

You can achieve unique document numbers by using placeholders right in the document number 😊

So going back to my Depreciation Journal, if I want the document number to include the date I can enter it as per below:

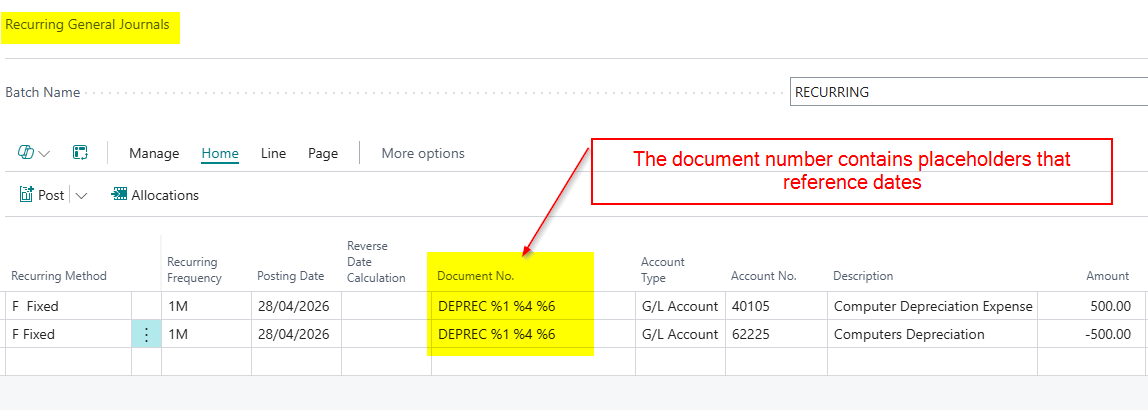
In the example above when I post the journal the system will replace the placeholder %1 with the Day number, %4 will be replaced with the Month name and %6 will be replaced with the year of the posting date of the journal.

The document number is then shown as per below in the “General Ledger Entries”

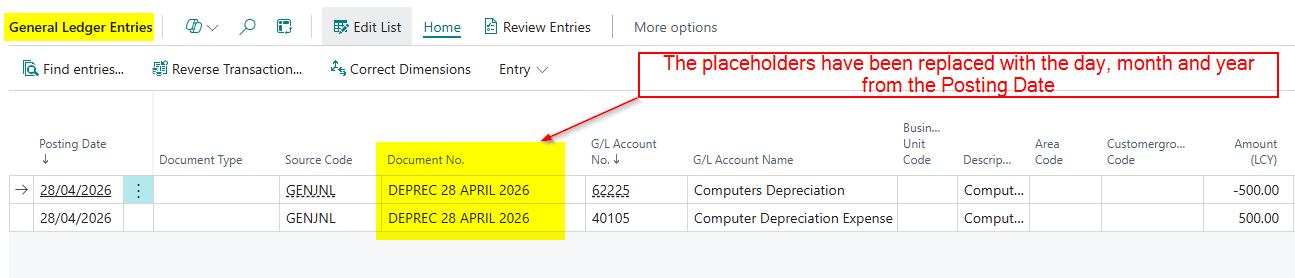
When I post this for May, there’s no need to update the document number. The system automatically replaces the placeholders using the posting date in the final document number in the posted entries.

If you’re curious about what other placeholders can be used. There is a full list below:

  • %1 = The day number of the period posting date
  • %2 = The week number of the period posting date
  • %3 = The month number of the period posting date
  • %4 = The month name of the period posting date
  • %5 = The accounting period name of the period posting date
  • %6 = The fiscal year of the period posting date

If anyone has used the deferral functionality they are exactly the same and more information on them can be found here https://learn.microsoft.com/en-gb/dynamics365/business-central/finance-how-defer-revenue-expenses

Conclusion

This post highlights the issue when using “Recurring General Journal”, in that you can’t use a “No. Series” on the journal batch.

We’ve looked at why I think that restriction exists, and how you can instead use the “Posting No. Series” on the batch header to ensure your posted entries receive a unique document number each time.

Alternatively, you can use placeholders within the Document No. field to dynamically generate meaningful document numbers without having to update them after every posting, which I find particularly useful 😊

Thanks for reading!

Dynamics 365 Business Central – A closer look at Registers in Business Central

When you post transactions in Business Central, as well as creating all the necessary entries in the system, various registers are also created which link the entries together.

These registers offer a valuable insight into how the system is working and are also a great tool to use when you want to track a transaction through the system.

I often find that registers don’t get the recognition they deserve with some users unaware of their existence.

In this post, we’ll shine a well deserved light on registers and explore why they are such a valuable feature in Business Central.

What is a Register

When you post transactions in Business Central, depending on the nature and type of the transaction, one or more registers are created.

For instance, posting a General Journal that solely impacts G/L accounts, results in the creation of “General Ledger Entries” and a “G/L Register”. (stay tuned for details of other registers the system can create 😊)

This “G/L Register” will have a record of all the entries involved in that journal.

For example, below is a manual depreciation journal entered via the “General Journal” page.

When I post this as well as the “General Ledger Entries”, I also get the G/L Register below.

As you can see the register is offering lots of very useful information. Its telling me who posted the transaction, when the transaction was posted, what batch was used, which module it originated in (via the Source Code), and the entry numbers created (“From Entry No” and “To Entry No” columns). Importantly, it also has a sequential number that is created by the system and can’t be changed. This offers a really good audit of the transactions moving through the system.

Navigate a Register

Now, by using the navigation options on the toolbar of the “G/L Register” page, I can explore the related entries for that G/L Register. For instance, as shown below, clicking the “General Ledger” button prompts the system to open the “General Ledger Entries” page, automatically filtered to the entry range specified in the G/L register (in this case, entries 3740 to 3741).

If you were to post a Sales Invoice, that has GL accounts on it, you would then get “General Ledger Entries” and “Customer Ledger Entries”. Therefore you would be able to navigate to the “Customer Ledger Entries” from the resulting “G/L Register” as well as the “General Ledger Entries”.

For example, I’ve now posted a Sales Invoice which has created a new G/L Register. From this register I can click “Customer Ledger” and “General Ledger” to view the relevant entries.

More Registers

So far, we’ve only just begun to explore registers 😊.

This time, let’s say we have a Sales Invoice that includes Inventory Items. In this case, we’ll get a “G/L Register” for the Customer and General Ledger Entries, but we’ll also get an “Item Register” for the entries related to the items.

The “Item Register” connects the “Item Ledger Entries” and the “Value Entries”. It serves as a useful record of how items are moving through the Inventory module.

For instance, I’ve posted a Sales Invoice for 5 Inventory Items, and below you can see the resulting “Item Register”. From this Item Register, I can view the associated Item Ledger Entries and Value Entries.

If we take things a step further, and I’d had been using a Location that has warehouse activities configured we’d have “Warehouse Entries” created and a “Warehouse Register” to keep track of activity in the warehouse 😊.

For example, I’ve now posted a Sales Invoice that generated movement in the warehouse through “Warehouse Entries”, resulting in the creation of a “Warehouse Register”. I can visit the “Warehouse Register” page to view this, alongside all other warehouse activities. By navigating to the Warehouse Entries, I can see the specific movement from the Bin.

Other registers

So what other registers do we have. You can see a list by searching “Register” in the Tell Me option but the common ones I use are as follows

  • G/L Register
  • Item Register
  • Warehouse Register
  • Fixed Assets Register
  • Project Register

Tip – Filtering Registers

As a final note, being a functional consultant, I find the “Source Code” field especially useful as it enables me to filter and track when specific routines have been run, such as the closure of VAT entries or the posting of the Adjust Exchange Rates process.

To do this, you simply apply a filter on the relevant “Source Code”. In the example below, I’ve filtered on the Source Code “VATSTMT” to check when the VAT was closed.

I must confess, during training and testing, I also use it to check how often users have been posting in the system 😊.

Conclusion

This post goes through how registers work in Business Central and just how useful they can be. They not only provide an audit from a financial perspective but also offer a glimpse into how the system is working with the various entries.

Thanks for reading!

Dynamics 365 Business Central – Walkthrough of GL Consolidation with Different Currency Business Units

Introduction

Business Central provides functionality to consolidate companies, enabling reporting at a group level. This consolidation feature also supports combining companies that operate with different local currencies.

In this post, we’ll explore how consolidation works when integrating one company that uses the same local currency as the consolidation company, and another company that uses a different local currency.

We’ll cover various setup aspects, including General Ledger (GL) code configurations in both companies. Then, we’ll consolidate transactions over two months and review the resulting GL entries.

It’s important to note that in my configuration, all companies share the same chart of accounts. In reality, this is often not the case, so we’ll also discuss how to map GL accounts from source companies to the consolidation company.

My Configuration

To walkthough this, I’ve created two trading companies in Business Central, both based on the Cronus demo data.

One company is a UK-based entity called “Cronus UK Company,” which uses GBP as its local currency (set in the General Ledger Setup page). 

The other company is called “Cronus EURO Company,” and it uses Euros as its local currency.

** Both companies are created using evaluation data in the same way. I’ve just changed the currency in the General Ledger Setup

Finally, I’ve been through the assisted setup to create a “Consolidation Company” that I’ll be consolidating the data from both companies into.

**The purpose of the post to look at the multi currency aspect of the consolidation so I won’t be going through this part, however its a fairly simple wizard to follow 😊

This has created me the following Consolidation Company, which is also GBP, adding both my trading companies as “Business Units”. (for more information on setting up a Consolidation Company see this link)

Chart of Account Configuration

Before we run the consolidation there are a couple of setting on the Chart of Accounts I want to focus on in each trading entity which are shown below:

With regards the “Consol Debit Acc.” and “Consol Credit Acc.“, these fields are used if you want to consolidate the balance in a General Ledger (GL) account to a different account in the consolidation company. Since all my companies use the same Chart of Accounts, as mentioned in the introduction, I will leave these fields blank so that the balances consolidate into the same GL accounts.

For the “Consol Translation Method“, if the company you are consolidating operates in a different currency than the consolidation company, it’s necessary to set a translation method. I will use “Average Rate (Manual)” for my Income Statement accounts and “Closing Rate” for my Balance Sheet accounts.

There are other translation method you can use which can be found here however in my experience Average Rate is typically used for Income Statement to smooth out rate differences over a period and closing rate is used for balance sheet to reflect the value at the end of the reporting period

Business Unit Configuration in the Consolidation Company

Now that we have configured the Chart of Accounts in each company, let’s take a closer look at the Business Units that have been set up in the Consolidated company using the Assisted Setup.

You can add these manually via the “Business Units” page in the consolidation company if you choose to setup the Consolidation company manually.

The Cronus UK company business unit configuration is below:

The Cronus EURO company business unit configuration is below.

Test Transactions

In each trading entity I’ve posted a series of General Journals to create the following General Ledger Entries

Cronus EURO Company: The GL account 10110 is an Income Statement Account and therefore is going to be consolidated with an Average Rare and the GL account 62110 is a Balance Sheet Account which is going to be consolidated using a Closing Rate. (more on how we set the rates when consolidating below)

Cronus UK Company :- As per above he GL account 10110 is an Income Statement Account and the GL account 62110 is a Balance Sheet Account. (rates are irrelevant for this company as its the same currency as the consolidation company)

Run Consolidation

Now we have configured the Chart of Accounts, the Business Units, and posted some transactions, we can run the consolidation and then review the resulting General Ledger Entries.

To do this we’ll need to go to the “Business Unit” page and click “Consolidate”

Next I enter the dates I want to consolidate, fill out the Document No, and click Next. (in this case I’m consolidating January first)

Then I tick the companies I wish to Consolidate and click “Next”

Now I’ll set the Average and Closing Rates for the EURO company. (the system will suggest a rate as well however I’m going to overtype this). To do this drill back on the “Average Currency Factor” as per below

This opens the “Setup Business Unit Currencies” page, where I can adjust the “Average” and “Closing” rates and then click OK. (I have used rates of 1.5 and 2 to simplify the calculations when we review the General Ledger Entries.)

** Therefore the balances on account 10110 will use a rate of 1.5 and the balances on account 62110 will use a rate of 2

Now this has all been set we can click “Next” and “Finish” to complete the Consolidation.

The Consolidation Entries

Now we have consolidated let’s have a look at the “General Ledger Entries” that have been produced by the consolidation process. (click to enlarge)

As you can see, the GBP_CO business unit has consolidated all the transactions exactly as expected with no adjustments.

However as we had different rates for Income Statement (Average) and Balance Sheet (Closing) we have an additional entry thats been post automatically. This is to balance the consolidation as we are using different rates.

This also shows nicely on the G/L Register, as a G/L register is created for each Business Unit that is consolidated

Here you can see the General Ledger Entries for the EURO_CO business unit

Consolidation for the next month

Let’s see what happens when we consolidate the next month using different rates again.

Enter the new Rates:

And then Consoldiate

Now let’s look at the General Ledger Entries (click to enlarge)

One important point here is we needed to leave the “Last Closing Rate” at 2 as the system first posted an adjustment recalculating the balance of the Balance Sheet account for the EURO_CO business unit to match the new rate of 1.75. (this is shown in point 2 in the screen shot above). This ensures the balance at the end of February reflects the Balance Sheet transactions at a “Closing Rate” of 1.75. i.e.

Prior to the February consolidation, the balance of the balance sheet account (62110) for the EURO_CO business unit was £50. The system then used the “Last Closing Rate” to calculate this equates to €100 using the “Last Closing Rate” of 2. It then calculated the GBP at the new “Closing Rate” of 1.75 as £57.14 (€100/1.75=£57.14). Therefore as the GBP balance was £50.00 an adjustment was posted for £7.14 (point 4 on the screen shot above)

Conclusion

This post walks through a consolidation process that involves business units with different currencies showing the different posting and adjustments that are made when using different translation methods.

Thanks for reading!