Background
Recently I’ve been testing the various setting on the location and how this affects the processes and steps involved in the receiving and putting away of inventory.
The settings I’ve been paying particular attention to are “Require Receive“, “Require Put-away” and “Put-away Worksheet“.
The different options and combinations you have selected affects how you process the receiving and putting away of the inventory, and which documents are used.
I’ll detail each of these below and each one assumes you have the “Bin code required” option selected as well.
Important note:- while learning and researching this subject I found this excellent post by Olof Simren which goes into great detail on this subject. http://www.olofsimren.com/processing-of-receipts/. This is a truly awesome post that I would highly recommend reading. The post is really well written and easy to understand, and at first it put me off writing this blog, as it covers things so well that I didn’t want it to appear like I was just repeating this information. However I decided to go ahead as the primary purpose of my blog is to assist in my learning and understanding of Dynamics NAV and Business Central, and writing things up really helps me. Of course if others find it useful as well then that is always a massive bonus 🙂
Location Setup
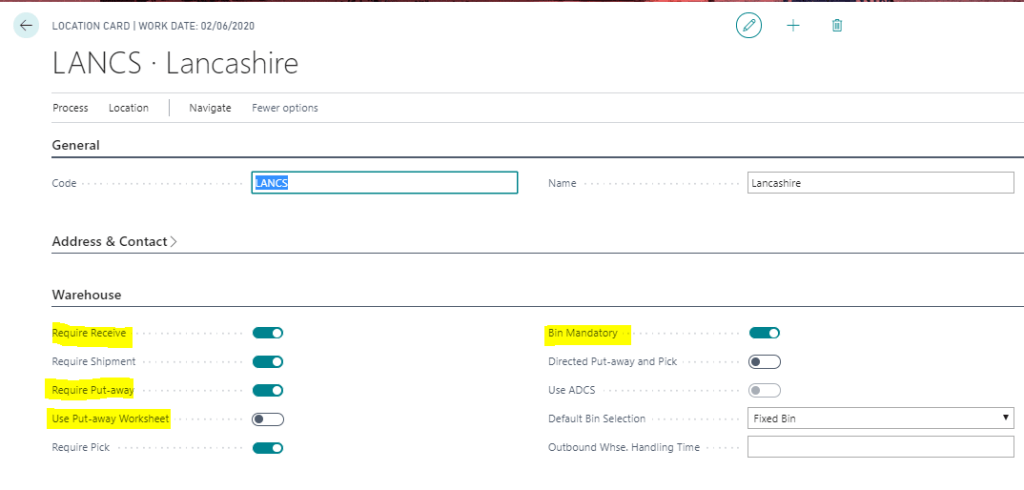
Firstly, the options I’m referring to can be selected on the “Location” page as per below:
Require Receive
If you just have the “Require Receive” option switched on then you are stating that a Warehouse Receipt document should be posted to receive the inventory.
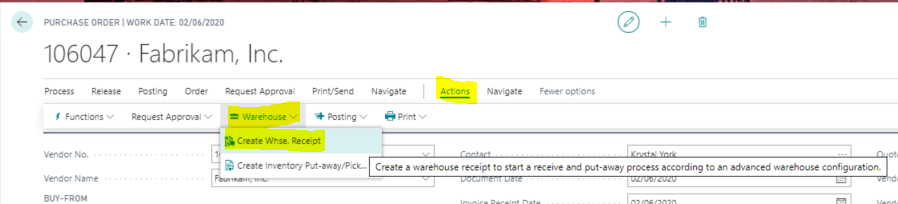
You can create a Warehouse Receipt document in either a push or pull fashion. i.e. you can go to “Warehouse Receipt” and recall the Purchase Order into the Warehouse Receipt or alternatively you can create the Warehouse Receipt from the Purchase Order using the option below:
After posting the Warehouse Receipt the goods are recorded in the Inventory and both item ledger and warehouse entries are created.
Therefore when just using the “Require Receive” on its own the process of recording inventory is as follows:
- Create and release Purchase Order.
- Create and post Warehouse Receipt.
An advantage of using this method is the ability to pull, and therefore receipt, more than one Purchase Order at once.
One limitation of using this method is you can’t easily record the inventory in more than one bin for the same line while receiving. (i.e. if you wanted to put the inventory into more than one bin for the same line item you’d have to be creative and re-open the Purchase Order and split the line and then use the Warehouse Receipt to receive)
** Please note during my testing I’ve found that although the option “Require Receive” is ticked ON you can still post the receipt from the Purchase Order by clicking “Post > Receive”
Require Put-away
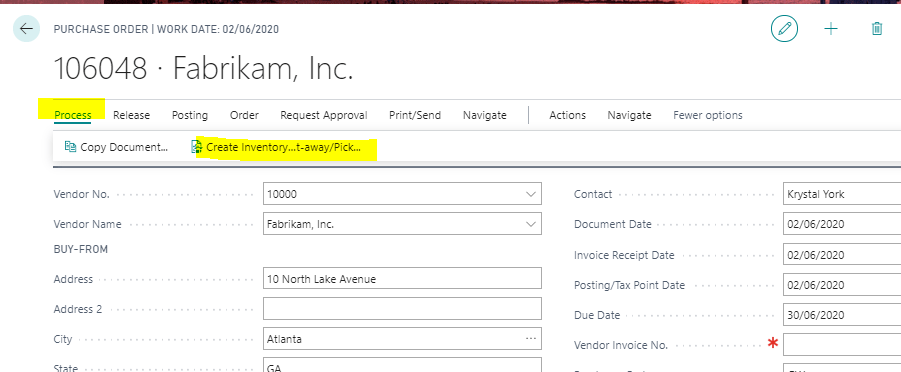
If you just have the “Require Put-away” option switched on you are stating that you must first put-away the goods via a Inventory put-away document. You can create an Inventory Put-away in either a push or pull fashion. i.e. you can go to Inventory Put-away and recall the Purchase Order onto the Inventory Put-away or alternatively you can create the Inventory Put-away from the Purchase Order using the option below:
After posting the Inventory Put-away the goods are posted into inventory and both item ledger and warehouse entries are created.
Therefore when just using the “Require Put-away” on its own the process of recording inventory is as follows:
- Create and release Purchase Order
- Create and post Inventory Put-away
One benefit of using the Inventory Put-away is you can “split line” to record the inventory in more than one bin.
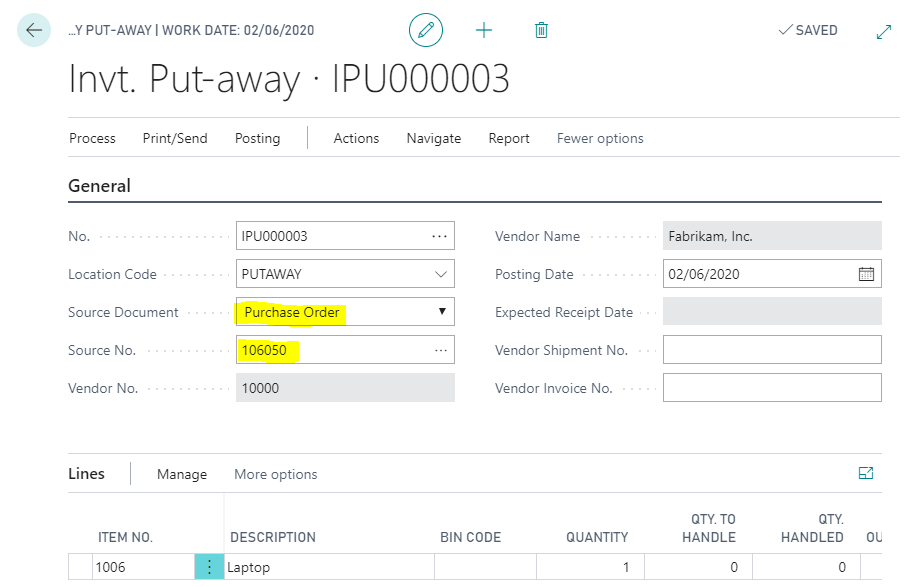
One limitation with Inventory Put-aways is you can only process one purchase order at a time. As you see below the Purchase Order number is stored on the header of the Inventory Put-away thus restricting the lines to one Purchase Order:
** Please note that as with the “Require Receive” option I’ve found that although the option “Require Put-away” is ticked ON you can still post the receipt from the Purchase Order by clicking “Post > Receive” thus bypassing this option. However this is mentioned as expected behaviour in this Microsoft document https://docs.microsoft.com/en-gb/dynamics365/business-central/warehouse-pick-items i.e. the snippet below is taken from that document

Require Receive and Require Put-away
When you have both the “Require Receive” and “Require Put-away” options ticked in combination you must now complete a two step process before the inventory is available. The first step is to create and post a Warehouse Receipt, which records the inventory in a receiving bin, and posts Item Ledger and Warehouse Entries. On posting the Warehouse Receipt a Warehouse Put-away is automatically created which enables you to register the movement of the inventory from the receiving bin to another bin, which then makes the inventory available. (this part posts additional Warehouse Entries)
Therefore when just using the “Require Receive” and “Require Put-away” together the process of recording inventory is as follows:
- Create and release the Purchase Order.
- Create and post a Warehouse Receipt. (automatically creates Warehouse Put-away)
- Register the inventory using the Warehouse Put-away
An important thing to note here is we are now using the “Warehouse Put-away” rather than the “Inventory Put-away” which means we can process more than one Purchase Order at once. (i.e. if the warehouse receipt we posted had more than one Purchase Order a “Warehouse Put-away” would be created for all Purchase Orders)
** Please note as with the previous configuration I found i could still post the receiving of the inventory from the Purchase Order as long as the bin code was populated on the purchase order line.
Require Receive \ Require Put-away \ Use Put-away Worksheet
With all three options ticked in combination you first create and post the “Warehouse Receipt” however posting the “Warehouse Receipt” doesn’t automatically create the “Warehouse Put-away“. You use the “Put away worksheet” to recall the “Warehouse Receipt” and then create a “Warehouse Put-away“.
Therefore when using the “Require Receive“, “Require Put-away” and “Use Put-away Worksheet” in combination the process of recording inventory is as follows:
- Create and release the Purchase Order.
- Create and post the Warehouse Receipt.
- Use Put-away Worksheet to create a Warehouse Put-away.
- Register the inventory using the Warehouse Put-away.
** Please note I also found even with all three of the options switched on I could still post the receiving of inventory from the Purchase Order as long as the bin code was populated on the purchase order line.
Conclusion
Interestingly in every scenario I could bypass the processes by simply posting the receipt directly from the Purchase Order. I found the only way the system forces you to follow the warehouse processes is when “Directed Put-away and pick” is switched ON on the location. I’d be interested to know if i’m missing something here or if this is expected behaviour as i do find this a little surprising.
Thanks for reading.