Dynamics 365 Business Central – Walking through an Adjust Exchange Rates (revaluation) scenario in Business Central

Introduction

Recently I helped someone in the Business Central forum with a query on revaluing their bank accounts using the “Adjust Exchange Rate” batch job.

We went back and forth for a while, trying various things, however in the end it was resolved by providing a simple worked example of the whole process that the user could compare to their process.

Therefore I thought it might be useful to write this up for anyone else who may have similar issues and want to see the whole process in action. (and as a bonus I can also use it as a reference point in future 🙂 )

** For info the original forum post can be found here

The Scenario

In this scenario my local currency (LCY) is GBP and I have a EURO bank account with several transactions that I wish to revalue at month end using a rate of 1.5.

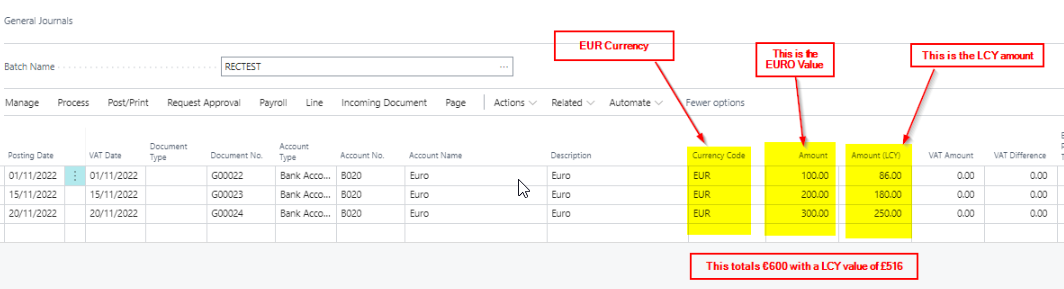
Step 1 – The initial transactions

To prepare for the revaluation I need some transactions on the EURO bank account. Therefore, I’ve posted the three entries below using different exchange rates.

The transactions total €600 with a LCY amount of £516.

Step 2 – Set the month end rate

Next, I set the month end rate of 1.5 in the Currency Exchange Rate page. This is the rate I want to revalue the bank account ledger entries at the end of month.

** For more info on how to set exchange rates, and what each field in this page means, I wrote this blog post.

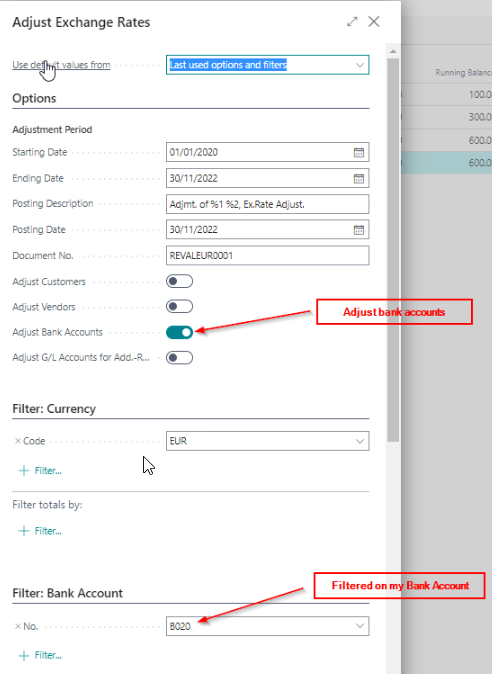
Step 3 – Run the “Adjust Exchange Rate” batch job

Finally, I run the “Adjust Exchange Rate” batch job with a posting date of 30/11/22 and added a few additional filters to revalue the bank account ledger entries.

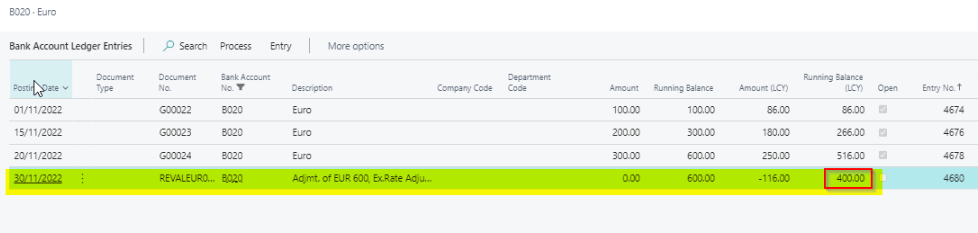
Step 4 – The Results

The system should create an adjustment of £116. This is because the bank account ledger entries total €600, which when revalued at the new rate of 1.5, equal an LCY amount of £400, and the current LCY amount is £516. Therefore an adjustment of £116 is required.

If we look at the General Ledger entries the Exchange Rate Adjustment has created, we can see this is exactly what has happened.

The system has also created a bank account ledger entry to record the exchange adjustment

Conclusion

The “Adjust Exchange Rate” batch job is an essential tool for companies that post transactions in foreign currencies and wish to revalue their customers, vendors and bank accounts.

However, one limitation to the routine is the inability to revalue an individual GL code, which some companies may find an issue, especially if migrating from Dynamics GP which has this functionality as standard. This is because only the LCY amount is held on the General Ledger Entries. (as well as the reporting currency which is something a little different)

Hopefully this functionality will be added in a later version of Business Central :).

Thanks for reading!

Dynamics 365 Business Central – How to create a workflow that only requires approval from “one of” the defined Approvers

Introduction

Recently I encountered a requirement for a workflow to be created that would send an approval to multiple users, however only one of the approvers needed to approve the request for the workflow to be fulfilled.

This post walks through how I achieved this using a Workflow User Group, and some tweaks to the standard Workflow.

Although at first I thought this would be relatively straight forward to configure, I did hit a bump in the road on way (see step 5 below). Hopefully this post will help others who encounter the same issue 🙂

Scenario

For the approval of Vendors its been decided the approval should be sent to two approvers, however only one approver needs to approve the request, for the approval to be fulfilled. Therefore, when one approver approves the request, all open approval entries for the other approver should be closed.

Step 1 – Workflow User Group

The first step is to configure a Workflow User Group with our approvers as per below:

As you can there are two approvers in the Workflow User Group, and I’ve entered a sequence number of 1 for each user.

Step 2 – Workflow Setup

To create the Workflow I’ll use a Workflow Template as per below:

I’ll then edit the workflow as described in the steps below.

Step 3 – Add the Workflow User Group to the Workflow

First, I’ll add the workflow user group as the approver type, and select my workflow user group I created earlier.

Step 4 – Edit the Events and Conditions

Next, I’ll change the “On Condition” for the second step to “Always” and also remove the third step:

The Bump in the road

At this point although the workflow would work, I found an approval entry is left open for the approver who didn’t approve, even though the record restriction on the Vendor was removed.

Step 5 – Add the additional response

In order to have the workflow close open approval entries after one approval you need to edit the second step and add the response “Approve the approval request for the record”

Conclusion

I found that without the additional Step 5 in the process of configuring the Workflow, one of the approvers would get a build up of open approval entries even though the Vendor would have been approved.

I hope this helps anyone else trying to configure a similar workflow.

Thanks for reading!

Update

If you are implementing this for a Purchase Order Approval, or any other document approval, ensure the response “Release the document” is still included in the “An Approval requested is Approved” step.

Dynamics 365 Business Central – Add the Notes and Attachments FactBox pane on the Customer Ledger Entries page

This is likely common knowledge in the community however its something I only discovered recently so I thought I’d share in the hope it helps someone else :).

Someone requested for the “Notes and Attachments” FactBox pane to be added to the Customer Ledger Entries page so they could record notes against a customer ledger entry.

As this wasn’t available at first sight I assumed it would require development to add this, however a colleague advised its already there, its just hiding and you can expose it using standard Personalisation 🙂

Therefore to expose this FactBox pane you just use follow the steps in the clip below:

It turns out this is hidden on all sorts of other pages!

For example the General Ledger Entries page and the Vendor Ledger Entries page. Just follow the same steps above to add to those pages.

I absolutely love simple tips like this 🙂

Thanks for reading!