Dynamics GP – Stranded records in PM20200 causing Invoices to go to History incorrectly when applying payments in Bank Management

The Issue

When a user was creating payables payments in the bank management module via “Transactions > Financial > Bank Management > Batches > Payments” they found that when they applied an invoice the invoice would go straight to HISTORY even though the payment hadn’t yet been posted.

As a consequence when the user did post the batch the payment hits the bank management module correctly, but then fails to post through the payables tables.

The error below is reported on the edit list and the payment remains in the WORK tables in payables, in a system generated batch prefixed CBPAY, and the invoices go to HISTORY with incomplete apply records:

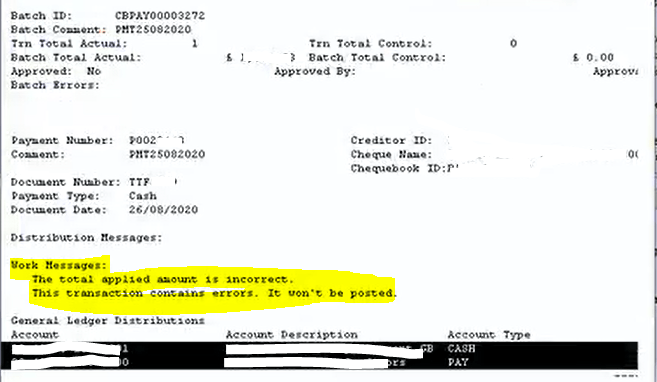
This happened every time they applied a payment in the bank management module using the option mentioned above.

The root cause

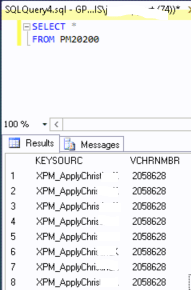
On investigation I found stranded records in the PM20200 (PM Distribution OPEN OPEN Temporary File) table with the users ID in the KEYSOURC column causing the issue.

Therefore to fix the issue I just deleted these records and this prevented the issue. (always ensure no one is in the system and you have a full backup prior to deleting any data)

Fixing the aftermath

To fix the data so the payment could be posted and applied to the invoices, I had to first correct the payment and then transfer the invoices back to OPEN.

** Please note if you have encountered this issue your data fix may be slightly different. Therefore prior to running any DELETE or UPDATE statements first run SELECT statements to ensure you are deleting or updating the right data and above all always ensure you have a good backup of your data.

I first fixed the payment by running the following SQL statements to update the apply amounts:

UPDATE PM10400 SET APPLDAMT=0, CURTRXAM=DOCAMNT WHERE PMNTNMBR='<payment number>'

Next I transferred the invoice back to OPEN and removed the HISTORY records using the steps below:

--Insert into PM Open

INSERT INTO PM20000

(VCHRNMBR,VENDORID,DOCTYPE,DOCDATE,DOCNUMBR,DOCAMNT,CURTRXAM,DISTKNAM,DISCAMNT,DSCDLRAM,BACHNUMB,TRXSORCE,BCHSOURC,DISCDATE,DUEDATE,PORDNMBR,TEN99AMNT,WROFAMNT,DISAMTAV,TRXDSCRN,UN1099AM,BKTPURAM,BKTFRTAM,BKTMSCAM,VOIDED,HOLD,CHEKBKID,DINVPDOF,PPSAMDED,PPSTAXRT,PGRAMSBJ,GSTDSAMT,POSTEDDT,PTDUSRID,MODIFDT,MDFUSRID,PYENTTYP,CARDNAME,PRCHAMNT,TRDISAMT,MSCCHAMT,FRTAMNT,TAXAMNT,TTLPYMTS,CURNCYID,PYMTRMID,SHIPMTHD,TAXSCHID,PCHSCHID,FRTSCHID,MSCSCHID,PSTGDATE,DISAVTKN,CNTRLTYP,NOTEINDX,PRCTDISC,RETNAGAM,ICTRX,Tax_Date,PRCHDATE,CORRCTN,SIMPLIFD,BNKRCAMT,APLYWITH,Electronic,ECTRX,DocPrinted,TaxInvReqd,VNDCHKNM,BackoutTradeDisc,CBVAT,VADCDTRO,TEN99TYPE,TEN99BOXNUMBER)

SELECT

VCHRNMBR,VENDORID,DOCTYPE,DOCDATE,DOCNUMBR,DOCAMNT,CURTRXAM,DISTKNAM,DISCAMNT,DSCDLRAM,BACHNUMB,TRXSORCE,BCHSOURC,DISCDATE,DUEDATE,PORDNMBR,TEN99AMNT,WROFAMNT,DISAMTAV,TRXDSCRN,UN1099AM,BKTPURAM,BKTFRTAM,BKTMSCAM,VOIDED,HOLD,CHEKBKID,DINVPDOF,PPSAMDED,PPSTAXRT,PGRAMSBJ,GSTDSAMT,POSTEDDT,PTDUSRID,MODIFDT,MDFUSRID,PYENTTYP,CARDNAME,PRCHAMNT,TRDISAMT,MSCCHAMT,FRTAMNT,TAXAMNT,TTLPYMTS,CURNCYID,PYMTRMID,SHIPMTHD,TAXSCHID,PCHSCHID,FRTSCHID,MSCSCHID,PSTGDATE,DISAVTKN,CNTRLTYP,NOTEINDX,PRCTDISC,RETNAGAM,ICTRX,Tax_Date,PRCHDATE,CORRCTN,SIMPLIFD,0,APLYWITH,Electronic,ECTRX,DocPrinted,TaxInvReqd,VNDCHKNM,BackoutTradeDisc,CBVAT,VADCDTRO,TEN99TYPE,TEN99BOXNUMBER

FROM PM30200 WHERE VCHRNMBR IN ('<Invoice Voucher Numbers>')

--Delete from History Table

DELETE FROM pm30200 WHERE VCHRNMBR IN ('<Invoice Voucher Numbers>')

--Update Current Transaction Amount

UPDATE PM20000 set CURTRXAM= DOCAMNT WHERE VCHRNMBR IN ('<Invoice Voucher Numbers>')


--Insert Distributions back into Open

INSERT INTO PM10100

(VCHRNMBR,DSTSQNUM,CNTRLTYP,CRDTAMNT,DEBITAMT,DSTINDX,DISTTYPE,CHANGED,USERID,PSTGSTUS,VENDORID,TRXSORCE,PSTGDATE,INTERID,CURNCYID,CURRNIDX,ORCRDAMT,ORDBTAMT,APTVCHNM,APTODCTY,SPCLDIST,DistRef,RATETPID,EXGTBLID,XCHGRATE,EXCHDATE,TIME1,RTCLCMTD,DECPLACS,EXPNDATE,ICCURRID,ICCURRIX,DENXRATE,MCTRXSTT,CorrespondingUnit)

SELECT

VCHRNMBR,DSTSQNUM,CNTRLTYP,CRDTAMNT,DEBITAMT,DSTINDX,DISTTYPE,CHANGED,USERID,PSTGSTUS,VENDORID,TRXSORCE,PSTGDATE,'ACAL2',CURNCYID,CURRNIDX,ORCRDAMT,ORDBTAMT,APTVCHNM,APTODCTY,SPCLDIST,DistRef,'','',1,'1900-01-01 00:00:00.000','1900-01-01 00:00:00.000',0,2,'1900-01-01 00:00:00.000','GBP',1014,0,0,''

FROM PM30600 WHERE VCHRNMBR IN ('<Invoice Voucher Numbers>')

--Delete dists from hist

DELETE FROM PM30600 WHERE VCHRNMBR IN ('<Invoice Voucher Numbers>')

--Update Key Record

UPDATE PM00400 set DCSTATUS=2 where CNTRLNUM IN ('<Invoice Voucher Numbers>')

-- Insert tax records back to PM10500

INSERT INTO pm10500
(VENDORID,VCHRNMBR,DOCTYPE,BACHNUMB,TAXDTLID,BKOUTTAX,TAXAMNT,ORTAXAMT,PCTAXAMT,ORPURTAX,FRTTXAMT,ORFRTTAX,MSCTXAMT,ORMSCTAX,ACTINDX,TRXSORCE,TDTTXPUR,ORTXBPUR,TXDTTPUR,ORTOTPUR,CURRNIDX,POSTED)

SELECT
VENDORID,VCHRNMBR,DOCTYPE,BACHNUMB,TAXDTLID,BKOUTTAX,TAXAMNT,ORTAXAMT,PCTAXAMT,ORPURTAX,FRTTXAMT,ORFRTTAX,MSCTXAMT,ORMSCTAX,ACTINDX,TRXSORCE,TDTTXPUR,ORTXBPUR,TXDTTPUR,ORTOTPUR,CURRNIDX,1
FROM PM30700 WHERE VCHRNMBR IN ('<Invoice Voucher Numbers>')

--Delete hist tax records from pm30700

DELETE PM30700 WHERE VCHRNMBR IN ('<Invoice Voucher Numbers>')

-- Delete History Applies

DELETE FROM PM30300 WHERE APTVCHNM IN ('<Invoice Voucher Numbers>')

Once I had completed these steps I could post the payment and apply to the invoices.

Thanks for reading!

Thinking of making the move to Business Central? We can help

Dynamics 365 Business Central – Posting a Payment Journal with VAT

I came across a situation where a user needed to post a credit card payment via a payment journal with a VAT element so I thought I’d document on my blog 🙂

In order to do this first create a Payment Journal batch with the relevant balancing account, in my case a credit card, and also select the highlighted VAT options below:

** Please note you may have to go to the General Journal Template for Payments and tick these ON before you can select them for the batch.

With the option “Copy VAT Setup to Jnl. Lines” selected, the VAT posting groups will be copied from the GL code and VAT will be calculated.

With the option “Allow VAT Difference” selected, changes can be made to the calculated VAT amounts.

If you only have one G/L expense code to record VAT its fairly simple. You can pickup the relevant G/L code, which should default the “VAT Bus Posting Group” and “VAT Prod. Posting Group”, and the system will calculate the VAT for you. You can then just leave the “Bal Account No.” as the bank account.

Now when you post the entry you will get VAT entries as well as G/L and Bank Account Ledger Entries:

If you wish to record VAT for more than one G/L code you can list the expense codes and blank off the “Bal. Account No” on each line and then have the final line entry as the balancing credit card bank account as per below. (again the VAT posting groups have defaulted from the G/L code)

Now when you post the batch you’ll get the relevant VAT entries as well as G/L and Bank Account Ledger Entries:

If you have the “VAT Difference” option ticked on the batch you can change the “VAT Amount” at any time if this differs from the actual VAT you need to post.

I hope you find this useful if you ever need to post payments with VAT.

Thanks for reading!

Dynamics GP Vs Dynamics 365 Business Central – Account Segments and Dimensions

Introduction

This is another blog in a series I’ve been writing comparing functionality in Dynamics GP to Dynamics 365 Business Central.

In this post I’m looking at account segments in Dynamics GP compared with dimensions in Dynamics 365 Business Central.

The configuration of Dimensions and Account Segments can become quite a in depth subject, so in this post I’m just going to briefly outline what I regard as the basics in both products.

**Please note you can extend the analysis in Dynamics GP with Multi Dimensional Analysis (MDA) or Analytical Accounting (AA) which I won’t cover in detail in this post. For example you might require additional analysis for a particular project which can be achieved with MDA or AA.

Dynamics GP – Account Segments

Dynamics GP supports a traditional account structure using account segments to describe a General Ledger code. You can create a maximum of 10 segments and the combination of those segments is the General Ledger code itself. For example in the demo data that accompanies Dynamics GP the General Ledger account code is comprised of 3 segments. This is shown below in the “Account Format Setup” window:

In this configuration there’s a “natural” segment, or main segment, and then there’s segments for “Division” and “Department”.

These additional segments can be named in the “Account Segment Setup” window.

Therefore the GL code below of 300-6170-00 can be described as the Repairs & Maintenance code for the “Sales” department. (the Sales department being department 300)

As I’m used to this configuration I do find reporting off the back of this configuration quite easy, however I’ve found one drawback is if I want to create a new department I’d tend to create this for all combinations of the natural code, so could end up with lots more codes that might not be used.

Dynamics 365 Business Central – Dimensions

In Dynamics 365 Business Central the main account code is made up of one segment, which is the natural code, and additional dimensions are created for analysis.

You can create a maximum of 2 Global dimensions and an unlimited number of shortcut dimensions.

Global dimensions are special as they are stored on the ledger entry tables so can be used to easily filter and analyse data throughout the system whereas shortcut dimensions are stored in a sub table.

For example below is a GL code (6110) from the Cronus data in Dynamics 365 Business Central which is a Sales Code described in one segment.

I can then assign dimensions at Customers/Suppliers/GL Code level to add my extra analysis. For example I’ve assigned the dimension “Customer Group” to the customer below with a value of “Large”. (you can also edit the analysis prior to posting)

Now when I post a transaction for this customer the dimension analysis will be posted onto the Ledger Entry tables for the transaction so you can perform additional analysis. (** As mentioned above Global dimensions are stored on the main Ledger Entry tables and shortcut dimensions on a sub table)

If I was replicating the demo company account setup from Dynamics GP I’d have the natural segment as the GL account, and two dimensions. One for the department and one for the division.

There’s also the flexibility to make the dimensions mandatory, require the same default code to be used, or have no code entered.

Finally, you can also set code mandatory or defaults at the table level for speed of setup. For example, I could setup a default for the customers table, so all customers require analysis. i.e. below I’ve set the system so every customer needs analysis to the CUSTOMERGROUP dimension

Conclusion

I’m used to the account segments in Dynamics GP, so seeing and using dimensions did take a little getting used to. However all in all dimensions offer great flexibility and if used correctly can keep the chart of accounts clear and concise.

Thanks for reading!

Thinking of making the move to Business Central? We can help