Dynamics 365 Business Central – A couple of methods I use when posting opening balances for Sales and Purchase Ledger

Introduction

In previous posts I’ve looked at how I post opening balances for Fixed Assets, Expected Costs and Bank Accounts. Links to these articles can be found below:

Today I wanted to discuss how I post opening balances for Sales and Purchase Ledger.

The post will focus on opening balances for Sales Ledger, however I follow the exact same process for Sales and Purchase Ledger.

I used to stick with one tried and trusted method however I recently encountered an issue which has made me reassess and try something new.

I’ll detail both methods below including the issue I recently encountered with the first method.

Preparation

In order to prepare for the opening balances, there’s a couple of very important things to check and do.

Firstly, unless there are exceptional circumstances, I will only bring in outstanding Sales Ledger transactions, therefore I always recommend applying all open invoices, credits, payments in the source system. I then ask the client to ensure the debtors report balances to the General Ledger Accounts Receivable code.

Once everything is reconciled in the source system, I provide a data pack in the form of a Excel spreadsheet for the client to complete with their Sales Ledger opening balance transactions that can be easily imported into a General Journal via a configuration package.

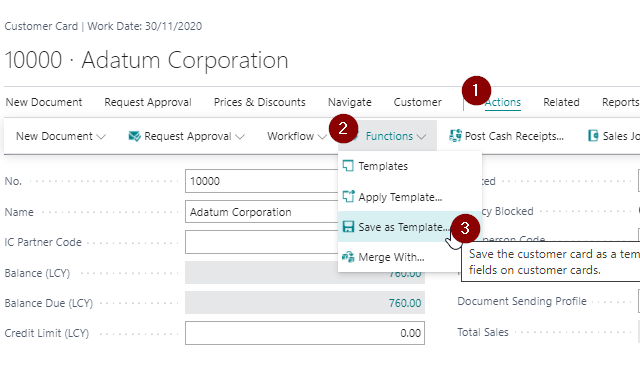
I also include a “Readme” sheet as part of the Excel spreadsheet. This has more information on each column included in the data pack, to make this easier for the client to complete. A snippet of the readme is shown below however you can download the Excel Sheet from here along with other Free Stuff 🙂

Its also worth noting the General Ledger opening balances for the Accounts Receivable and Accounts Payable is posted separately via the GL Opening Balance Trial Balance.

Method 1 – Balance every entry to the Accounts Receivable code

Method one involves importing the data pack into a General Journal and then balancing each Sales Ledger opening balance entry (i.e. open Invoice, Credit, Payment etc) to the Accounts Receivable control account. This produces GL entries that will both Debit and Credit the same Accounts Receivable control account. (I do this as the Accounts Receivable opening balance is posted as part of the General Ledger opening balances).

After everything is posted I’ll then check the “Aged Accounts Receivable” report balances to the General Ledger Accounts Receivable code.

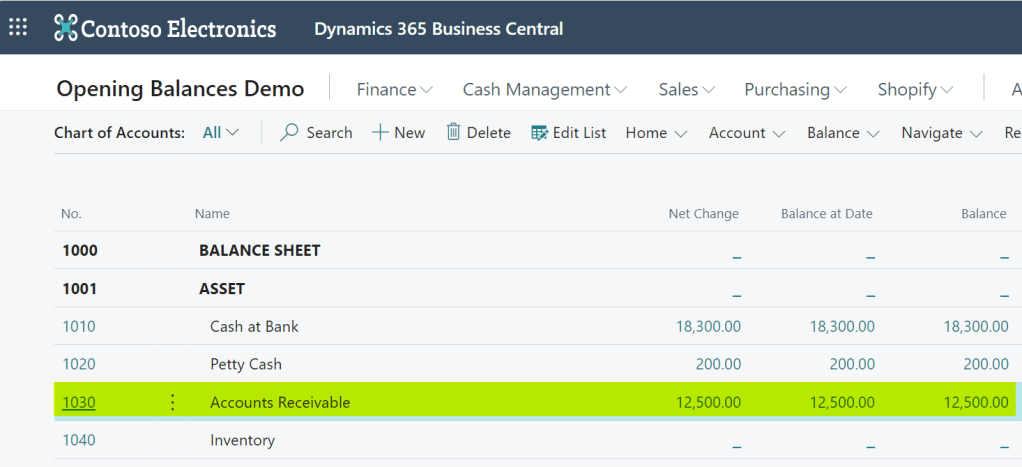
For example in the demo company below the Accounts Receivable GL account is 1030 and has a posted opening balance of £12,500.00

Therefore I import the Sales Ledger opening balances from the data pack into a General Journal and then ensure each entry balances to GL code 1030 and the total balances to £12,500.00.

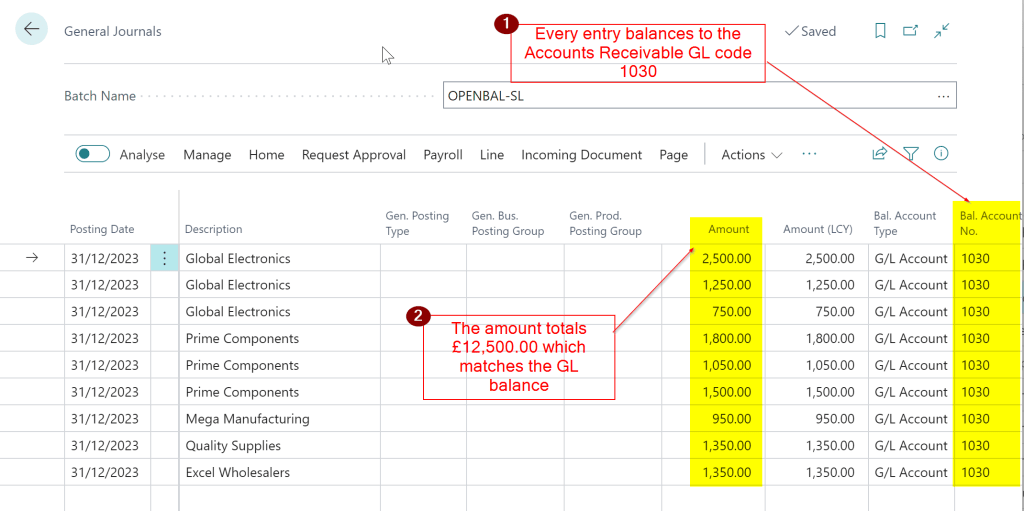
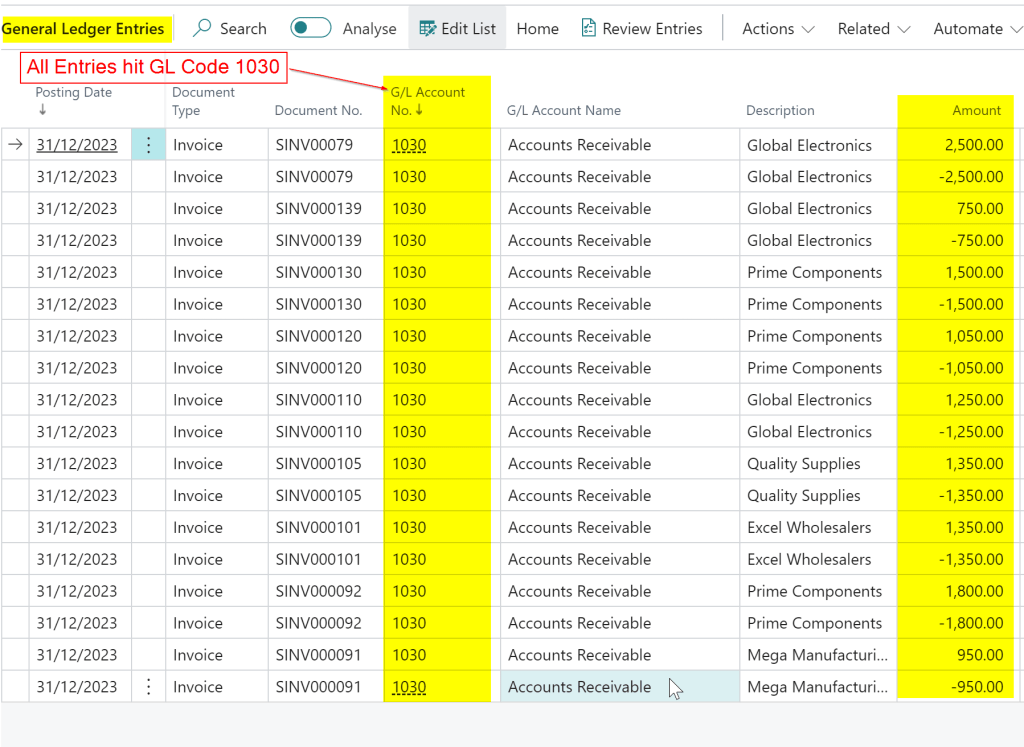
When posted every entry then Debits and Credits the GL Code 1030 making no effect to the GL balance.

As a final check, after posting the opening balance I run the “Aged Accounts Receivable” report and ensure it balances to £12,500.00 and therefore matches the General Ledger balance.

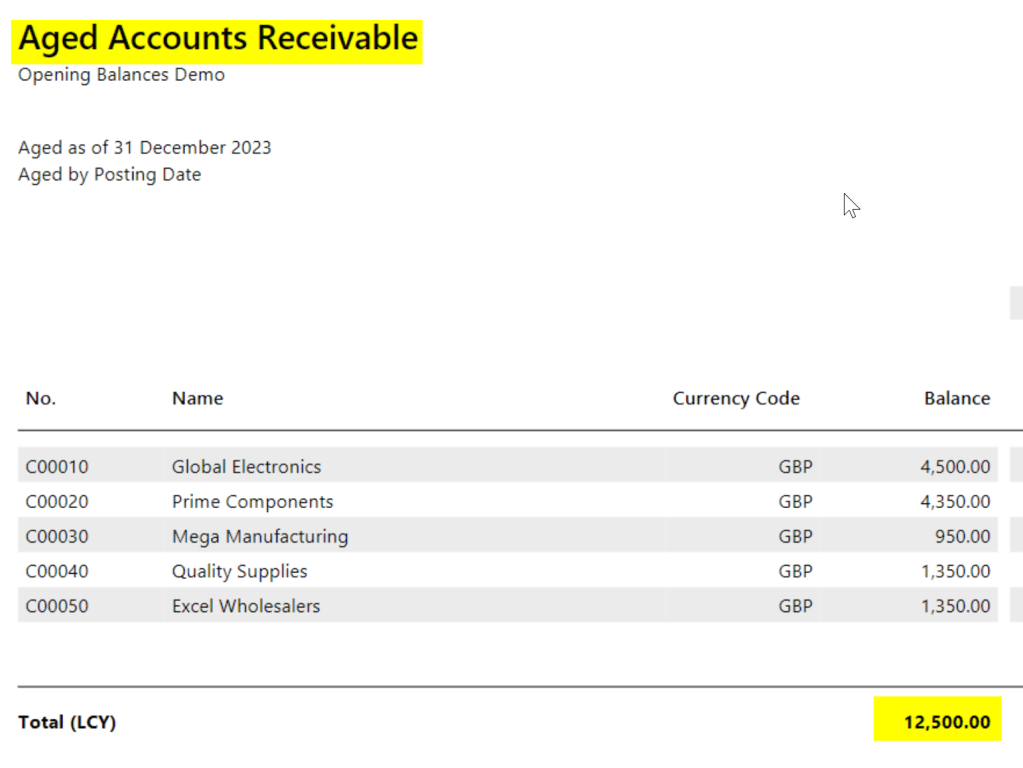
At the end of the process I have a balance on the General Ledger for GL code 1030 of £12,500.00 and a balance on my Sales Ledger of £12,500.00.

Therefore everything balances 🙂

** There is a slight flaw with this which I’ll detail after Method 2 **

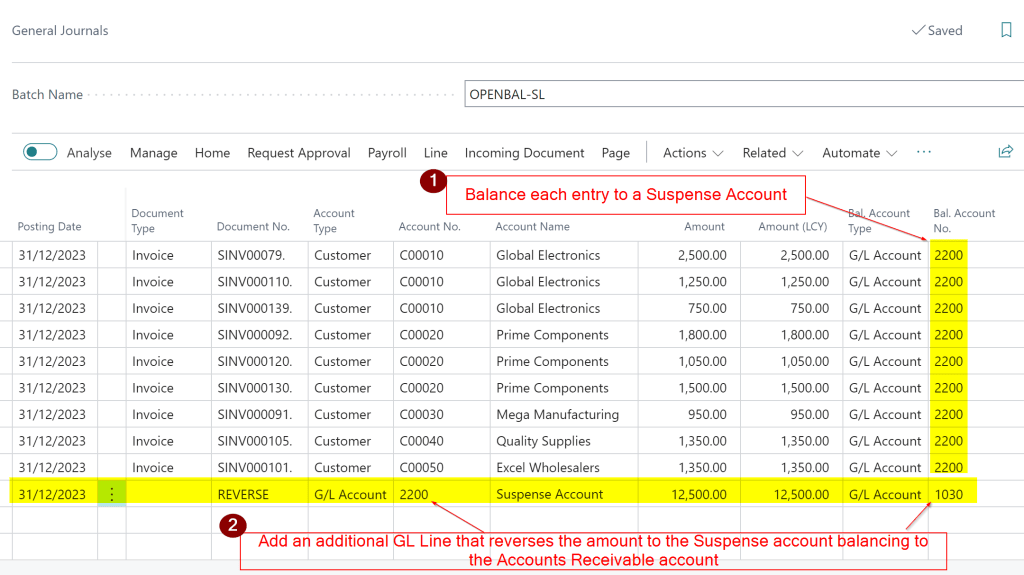
Method 2 – Balance every entry to a Suspense Code

The next method follows the same process except you balance each entry to a Suspense Account.

You then add an additional line that reverses the balance in the Suspense Account to the Accounts Receivable GL Code

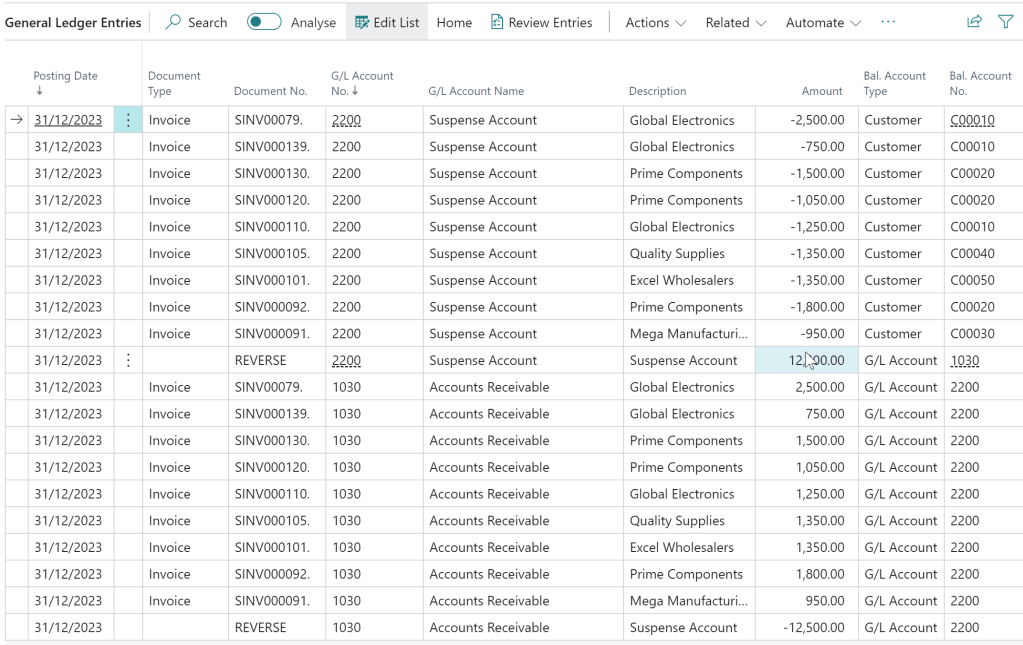
The GL Entries for both the Accounts Receivable and Suspense net off to £0.00.

The final check would be to ensure the “Aged Accounts Receivable” report matches the Accounts Receivable GL balance just like Method 1.

Issue with Method 1

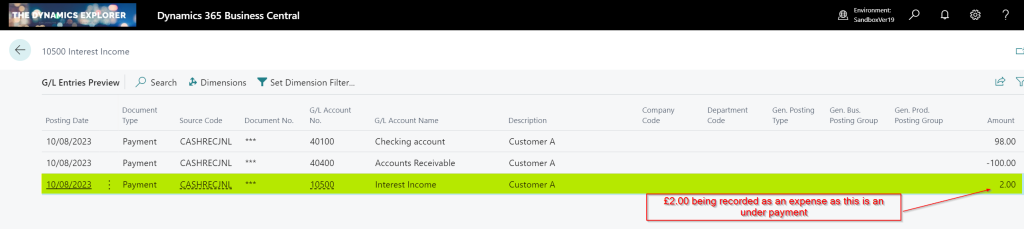
The issue with method one arises if someone reverses one of the Sales Ledger opening balance entries.

If this happens the GL entries debit and credit the Accounts Receivable GL code, as these were the original entries, which causes an imbalance between the GL and the “Aged Accounts Receivable” report (as the transaction drops off this report).

I’ve historically found this a tricky issue to spot and resolve without significant manual reconciliation.

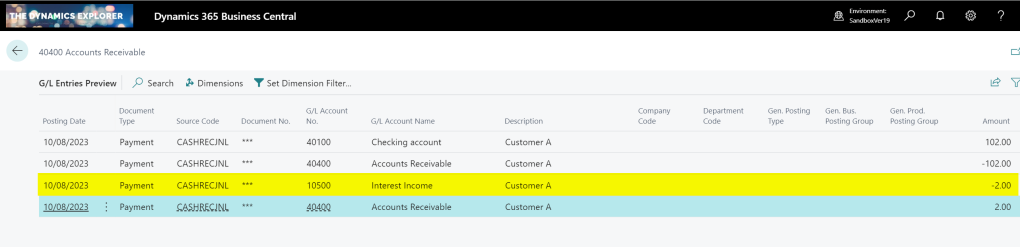
If you were to reverse an opening balance entry posted using Method 2 this wouldn’t the case. The Suspense Account would be affected, as well as the Accounts Receivable account. Therefore the Aged Accounts Receivable would still balance, and you could also easily spot an issue as the suspense account would have a balance.

Conclusion

Both methods offer good solutions for importing and posting opening balances for both Sales and Purchase ledger opening balances.

Although the issue with Method 1 doesn’t happen often its something to be aware of as it can cause issues following a go live.

Thanks for reading!

Dynamics 365 Business Central – Write off overpayments and underpayments using Payment Tolerance

Introduction

There may be occasions when customers overpay or underpay a particular invoice, and you’d like to write off the amount rather than leave it on their account. In this blog, I’ll walk through how you can automatically write off amounts when entering Cash Receipts using a Payment Tolerance. First, I’ll explain an underpayment write-off, followed by an overpayment write-off.

Setup

The setup for Payment Tolerance is located in the General Ledger Setup page.

The “Payment tolerance % amount” is the default amount that can be written off an invoice. Therefore, for example, if you had an invoice for £100.00, the default you could write off would be £0.10. (as we’ll see below this is a suggestion that can be over written when applying)

The Max. Payment Tolerance Amount is the maximum you’ll allow to be written off an invoice.

Finally, you also need to setup the Payment Tolerance General Ledger codes in the Customer Posting Group.

Under Payment Scenario

In this first scenario, we have a Sales Invoice for £100.00, but we have only received £98.00, and we wish to write off the £2.00.

The cash receipt is created for £98.00 as per below:

I then click “Process > Apply Entries” and find and apply the cash receipt to the invoice.

Once in the apply screen I can see the £100.00 and the Max Payment Tolerance has defaulted to £0.10 as per my setup. (this is 10% of the Sales Invoice Total)

Next I change this to 2.00 and then click “Process > Set Applies-to ID”

Now, when I click OK, I’m presented with the following message:

The default is “Leave a Remaining Amount?” however I change this to “Post the Balance as a Payment Tolerance?” and click “Yes”.

Now, when I preview the postings, I can see amounts being recorded in the Payment Tolerance GL accounts to account for the Payment Tolerance in the General Ledger. Additionally, there are Detailed Customer Ledger Entries to rectify the remaining amount on the Sales Invoice.

The General Ledger entries have an extra entry for the £2.00 underpayment, which is recorded as an expense. (i.e. a Debit amount)

There is also an extra detailed ledger entry to correct the remaining amount on the Sales Invoice

Over Payment Scenario

In the second scenario, we have a Sales Invoice for £100.00, and we have received £102.00. Instead of returning the £2.00 or leaving it on account, we opt to write off the £2.00 using payment tolerance.

Again we create a Cash Receipt for £102.00 as per below:

We then find the Sales Invoice and change the Payment Tolerance to £2.00 and select “Set Applies-to ID”

Again, we are prompted with the payment tolerance warning so select “Post the Balance as a Payment Tolerance?” and click “Yes”.

This posts additional General Ledger Entries for the £2.00 overpayment, but this time crediting the tolerance account. (as this is additional Income)

We also get additional Detail Customer Entries to correct the amount remaining on the Payment

Taking Payment Tolerance on Posted Documents

In the previous examples we walked through the process of applying the Payment Tolerance while posting the Cash Receipt. Now, let’s consider a scenario where the Cash Receipt has already been posted, and we aim to apply it to an invoice while also considering a payment tolerance.

Below is a posted sales invoice and a posted cash receipt. The sales invoice is for £100.00 and the cash receipt is £98.00. We will now apply them together and take the payment tolerance rather than leave £2.00 outstanding on the invoice.

First I go to “Customer Ledger Entries” and highlight the Cash Receipt and select “Process > Apply Entries”

Next I change the “Max Payment Tolerance” amount to £2.00 and click “Process > Set Applies-to ID”

I then click “Process > Post Application” and click OK

I’m then presented with the option of how to deal with the Payment Tolerance.

I select “Post the Balance as Payment Tolerance” and click “Yes” and the entries are posted and both documents will show an amount remaining of £0.00.

Conclusion

As you can see, the payment tolerance feature can be incredibly useful for writing off amounts when applying cash receipts.

If you encounter numerous instances of underpayments and overpayments, leveraging this functionality eliminates the need for manually entering adjustments to clear these minor sums.

Thanks for reading!

Need help with Business Central? Contact us

Dynamics GP Vs Dynamics 365 Business Central – Class IDs and Templates

Introduction

This is another blog in a series I’ve been writing comparing functionality in Dynamics GP to Dynamics 365 Business Central.

In this post I’ll compare Dynamics GP Class ID’s to Dynamics 365 Business Central Templates. Both offer a method to quickly setup static data like customers and vendors however as usual both offer slightly different features and functionality.

Dynamics GP – Class ID’s

When creating static data like customers or vendors in Dynamics GP you can use Class IDs to make the process more efficient. As the Class ID is stored on the customer card, we also generally advise to create Class’s as a way to group together similar customers or vendors.

Below is the Debtor “Class ID” that can be used for defaults when setting up Customers in Dynamics GP. (this is accessed via the “Tools > Setup > Sales > Debtor Class” menu option)

As you can see various options can be set on the Class that the customer will then inherit if its assigned this Class. Things like the payment terms, the credit limit, currency and so on. We also specify the default GL codes that can should be used.

Once its setup you physically assign the Class ID to your customers as per below and the customer will inherit the settings from the Class ID.

You can then make any tweaks to the customer setup after the settings from the Class have been copied. For example you may wish to have slightly different discount on this debtor to what was on the Class ID.

One interesting feature of the Class ID is, if you make a specific change on the Class ID you can then roll this down to all Customers that are assigned this Class. (or not if you prefer). For example you may change the Sales Person on a Class and roll this change down to all Customers in the Class and only this change will be rolled down. (therefore other tweaks you had made on the Customer would be unaffected)

As the Class ID is physically stored against the customer you can also run certain reports by Class ID such as the various trial balance reports.

Dynamics 365 Business Central – Templates

In Dynamics 365 Business Central we can use “Templates” to assist in creating static data such as customers and vendors.

To do this I can select “Actions > Functions > Templates” when in a customer page.

Next I can click “Actions > New Document > New”

This would present me with a “Customer Template” I can create as per below:

In this page I can set things like default payment terms, currency codes and also posting groups for GL codes.

Once I’ve entered the default information on the template I can select this when creating new customers so those settings are inherited. I can also then edit and tweak any settings that are specific to this customer.

**Please note the template you used to create a customer isn’t saved on the customer.

Also, if I’ve accidentally assigned the incorrect template to a customer I can reapply another template via the option below whilst in the customer page

I can also create a new template based on the settings of a customer that’s already been created (or any existing customer). To do this I’d select the option below in the customer page:

Conclusion

Both Dynamics GP and Dynamics 365 Business Central offer great solutions to improve the efficiency of entering static data.

The difference with Dynamics GP is the Class ID stays with the customer enabling you to group certain debtors and run reports based on certain Classes whereas the template is just used to copy information to the customer.

Another interesting feature of Class Ids in Dynamics GP is the ability to change the Class and roll down any changes to the associated debtors.

Thanks for reading!

Thinking of making the move to Business Central? We can help