Dynamics 365 Business Central – How to default a General Ledger account onto a Purchase Invoice using “Recurring Purchase Lines”

Introduction

There may be times when you regularly use the same General Ledger code on a Purchase Invoice for a certain Vendor. For example, a rent GL account when posting an overhead invoice for your rent.

In this case it would be great if the system would default the GL account onto the Purchase Invoice after you select the supplier.

In this post we’ll look at how this is possible using “Recurring Purchase Lines” in Business Central.

The Scenario

The scenario we have is every month we receive a rent invoice from our landlord for our business premises.

Every month when keying this into Business Central we have to select the supplier and then manually pickup the relevant GL account.

We want a method to streamline this process by having Business Central automatically populate the Purchase Invoice detail with the GL code as soon as we select the Vendor.

We are going to achieve this by configuring and using “Recurring Purchase Lines”

Setup the Recurring Purchase Line

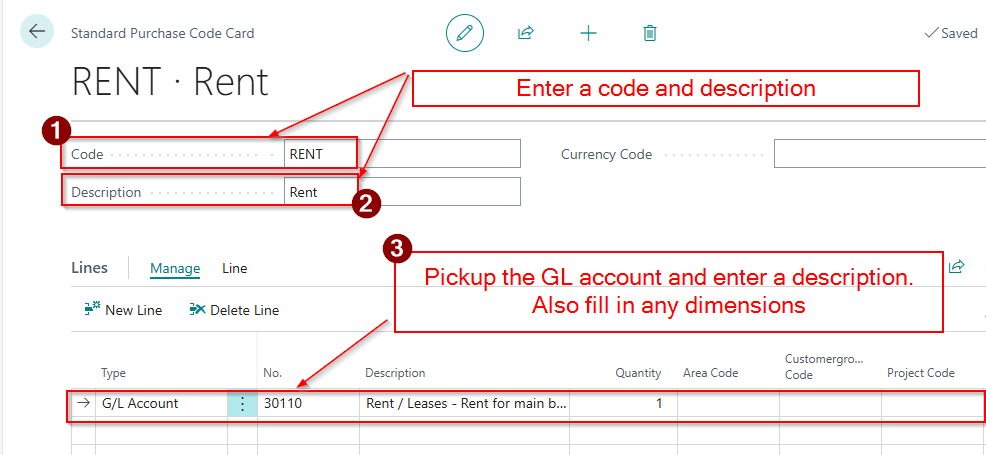
The first step is to search “Recurring Purchase Lines” and open the page

Once in the page I’ll click “New”

I’ll then enter a code and a description and then select the GL code and any dimensions I also want to default.

Now the Recurring Purchase Line is setup we need to go and add it to our supplier.

Add the Recurring Purchase Line to the Vendor

I’ll therefore go to “Vendors” and click “Related > Recurring Purchase Lines”

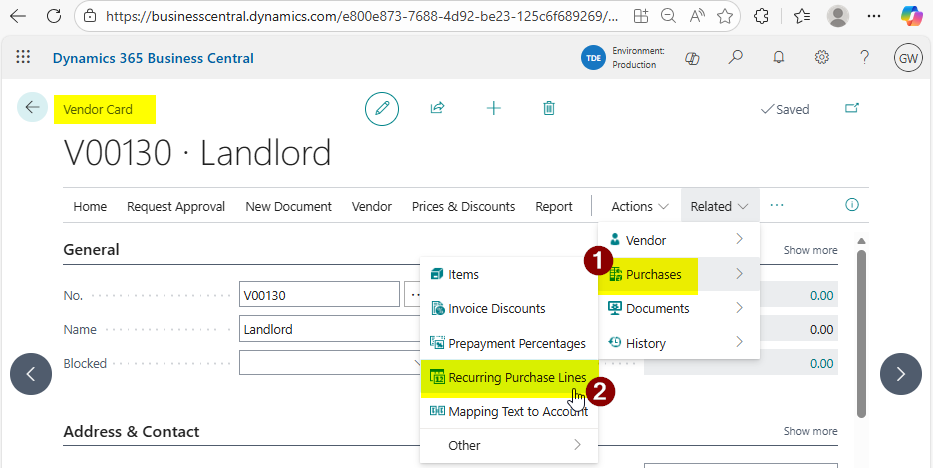
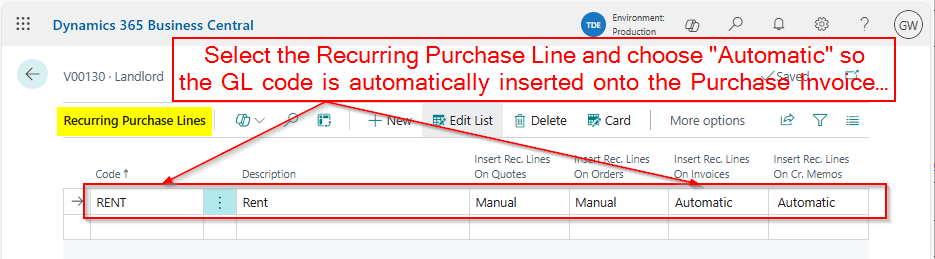
You then pick the Recurring Purchase Line we just created and select “Automatic” so the associated GL code is automatically inserted when we create new Invoices and Credits

Now the setup is complete all that’s left is to test it 😊

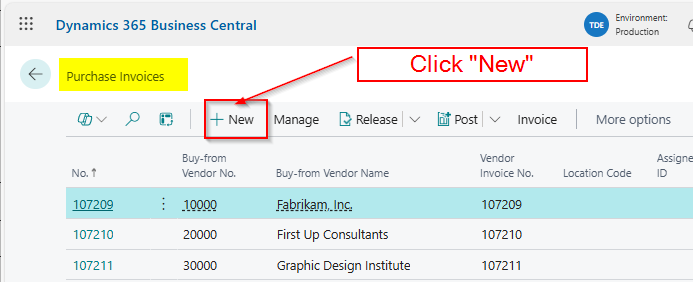
Let’s create a Purchase Invoice

To test I’ll go to the “Purchase Invoice” page and create a new invoice. (I could do this from the Vendor by clicking “New Document > Purchase Invoice” but for this demonstration I’ll go the long way round 😊)

Next I’ll pickup the Vendor, and as you can see the GL account has been automatically pulled through onto the Invoice lines.

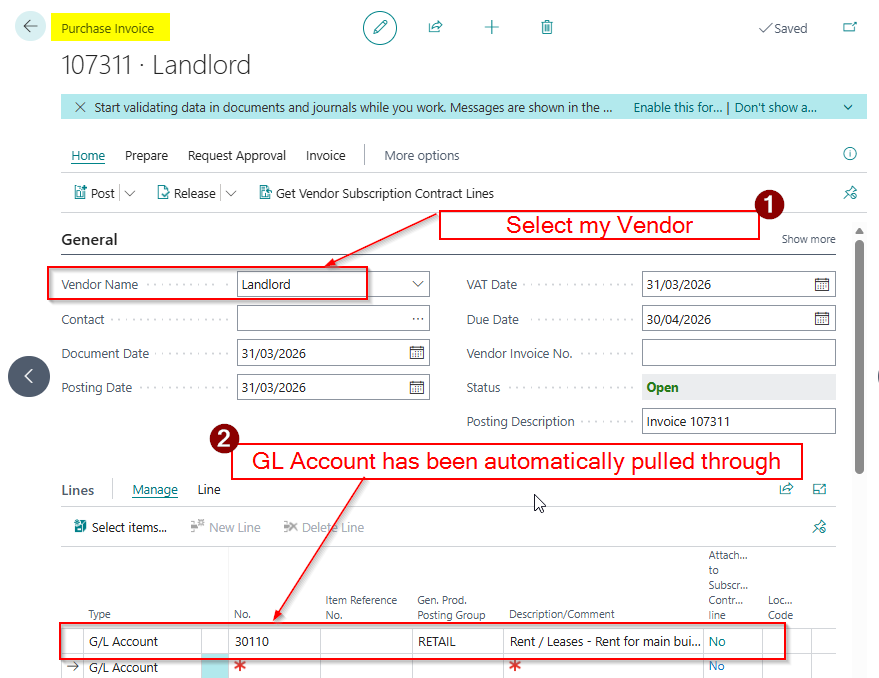
This is a great time saver and ensures the correct GL code is always picked up.

Conclusion

This post has been through how to setup and configure Recurring Purchase Lines. This can help with the speed and accuracy of entering Purchase transactions.

Its also worth noting this functionality can be used for Items as well as GL Accounts. You can also assign the Recurring Purchase Lines to multiple suppliers and add multiple lines to each Recurring Purchase Line.

All in all its just another fantastic feature of Business Central 😊

Thanks for reading!

Dynamics GP to Dynamics 365 Business Central – How to post a batch of Sales or Purchase Invoices using the same Posting Date

Introduction

During a recent training session with a client transitioning from Dynamics GP, a question came up regarding batch posting.

In Dynamics GP, it’s possible to use the batch’s “Posting Date” as the posting date for all transactions within the batch. The client wanted to know if this same functionality is available in Business Central.

In this post, I’ll walk you through how to achieve this in Business Central.

Dynamics GP Batch Setting

The setting the client is referring to is configured in the “Posting Setup” window in Dynamics GP as shown below:

Here, you can configure, on a ledger and per-transaction type (origin) basis, whether the system should use the posting date from the individual transaction or the batch when posting transactions.

Business Central “Post Batch” Feature

In Business Central, when posting multiple Sales or Purchase Invoices, you can control which date the system uses as the “Posting Date” through the following option.

See below, I can select multiple Purchase Invoices and select “Post > Post Batch”

And then enter the Posting Date you wish the system to use for each of your Purchase Invoices:

Let’s walkthrough an example with Purchase Invoices

Let’s say you have the two Purchase Invoices shown below, each with a different posting date in September, but you want both to be posted using a Posting Date of September 30, 2024:

First, you select both Purchase Invoices in the Purchase Invoice list page, choose “Post > Post Batch,” and choose to replace the Posting Date as shown below.

Now when I view the Purchase Invoices I can see both invoices have a Posting Date of 30/09/2024

Conclusion

This post shows how you can batch post Sales or Purchase Invoices using a single Posting Date, replicating the functionality available in Dynamics GP.

Thanks for reading!

Dynamics 365 Business Central – How to Post a VAT only Invoice

Although not a regular occurrence, from time to time users need to post a VAT only invoice onto the sales or purchase ledger. If this happens below are the steps you can take to do this:

Please note these steps are specifically for a Purchase Invoice however it should work the same for a Sales Invoice.

Step 1: Add a new VAT Product Posting Group

First go to “VAT Product Posting Group” and add a new VAT Product Posting group for FULL VAT as per below

Step 2: Configure VAT Posting Setup

Next we need an additional FULL VAT entry in the “VAT Posting Setup” matrix as per the screen shot below. I’ve included FULL VAT twice, once with a blank “VAT Bus. Posting Group”, and once with a “VAT Bus. Posting Group” of DOMESTIC.

Please note I’ve set the system up this way so if entering a VAT only invoice via a “Purchase Journal” I only have to populate the “VAT Prod. Posting Group” whereas if I were to enter the invoice via “Purchase Invoice” its likely the supplier would have a “VAT Bus. Posting Group” of DOMESTIC. Setting the system up this way covers both scenarios.

Step 3: Entering the VAT only invoice via a “Purchase Journal” window.

In this example I’m entering a £100.00 VAT only invoice via the “Purchase Journal” window.

To do this I’ve entered the invoice details as follows:

Just to confirm, I’ve selected a document type of “Invoice” and the Vendor account of “1000”. Then for the “VAT only” element to work I’ve selected the following for the various columns:

Bal. Account Type = G/L Account

Bal Account No. = 46330 (this is the VAT account specified in the VAT Posting Setup)

Bal. Gen Posting Type = Purchase

Bal. VAT Bus. Posting Group = BLANK (I could select DOMESTIC as well if I like)

Bal. VAT Prod. Posting Group = FULL VAT

Please note using the “VAT Posting Group” setup outlined in my screen shot above a combination of a blank “VAT Bus. Posting Group” and a “VAT Prod. Posting Group” of “FULL VAT” equates to 100% full VAT

If I now preview the posting on this transaction I can see 3 G/L Entries and one VAT entry:

If I drill down on the G/L Entries this shows the full amount posting to the VAT control account specified in the VAT Posting Setup. (as this is a Purchase Invoice the credit side goes to the Creditors Control Account):

And when I drill back on the VAT entries I can see a VAT entry for the full amount:

Step 4: Entering the VAT only invoice via the “Purchase Invoice” option

Once in the “Purchase Invoice” page I enter the invoice line as per below.

To confirm, I’ve entered the line as per below:

Type = G/L Account

No. = 46330 (this is the VAT account specified in the VAT Posting Setup)

Vat Prod. Posting Group = FULL VAT

Now when I check the “Statistics” on the invoice it shows the full amount to VAT:

Also, when I preview the posting I can see G/L entries to the VAT account and a VAT Entry of the full amount:

Step 5: Ensure FULL VAT is included on the VAT Statement

Once you have posted the transaction you should also ensure the new “VAT Prod. Posting Group” (i.e. FULL VAT) is included on the VAT statement so any transactions posted to this are picked up correctly when reporting the VAT.

As you can see below I’ve included this in the Purchases section:

I hope this helps anyone who needs to post a VAT only invoice in Dynamics 365 Business Central.

Thanks for reading!