There may be times when you need to post a full VAT only journal to record a VAT adjustment. In these scenarios you want no effect in the General Ledger, but wish to have an adjusting VAT entry appear on the VAT statement.
In this post, I’ll walk through the necessary steps for setting up VAT for these scenarios. Once the setup is complete, I’ll explain the process for posting the VAT only journal.
VAT Setup
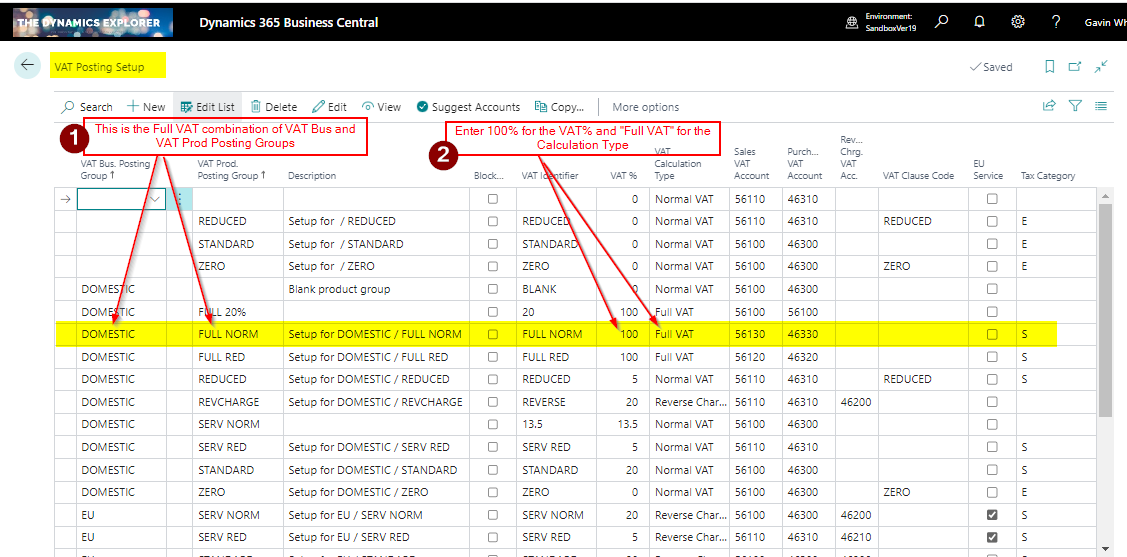
First, we need to add the necessary VAT combination in the VAT Posting Setup window. For this I go to the “VAT Posting Setup” window.
In this window I add the following VAT combination.
Now if I use the combination of “Domestic” and “Full Norm” in a journal this should calculate full VAT at 100%.
VAT Journal
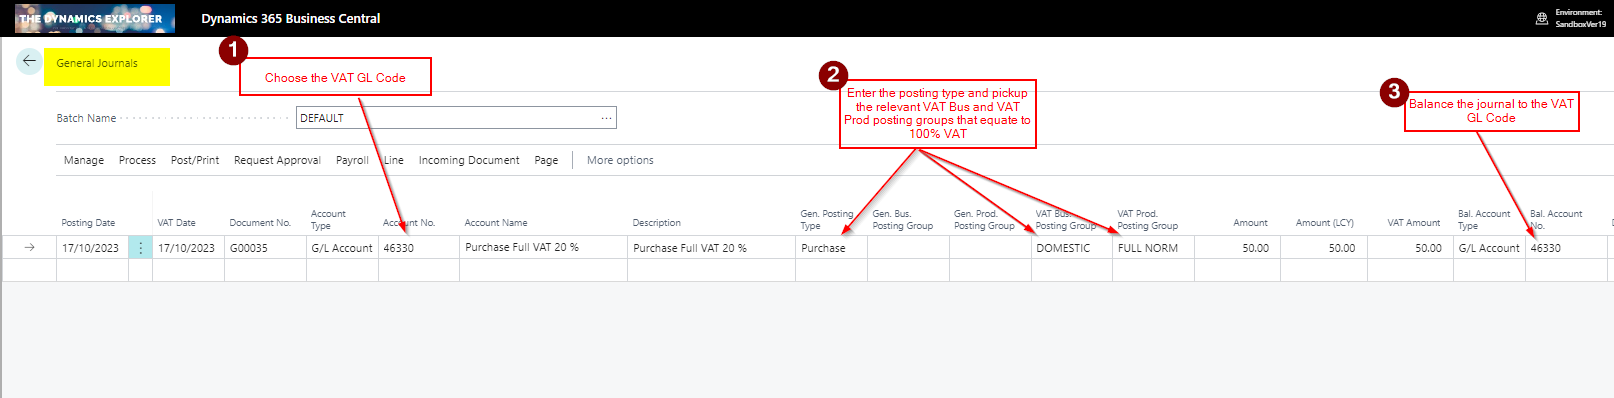
Now the VAT Posting Setup is complete, I’ll post the correcting VAT adjustment journal using the “General Journal” page as per the screen shot below.
In this journal I’m doing the following:
1) First I’m selecting the VAT GL Code
2) Then I’m selecting the relevant VAT Business and VAT Product Posting Group for the Full VAT combination
3) Lastly, I’m balancing the journal to the same VAT GL code
This produces the following GL Entries. As you can see there is no effect in the General Ledger.
The posting also creating this VAT Entry
Therefore, although we have no effect in the General Ledger, we have a VAT entry to record the adjustment on the VAT Statement. We just need to edit the VAT statement to pickup the VAT Business and VAT Product posting combinations
VAT Statement
To ensure this is picked up on the VAT Statement go to the VAT Statement page and add the combination:
Conclusion
This post shows how you can setup Business Central to post VAT adjustments that won’t affect the General Ledger but do create adjusting VAT entries.
When you reverse a journal entry using the standard “Reverse” feature there’s no option to change the posting date. By default the journal will automatically reverse on the same date as the original journal postings. This isn’t ideal if you have closed the period and want the reversal to post into a different period.
In this post I’ll show how you can reverse a journal and change the date using the “Posted General Journal” feature. I’m a big fan of this feature as it not only gives the ability to reverse a journal with a different date but you can also reverse multiple journals.
The Issue
As discussed, when reversing a journal using the standard functionality there’s no way to change the “Posting Date”. The field highlighted below isn’t editable.
If the financial period is closed, posting the reversal into a different period becomes necessary, which prevents the ability to use the standard feature.
Configuring Posted General Journal Functionality
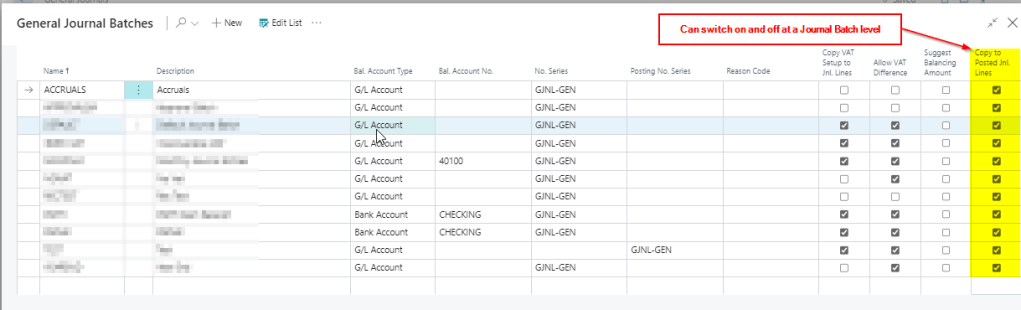
Before we can use the Posted General Journal functionality we first have to ensure its enabled on the various General Journal Templates.
Therefore search “General Journal Templates” and tick the option “Copy to Posted Jnl” as per below:
When the option has been selected on the General Journal Template, it can then be toggled off and on at a Journal Batch level as well:
With this option enabled any journal that’s subsequently posted creates “Posted Gen. Journal Lines” in addition to the usual General Ledger Entries.
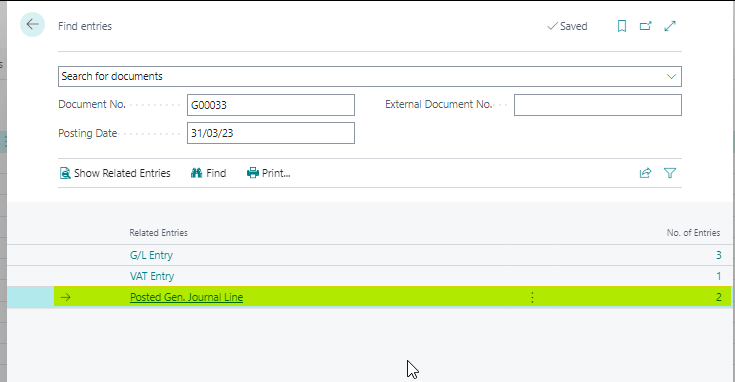
For example I clicked “Find Entries” on a General Ledger Entry and I can see additional “Posted Gen. Journal Lines”
I find this really useful as if you drill down on the “Posted Gen. Journal Line” it opens the Posted General Journal page which provides a snapshot of the journal that was posted.
This is very similar to how a snapshot of a Sales Invoice is taken and saved as a “Posted Sales Invoice” which you can refer back to.
Reversing a Journal using the Posted General Journal Page
Now we have the option switched on we can walk through how to reverse a journal.
First open the “Posted General Journal” page. You can either search this directly or drill down from the “Find Entries” page.
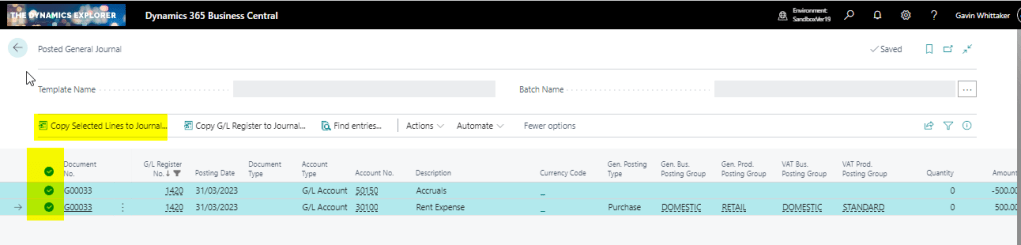
Once in the “Posted General Journal” page locate the entry you wish to reverse. In my example I’m going to reverse document number G00033.
I therefore filter on this document number and select both lines and choose “Copy Selected Lines to General Journal” as per below:
** Please note you can also select “Copy G/L Register to General Journal Lines” **
Next I’ll choose to replace posting date with an April date and also to reverse the sign:
Now when I open the ACCRUALS batch its the reversing journal is ready to post.
You can also use this functionality to reverse more than one journal at once and I’ve also used it to find out the G/L Register number of a journal postings 🙂
Conclusion
As you can probably tell I’m a big fan of this functionality. I think this is because of my background using Dynamics GP which creates similar snapshots of posted journals.
Ever wondered why you have options to post to Vendors in a Sales Journal and Customers in a Purchase Journal? What do Documents and Journals have in common? How are Ledger entries and GL register created?
In this post I’ll explain more about Financial Journals and Documents and hopefully unlock some of their secrets along the way.
**Please note there are other journals such as Item Journals for inventory management which I wont cover in this post)
Journals
Journals are scattered throughout Dynamics 365 Business Central and can be used to record a whole manner of transactions. The most commonly used financial journals would be General Journals, Sales Journals, Purchase Journals, Cash Receipt Journals and Payment Journals.
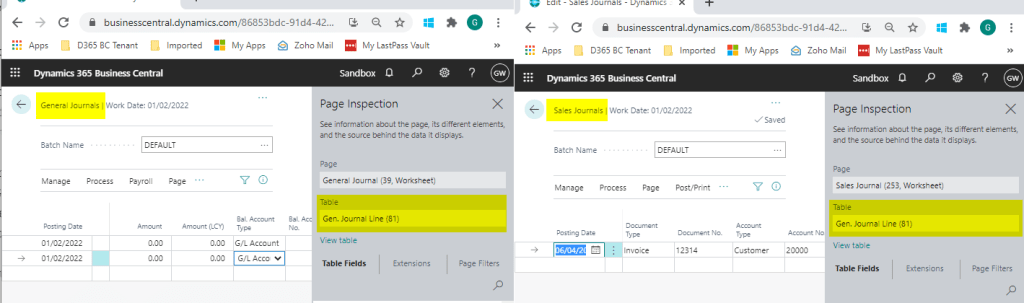
Interestingly, under the hood all the journals are pretty much the same. All the journal pages are based on the Gen. Journal Line (81) table and all journals use the same Gen. Journal posting routine (codeunit) to create the relevant Ledger Entries and G/L Register.
As you can see from the image below although the General Journal and Sales Journal use different pages they are based on the same table.
The difference between the journals only really exists on their Pages and the actions and options available on those Pages.
For example the Payment Journal page has an action to run the “Suggested Payment Routine”, which is relevant to paying suppliers, and the other journals also have different actions. However, as they are all technically the same, nothing stops me creating a Payables Payment transaction in a Sales Journal and getting the correct Ledger Entries.
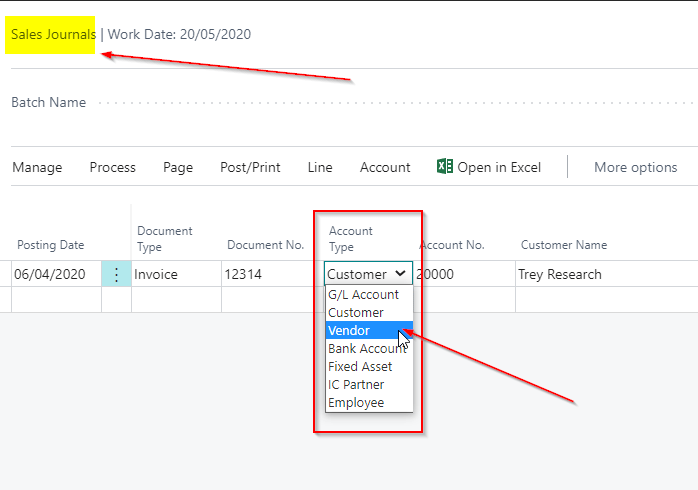
For instance, as you can see below although I’m in a Sales Journal I can still choose an Account Type of “Vendor”.
When you post the journal the relevant Ledger Entries and G/L Register are created and the journal lines are removed. (some exceptions exist like for recurring journals).
Therefore, taking all this into consideration, we could technically just use the “General Journal” page to record all of our financial transactions in Business Central, whether they be Sales or Purchase entries. We can also use one journal to record a whole host of different types of transaction. (as I show in this post)
Documents – Overview
When we refer to documents in Dynamics 365 Business Central we are referring to things like Sales Invoices and Purchase Invoices. (there are of course others such as Sales Orders, Sales Shipments, Purchase Orders, and Purchase Receipts)
They will have a Header and Lines, with the Header typically containing information on the Customer or Supplier and various dates, and the lines containing information or what you are selling or buying, for example items or GL codes.
When you post an Invoice, postings routines are ran to create the Ledger Entries and G/L Registers and new Posted Documents are created and the unposted document is removed. (you can archive Sales Orders using the archiving options in Setup)
For example if I were to Post a Sales Order via the “Ship and Invoice” option a Posted Sales Shipment and Posted Sales Invoice would be created along with financial Ledger Entries such as General Ledger and Customer Ledger Entries.
Documents – Posting
So what do Documents and Journals have in common? What makes them technically the same when it comes to the creation of the Ledger Entries and GL Registers?
As mentioned above when you post a Document the system runs posting routines to create the relevant ledger entries and it turns out these are the exact same posting routines that run when you are posting a journal (whether that be a General Journal, Payment Journal etc).
The posting routine responsible for this is “Codeunit 12, Gen. Jnl.-Post Line”. This is responsible for creating all the Financial Ledger Entries and G/L Register regardless of whether you are posting a journal or a document.
Therefore when you post a document its converted into journal lines, the lines then validated, and finally its posted in the same way as a journal.
Conclusion
The Gen. Journal Line table and Gen. Jnl.-Post Line codeunit do feel like the heart of Dynamics 365 Business Central. (certainly the financial heart)
I hope this article helped explain some of the concepts around journals that I found confusing when I started out with Business Central.