Dynamics 365 Business Central – Error Message “You have one or more documents that must be posted before you post document no….” when posting a Journal

Introduction

When posting a Journal in Business Central you receive the message “You have one or more documents that must be posted before you post document no..<docno>..according to your company’s No. Series setup”.

In this post we’ll look at why this error occurs and how it can be resolved.

First, let’s recreate the error

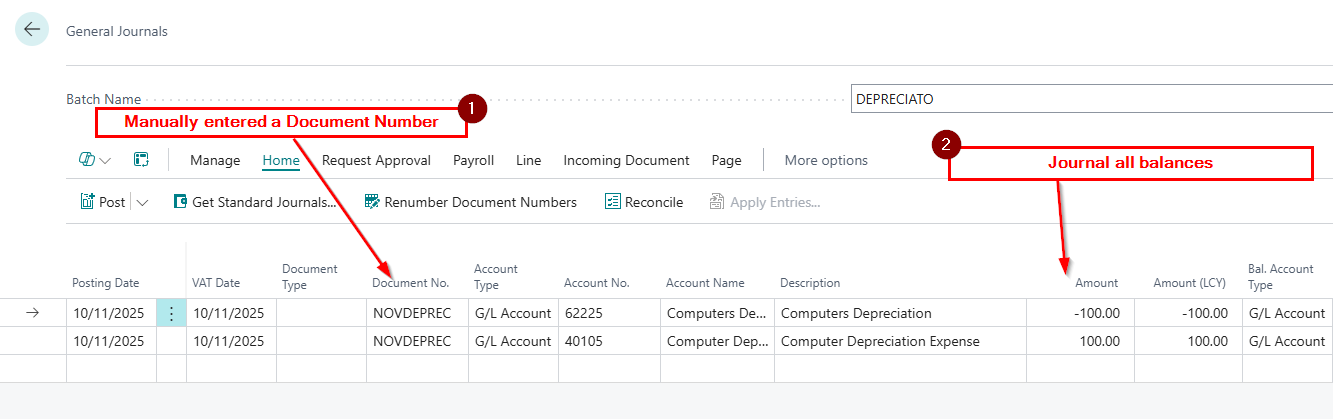
Here I have a journal batch for Depreciation. Everything looks fine, I’ve entered a Document Number and the journal balances.

The system will allow me to “Preview Post” however when I try and post the batch I’m presented with the error below:

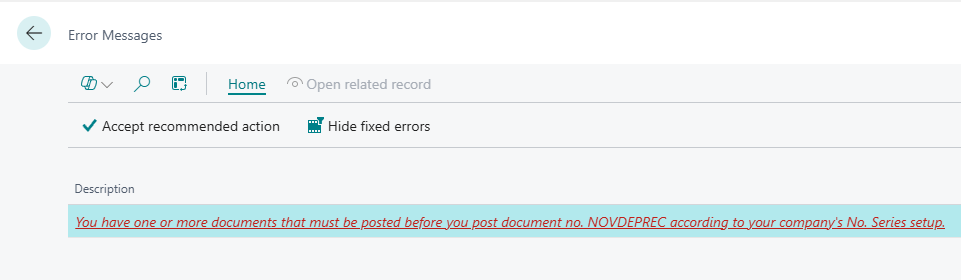
I’m unable to post the batch?

Before we discuss the solution, let’s take a closer look at the configuration.

Journal Batch Configuration

The error is giving me some clues to the issue. Part of the error is saying “according to your company’s No. series setup”. I know that a No. Series in a Journal comes from the batch itself, so let’s have a look at that.

Below is a screen shot of my “DEPRECIATO” batch when contains my journal.

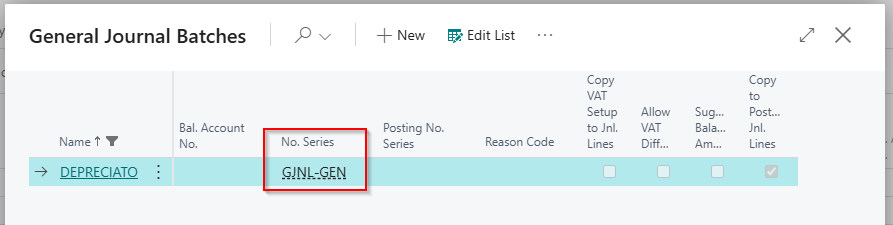
Here we can see that the batch has been assigned the No. Series “GJNL-GEN” so let’s go to the “No. Series” page and take a closer look at its configuration.

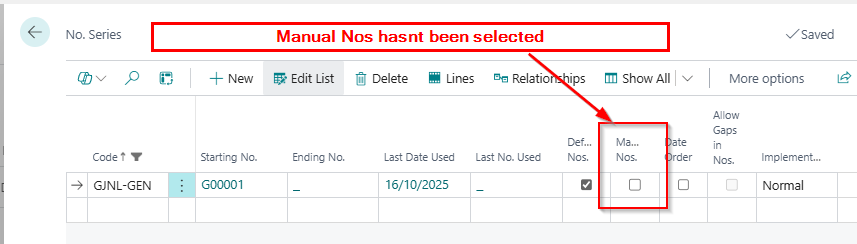
Straight away I’m seeing that “Manual No’s” has been switched OFF on the batch. This means that as this Number Series is assigned to my batch, I can’t enter my own number in journals in this batch.

Going back to my batch, I’ve explicitly given the journal my own Document Number of “NOVDEPREC”. However, as we have seen, the Number Series assigned to my batch doesn’t allow Manual No’s.

Therefore, this must be my issue 😊.

The Solutions

Now we know the issue, let’s think of some potential solutions.

Switch ON Manual Numbers on the Number Series

The most obvious solution is to go to my Number Series and switch ON manual numbers. This would enable me to use my own document number of NOVDEPREC and the journal should post.

However this means that if the number series is assigned to any other batches, users would now be able to enter their own document numbers, and this might not be a good idea.

Remove the Number Series from the Batch

I could also remove the “Number Series” from my batch. I could then use any document number I like on the journal lines.

This would be fine is this is my personal batch, and the controller is happy for manual numbers to be used on journals.

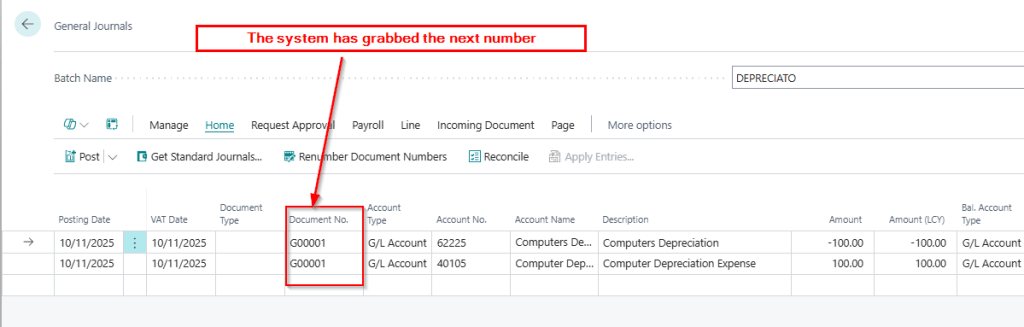
Click “Renumber Document Numbers” on the menu

Finally, I could click “Renumber Document Numbers” from the function menu on the journal page as per below:

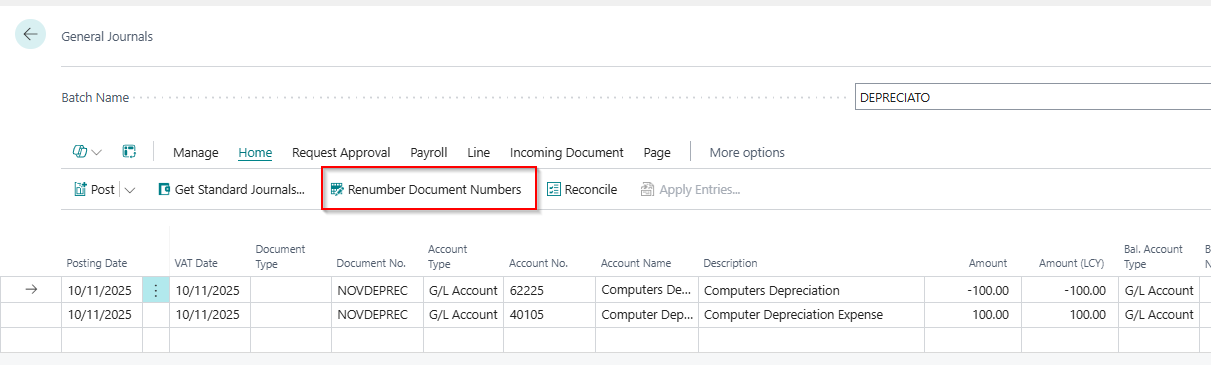
This will automatically fetch the next number from the Number Series and the batch should now post

Conclusion

This post has shown why the error “you have one or more documents that must be posted before you post document no..<docno>..according to your company’s No. Series setup” occurs, and gives a number of solutions.

I tend to use the last option when fixing this, as I assume the user what’s a sequential number for their journals. Having that configuration also ensures you always have a sequential journal number which most users want.

Thanks for reading!

Dynamics 365 Business Central – Shortcut Dimensions and Why Your Dimensions Aren’t Visible on Journal and Document Lines

Introduction

It’s common for users to overlook a crucial step when setting up new Dimensions in Business Central, which can result in the Dimensions not being easily visible or accessible in various documents and journals pages.

This post will guide you through the process of adding a new Dimension and explain the final, often overlooked step that makes your Dimensions easily accessible.

As a side note, I think it also explains why these dimensions are referred to as “Shortcut” dimensions 😉

Create a new Dimension

One of the things I love most about Business Central is how simple it is to gain additional financial insights by adding additional Dimensions, without the need to create new General Ledger accounts. (this harks back to my Dynamics GP days 😊)

In this instance I want to start analysing my financial data by SEASON, so I’ll go to “Dimensions” and create the new Dimension and Dimension Values. (note how I already have lots of other dimensions i.e. AREA and BUSINESSGROUP etc)

I’ll now add the Dimension Values I want to analyse to:

Lets use it in a General Journal

Now I’ve created the new Dimension, I’ll use it in a General Journal, however on first inspection its not available as a column for me to use?

In fact, as you can see from my screen shot above, the only dimensions I have available are “DEPARTMENT” and “CUSTOMERGROUP”? Why can’t I post to my other dimensions like my new SEASON dimension and the other existing dimensions like AREA and BUSINESSGROUP etc?

The simple answer is that I can – it’s just not immediately obvious. By clicking “Line > Dimensions”, as shown below, I can access all my dimensions.

This is great, but I want to be able to enter them easily, right on the journal line, just like I can with “DEPARTMENT” and “CUSTOMERGROUP”.

Essentially, I want these dimensions to be more accessible – to be “shortcuts”, if you will. (Hold that thought 😉)

Let’s make them “shortcuts”

The solution to this issue is found on the “General Ledger Setup” page.

After creating a new Dimension, the final step is to add it as a “Shortcut” dimension on the “General Ledger Setup” page.

In my company, I’ve only added DEPARTMENT and CUSTOMERGROUP as shortcut dimensions, which is why those are the only ones I can see on the journal lines:

When you designate a dimension as a “Shortcut” dimension in the General Ledger Setup, it becomes available on the lines of Journals and Documents.

I’ll therefore add my new Dimension, SEASON, as my “Shortcut Dimension 3 Code”

Now, when I open my General Journal page, I can see the SEASON dimension alongside the DEPARTMENT and CUSTOMERGROUP dimensions.

I no longer have to click “Line > Dimensions”, its available as a “shortcut” right on the journal line 😊

Conclusion

This post highlights the importance of completing the final configuration step when creating Dimensions: adding them to your General Ledger Setup. Without this step, using the dimensions in Journals and Documents requires more clicks and is therefore more difficult.

It’s also clear now that, although you can create an unlimited number of dimensions, you can only have a maximum of eight shortcut dimensions. Any additional dimensions will need to be accessed through the menu bar options.

Thanks for reading!

Dynamics 365 Business Central – A closer look at the Balance and Total Balance Fields in Journal pages

Introduction

I’m often asked what the “Balance” and “Total Balance” fields represent on the General Journal page (or any journal page). Since its something I go through regularly I thought I’d take the opportunity to make it into a blog post 😊 . (I also love revisiting some of the basics of journal functionality)

Therefore in this post we’ll walk through how the “Balance” and “Total Balance” fields are calculated and why I often refer to them as the “unbalanced” amounts.

Its also nice as it gives us the opportunity to highlight some of the basic functionality in the journal like how you can “Balance” a line using the “Bal. Account No”.

General Journal Example

To demonstrate how the balance and total balance fields are calculating, I’ve created a four line journal in the General Journal page. Crucially on the third line I’ll enter a “Balancing” general ledger account in the “Bal. Account No” field. (more on why later)

The journal I’ve entered is below with the balance and total balance highlighted:

At this point, I have a four-line journal with a total amount of the lines is £180.00. The “Balance” field currently shows £100.00, while the “Total Balance” shows £160.00. As a result, all three values differ from one another.

Now let’s break this down and first look at how the “Balance” field is being calculated.

The Balance Field (or is it the unbalanced field?)

The “Balance” field represents the running total of the journal lines based on the line you have selected in the journal. For example, in the screenshot above, I’ve selected the top line, so the “Balance” field shows £100.00, as this is the value of the first line. If I were to click on the second line, the “Balance” would change to £150.00 as per below.

However this isn’t where the story ends with the “Balance” total😉.

If I click on the 3rd line the “Balance” will remain at £150.00, but why is this? Why hasn’t the balance field changed to £170.00? If you look closely its because the 3rd line has been balanced with a G/L Account. Therefore the “Balance” of the journal on the 3rd line remains at £150.00.

Finally if I click on the 4th line of the journal the balance will change to £160.00 as this is the sum of 1st, 2nd and 4th lines of the journal. (its the sum of the unbalanced lines of the journal)

Total Balance

The “Total Balance” field disregards which line you’ve selected in the journal and shows the “Total Balance” of the unbalanced lines. In this case, it’s £160.00.

To wrap this up, if I add a fifth line that “balances” the lines that are unbalanced, the “Total Balance” changes to £0.00 (and would show £0.00 regardless of where you click in the journal).

Its also important to note you can only post the batch when the “Total Balance” is zero.

Conclusion

The “Balance” field provides a running total based on your selected line, while the “Total Balance” reflects the sum of all unbalanced lines in the journal. Recognising how these fields work not only helps in verifying your entries, but also ensures your journal is correctly balanced before posting.

Thanks for reading!