Dynamics GP to Business Central – How to Control your General Ledger Code and Dimension Combinations using Allowed Values Filter

Introduction

Due to the design of the General Ledger Account structure in Dynamics GP, its easy to control the General Ledger and Dimension combinations you want to use in transactions.

This is because the General Ledger code itself includes the Segment and Nominal code. Therefore if you don’t want a certain segment to be used with a Nominal code, you simply don’t create that General Ledger Code.

However when you migrate to Business Central those segments become “Dimensions” and are by default available to select with any General Ledger code.

In this post I’ll go through how you can enable the same control in Business Central using the “Allowed Value Filter” option when creating your General Ledger accounts.

How it works in Dynamics GP

Let’s say we have a segment for “Cost Centre” in Dynamics GP, and one of those cost centres is 500 for “Research and Development”. If we want to ensure that only the relevant expense codes are used with that Cost Centre, we simply don’t create those General Ledger Code combinations.

For example, I have an expense code for “Office Supplies” of 31010, therefore I don’t create the General Ledger Code 500-31010 in my Chart of Accounts.

However, I also have other Cost Centres for Sales (100), HR (200), IT (300) etc which I would create the relevant General Ledger Codes. For example I’d create the General Ledger code 300-31010 to record my Office Supplies for the IT cost centre.

This is a nice easy way to control postings and ensure incorrect entries aren’t posted.

The Business Central Approach

When you migrate to Business Central, your General Ledger (GL) accounts are consolidated based on the nominal code. For example, General Ledger codes such as 100-31010, 200-31010 and 300-31010 are merged into a single GL code, 31010. The Cost Centre then becomes a Dimension.

In my opinion, this a much better way to manage the General Ledger accounts, as it consolidates my chart of accounts, and I no longer have to create multiple General Ledger accounts every time I introduce a new Cost Centre like I would have to Dynamics GP 😊

However the question now is, how can I control which Cost Centres I can use with my General Ledger Codes in Business Central?

Blocking Dimension Values by General Ledger code

The solution to this issue is the “Allowed Values Filter” to limit the Dimension Values allowed on your General Ledger Account Card.

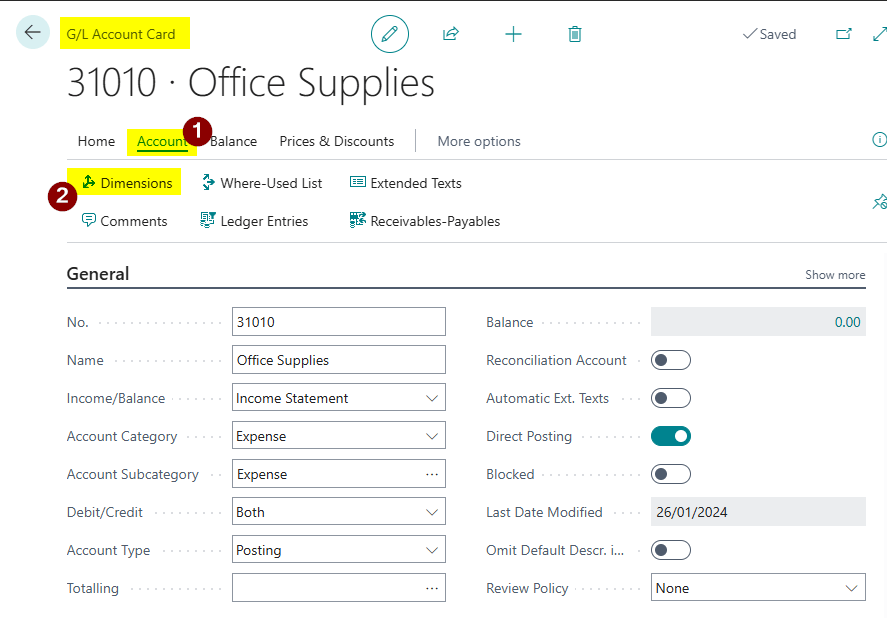
To do this open your General Ledger Account card and click “Account > Dimensions”.

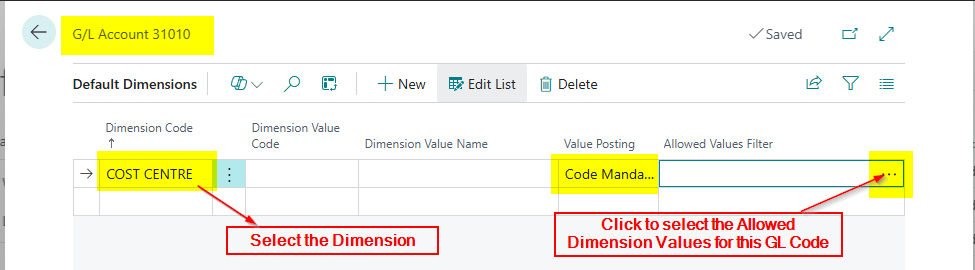
Next choose the relevant Dimension, in this case “Cost Centre”, and click to select the “Allowed Values Filter”.

This only works if you select “Code Mandatory” for the posting which is usually ok for Dynamics GP migrations

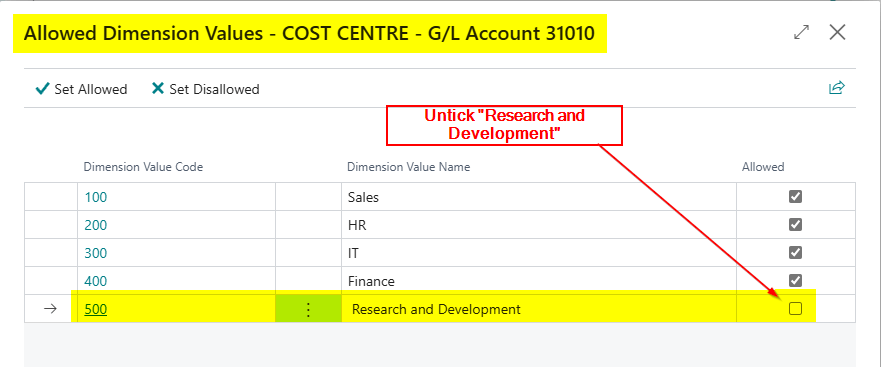
Now I can untick the Cost Centres I don’t want to be used with this General Ledger code.

Conclusion

In this post I’ve shown how by leveraging the “Allowed Values Filter” in Business Central, you can maintain the same level of control over General Ledger and Dimension combinations as in Dynamics GP, ensuring only valid Cost Centres are used with specific General Ledger codes 😊.

Thanks for reading!

Dynamics GP to Business Central – How to easily convert your GP word templates to BC word layouts

Introduction

Just like Business Central, Dynamics GP allows you to design your externally facing document layouts, such as Sales Invoices / Customer Statements / Remittance Advice, using Microsoft Word.

When migrating to Business Central, you might have lots of different layouts in Dynamics GP that you need to recreate in Business Central, which can potentially take lots of time and effort.

In this post, using a Sales Invoice as an example, I’ll show how you can quickly and efficiently migrate the structure of the layouts to Business Central, rather than recreating them from scratch.

Step 1: Remove Content Controls from your Dynamics GP Layout

The first step involves removing the existing content controls from your Dynamics GP Sales Invoice layout.

To do this extract your Word Layout from Dynamics GP, open it in Word, and you’ll see it has references to the old Dynamics GP fields as per below:

We need to remove these references, so press CTRL+A to select all, and then right click and choose “Remove Content Control”

This will remove all the content controls from the Word Document.

If the layout has headers or footers, ensure you remove content controls from any of those fields as well.

Step 2 – Import the Word Layout into Business Central

In Business Central, go to the “Report Layouts” page, and click “New” and enter the details as per below. Then click OK, browse to your Dynamics GP layout, which now has no content controls, and import it into Business Central.

Step 3 – Update and Export Layout

Now the report layout has been uploaded into Business Central, it will show in the “Report Layouts” page.

The next step is to select the layout and click “Update and Export Layout” which will download the layout and add the Business Central data set.

Step 4 – Open the Layout in Word and make the Changes

The final step is to open the layout in Word, select the Business Central data set via XML part, and start adding the Business Central fields onto the layout.

The great thing now is, you can methodically remove the text from the layout, and replace it with the relevant fields from the Business Central XML data set. This ensures you keep the original design, saving lots of time compared to recreating it from scratch.

Tip: I recommend keeping a copy of the original Dynamics GP template with its content controls intact, so you can easily reference the Dynamics GP data fields.

Conclusion

This blog outlines a straightforward process for rapidly converting your Dynamics GP layouts to Business Central in just a few simple steps.

Incidentally, this approach can be applied to any Word document you wish to adapt with a Business Central data set, though I’ve found it particularly valuable for Dynamics GP migrations.

Thanks for reading!

Dynamics GP – The remittance reprint is including a remittance for a different vendor

A client reported that when reprinting a remittance via the “Recreate Check Stub” option it was correctly reprinting the remittance however another remittance for a totally different vendor was also printing at the same time?

The option being used for the remittance reprint is below

To troubleshoot I looked at the main table used on the “Reprint Check Remittance” layout in report writer.

As you can see from the image above this is the “PM Remittance Temp” table which on investigation is the PM80950 table.

When I queried this table in SQL I found a single row and the Vendor ID matched that of the remittance that was being tagged onto the reprint.

I therefore removed this row from the table by running a DELETE statement in SQL and now when I reprint the remittance it prints correctly.

I hope this helps someone else in the future if they come across the same issue.

Thanks for reading!

Thinking of making the move to Business Central? We can help