This is the second in a two part series looking at what your Dynamics GP data looks like when its migrated into Business Central.
In the first part we explored how opening balances are migrated and how they appear in Dynamics GP. We also looked at some of the options you have when migrating the opening balances, like preventing them auto posting so you can make changes if you were thinking of modifying the Chart of Accounts or adding dimensions. You can read the full post here.
In this post I want to look at how the Historical data migrates and where you can find the historical transactions in Dynamics GP. We’ll specifically look at Sales and Financial transactions.
Please note the migrated historical Purchasing data can be found in the same place as the Sales data you just select the Vendor List rather than Sales List
In my opinion this is one of the main reasons you might consider using the Microsoft tools to migrate your Dynamics GP data to Business Central. The migration of the Historical transactions is one of the first questions you I’m asked on almost every Business Central project, regardless of whether the client is moving from Dynamics GP. Normally the answer is no, or you can but it will involved lots of work and expense. This isn’t the case when moving from Dynamics GP to Business Central. The migration tooling does all the hard work for us and we can reap all the benefits.
Just like the previous post I’ll be using a migrated copy of the Dynamics GP “Fabrikam” text company I’ve migrated into my demo Business Central environment.
Options for Migrating Historical Data
Before we look at the migrated data let’s have a quick look at the options available when migrating the data.
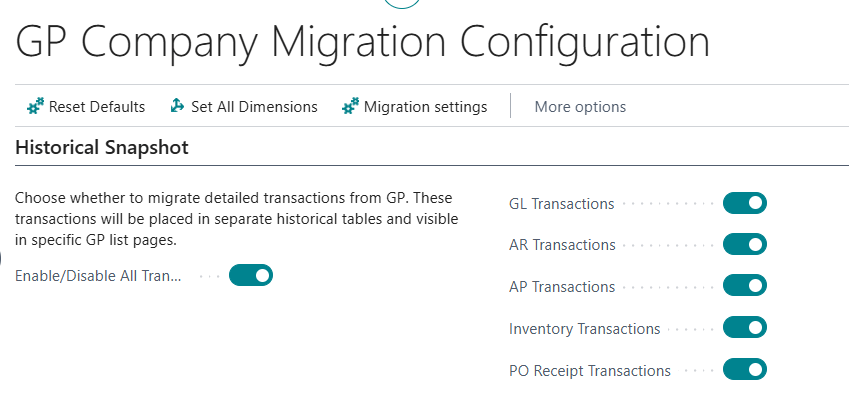
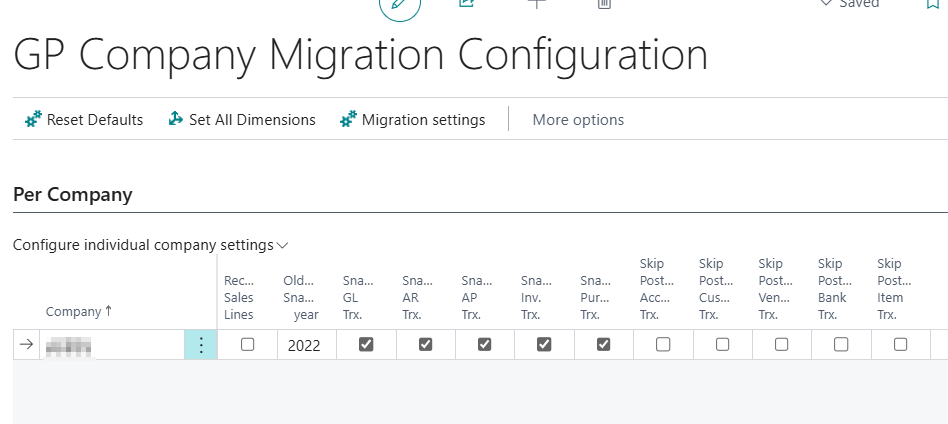
In the “GP Company Migration Configuration” page we are offered the option to migrate the following modules:
We can also specify how many years of history you can migrate using the setting below:
I tend to select all modules and set the history to around 6 years.
Now we know what we can migrate, let’s take a look at where we can find the historical transactions in Business Central, and what they look like 😊.
What do my Historical Sales and Receivables Transactions look like and where can I find them?
Let’s first take a look at some Sales Transactions.
The historical data doesn’t create Customer Ledger Entries, as they have already been fully paid. The historical transactions are migrated into special tables, which can be accessed in various areas of Business Central.
There are a few places you can see your migrated Sales historical transactions however my favourite place is via the “Factbox” on the Customer List Page.
Here I’ve opened the Customer List page and you can see the tiles on the Factbox I can use to see my Dynamics GP transactions
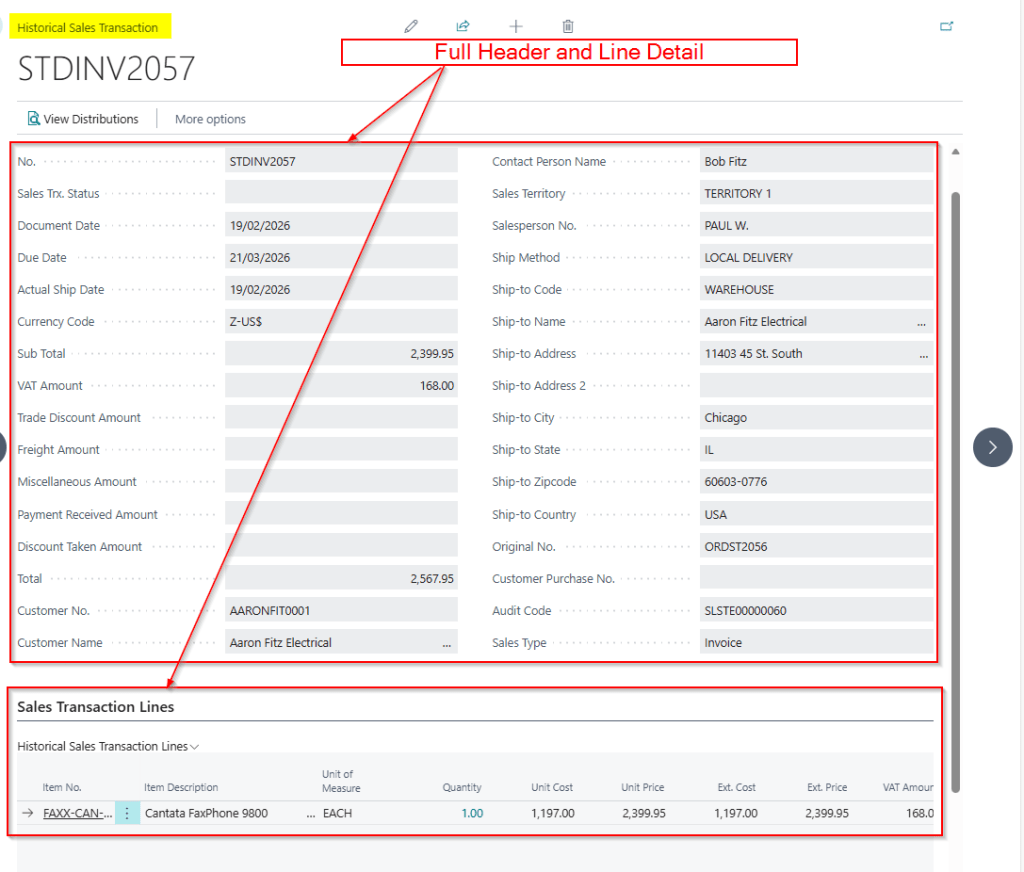
If I click on the “GP Sales Transactions” tile I can see a full list of the “Sales Order Processing” transactions that have migrated from Dynamics GP:
From here I can drill down onto them and see “Distributions” and the Sales Lines
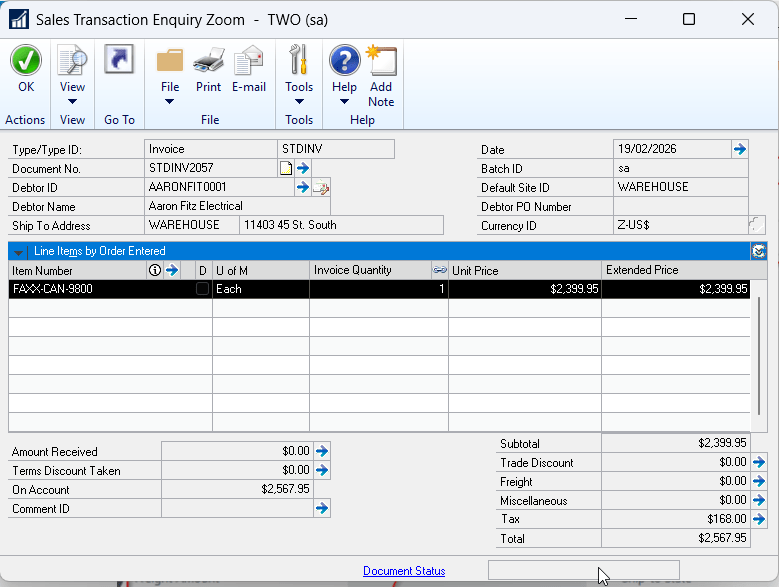
Here’s the same transaction in Dynamics GP. You can see all the detail has migrated
This information being available in Business Central is incredibly useful.
For example I can view the detail on previous Sales Orders and Sales Invoices I’ve sent to my customers. I no longer have to keep referencing my legacy Dynamics GP system for this type of information. Its seamlessly at my finger tips right in Business Central.
But wait it gets better!! Let’s now have a look at the information in the “GP Receivables Transactions” tile.
Note that when you post a Sales Invoice in Dynamics GP, as well as the Posted Sales Invoice, you also get a RM (Receivables Management) type transaction which is a little like the “Customer Ledger Entry” in Business Central. By drilling down on the “GP Receivables Transactions” we are looking at this RM transaction. This is what you apply cash receipts to and what Debtors reports are based off.
After selecting the “GP Receivables Transactions” tile we can see a list of all the fully paid migrated historical transactions:
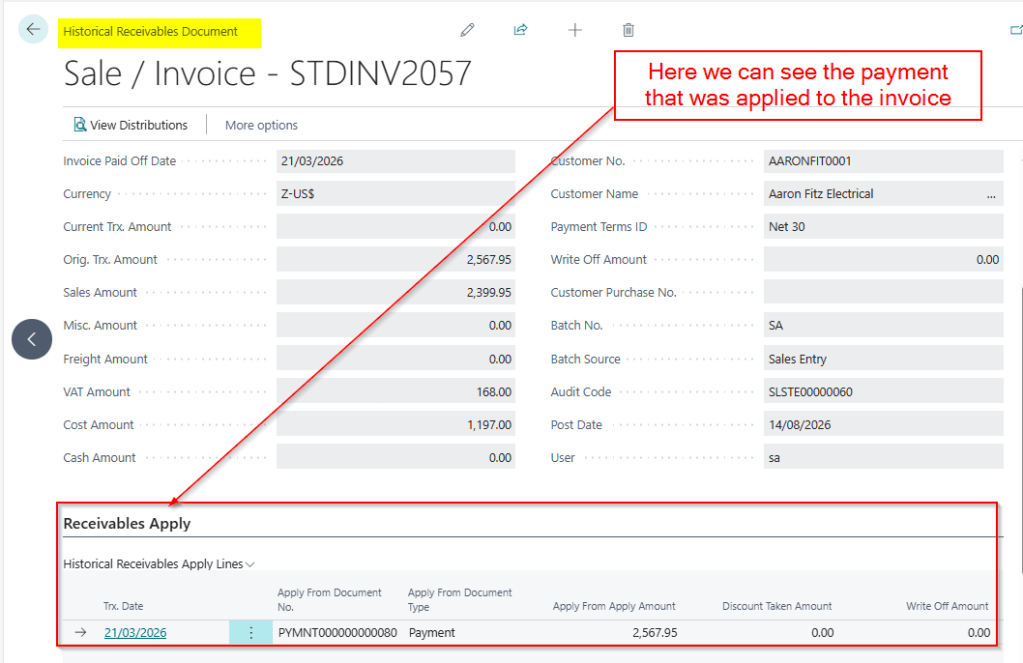
If I drill down on our invoice from the earlier example, STDINV2057, we can now see the Payment that was applied to it.
Amazing! We can see the exact payment that paid the invoice.
This gives me lots of advantages. For example, if I have credit control queries from my customers, I can answer them from right inside Business Central. No need to switch between systems, its right here at my finger tips.
What do my historical Financial Journals look like and where can I find them?
Now let’s take a look at the historical financial data that is migrated.
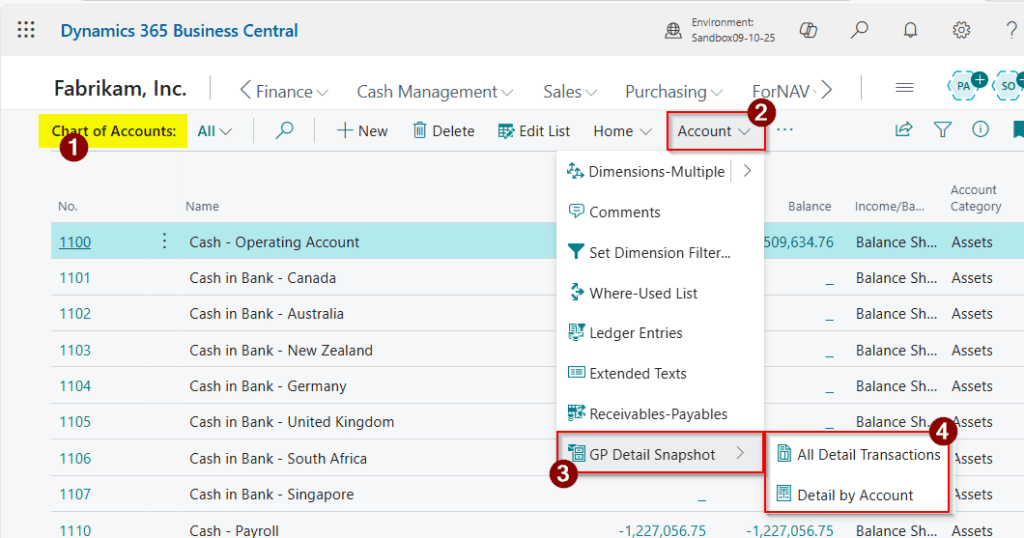
To find the historical Financial data you first go to the “Chart of Accounts” page and from here I can select “Account > GP Detail Snaphot” to get the various options as per below:
I’ll first click “All Detail Transactions” and this takes us to a full list of all the journals that have migrated.
If you are missing you’re old segmented GL structure you can see it here 😊.
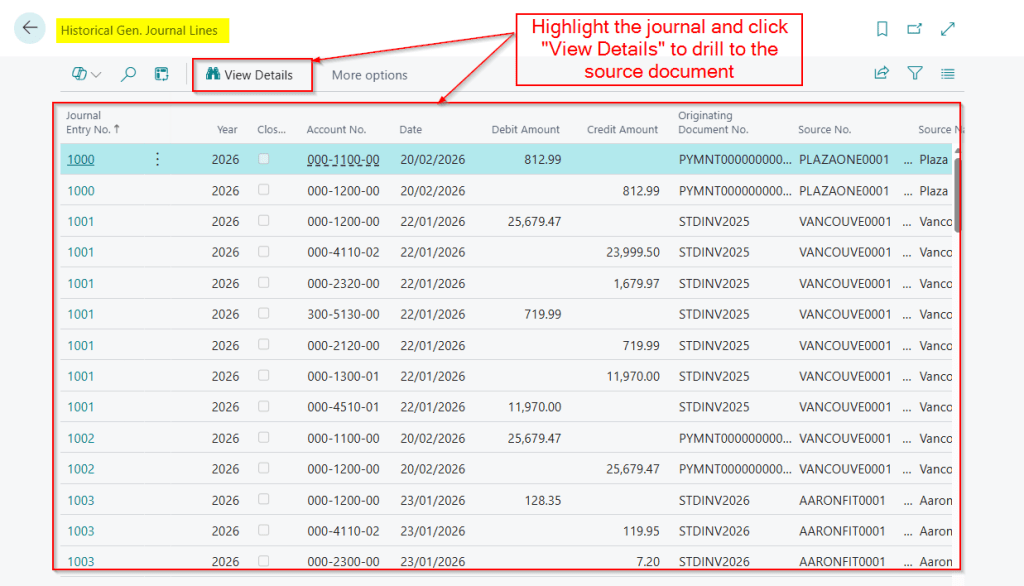
What’s absolutely fantastic is you can highlight a journal and click “View Details” to view the originating transaction. For example if I highlight the payment above and click “View Details” it shows me the payment.
I can even see the Invoice that the payment paid 😊.
If I now click the “Detail by Account” option I can see my whole GL account structure and I’m able to drill down and view the journals per account:
Again this is amazing information that I no longer have to go into Dynamics GP to view.
Now if I have queries on balances or I make regular journal adjustments I can view the historical entries right inside of Business Central.
Conclusion
In this post, we’ve explored how historical data from Dynamics GP is migrated into Business Central using Microsoft’s Cloud Migration tools, and how that data can be accessed for day-to-day reference.
Being able to view historical sales transactions, applied payments, and detailed financial journals directly inside Business Central provides massive value when migrating from Dynamics GP to Business Central.
I would even argue that even if you decide not to go live using a migrated GP company, there can still be significant benefit in migrating your historical data into Business Central as a separate reference company. This allows users to access GP history in a familiar Business Central interface, without impacting the live transactional company. This could strike a nice balance between keeping historical information accessible and starting fresh.
Ultimately, having historical GP data available inside Business Central helps make the new system a true single point of reference.
Microsoft recently added a new feature to Business Central called “Add fields from related tables in Analysis mode”. This is one of the most talked features to arrive in Business Central in a long time, and is rightly receiving rave reviews in the community.
Coming from a Dynamics GP background myself, I couldn’t help but notice its similarity to the much loved “Smartlist” feature in Dynamics GP.
In this post, I’ll compare these two features highlighting their similarities, explore their capabilities, and share real world examples of how I’ve used Business Central’s new feature to solve some reporting challenges.
Smartlist in Dynamics GP
Smartlist is a much loved tool in Dynamics GP that offers a central location where you can report and search on all aspect of your company data.
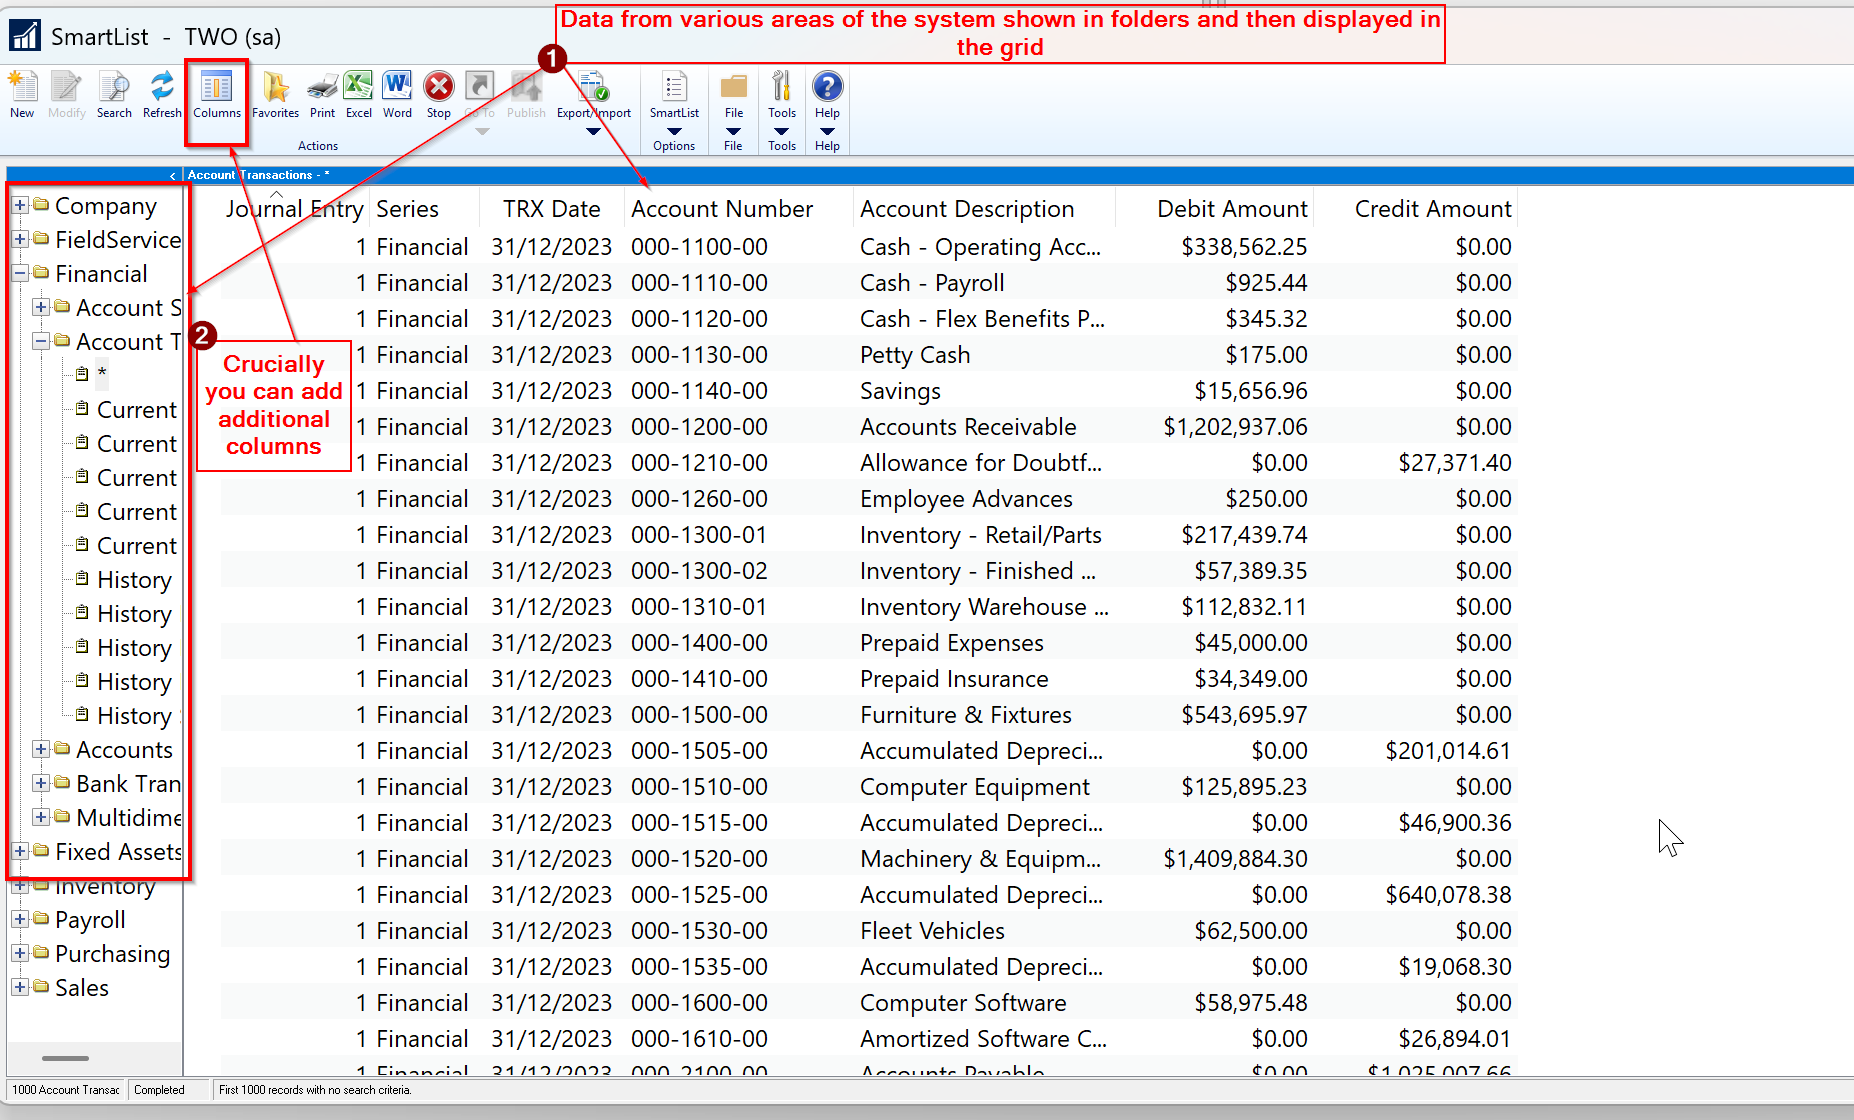
I’ve captured an image of this tool below
As you can see, the various areas of the system such as “Sales”, “Purchasing” and “Financial” are listed in the left hand pane as yellow folders, and you can select them to view the data.
Crucially you can also add additional columns to the view and search and then export the data to Excel. You can also save “favourites” so you don’t have to recreate these views again.
Additionally, you can also use a feature called “Smartlist Designer” which enables a user to create their own Smartlist, joining tables together so they can view data from more than one related table.
This is a really powerful set of tools that you can use to generate reports, right in the standard product, without the need for any additional reporting tools.
Introducing “Add fields from related tables in analysis mode” in Business Central
I must admit as much as I loved Business Central when I first made the move, I did miss the reporting capabilities that Smartlist gave me.
Although I love the various analysis views in Business Central, and how I can export data so easily from pretty much any page, I’d often find myself struggling for some crucial fields to include on the list pages, that I could easily get using a Smartlist in Dynamics GP.
However it seems some of these challenges are over with the introduction of “Add fields from related tables in analysis mode” 😊.
To use this feature you must first activate it via the “Feature Management” page.
With this feature enabled, when you access a List Page in Business Central and click the “Analyse” button you can add additional columns 😊. (just like Smartlist)
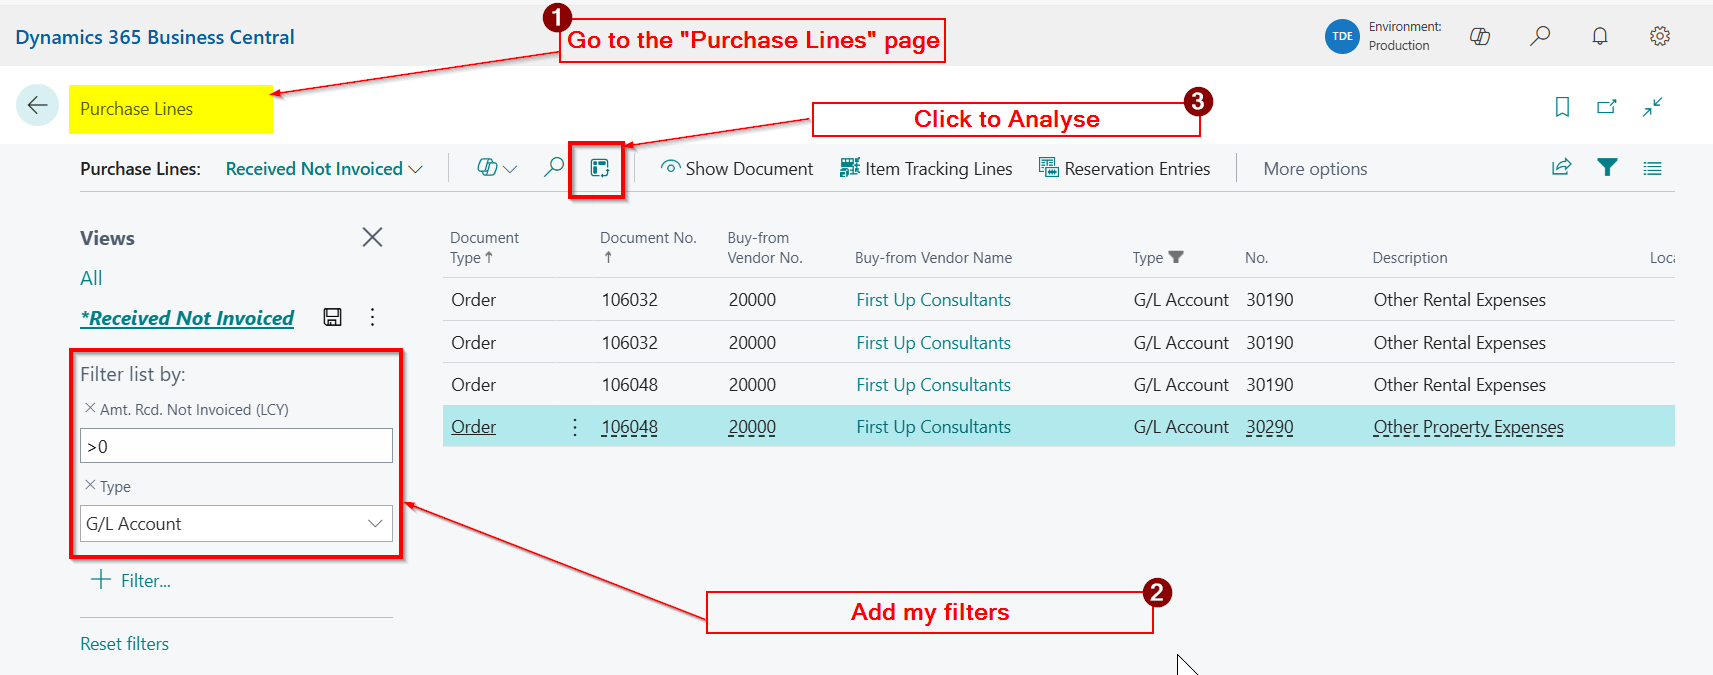
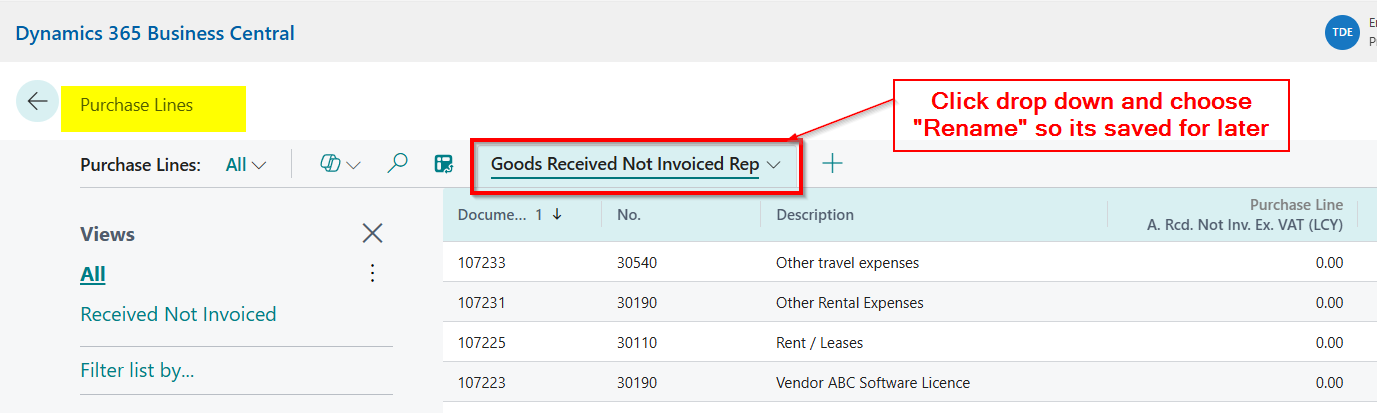
For example, I recently needed to add the “Amt. Received Not Invoice Excl VAT” to the “Purchase Lines” page so I could create a “Goods Received Not Invoiced” report.
To achieve this I went to the “Purchase Lines” page, added my filter, and then clicked the “Analyse” button
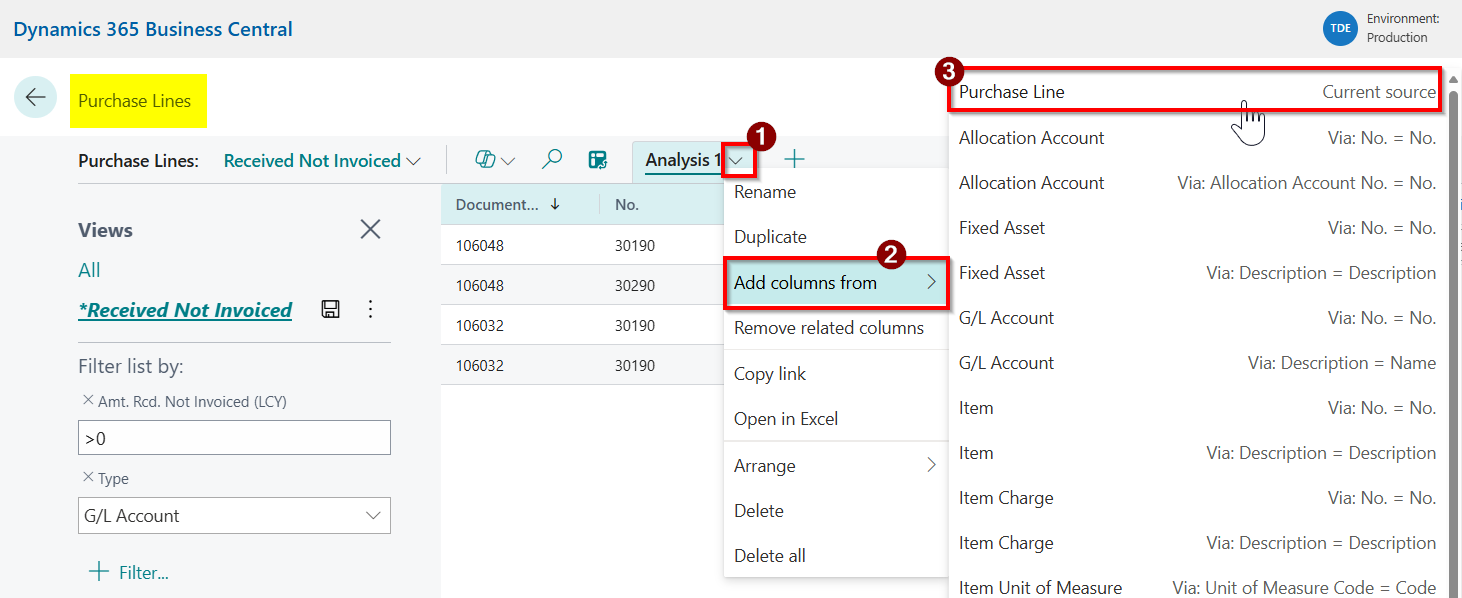
Next click “Add columns from” and then selected “Purchase Line”
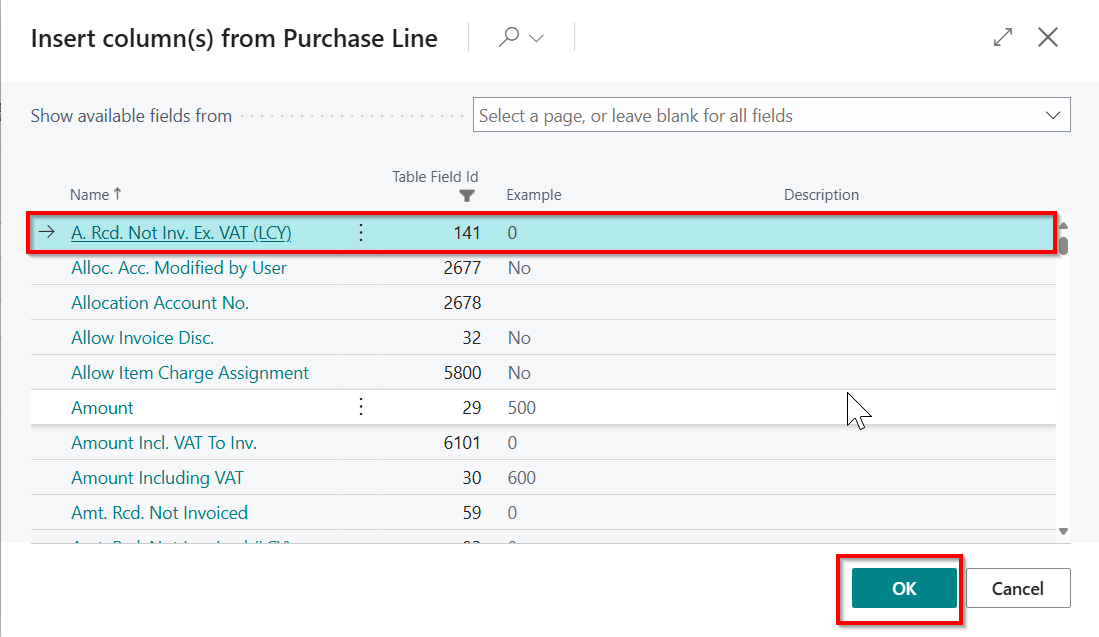
Then select my column and click “OK”
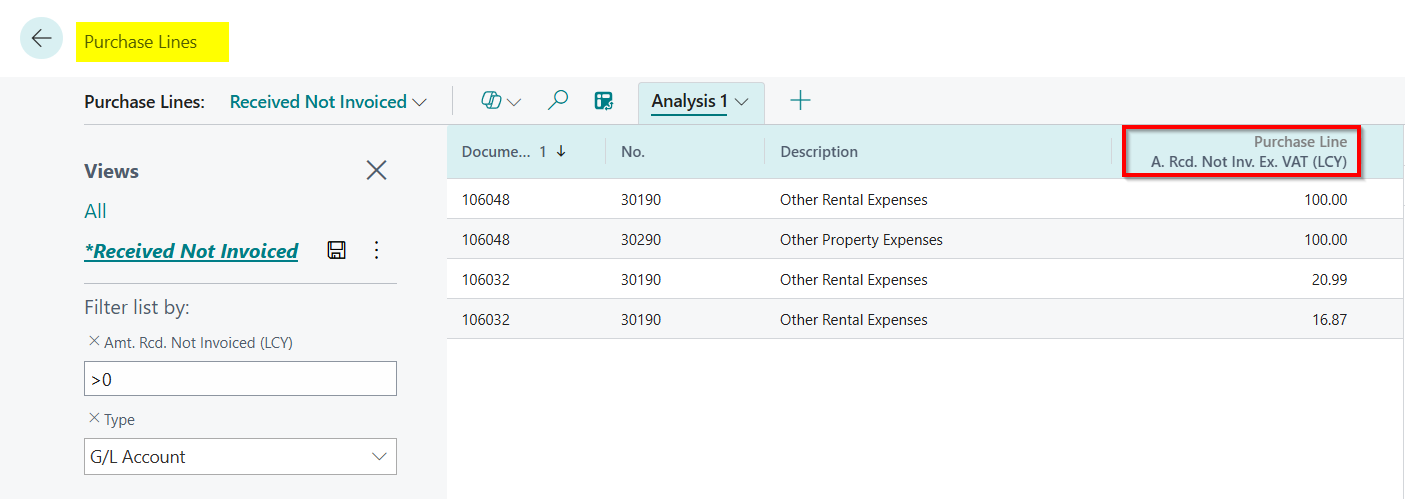
The column now appears with a reference to the table it was added from:
Finally I can save it as a “Favourite” so I don’t have to keep recreating it. (just like Smartlist)
Amazing!! I’ve managed to create my report without stepping outside of Business Central. No third party tool needed!
And there’s more…
However, in this instance, we’ve only just scratched the surface.
In the example above I added a column from the table the page is based off, which you could argue I could get using other more traditional ways, such as via “Personalisation” or “Customisation” on the role.
I blog about adding extra fields via Customisation here
The real power of this functionality comes when you want to include data from other related tables. (Much like Smartlist Designer. Do you see the similarity now 😊)
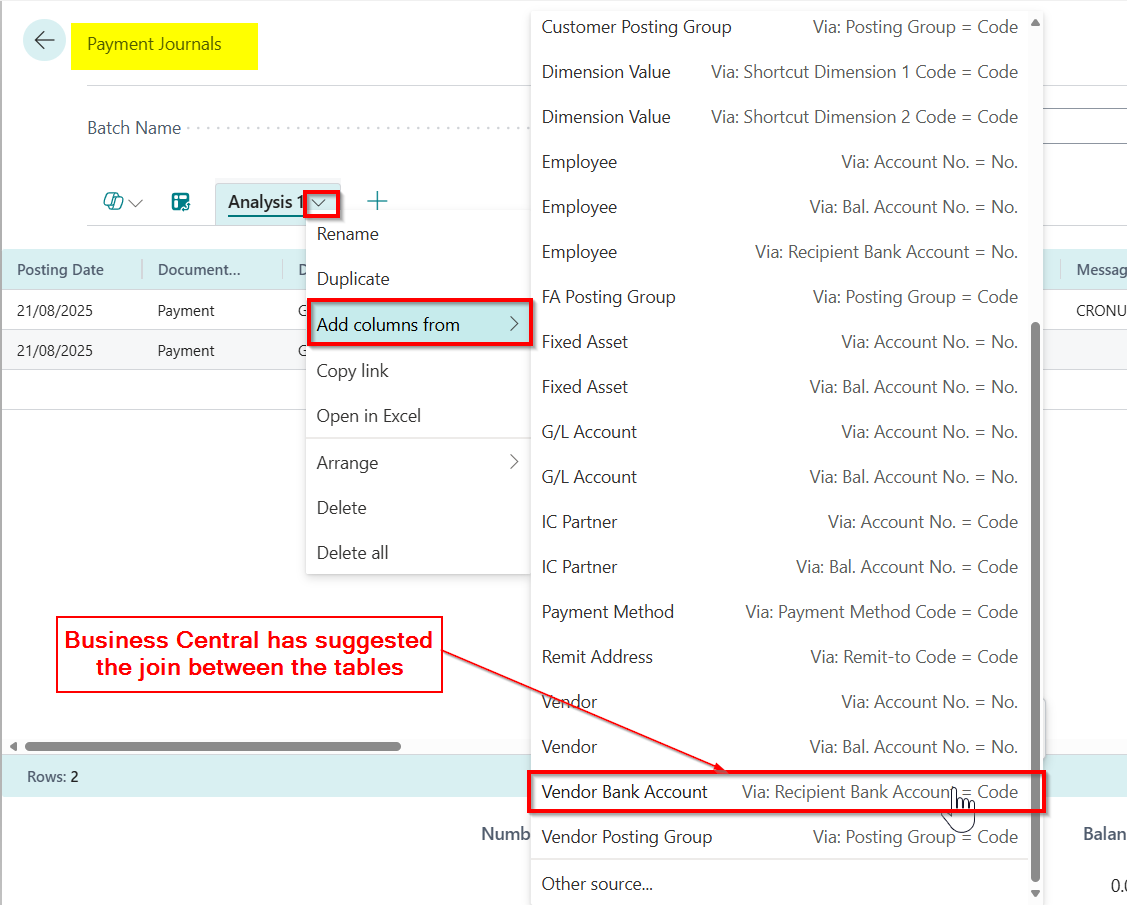
For example I recently had to add the “Bank Account” and “Sort Code” to a payment journal for a user.
To do this I went into the “Analyse Mode” on the Payment Journal and clicked “Add columns from” and selected the relevant table
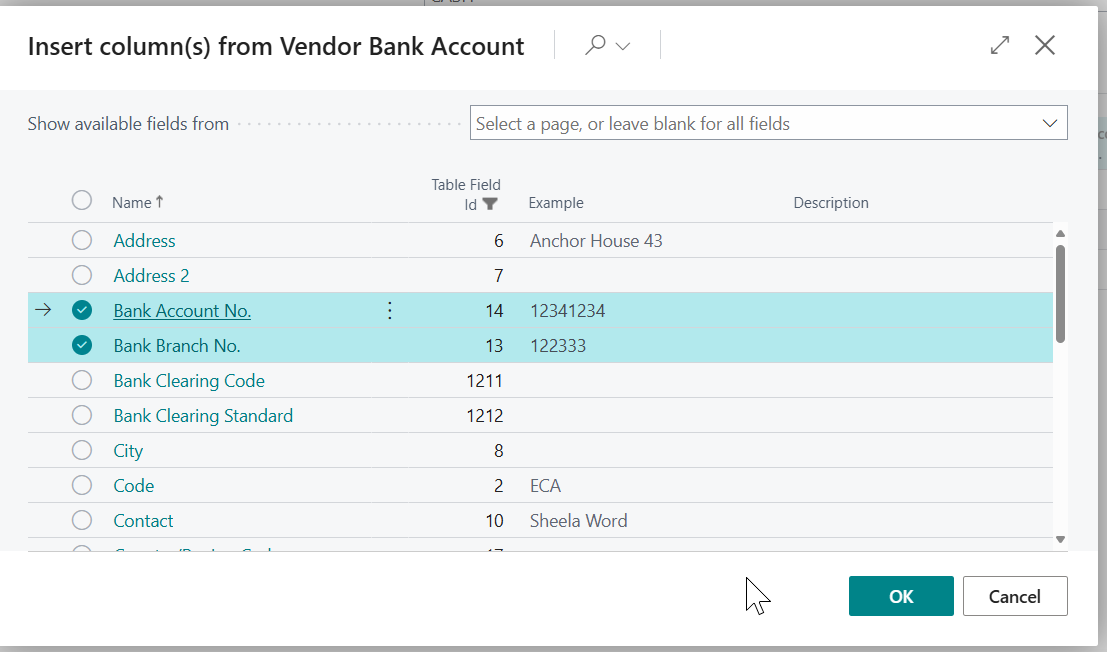
Next I select the relevant columns
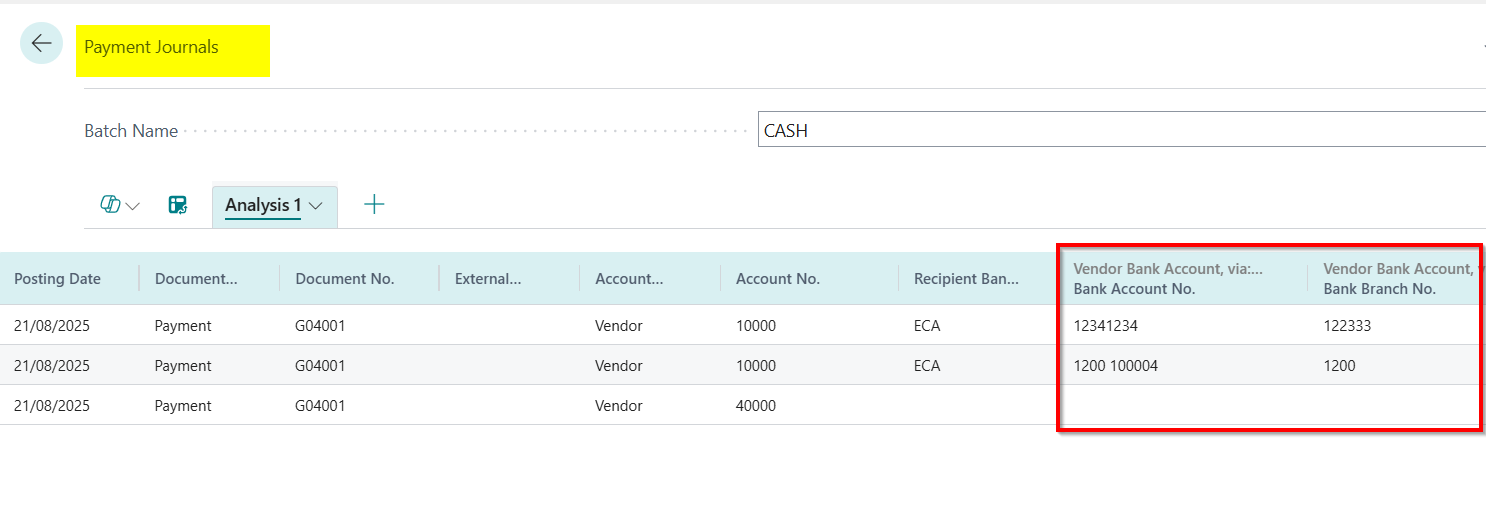
And click OK and the columns are displayed. (I could then save it like I did in the first example)
You can even create your own links by selecting “Other source…” and linking to tables that Business Central hasn’t suggested. This opens up all sorts of possibilities for reporting.
Conclusion
This is an amazing feature that has so much potential to make life easier for users of Business Central. Lots more reporting requirements can be fulfilled without the need for third party reporting tools.
Although its a little different to Smarlist in Dynamics GP, there are many similarities that I believe will make it a highly appreciated enhancement to Business Central for many users transitioning from GP to BC, as well as for those contemplating the move.
Due to the design of the General Ledger Account structure in Dynamics GP, its easy to control the General Ledger and Dimension combinations you want to use in transactions.
This is because the General Ledger code itself includes the Segment and Nominal code. Therefore if you don’t want a certain segment to be used with a Nominal code, you simply don’t create that General Ledger Code.
However when you migrate to Business Central those segments become “Dimensions” and are by default available to select with any General Ledger code.
In this post I’ll go through how you can enable the same control in Business Central using the “Allowed Value Filter” option when creating your General Ledger accounts.
How it works in Dynamics GP
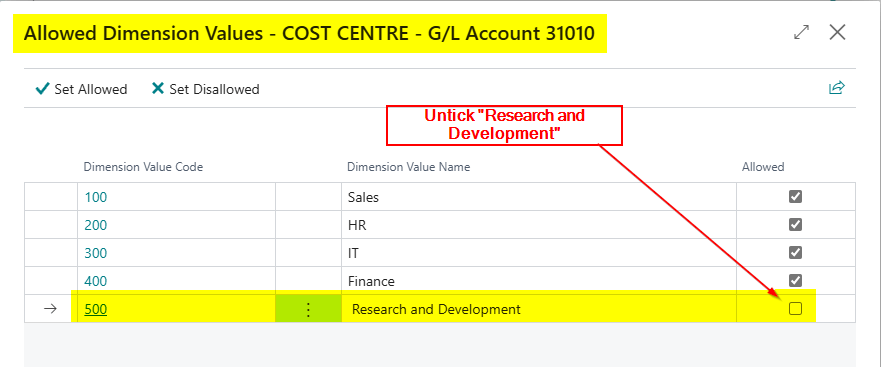
Let’s say we have a segment for “Cost Centre” in Dynamics GP, and one of those cost centres is 500 for “Research and Development”. If we want to ensure that only the relevant expense codes are used with that Cost Centre, we simply don’t create those General Ledger Code combinations.
For example, I have an expense code for “Office Supplies” of 31010, therefore I don’t create the General Ledger Code 500-31010 in my Chart of Accounts.
However, I also have other Cost Centres for Sales (100), HR (200), IT (300) etc which I would create the relevant General Ledger Codes. For example I’d create the General Ledger code 300-31010 to record my Office Supplies for the IT cost centre.
This is a nice easy way to control postings and ensure incorrect entries aren’t posted.
The Business Central Approach
When you migrate to Business Central, your General Ledger (GL) accounts are consolidated based on the nominal code. For example, General Ledger codes such as 100-31010, 200-31010 and 300-31010 are merged into a single GL code, 31010. The Cost Centre then becomes a Dimension.
In my opinion, this a much better way to manage the General Ledger accounts, as it consolidates my chart of accounts, and I no longer have to create multiple General Ledger accounts every time I introduce a new Cost Centre like I would have to Dynamics GP 😊
However the question now is, how can I control which Cost Centres I can use with my General Ledger Codes in Business Central?
Blocking Dimension Values by General Ledger code
The solution to this issue is the “Allowed Values Filter” to limit the Dimension Values allowed on your General Ledger Account Card.
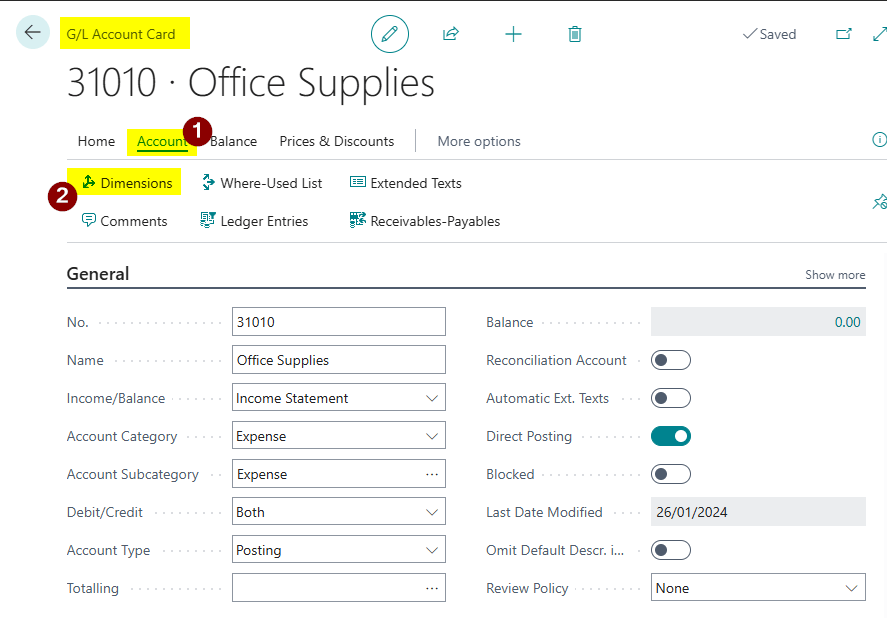
To do this open your General Ledger Account card and click “Account > Dimensions”.
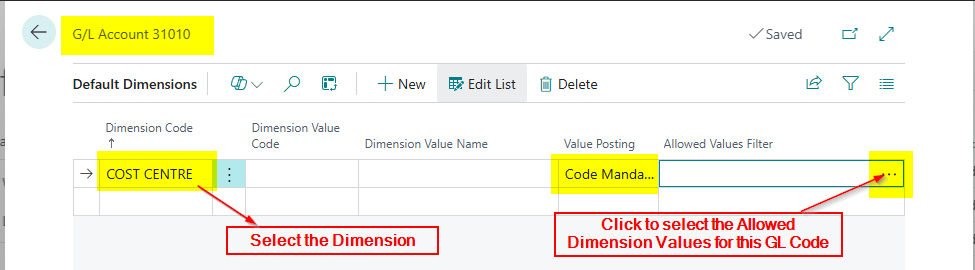
Next choose the relevant Dimension, in this case “Cost Centre”, and click to select the “Allowed Values Filter”.
This only works if you select “Code Mandatory” for the posting which is usually ok for Dynamics GP migrations
Now I can untick the Cost Centres I don’t want to be used with this General Ledger code.
Conclusion
In this post I’ve shown how by leveraging the “Allowed Values Filter” in Business Central, you can maintain the same level of control over General Ledger and Dimension combinations as in Dynamics GP, ensuring only valid Cost Centres are used with specific General Ledger codes 😊.