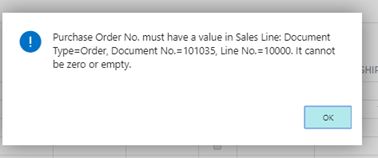
I recently ran into an issue drilling back on a Purchase Order from a Sales Order with drop shipment lines. The exact error was “Purchase Order No. must have a value in Sales Line…….It cannot be zero or empty” as shown in the screen shot below:
Purchase Order No. must have a value in Sales Line
On investigation this only affected the lines on the Sales Order that had been shipped and invoiced. If I drilled back on an outstanding line on the Sales Order the Purchase Order is displayed without issue. After troubleshooting this it seems when you receive and invoice the line item on a drop shipment the system removes the link back to the Purchase Order and consequently you receive an error trying to drill down.
I’ve detailed how you can recreate the issue below, with a neat trick that can be used to view the data in the Sales Order tables via your browser.
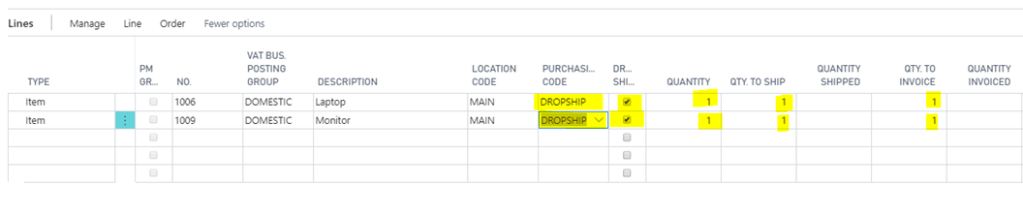
To recreate the error first add a Sales Order with more than one drop shipment line as per below:
Sales Lines marked as Drop Shipment
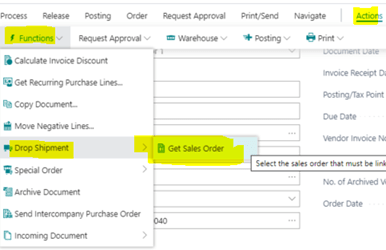
Next create the Purchase Order and pull through the Sales Order using the function below
Function to Get Sales Order lines
Finally go back to the Sales Order and ship and invoice the first line
The first line has been shipped and invoiced
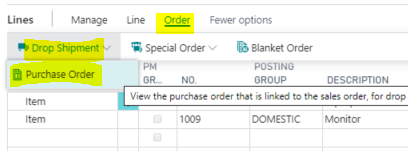
Now highlight the first line and try and drill back to the Purchase Order using the option below
On doing this you are prompted with the error
Purchase Order No. must have a value in Sales Line
Therefore following this document I added &table=37 to the end of my URL to view the full contents of the Sales Line table
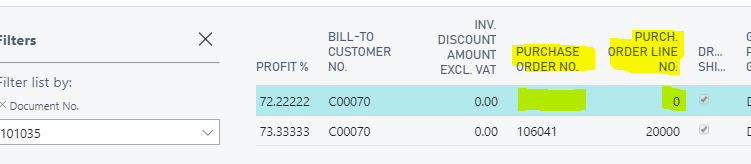
On viewing the data in the table I can see the Purchase Order Number has been removed from the shipped and invoiced line
Purchase Order No. and Purch Order Line No. removed once shipped and invoiced
This is preventing me from drilling back on the Purchase Order. If you check the Purchase Line table (table 39) you can see the Sales Order number has also been removed, so you wouldn’t be able to drill down on the Sales Order from the Purchase Order either.
I also worked through the issue on my local Dynamics NAV install and observed the same behaviour, therefore I’m sure this is by design, however I’m unsure of the reasons. It seems the link to the Purchase Order is permanently removed once the sales line has been shipped and invoiced.
I also checked table 113, which is the Sales Invoice Line table, but this also doesn’t seem to keep the link back to the purchase order.
I’d be interested to know if I’m missing something here. Perhaps there is a way to get back to the Purchase Order from the sales document once its been posted. If there is I’d be very grateful if you could let me know.
Over the last few days I’ve been working through a vendor payment run in Dynamics 365 Business Central and thought it useful to document my journey.
In this step by step post I’ll be generating payments using the “Suggest Vendor Payments” feature and then also going through the process of removing an invoice from a payment as you would in real life.
Setup
To keep things simple before I started I created two vendors, V00080 and V00090, and posted a couple of documents on each vendor. I’ll use these as the basis for my walk through.
On the vendor I set the “Payment Method” as “Cheque” as per below (I’ll likely look at another post for EFT\BACS in the future)
Setup of one of the Vendors I created for my walk through
The documents I posted onto the vendors created the following vendor ledger entries which I’ll be working with:
As you can see I have two invoices on vendor V00080 with a total of £180.00 and two invoices and one credit note on V00090 giving a total of £240.00.
Payment Journal
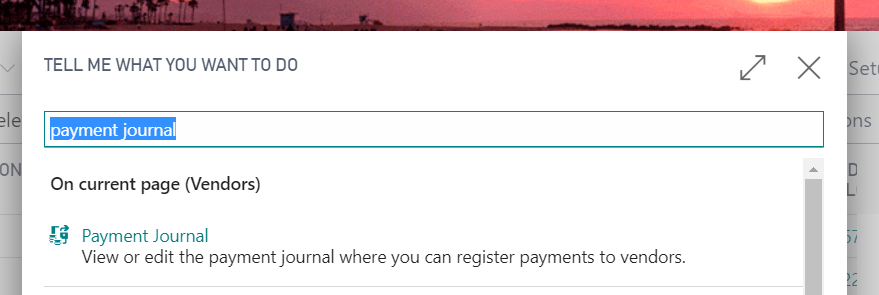
In order to pay these documents I’ll be using the “Payment Journal” which can be found by clicking the search option and typing “Payment Journal”
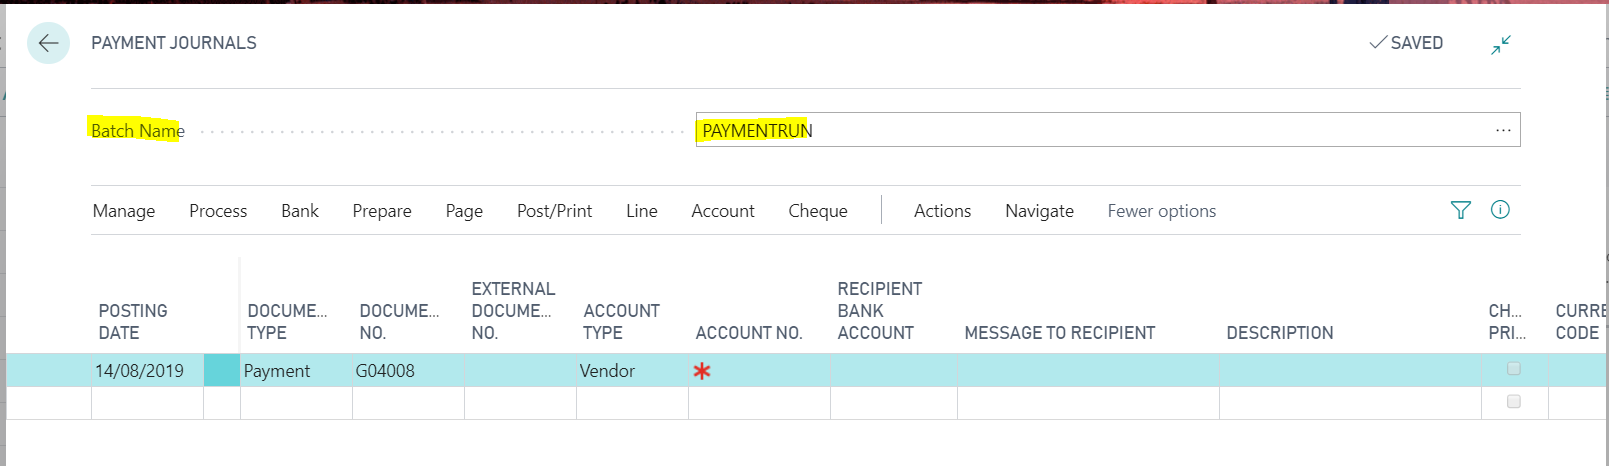
Once in the “Payment Journal” page the first thing to select is the batch. As you can see I’ve selected one called PAYMENTRUN
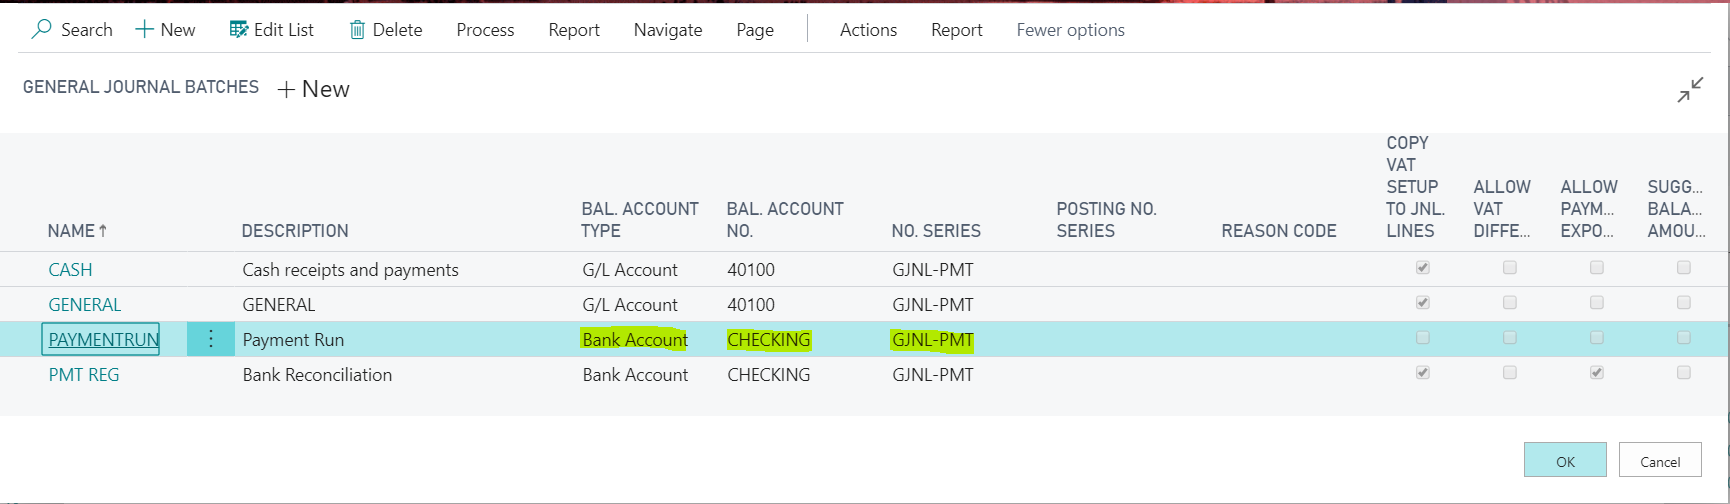
If we drill down on the batch you can see it determines the balancing account and also the number series to use. I’ve select “Bank Account” as the balancing account so the system will create “Bank Account Ledger Entries” that I can later reconcile via the bank reconciliation.
Once we have decided on the batch we can turn to creating the payments.
Suggested Vendor Payments
The process that completes the initial swoop looking for transactions to pay based on a set of criteria is “Suggest Vendor Payments”
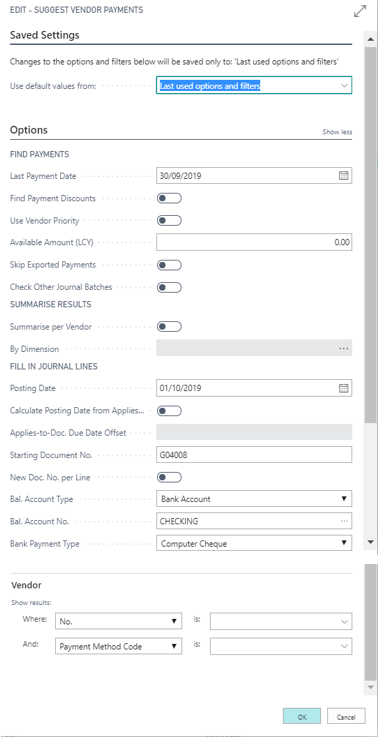
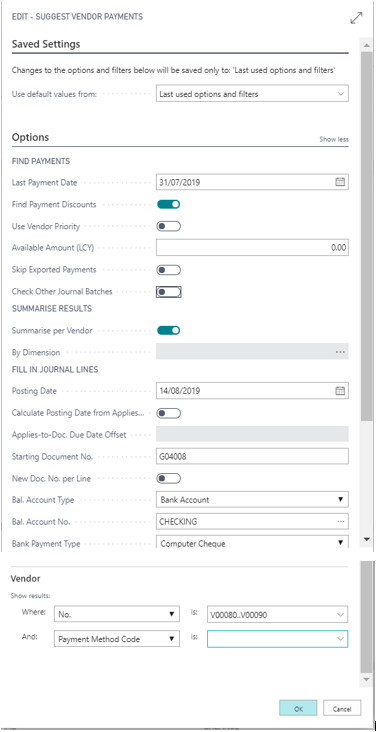
On clicking “Suggest Vendor Payments” you are presented with the following options
I’ll focus on the ones I’ll be using as part of my payment run for vendors V00080 and V00090
Last Payment Date:- This is the due date cut off. I’m going to set this to 31/07/19 as I don’t want to pay any invoices after this date.
Find Payment Discounts:- I’m going to switch this on because if there are any payment discounts, I want the payments that are created to reflect them.
Summarise per Vendor:- I’m going to switch this on because I only want to create one payment journal entry per vendor rather than one entry per invoice I’m paying.
Posting Date:- I’m going to set this to 14/08/19 as this is the date I’ll be paying the invoices.
Balance Account Type:- I’m going to set this to “Bank Account” as I want the system to create bank account ledger entries so I can reconcile the payment via bank reconciliation.
Bal Account No:- I’m selecting “CHECKING” as this is the bank I’ll be paying from.
Payment Type:- I’m selecting “Computer Cheque” as on this occasion I’ll be printing cheques.
Vendor No:- I’ll be entering a range of V00080..V00090 as I only want to pay those two vendors
Therefore my options are:
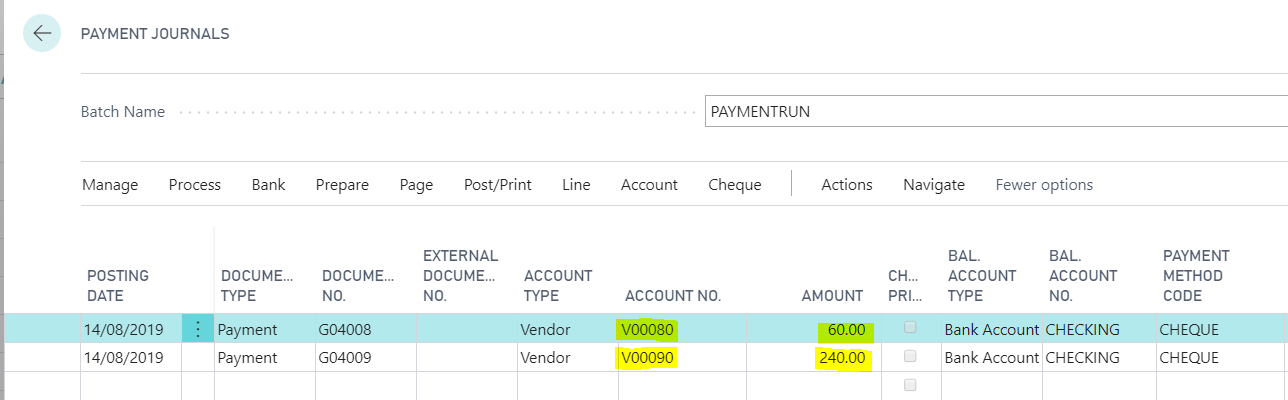
When i click OK I get the following payments generated for me.
Now the system has generated the payments we can go ahead and tweak them for what we actually want to pay.
Editing the Payments
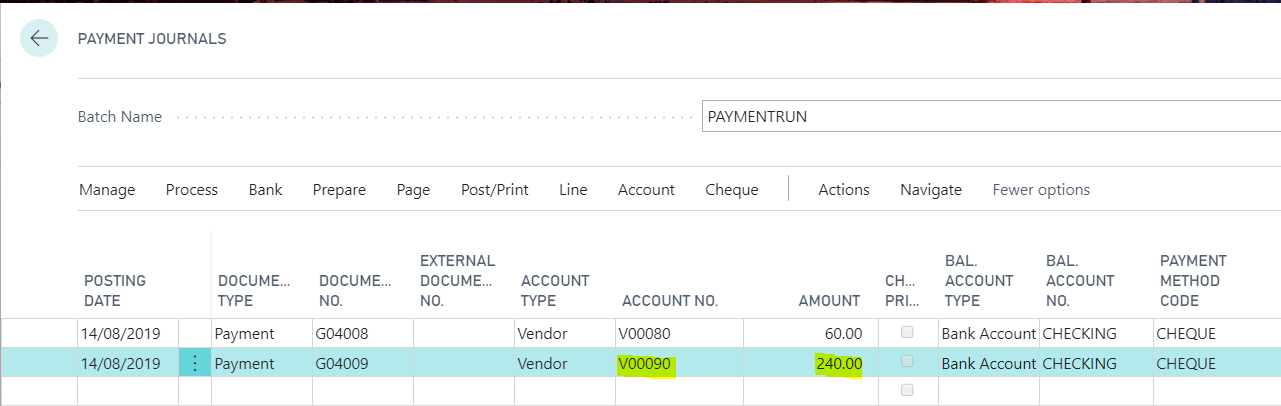
As you can see the system has generated a Payment for Vendor V00080 of £60.00 and a Payment for Vendor V00090 of £240.00
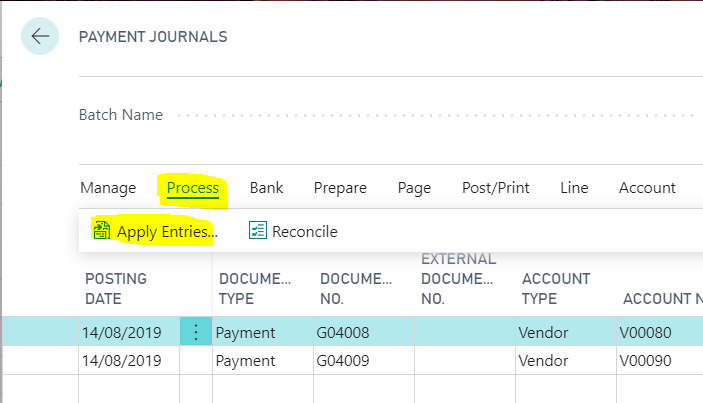
To view the invoices that have been applied on the payment you click “Process > Apply Entries”
If I select this option on the payment of £60.00 on Vendor V00080 you can see the invoices applied:
As you can see above the system has applied INV00002 but hasn’t applied INV0001. This is because INV0001 has a due date of 01/08/19 which falls outside of the due date cut off I entered into the “Last Payment Date” field in the “Suggest Vendor Payments” window. I’m happy with this so I’ll click ok and move to the next payment.
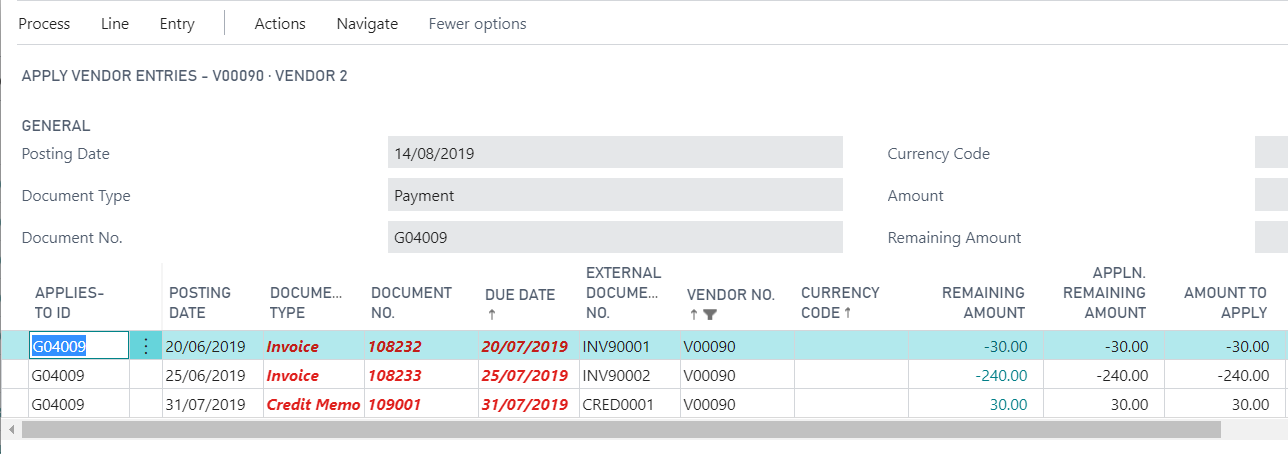
If I highlight the payment for Vendor V00090 and click “Process > Applied Entries” I get the following screen:
The first thing to note is the system has included the credit memo on the payment run. This is great and exactly what I’d expected.
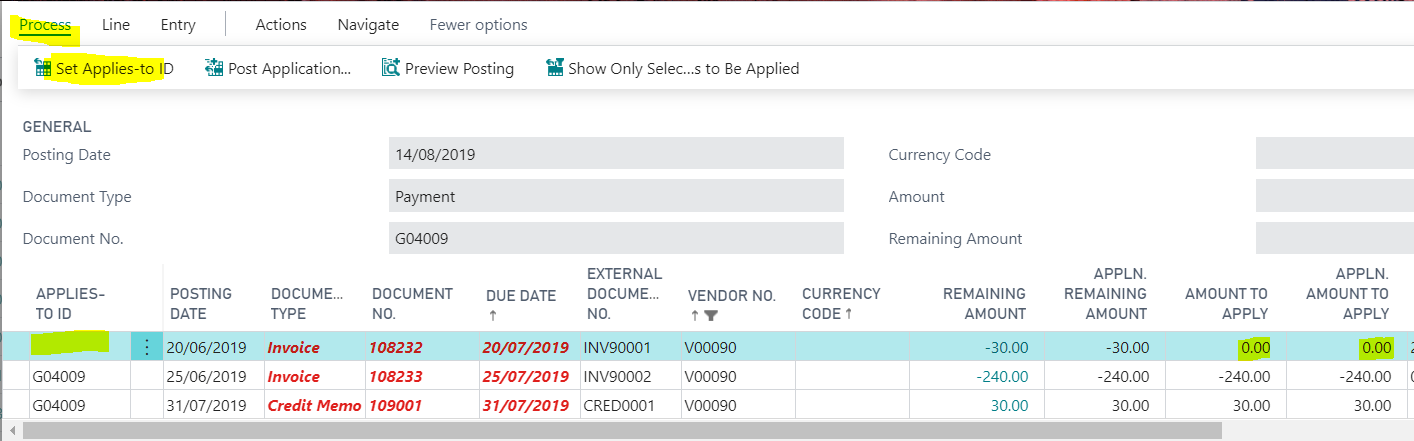
Next I’m going to remove INV90001 from the payment run as I’m not ready to pay this Invoice just yet. To do this I’ll highlight the line and click “Process > Set Applies-to-ID”. Doing this blanks out the “APPLIES-TO-ID” field and also sets the “AMOUNT TO APPLY” and “APPLN. AMOUNT TO APPLY” to £0.00 on the invoice as per below
This all seems fine however when you click OK it would appear the payment amount hasn’t been updated on the Payment Journal to reflect the change I made?
It would seem I have to manually update this or the system would still post a payment for £240.00 onto the account. i.e. the posted payment would remain open and there would be an amount remaining of £30.00 on it.
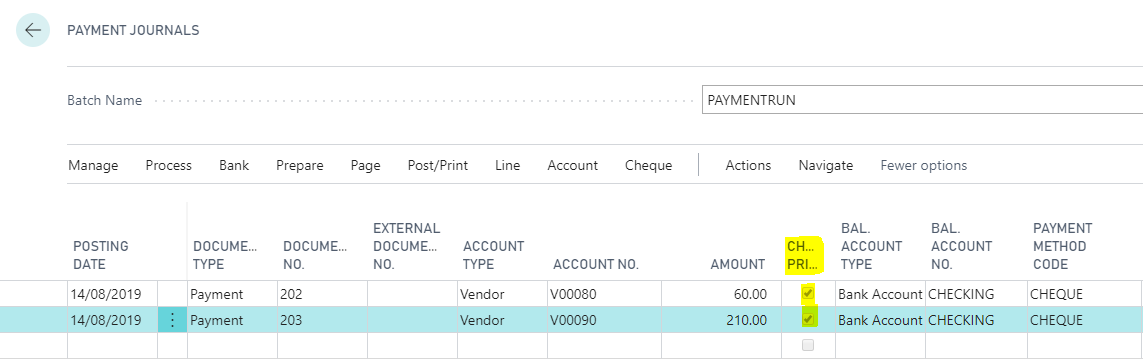
I therefore edit the payment amount on the header to £210.00 to reflect the new payment amount:
Printing the Cheques
To print the cheques you just need to select “Cheque > Print Cheques”
On clicking this option you are presented with the following options:
I’m going to leave all the defaults and click “Print” and select my printer.
After doing this the flag “Cheques Printed” is checked.
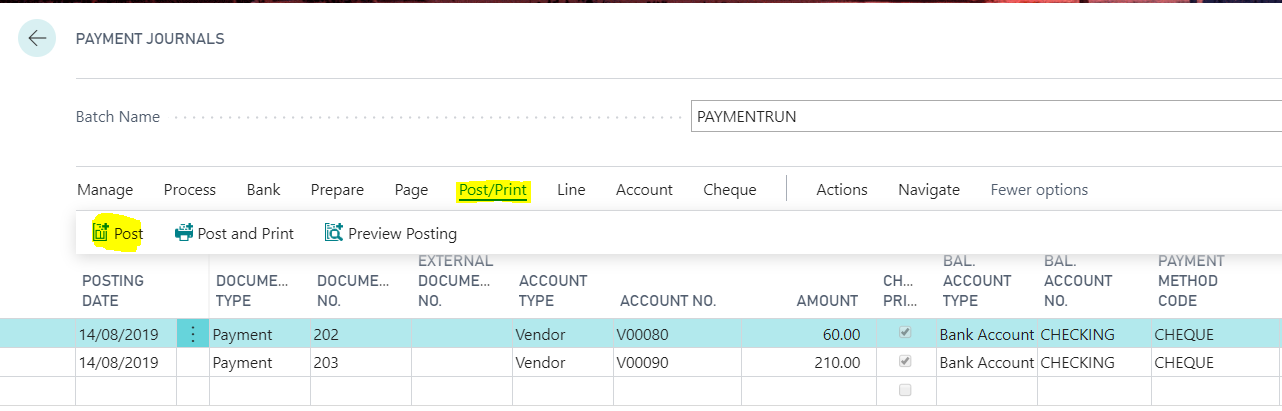
Posting the Payments
Once you have printed the cheques and are ready to post you can just click “Post\Print> Post” as per below
This will create the Vendor Ledger Entries and also Bank Account Ledger Entries as our “Balancing Account Type” is set to “Bank Account”.
If I now view the “Vendor Ledger Entries” I can see the payments have been posted and applied to the invoices.
Conclusion
I hope you have found this write up on the payment run useful. I’m sure I’ve left out some options that can be used and being new to the Dynamics 365 Business Central \ NAV world I’d be very interested to hear of other peoples experiences.
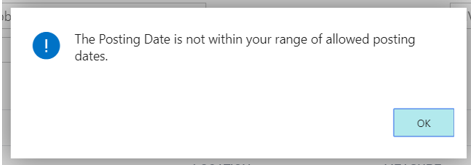
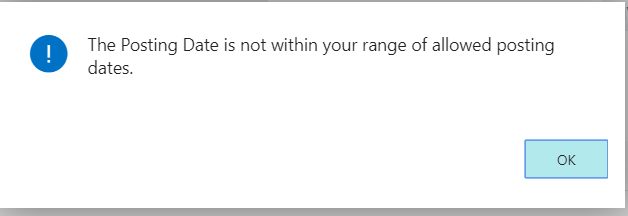
You receive the message “The Posting Date is not within your range of allowed posting dates” when trying to post a Purchase Invoice in Business Central.
According to the user setup the “Posting Date” of the document I’m posting is within the allowed posting range so why won’t the system allow me to post it?
Background – Value Entries
To provide a little more detail I’m trying to post a Purchase Invoice that I’ve matched to a Posted Purchase Receipt and I’ve increased the Unit Cost on the Purchase Invoice as the price has changed since the goods were received. I’ve also sold the items on a Sales Invoice before I’ve tried posting the Purchase Invoice.
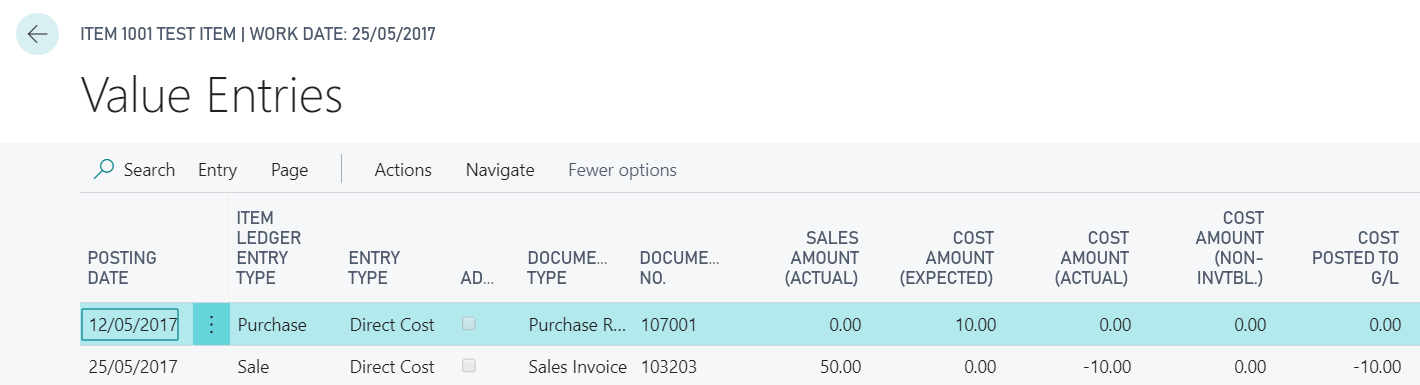
Therefore, if we look at the value entries of this item prior to attempting to post the Purchase Invoice they are as follows
We have a value entry for the Posted Purchase Receipt showing a date of 12/05/2017 and a “Cost Amount (Expected)” of £10.00 (this the amount I used when posting the Purchase Receipt)
We also have a value entry for the Sales Invoice showing a Posting date of 25/05/2017 and a “Cost Amount (Expected)” of £10.00.
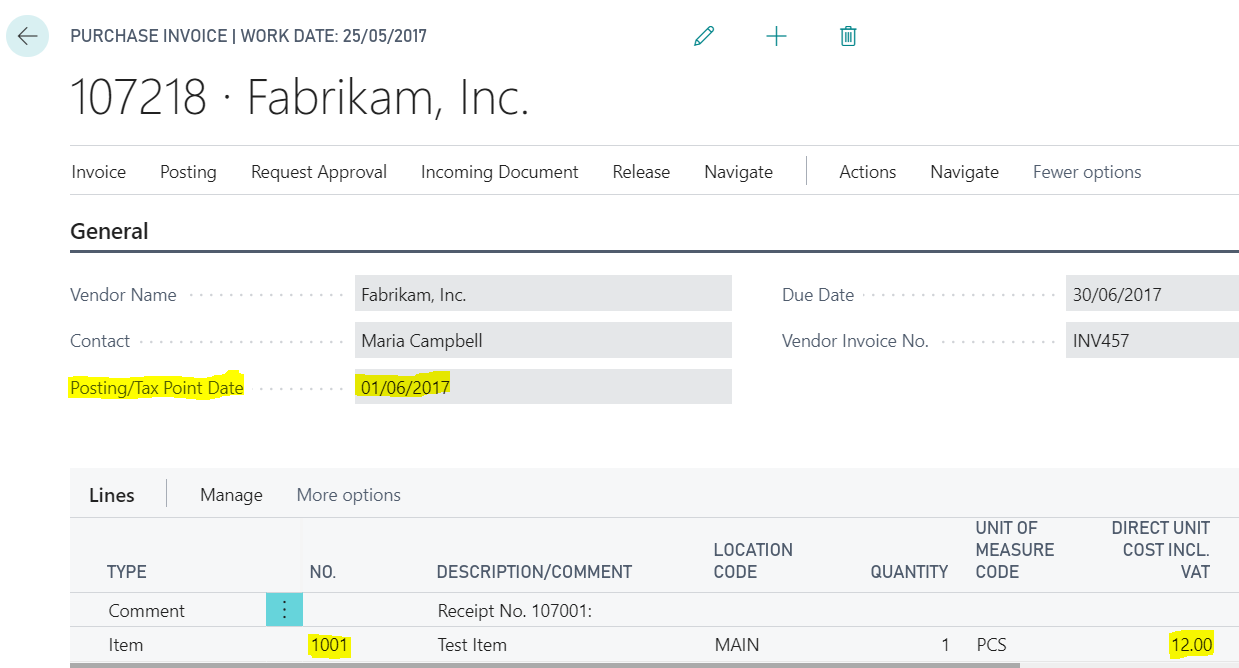
Details of the Purchase Invoice
The Purchase Invoice I’m posting is dated 01/06/2017 and I’ve amended the Unit Cost from the original £10.00 that pulled through from the Posted Purchase Receipt to £12.00
Now when I try and post this transaction, I receive the message
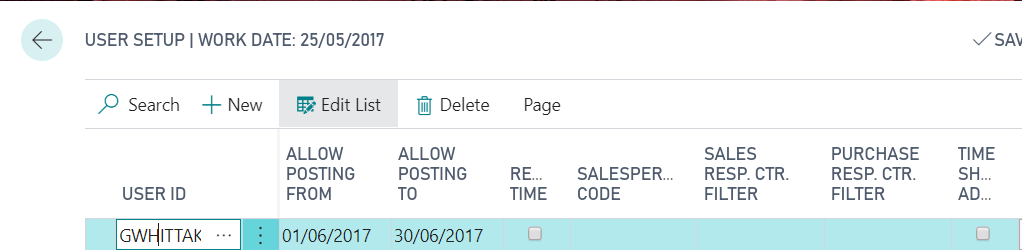
Therefore, just to confirm the Posting Date of the Purchase Invoice is within my allowed posting dates below is a screen shot of the User Setup window showing my Allow Posting Dates
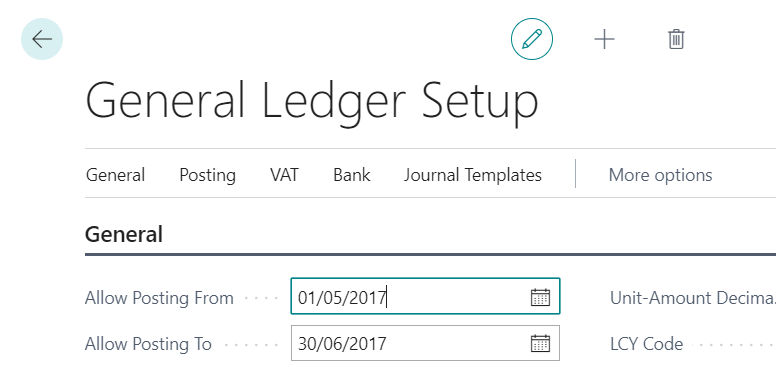
The dates are also within the General Ledger allowed posting dates as shown below
Therefore, at first glance its not apparent why the system isn’t allowing me to post this document? The Purchase Invoice posting date is 01/06/17 and this is within my range of allowed posting dates?
The Issue – Automatic Cost Adjustment and Adjust Cost Item Entries
When posting the Purchase Invoice, the system has detected that the cost has changed from the Posted Purchase Receipt, and as this has been sold on a Sales Invoice, the cost of goods sold need adjusting.
The system therefore tries to post an adjustment using the Posting Date of the entry its adjusting (in this case the Sale Entry on the 25/05/17), which is in May, and as this falls outside of my posting range I receive the error “The Posting Date is not within your range of allowed Posting Dates”.
** Please note there is a complex method for selecting the Posting Date if the Posting Date of the entry being adjusted also fell outside of the “Allowed Posting Dates” of the General Ledger and also if “Inventory Periods” are being used. More information on this can be found in this Microsoft document https://docs.microsoft.com/en-us/previous-versions/dynamicsnav-2016/dn948192(v=nav.90)
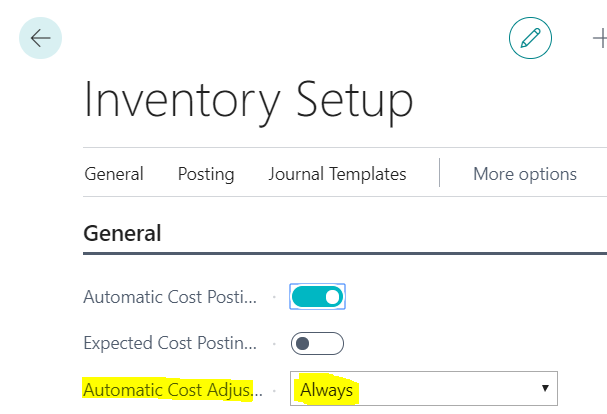
** Its also worth noting I’m getting this message when posting the Purchase Invoice because the option “Automatic Cost Adjustment” is set to “Always” in Inventory Setup. This means the system checks for cost adjustments when you post the transaction. If this wasn’t set to “Always”, then depending on its setting its possible the document would post however when the “Adjust Cost Item Entries” batch job was subsequently run the error would occur.
See below for my Inventory Setup
Solution
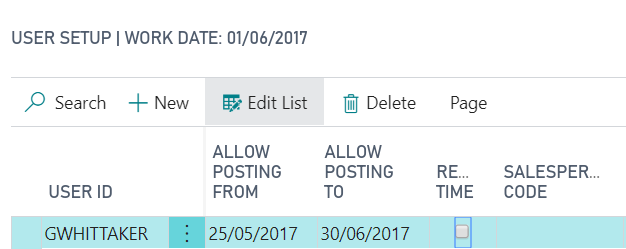
There are two possible solutions to my issue here. The first is to change my “Allowed Posting Dates” in the “User Setup” to 25/05/2017 through to 30/06/2017. This will then include the posting date of the entry that will be adjusted.
Alternatively, I could change the “Allowed Posting Dates” in the General Ledger Setup to 01/06/2017 through to 30/06/2017. Then, as per the article I linked to, the system would use the date of 01/06/2017 for the adjustment entries, (i.e. the first open date in the General Ledger Setup) which does fall in my allowed periods to post to.
Therefore I’ll change my “Allowed Posting Dates” in the User Setup as per below
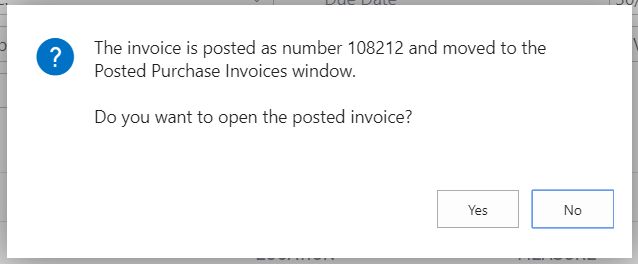
And now when I post the Purchase Invoice this is succecssful
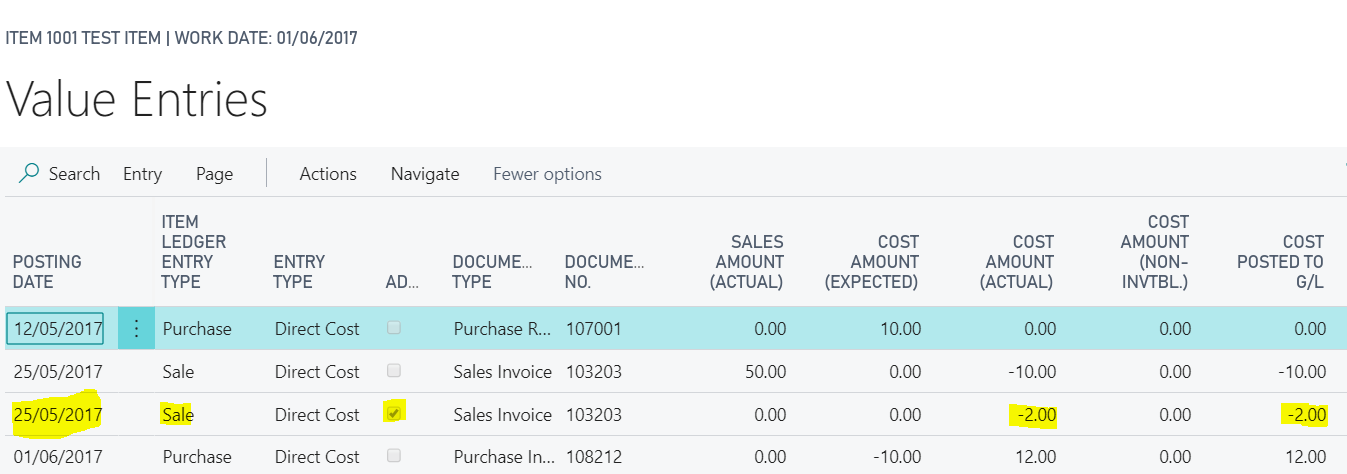
If I now view the Value Entries you can see the adjustment entry created with a Posting Date of 25/05/17.
Conclusion
Although this is a simple example it shows why you may encounter this error when it seems the postings date configuration on the User Setup should allow a document to post.