Dynamics 365 Business Central – How to add a field to a Page that’s not available via personalisation

Introduction

Personalisation is a great feature that allows users to add and remove fields on pages in Business Central. (assuming the role the user is assigned allows it). However sometimes there might be a field you wish to add that’s not available when you try and add it via personalisation.

In this post we’ll go through why the field isn’t available and also how you still add it by customising the role.

Why do we only get certain fields in Personalisation

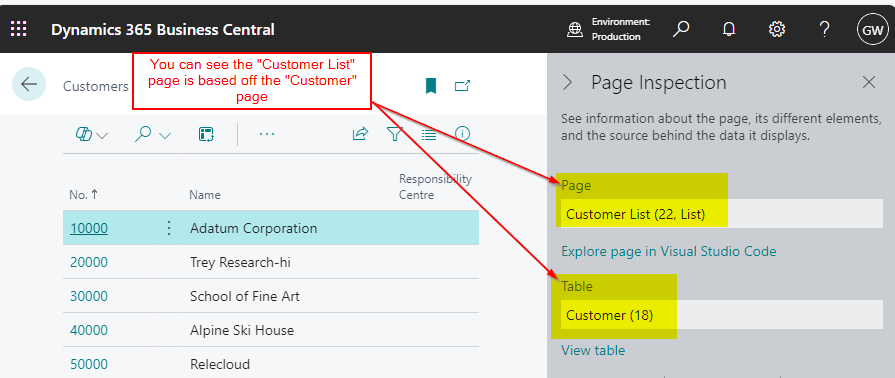
Every page in Business Central is based on a table, which you can verify using the “Page Inspector” tool. For instance, on the Customer List page, pressing CTRL+ALT+F1 reveals that it is built on the “Customer” table.

However, if I try and personalise and add the “City” field, its not available?

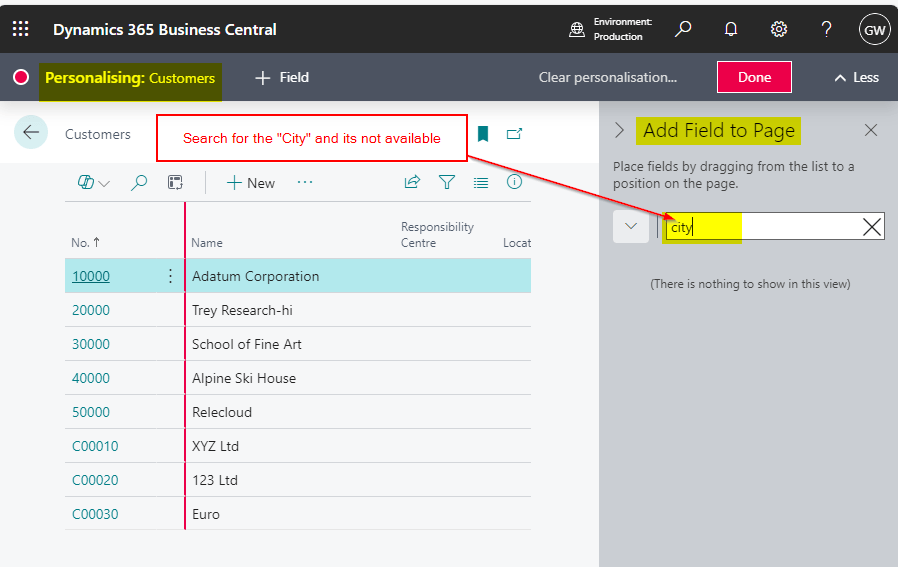
I’m fairly confident the “City” field is part of the “Customer” table, so why isn’t it available to add through personalisation?

This is because, while the “City” field exists in the “Customer” table, and the “Customer List” is based off the “Customer” table, it hasn’t been included in the “Customer List” page object.

Adding Fields by Customising the Role Centre

So, how can you add a field that isn’t available through personalisation, but exists in the table?

The answer is to customise the Role Centre! 😊 By using the “Customise” feature on the Role Centre, you can access all the fields in the table that the page is based on.

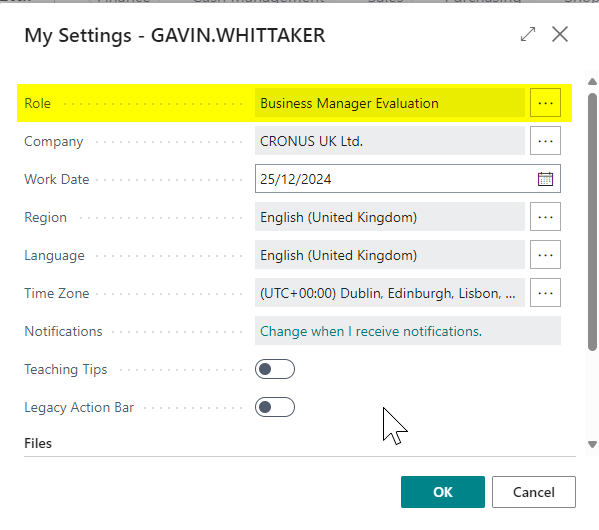
For example, to add the “City” field to the Customer List page, I just need to determine which Role Centre I’m using and customise the page from there.

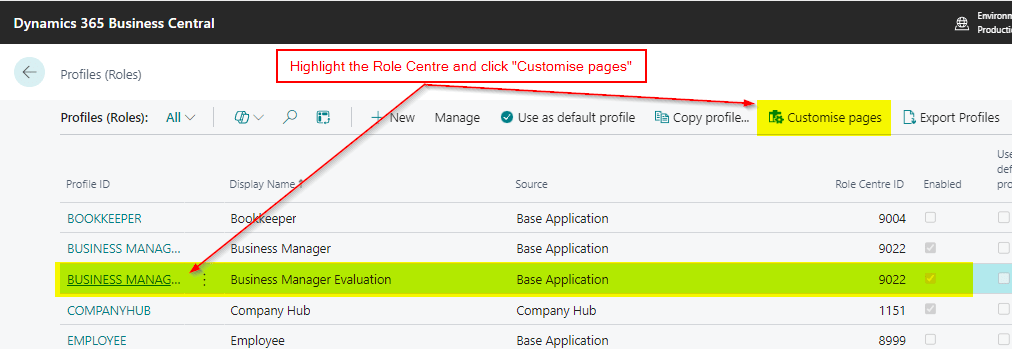
When checking, I found that my current Role Centre is “Business Manager Evaluation”.

I can then locate that Role Centre on the “Profiles (Roles) page and click “Customise pages”

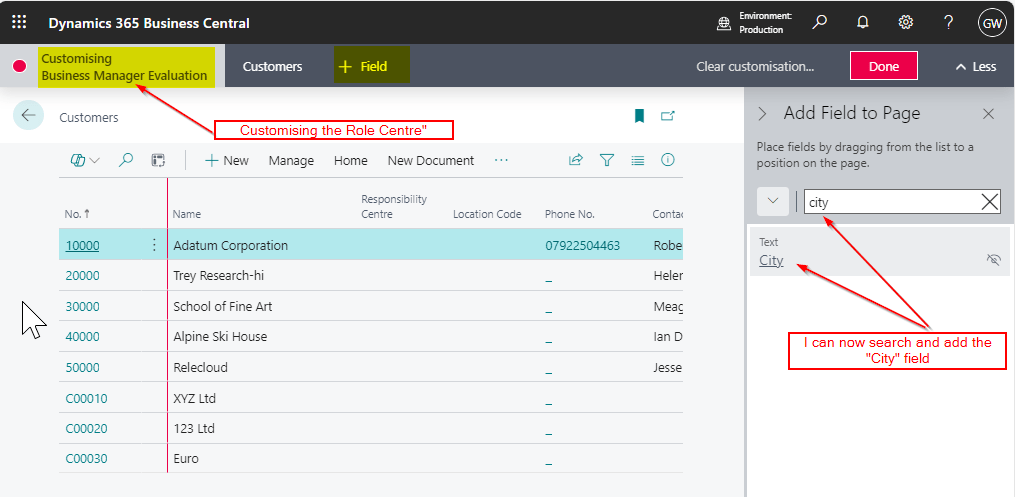
This opens another Business Central session that I can browse to the “Customer List” page and add the additional fields in just the same way as if I was personalising

Once this has been added to the page, the City field will be available for everyone using that Role Centre (any users not wishing to see it use “Personalisation” to remove it).

Conclusion

This is one simple method you can use to add fields to a page that aren’t available via Personalisation.

You can read more on this in the following Microsoft article Customising Pages for Roles – Business Central | Microsoft Learn

Thanks for reading!

Dynamics 365 Business Central – Exploring the Different Options when running the “Close Income Statement” Routine

Introduction

In this post, we’ll explore the various options available when running the “Close Income Statement” routine in Business Central, and we’ll also look at the outcomes of running each option.

This routine is used to close the income statement General Ledger accounts and transfer the balances to the retained earnings account as part of the General Ledger year end routine.

Depending on your needs, Business Central offers several ways to customise how these accounts are closed, and in this post, we’ll walk through each of these options, showing the results when the routine is run using the different settings.

Please note this post assumes you have followed any year end processes such as ensuring all General Ledger accounts are correctly set as either Income Statement or Balance Sheet and the Financial Year has been closed via the “Accounting Periods” page.

Option 1 – Post to Retained Earnings in Summary with no Dimensions

With option 1 we select the following options in the “Close Income Statement” page

  1. Post to Retained Earnings Acc. = Balance
  2. Dimensions = None Selected

Using the options above the system closes each income statement at GL account level, without any breakdown by dimension. Therefore is I were to have multiple postings to an income statement GL account, and each posting had different dimension analysis, I’d just get one entry in my closing journal for the total balance of the income statement account, rather than a posting per dimension combination.

Additionally, as we have selected “Balance”, the system will make a single entry to the retained earnings account, consolidating all income and expense balances into one summarised posting.

The outcome of using these options in my demo data is shown below.

Option 2 – Post in Detail to the Retained Earnings but no Dimension Analysis

With option 2 we select the following options in the “Close Income Statement” page

  1. Post to Retained Earnings Acc. = Detail
  2. Dimensions = None Selected

When you run the “Close Income Statement” process in Business Central and select “Detail” rather than “Balance,” the system posts an entry to the Retained Earnings account for each individual income statement GL account its closing. I’ll therefore get multiple entries (“Detail”) to the retained earnings account rather than a “Balance”.

However, as I’ve still not selected “Dimension”, I’d still only get one posting per income statement account, regardless of any dimension postings.

The outcome of using these options in my demo data is shown below.

To highlight the additional “detail” posting to the Retained Earnings account, if I preview post this journal I can see the 5 posting to the Retained Earnings account rather than one entry.

Option 3 – Post in Summary to Retained Earnings and close by Dimension

With option 3 we select the following options in the “Close Income Statement” page

  1. Post to Retained Earnings Acc. = Summary
  2. Dimensions = All Selected

With “Balance” and dimensions enabled as per the above screen shot, we are now back to posting a summarised entry to retained earnings account, however we will now have breakdown of the GL posting by dimension for each income statement, creating separate entries per dimension.

The outcome of using these options in my demo data is shown below.

There are now multiple entries to the GL accounts per dimension combination all balanced to one entry to the Retained Earnings account

Option 4 – Post in Detail to Retained Earnings and close by Dimension

With option 4 we select the following options in the “Close Income Statement” page

  1. Post to Retained Earnings Acc. = Detail
  2. Dimensions = All Selected

The final option we’ll look at when running the “Close Income Statement” process is to select “Detail” and tick “Dimension” as per the screen show above.

Having these options selected will post a separate entry to the retained earnings account for each income statement GL account (Detail) and further breaks down for each entry by dimension. (as we have ticked the Dimensions). This provides the highest level of detail.

The outcome of using these options in my demo data is shown below.

Conclusion

As we can see the “Close Income Statement” routine in Business Central offers several options to customise how income statement balances are posted to retained earnings.

Whether you choose to post a single summarised entry to the Retained Earnings account, or want more detailed posting, each method allows for different levels of analysis and reporting.

Thanks for reading!

Dynamics 365 Business Central – A Method for posting VAT Opening Balances when going LIVE mid VAT Period

Introduction

In previous posts I’ve looked at how I post opening balances for various modules in Business Central. Links to these articles can be found below:

How I post opening balances for the General Ledger in Business Central

Today I wanted to discuss how I post opening balances for the VAT Statement when going live Mid VAT period.

Challenges Going LIVE mid VAT Period

If you are going LIVE with Business Central mid-VAT period, some of your VAT transactions will remain in your existing system. As a result, you won’t be able to submit your VAT return through Business Central, as it won’t include all the relevant entries. You could choose to use bridging software for submission, but you also have the option to post an opening VAT position via a journal entry.

This post will walk you through the steps to use a General Journal to record the VAT entries from your previous system enabling you to post your VAT statement from Business Central.

VAT Journal Example

To post the opening position, you’ll first need to gather the VAT figures for each box on the VAT statement from your existing system.

In this example, we’ll assume the following values have been collected from the existing system and are required for the various boxes on the VAT Statement:

VAT Box NumberAmount
Box 1 – VAT due on Sales£10,000.00
Box 4 – VAT to reclaim on Purchases£7,000.00
Box 6 – Total Value of VAT on Sales£100,000.00
Box 7 – Total Value of VAT on Purchases£70,000.00

To accommodate posting the journal we need to ensure we have a large value in the “Max VAT Difference Allowed” field in the “General Ledger Setup”

Then, to record the VAT entries we enter a General Journal as per below

Click to Enlarge

Here’s a breakdown of the General Journal:

Step 1:
Enter the VAT General Ledger codes in the “Account No.” and “Bal. Account No.” fields. This ensures the entries have no impact on the General Ledger.

Step 2:
Select the relevant VAT Posting Groups associated with the boxes on the VAT Statement.

Step 3:
Enter the VAT amounts you want reflected on the VAT Statement.

When I now preview the postings for this General Journal I can see the amounts net each other out so there’s no affect to the General Ledger.

However this journal has created the following VAT entries which can be reported on the VAT Statement.

I’ll therefore post this and view the VAT Statement and I can see the amounts are being picked up correctly.

Conclusion

In the past, bridging software was commonly used when going live with Business Central mid-VAT reporting period. However, this post explains how to post a journal to record VAT entries when moving to Business Central midway through a VAT period.

Thanks for reading!

Want further help with Business Central?

If you’d like more help with Business Central, I also run Rapid365, which provides Business Central implementation and support services for UK businesses, supporting you through setup and go-live.

👉 View services and pricing at Rapid365.co.uk/pricing