Dynamics GP Vs Dynamics 365 Business Central – Reconciling AP and AR to the General Ledger

Introduction

Its good practice to periodically reconcile the General Ledger control accounts to the sub ledgers. In this post I’ll highlight the reports and enquiries that can be used in Dynamics GP versus the reports and enquiries that can be used in Dynamics 365 Business Central to achieve this task.

Dynamics GP

On the General ledger side you can obtain a balance on a GL code at any given period via the “Enquiry > Financial > Summary” window shown below:

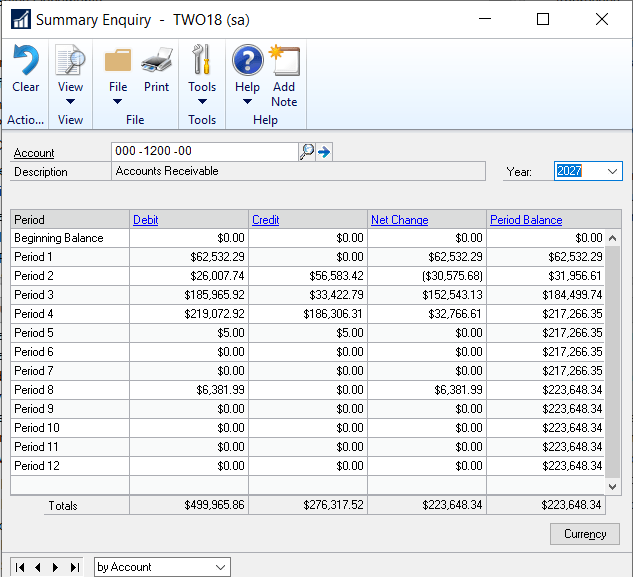
This window provides information on the debits, credits, net change and period balances for an individual account for the year selected.

I love this view as it gives you a lot of information in a handy window that’s also easy to consume. You can drill down by clicking on the blue hyperlink headings to get to the detailed information.

** Incidentally Dynamics GP stores the information displayed in the summary window in a separate table from the detail information. Its not summed data based on detailed transactions. This provides performance efficiencies if there’s lots of data however on rare occasions it might not accurately reflect the period balance. (seasoned GP users will be well aware of this headache).

Unfortunately you can’t get the General Ledger balance at a date that’s in the middle of the period using this window. If you want a General Ledger position at a given date I’d recommend using the “Reports > Financial > Trial Balance > Summary” report.

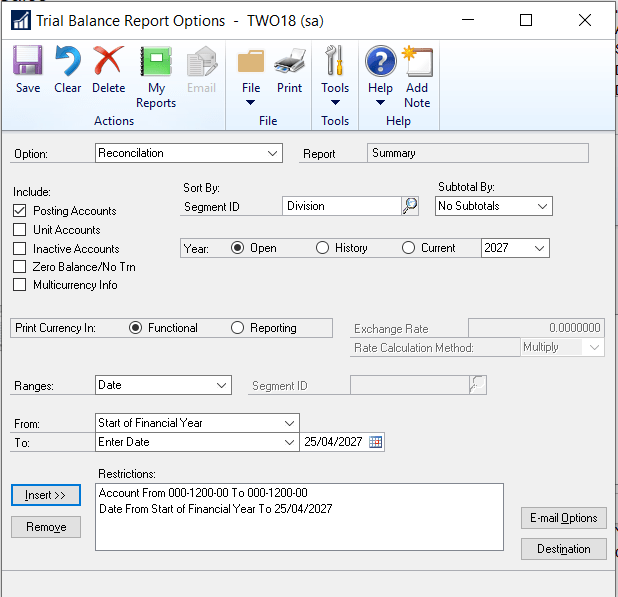
With the restrictions I’ve added above I can see the General Ledger balance at the 25/04/27. If I wanted a detailed breakdown I’d use the “Reports > Financial > Trial Balance > Detail” using similar restrictions.

Once you have the control account balance you can obtain the AP or AR balance via the relevant Historical Aged Trial Balance report. You can access this via “Reports > Sales (or Purchasing) > Trial Balance > Historical Aged Trial Balance”. The options for the report are shown below:

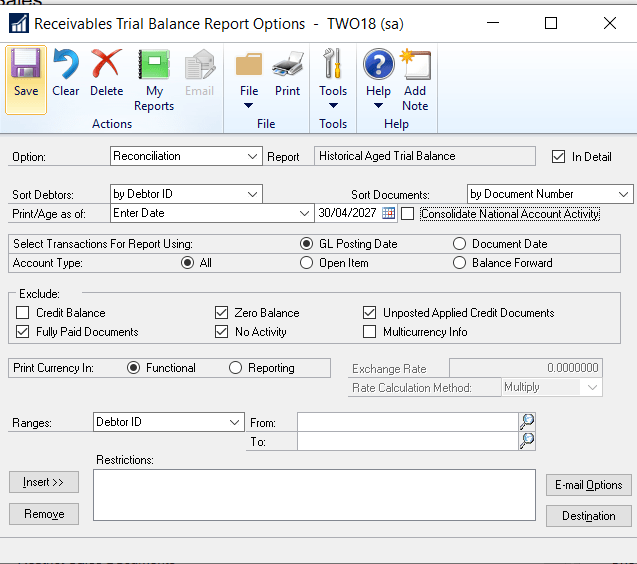
Key fields on this window are:

Print/Age as of:- Using this report you get a retrospective position on the ledger at any given time. For example if I wanted to reconcile back to January 2020, I’d simply change this date to 31/01/2020 and the report would disregard all activity after this point.

Select Transactions for Report Using:- You can select either Document Date or Posting Date. When reconciling to the General Ledger its recommended to use Posting Date.

Detail:- You can either tick or untick this option if you want a summary per Debtor or Creditor or the detail information.

Using the information from this report you can reconcile back to the GL to ensure the ledgers balance.

Its also worth noting that there is a “Reconcile to GL” feature you can use via “Tools > Routines > Financial > Reconcile to GL”. This tool is very useful as it provides an insight into potential differences between the GL and a given subledger. i.e. it would highlight manual journals that could be causing issues.

Dynamics 365 Business Central

If I want to see a quick balance of a General Ledger code in Dynamics 365 Business Central I’d start by going to the Chart of Accounts page as per below:

In this page I can filter for the General Ledger codes in question and filter the totals using the “Filter totals by:” option.

When I enter a “Filter totals by:” restriction the values shown in the “Balance at Date” and “Net Change” columns change automatically based on the filter (however the “Balance” column always shows the current balance). Therefore in the screen shot above the “Net Change” is showing the change in April and the “Balance at Date” is showing the balance at the end of April.

This is a great feature as I can simply change this filter to any date in the year. I can then drill down on the detail transactions by clicking the amounts.

** Incidentally, the “Balance at Date” and “Net Change” values are dynamic as the data displayed on the page is based on detailed data. (they also don’t exist as fields in a table – they are a special type of field called flow fields). The “Filter list by:” filter is a special filter called a “Flow Filter” that work with those flow fields and performance is maintained by SIFT indexes (SQL Indexed Views).

Its also worth noting I can get a simpler view showing all period amounts for a given General Ledger code by highlighting the General Ledger code and selecting “Navigate > Balance > G/L Account Balance” from the navigation bar.

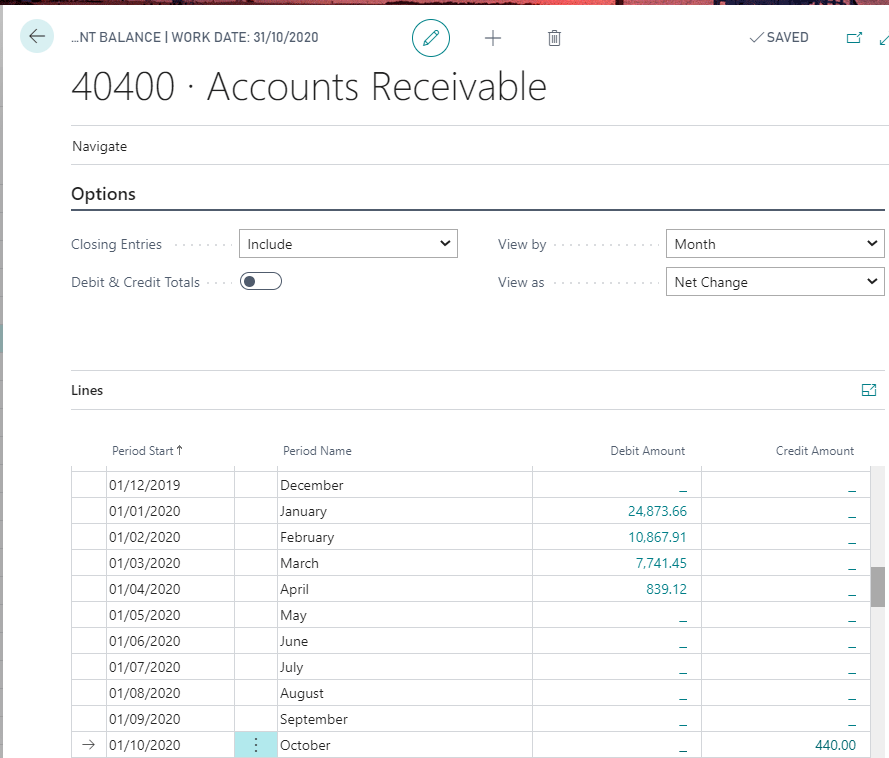
Again I can drill down on the amounts to see detailed information. This also offers a more familiar way of viewing the balance for a Dynamics GP user.

To obtain a balance on the AP and AR side I’d use the relevant Aged Accounts reports as shown below. (just search for “Aged Accounts” to see these)
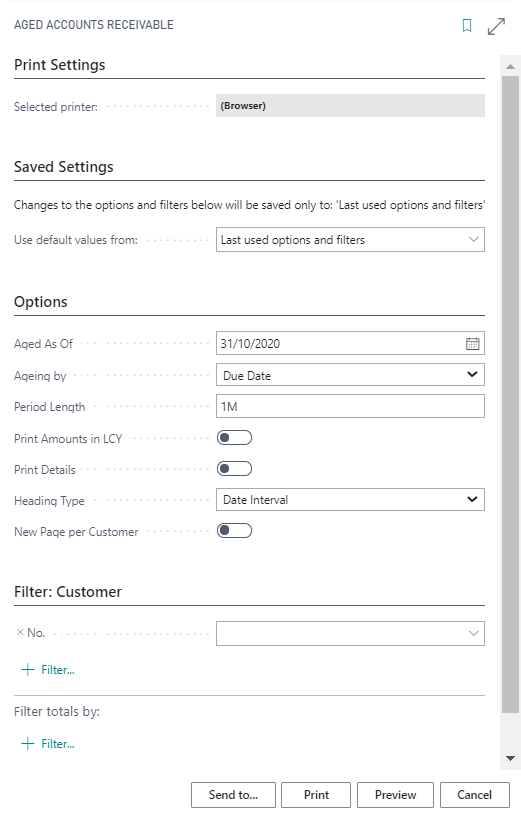
The key fields are

Aged as of:- this is similar to the GP option “Age/As of” and will give you the position “as at” a given date enabling you to reconcile to a point in time.

Print Details:- With this option checked the report is printed with transaction detail however left unchecked you are presented with a summary per debtor.

Using the information from this report you can reconcile back to the General Ledger to ensure the ledgers balance

Conclusion

As expected both products offer great and simple options for reconciling your sub ledger back to the General Ledger control accounts.

As I stated above I really like the GP summary enquiry screen however I also love the flexibility that the flow filters provide in Dynamics 365 Business Central. (FYI, this functionality is offered throughout the system).

Also, in Business Central, as the summary values are provided based on detailed data in the ledger entries table, I can guarantee the balances are providing accurate information every time.

Thanks for reading!

Thinking of making the move to Business Central? We can help

Dynamics GP Vs Dynamics 365 Business Central – Managing Financial Periods

Introduction

Dynamics GP and Dynamics 365 Business Central both have great options to manage financial periods therefore controlling what date ranges users can post into.

In this post I’ll explore how this is achieved in both products, and point out what I think are the key benefits of each solution.

Dynamics GP

In Dynamics GP you can open and close financial periods using the “Financial Period Setup” window as per below

There’s a couple of key takeaways here:

  1. This is a global setting therefore the configuration of this window affects all users of the system. i.e. you can’t allow some users to post into certain periods on an individual basis.
  2. You can close the financial period for one series, (or ledger) while leaving another series open. For example, in the configuration above you can post a Sales transaction with a GL posting date of March, however you can’t post a Purchasing transaction with a GL posting date of March as that has been closed.

Dynamics 365 Business Central

In Dynamics 365 Business Central you can control allowed posting dates in two separate places.

The first is by entering a specific date range in the General Ledger Setup as per below.

The next is at user level via the User Setup window:

If you haven’t specified a user as having a different “Allowed Posting Date” range in the User Setup window then they are bound to the allowed posting dates in the General Ledger Setup.

The key takeaways here are:

  1. You can have different allowed posting dates for different users.
  2. You can’t completely close one series (ledger) and have another still open.

Conclusion

I think both systems have great features.

I love the way you have the flexibility to only close down certain series (ledgers) in Dynamics GP, as I imagine in the real world departments aren’t ready to close at the same time.

I also like how in Dynamics 365 Business Central we can close a financial period using the “General Ledger Setup” window for the majority of users however you can configure some users, for example a financial controller, to have the flexibility of posting across a larger date range.

Perhaps one day one of the products will incorporate both ideas 🙂

Thanks for reading!

Thinking of making the move to Business Central? We can help

Dynamics 365 Business Central – How to Post a VAT only Invoice

Although not a regular occurrence, from time to time users need to post a VAT only invoice onto the sales or purchase ledger. If this happens below are the steps you can take to do this:

Please note these steps are specifically for a Purchase Invoice however it should work the same for a Sales Invoice.

Step 1: Add a new VAT Product Posting Group

First go to “VAT Product Posting Group” and add a new VAT Product Posting group for FULL VAT as per below

Step 2: Configure VAT Posting Setup

Next we need an additional FULL VAT entry in the “VAT Posting Setup” matrix as per the screen shot below. I’ve included FULL VAT twice, once with a blank “VAT Bus. Posting Group”, and once with a “VAT Bus. Posting Group” of DOMESTIC.

Please note I’ve set the system up this way so if entering a VAT only invoice via a “Purchase Journal” I only have to populate the “VAT Prod. Posting Group” whereas if I were to enter the invoice via “Purchase Invoice” its likely the supplier would have a “VAT Bus. Posting Group” of DOMESTIC. Setting the system up this way covers both scenarios.

Step 3: Entering the VAT only invoice via a “Purchase Journal” window.

In this example I’m entering a £100.00 VAT only invoice via the “Purchase Journal” window.

To do this I’ve entered the invoice details as follows:

Just to confirm, I’ve selected a document type of “Invoice” and the Vendor account of “1000”. Then for the “VAT only” element to work I’ve selected the following for the various columns:

Bal. Account Type = G/L Account

Bal Account No. = 46330 (this is the VAT account specified in the VAT Posting Setup)

Bal. Gen Posting Type = Purchase

Bal. VAT Bus. Posting Group = BLANK (I could select DOMESTIC as well if I like)

Bal. VAT Prod. Posting Group = FULL VAT

Please note using the “VAT Posting Group” setup outlined in my screen shot above a combination of a blank “VAT Bus. Posting Group” and a “VAT Prod. Posting Group” of “FULL VAT” equates to 100% full VAT

If I now preview the posting on this transaction I can see 3 G/L Entries and one VAT entry:

If I drill down on the G/L Entries this shows the full amount posting to the VAT control account specified in the VAT Posting Setup. (as this is a Purchase Invoice the credit side goes to the Creditors Control Account):

And when I drill back on the VAT entries I can see a VAT entry for the full amount:

Step 4: Entering the VAT only invoice via the “Purchase Invoice” option

Once in the “Purchase Invoice” page I enter the invoice line as per below.

To confirm, I’ve entered the line as per below:

Type = G/L Account

No. = 46330 (this is the VAT account specified in the VAT Posting Setup)

Vat Prod. Posting Group = FULL VAT

Now when I check the “Statistics” on the invoice it shows the full amount to VAT:

Also, when I preview the posting I can see G/L entries to the VAT account and a VAT Entry of the full amount:

Step 5: Ensure FULL VAT is included on the VAT Statement

Once you have posted the transaction you should also ensure the new “VAT Prod. Posting Group” (i.e. FULL VAT) is included on the VAT statement so any transactions posted to this are picked up correctly when reporting the VAT.

As you can see below I’ve included this in the Purchases section:

I hope this helps anyone who needs to post a VAT only invoice in Dynamics 365 Business Central.

Thanks for reading!