Dynamics 365 Business Central – How troubleshooting the error “Amount must be positive in Gen. Journal Line Journal…” took me on a journey of discovery with Journals

Introduction

I had a user report the error “Amount must be positive in Gen. Journal Line Journal Template Name=’PURCHASES’…..” when posting a Purchase Journal and although the solution is straight forward (the error is telling us the problem) it started a fascinating learning journey into the world of journals in Business Central.

The Beginning – The Error

To confirm the error in full I’ve provided a screen shot below:

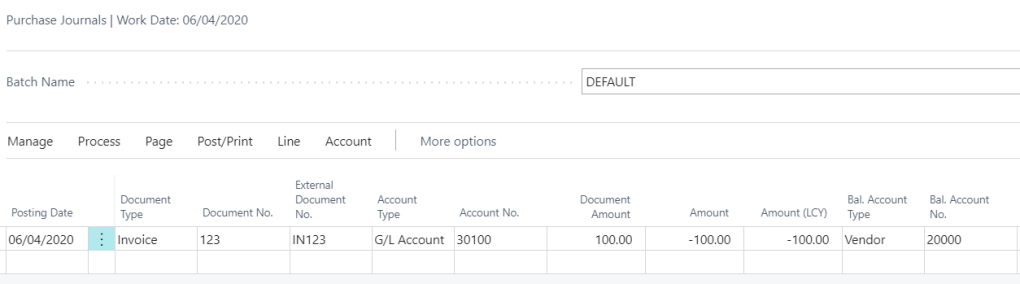
A journal line similar to the one being entered, which was causing the error is below. (its a purchase invoice for £100.00)

The simple fix here is to change the “Amount” column to a positive value but why do we have to do that?

The Middle – A Deep dive

If we step back and take a closer look at the journal line we are trying to post we can see the following:

  1. The journal line has a “Document Type” of “Invoice”
  2. The “Account Type” is “G/L Account”
  3. The “Amount” is a negative value.
  4. The Balancing Account Type is “Vendor”.

So, based on this information what are we telling the system to post?

As the “Amount” is negative we are asking the system to “Credit” the G/L expense code, and as the balancing entry is “Vendor” we are asking the system to debit payables and create a positive “Vendor Ledger Entry”. However, if we think about things, this isn’t the expected entries for a Purchase Invoice. For an purchase invoice you’d expect to Debit the G\L Expense code, Credit the “Vendor” and create a negative “Vendor Ledger Entry”. Therefore when we attempt to post the above transaction Business Central produces the error:

Amount must be positive in Gen. Journal Line Journal…..

In essence the error is saying:

“In order to post a Document Type of Invoice for this Purchase Journal Template you need to Debit the G/L Code 30100. Therefore the Amount should be Positive”

So, what happens if we post the same journal line but the opposite way around? What happens if we leave the “Document Type” of “Invoice” but select “Account Type” of “Vendor” first, leave the “Amount” as a negative value, and have the “G/L Account” as the balancing entry like this:

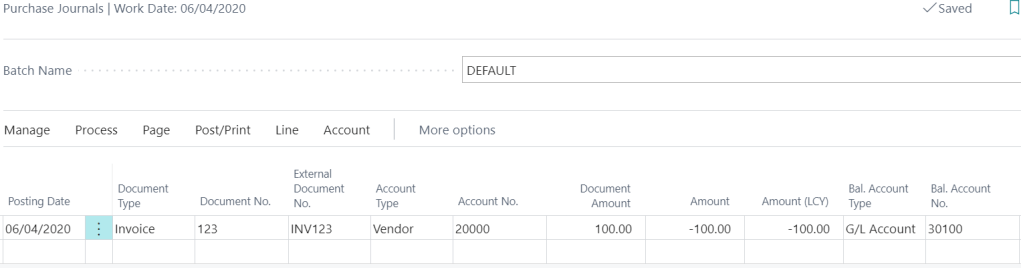
When I attempt to post this it works fine, even though the “Amount” is still negative?

This is because I’m now asking the system to Credit the Vendor (and create a negative “Vendor Ledger Entry”) and Debit the G/L Account 30100 which are valid entries for a document type of “Invoice”.

Penny dropped! I now understand how the journals are working!

The End – More Fun with Journals

Taking this further, have you ever wondered how you can post a Sales Invoice from a Purchase Journal? (or just about any transaction from any Journal) Well if we apply the logic above we can see how this will work just fine.

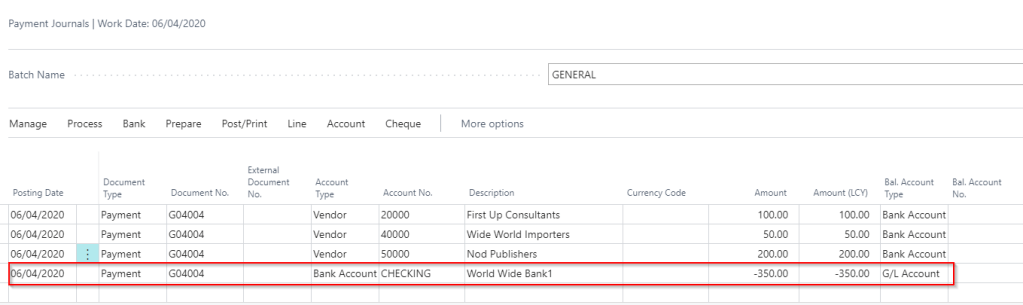
Take this Sales Invoice I’ve entered in the Purchase Journal page as an example:

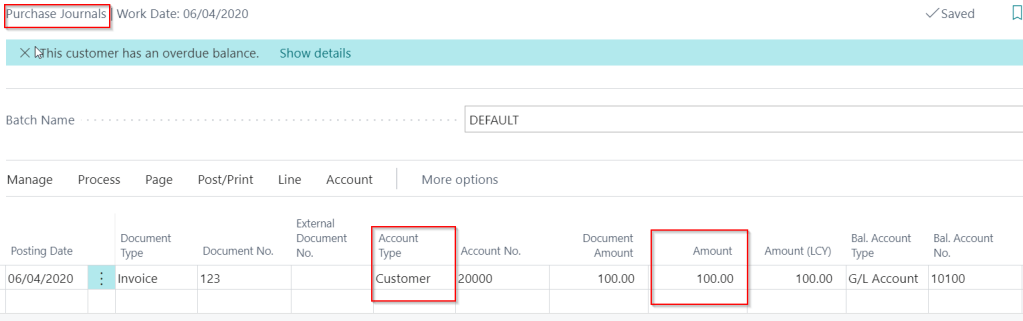
Here I’ve selected a “Document Type” of “Invoice” and an “Account Type” of “Customer” and my Bal. Account Type is my G/L revenue code. I’ve then entered a positive number in the “Amount” column. (as this is a Purchase Journal the “Amount” had defaulted to a negative value after choosing “Invoice”) If I post this journal line the system will Debit my receivables, create a positive “Customer Ledger Entry” and the balancing G/L code will be credited. It will therefore work just fine.

The Extras – Lets get a bit technical

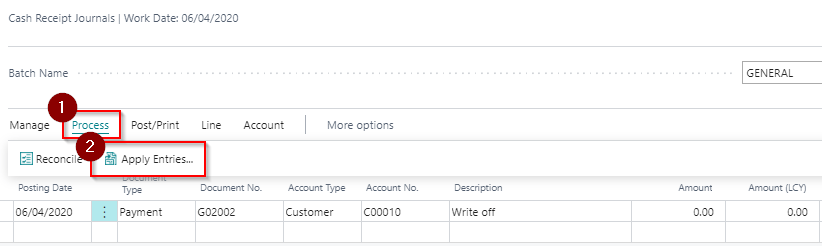
How is all this working? Every Page in Dynamics 365 Business Central is based on a table. If you run the “Page Inspector” on the Journal pages you can see they are all based on the “Gen. Journal Line (81)” table. (just press CTRL+ALT+F1 on any page to see the Page Inspector)

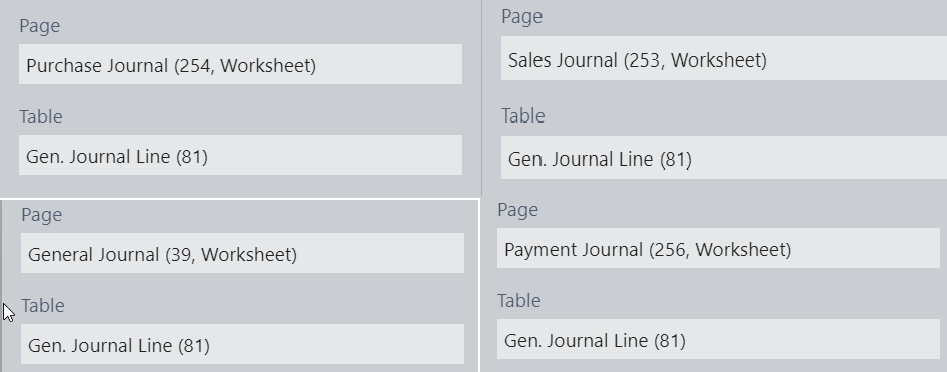
This is essentially why we can perform the same actions in all the different Journal pages. For example we can post a Sales Invoice in Purchase Journal or even more bizarre post a Sales Invoice in a Payment Journal. (try it…trust me it works!)

The only difference is that some pages, like the Payment Journal page, have specific actions related to paying vendors like the “Suggested Payments” action.

Cool, eh!

Conclusion

I must admit this some of this information might be obvious to a seasoned Dynamics NAV or Dynamics 365 Business Central professional however coming from a Dynamics GP background this was a really important learning experience for me.

Now I’ve grasped these concepts I’m much more comfortable working with journals.

Thanks for reading!

Dynamics 365 Business Central – How to post one Bank Account Ledger Entry for multiple payment entries in the Payment Journal

Introduction

When creating multiple payments in the payment journal you can have the system create one bank ledger entry per payment or alternatively one bank account ledger entry for the whole batch of payments.

The decision as to whether to have one bank account ledger entry or multiple bank ledger entries is largely driven by how you want the payments to appear on the bank reconciliation. If you are likely to see them individually on your bank statement, then you’d want the system create one bank ledger entry per payment. However, if the payments show on the bank statement as one grand total for the whole batch, you can have the system create one bank account ledger entry for all the payments.

In this article I’ll cover both scenarios. Firstly, how to create individual bank account ledger entries per payment, and then how to create one bank account ledger entry for multiple payments.

Individual Bank Account Ledger Entries

To create individual bank account ledger entries per payment you can add a bank account as a balancing entry on each individual payment as per below

If I were to post this I’d get three individual bank account ledger entries

** Please note, as per the screen shot, you’ll also get 6 G/L Entries posting this way.

Now when I pull the Bank Account Ledger Entries into the bank statement I’ll get 3 individual lines for each payment.

One Bank Account Ledger Entry for multiple payments

To create one bank account ledger entry for multiple payment lines you can leave the “Bal. Account No.” blank on each payment line and create a balancing entry instead as per below:

** Please note all entries require the same Document Number as per the screen shot above.

** Alternatively you can switch the option “Force Doc Balance” off on the General Journal Template and have different document numbers. You then only have to ensure all documents on the same Posting Date balance.

Now when you post this batch of payments you only get one bank account ledger entry for all 3 payments.

** Please note you also get a reduced number of G/L Entries as well.

Now when I pull the bank account ledger entries into the bank reconciliation I get one total of £350.00 for the whole batch of payments rather than individual amounts

One caveat I can think of to the second approach is if you need to reverse one of the payments via the in built “Reverse” feature, you are required to reverse them all. Whereas the individual approach you can reverse them individually.

*Please note you could just create a manual entry to reverse one of the payments though.

As always its best to work through the steps in a sandbox or test company first to see if this meets your individual needs.

Thanks for reading!

Dynamics 365 Business Central – Use Payment Tolerance to Write Off Amounts

Introduction

There might be occasions when you wish to write off the amount of an invoice. For example if a customer has underpaid and you don’t wish to leave the balance on the invoice. You can achieve this using a payment tolerance.

Please note there’s an updated post here that shows under and over payments 🙂

Scenario

In this scenario I have a posted invoice for £101.00 and the customer has sent a payment of £100.00. Instead of applying the payment and leaving a balance on the invoice of £1.00, we’ll write off the £1.00 using a payment tolerance.

Below is the invoice for £101.00 as shown in the Customer Ledger Entries page:

I’ll now go to a Cash Receipts Journal and raise the payment below and click “Apply Entries” to apply this to the Invoice (* Please note you can also post the payment for £100.00 and apply afterwards using the same technique)

Once in the “Apply Customer Entries” page I first change the “Pmt. Disc. Tolerance Date” so its after the posting date of the invoice, then I’ll add a “Max. Payment Tolerance” of £1.00 and finally enter £100.00 in the “Amount to Apply” as per below

Now, back in the Cash Receipt Journal window I’ll select “Preview Postings” so I can double check this is going to work as intended prior to clicking “Post”. I can check this by viewing the “Detailed Ledger Entries” and in this scenario everything seems to be fine as I have a “Payment Tolerance” entry type in the Detailed Ledger Entries.

As everything is fine I’ll now post this transaction, which will close the Invoice as fully applied:

After posting the Payment the remaining amount on the Payment and Invoice are both £0.00. If I click “Remaining amount” on the Payment I can see the “Payment Tolerance” in the Detailed Ledger Entries.

I hope you find this useful.

Thanks for reading!