When posting Purchase Invoices you can sometimes encounter the error “The Posting Date is not within your range of allowed posting dates” even though the Posting Date on the Invoice is within your allowed range.
In this post I’ll briefly explain a method you can use to find out which Posting Date the system is trying to post into and also why you are getting this message.
** Please note I’ve also written about this here but cover more things in this post 🙂
The Error
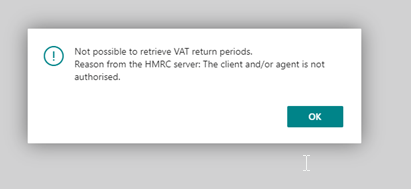
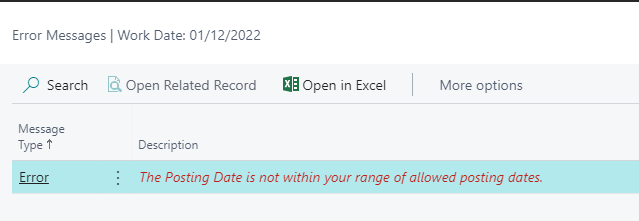
A common scenario is you are happily posting a Purchase Invoice that is matched to a Posted Purchase Receipt when you receive the error below:
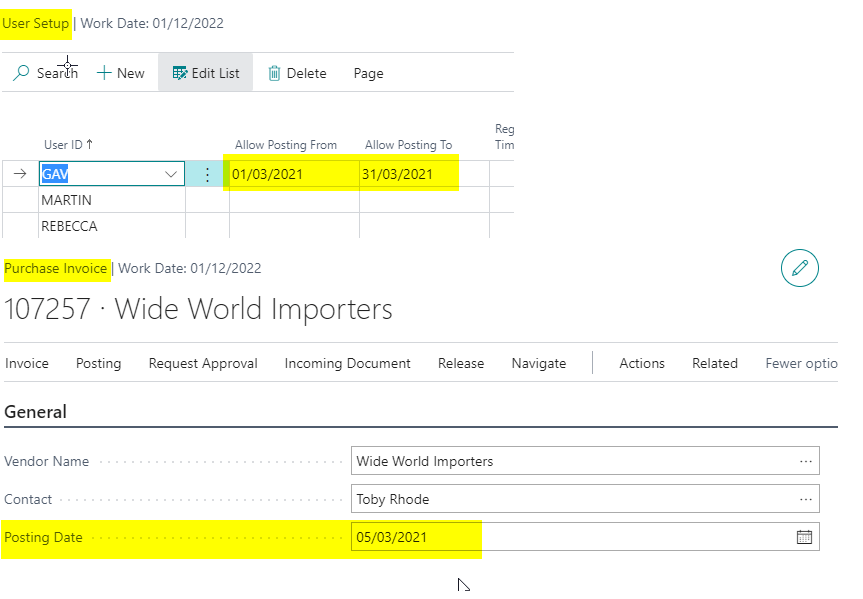
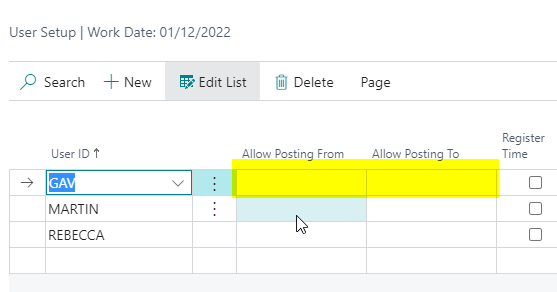
The first thing to do is check if the Posting Date of the Purchase Invoice does indeed fall within your allowed posting range. You can check your allow posting date range via “User Setup” and compare this to the Posting Date on the document.
As you can see the Posting Date of the document (05/03/21) falls within my allowed posting dates (01/03/21 – 31/03/21) so what’s the issue? Why is the system saying this posting falls outside my allowed range?
The Troubleshooting Method
Before we try and understand why this is happening its a good idea to figure out which date the system is trying to post into. I do this by following the method below:
1) Blank out your posting range in the “User Setup”.
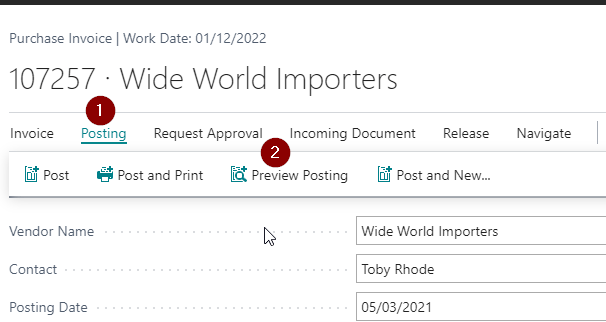
2) Rather than posting the document select to “Preview” the postings as per below. (if you did choose to post the document it would work so be sure to only Preview)
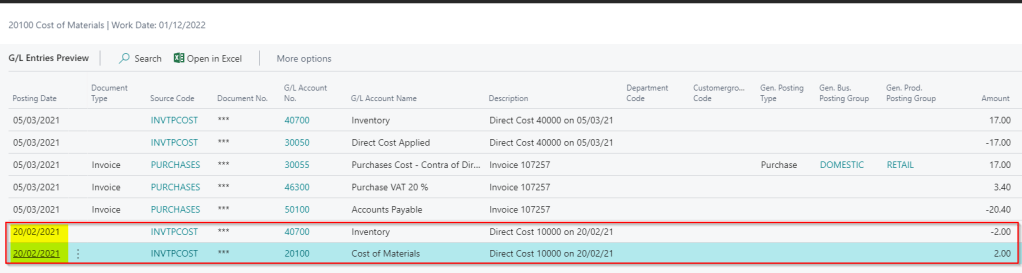
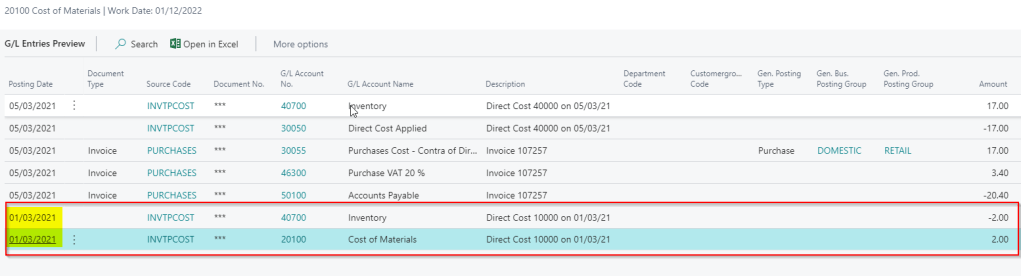
3) If you then drill down on the G/L Entries this will show you the Posting Date the system is trying to use which is outside of your range:
So, now we know the system is trying to post a portion of the GL entries to the date 20/02/21, which falls outside my range of Posting Dates, and this is why I’m receiving the error message. However, before we go changing our allowed posting dates and posting the document, let’s look into why the system is posting back to this date.
A Little background
Before we get into why this happens its useful to have some background on this example. In this example the Sales and Purchasing process followed the following steps:
1) The Item was purchase receipted at a cost of £15.00 on the 10/02/21.
2) The Item was sold on a Sales Invoice on the 20/02/21.
3) The Purchase Receipt is being Purchase Invoiced on the 05/03/21 but the cost changed from £15.00 to £17.00 on the Item.
The key point here is point 3. The costs of the Item have changed from when they were purchase receipted (point 1) and subsequently sold (point 2). When this happens a key piece of functionality called “Adjust Costs – Item Entries” makes adjustment postings but more on that later.
Digging deeper
In Business Central when posting a Purchase Invoice that involves Items you are essentially creating two separate postings (registers). This is standard behaviour to support the “Automatic Cost Posting” feature. (more on that here)
One posting is for the purchases side of the transaction, which includes the Account Payable G/L code, and the other is for the Inventory. If you take a look at the G/L entries window you can see these defined in groups by the “Source Code”. The PURCHASES source code is the entries related to purchases such as the Account Payables G/L code and the INVPTCOST is for the Inventory postings.
In our example one of the INVPTCOST set of postings is causing an issue. For some reason this has been back dated to the 20/02/21. So why have these entries been created?
Adjust Costs – Item Entries
These entries have been created by the “Adjust Cost – Item Entries” batch job that runs when you post the Purchase Invoice (assuming you have “Automatic Cost Adjustment” set to Always).
As the costs have changed from £15.00 on the Purchase Receipt (point 1) to £17.00 on the Purchase Invoice (point 3) adjustments need to be made as the Item was sold at a cost of £15.00 (point 2). Therefore the Cost of Goods Sold and Inventory postings need adjusting to the new Cost.
Choosing the Posting Date for the Adjustment
So why has the system selected the date of 20/02/21 for these postings?
The system determines the earliest date for Inventory adjustments based on the Allowed Posting Dates in the General Ledger Setup. (and also Inventory Periods if they are in use. You can read more about how the Posting Date is selected when Inventory Periods are involved via this Microsoft article.)
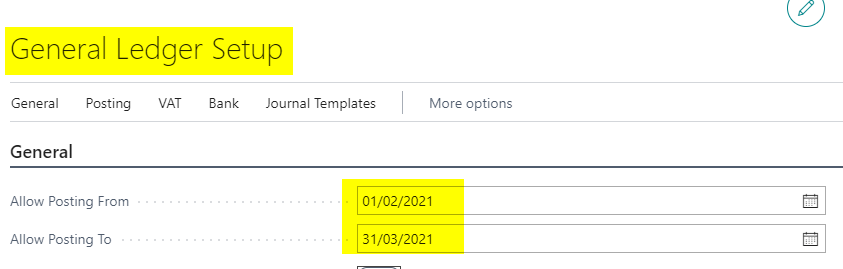
Therefore if we check our General Ledger Setup the Allowed Posting Dates are as follows:
In this configuration the earliest date we can post an adjustment is the 01/02/21.
In our scenario the Inventory we need to adjust on the Sales Invoice has a posting date of 20/02/21. Looking at our General Ledger Posting Setup we allow postings to this date so system creates adjustments with a posting date of 20/02/21 and as a consequence of this we receive the error “The Posting Date is not within your range of allowed posting dates” as our User Setup only allows postings between 01/03/12 and 31/03/21.
The Fix
Now we know why this is happening, and how the date is selected, we can choose to fix this by either adjusting our User Setup to allow posting in February or change the General Ledger Setup.
In my scenario I’ve changed the General Ledger Setup to only allow postings from 01/03/21 through to 31/03/21 which matches my User Setup. So now the earliest posting date that can be used for the Inventory Adjustment is 01/03/21.
If I now preview postings you can see the system will make the adjustment on the 01/03/21.
I will now be able to post this transaction as the Posting Dates on all entries are within my Allowed Posting Dates.
Conclusion
This error crops up a lot when people sell items prior to Purchase Invoicing them and costs change. Hopefully this article will help explain why this is happening and how you can troubleshoot it.
Coming from a Dynamics GP background I initially found the exchange rate setup in Dynamics 365 Business Central a little confusing. In Dynamics GP you set an exchange rate, and then configure whether you wish the system to divide or multiple the foreign currency amount by that rate, to get the local currency amount, and that’s it.
However, in Dynamics 365 Business Central things are a little different. In this post I’ll walk through the key fields in the Currency Exchange Rates page to explain how you can set Exchange Rates in Dynamics 365 Business Central.
** This post only goes through setting Exchange Rates for Documents. It doesn’t touch on the Exchange Adjustment side of things.
Currency Setup
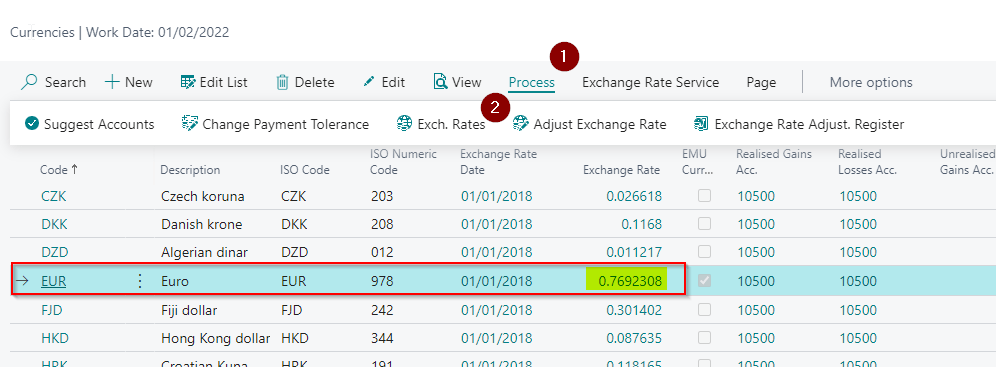
To access the “Currency Exchange Rate” page you must first go to the “Currencies” page, highlight the currency in question, and then drill down on the “Exchange Rate”. Alternatively from the “Currencies” page you can highlight the currency and click “Process > Exch. Rates” as per below.
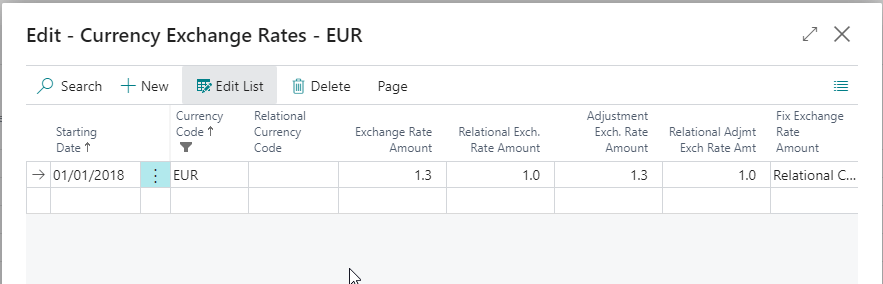
This should then open the “Currency Exchange Rates” window which is shown below:
As I mentioned previously this window looks a little confusing to me? It appears there’s more than one place to enter a rate for the same currency? There’s also no option to specify if you wish to divide or multiply the currency at a given rate? (which is something I’m used to). So where do you enter the rate exactly?
Making sense of it all
I’ve found the key fields in this window are the “Exchange Rate Amount” and the “Relational Exch. Rate Amount”.
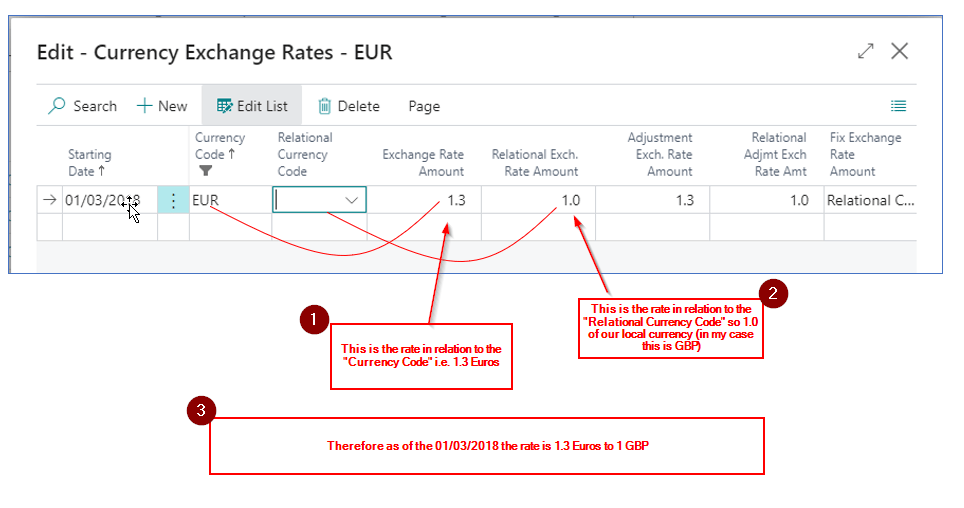
The “Exchange Rate Amount” is the rate to use for the “Currency Code” selected on the line, and the “Relational Exch. Rate Amount” relates to the rate to use for the “Relational Currency Code”. (generally its left blank so its the local currency – see further below for an example where this isn’t the case)
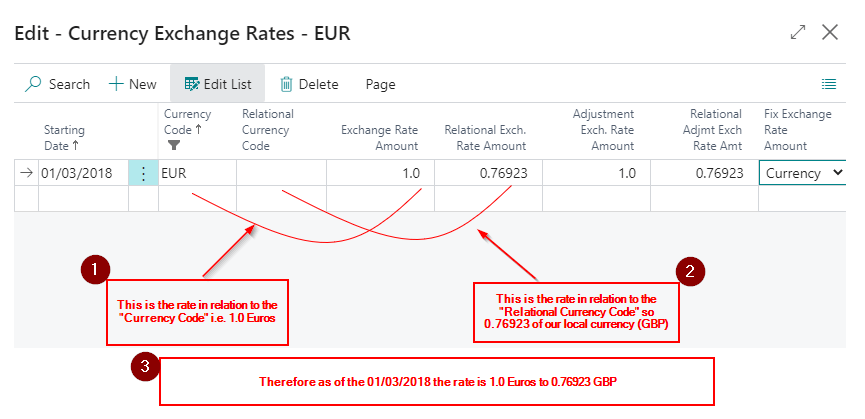
This can be further explained in the image below
Therefore using the Currency Exchange Rates window shown above, as we have 1.0 in the Relational Exch. Rate Amount (GBP) and 1.3 in the Exchange Rate Amount (EUR) this means 1.3 Euros is equal to 1 GBP. (The “Exchange Rate Amount” is acting as the exchange rate)
Hence entering a transaction for €200.00 would equate to £153.85 (i.e. 200 / 1.3 = 153.85)
I could also flip this by entering 1.0 in the “Exchange Rate Amount” and 0.76923 in the “Relational Exch. Rate Amount” as per below:
This now means the “Relational Exch. Rate Amount” is acting as the Exchange Rate.
In this example €1 (Exchange Rate Amount) is equal to £0.76923 (Relational Exch. Rate Amount). Therefore entering a transaction for €200.00 would also equate to £153.85 (i.e. 200 * 0.76923)
Both would work exactly the same its just a slightly different configuration.
** I would tend to use the divide method as the rates make more sense in this scenario.
Bonus – Adding a Relational Currency Code
I’ve never come across a situation where the “Relational Currency Code” is anything other than blank (i.e. the local currency) however now we know how the relationships work let’s test this out.
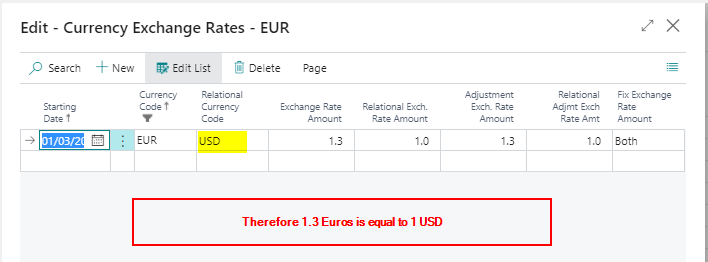
I’ve therefore changed the Currency Exchange Rates page for EUR to include USD as the Relational Currency Code as per below
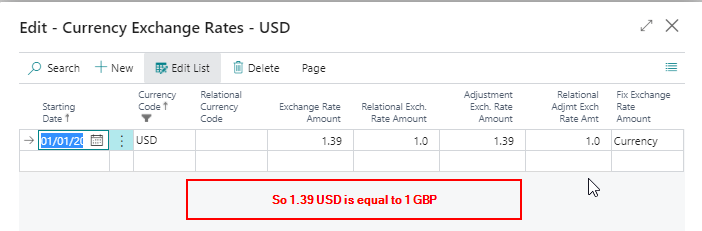
And the USD rate is below:
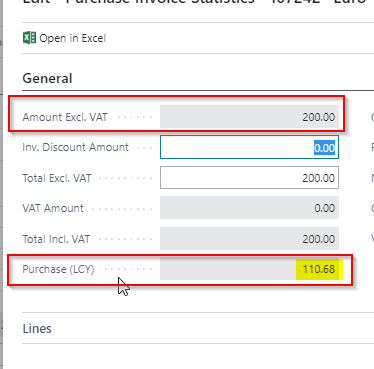
Therefore if I were to raise a €200 Invoice the GBP will be calculated as follows:
Step 1 Euros to USD :- €200 / 1.3 = $153.8462
Step 2 USD to GBP :- $153.8462 / 1.39 = £110.68
To confirm I added an Invoice in Business Central and below is the statistics page confirming our calculations
Conclusion
Although confusing at first (at least to me) understanding how the Exchange Rates are picked up and used is fairly straight forward. Its also flexible offering various options for how to calculate exchange rates.