Dynamics 365 Business Central – How to cancel a full month of Depreciation in the Fixed Assets module

Introduction

I recently encountered an issue where the fixed assets depreciation had been ran incorrectly and therefore it all had to be cancelled.

In this post, I’ll show a couple of ways you can cancel all depreciation in a given time frame or filter. These include using the “Cancel Entries” on the “FA Ledger Entries” page, and my preferred option, the “Cancel FA Entries” function on the Deprecation Book.

Scenario

In this scenario, I’ve posted depreciation for the month of August, impacting more than 300 assets. However, I’ve identified an error and now wish to cancel all depreciation for August.

There are a couple of approaches I could use to address this issue.

Option 1:- Multi select in the FA Ledger Entries Page

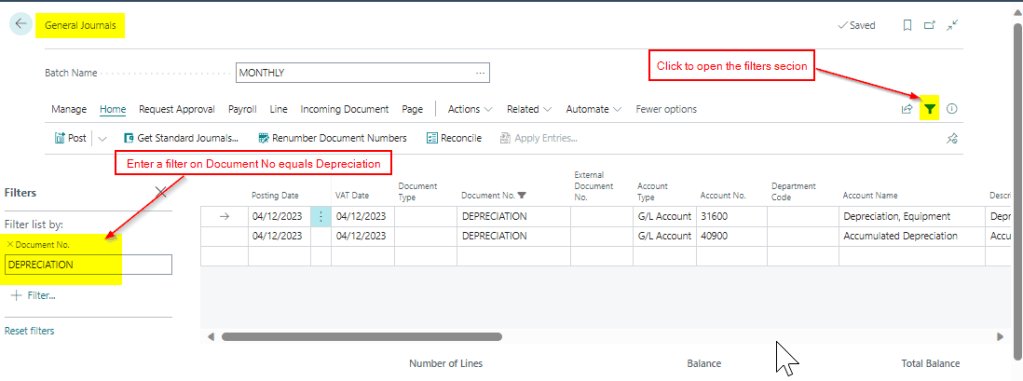
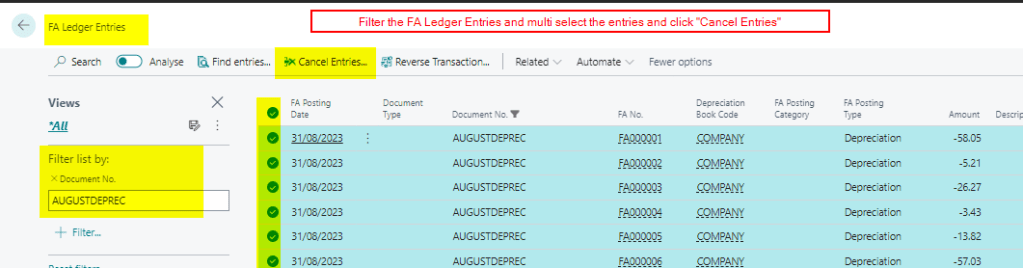
One way I could resolve this is to go the “FA Ledger Entries” page and filter for the entries I wish to cancel and click “Cancel Entries”.

For example, below I’ve filtered on the “AUGUSTDEPREC” document number and then selected all the entries and clicked “Cancel Entries”.

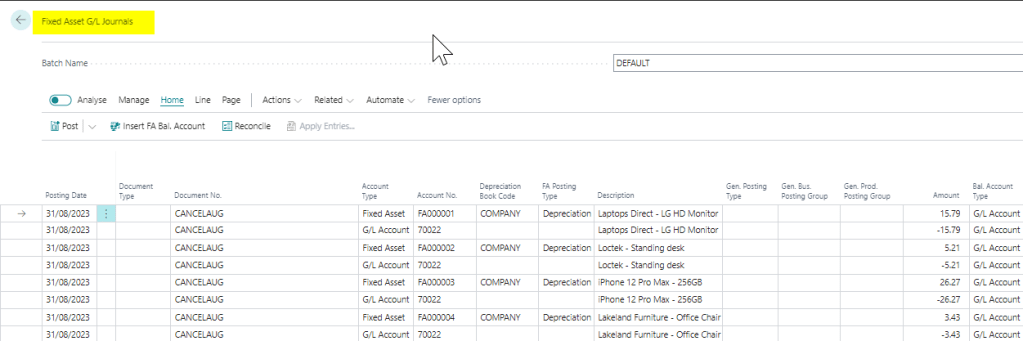
Although this would create me a Fixed Assets G/L Journal to cancel the entries, it wouldn’t automatically populate the balancing account. I’d then have to open the “Fixed Asset G/L Journal” page and highlight all the rows and click “Insert FA Bal Account”

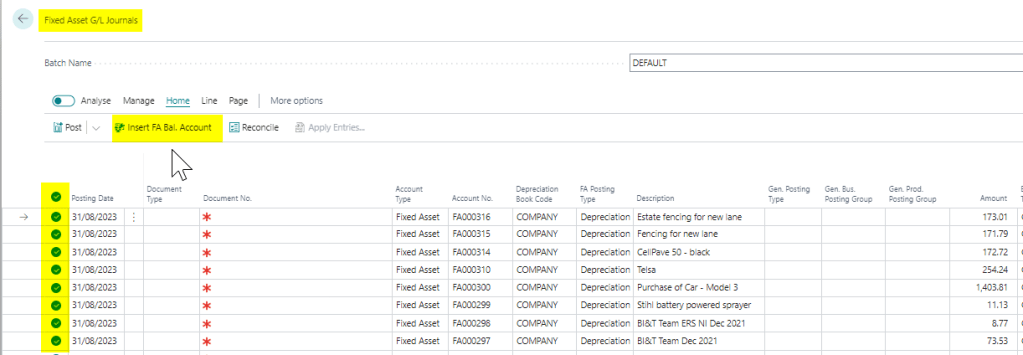
I could then post the journal which would cancel the entries.

Option 2 – Use “Cancel FA Ledger Entries” on the Depreciation Book

I find that another, more efficient way of doing this, would be to use the “Cancel FA Ledger Entries” function on the Depreciation Book.

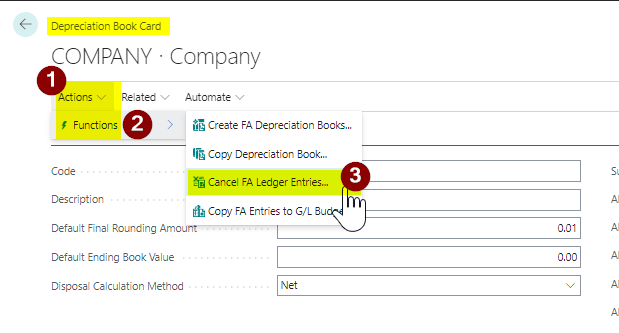
To do this search “Depreciation Book”, select the relevant Depreciation Book, and then click to edit it. Next, select the option “Actions > Functions > Cancel FA Ledger Entries”

This will open a dialog box with various options for cancelling different types of Fixed Assets transactions including Depreciation.

I’ll therefore choose the options below and click OK.

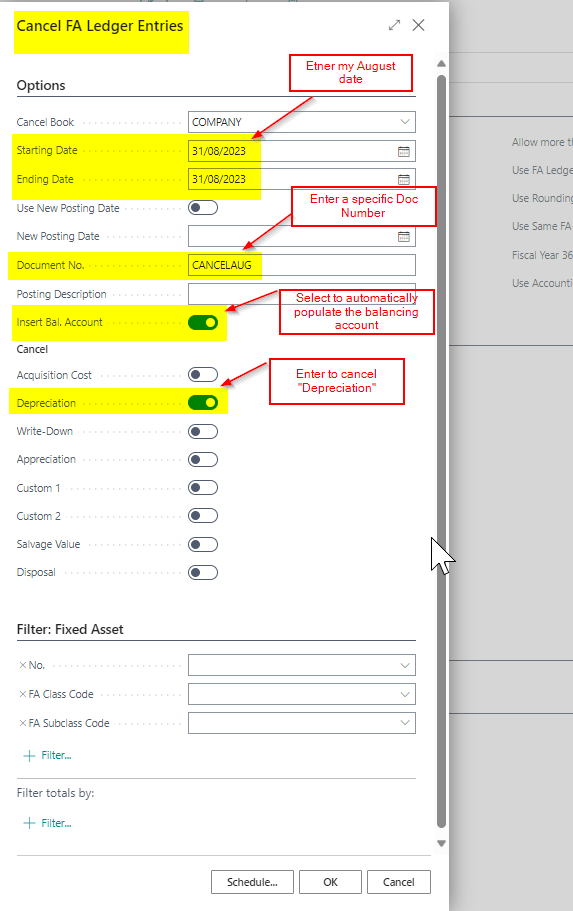
Using this method, I’m sure to cancel all depreciation entries within the specified date range. Additionally, it allows me to include the balancing account and specify a document date, all conveniently on a single page.

This will then create the relevant Fixed Asset G/L Journal I can post to cancel the entries

Final Note

When you choose to “Cancel” entries although all entries are reversed, including GL entries, they don’t appear in the “FA Ledger Entries” page. (this includes the FA Ledger Entry you cancelled). They can be viewed via the “FA Error Ledger Entries” page. This is by design as the entries have been cancelled.

Conclusion

There are various methods available for cancelling Fixed Assets entries. However, when I need to cancel multiple entries simultaneously, such as monthly depreciation, I prefer using the “Cancel FA Ledger Entries” page. When cancelling individual entries, I find the “Cancel FA Entries” option on the “FA Ledger Entries” page to be more convenient.

Thanks for reading!

Dynamics 365 Business Central – How to selectively post part of a Journal batch using filters

Introduction

There might be situations when you only want to post part of a Journal batch, rather than the whole batch. For example, if you have several monthly adjustment journals in one batch, you might only want to post a selection of the entries, rather than the whole batch. In this post I’ll walk through how this can be achieved using filters.

Scenario

Let’s say you have a month end journal batch that contains several monthly adjustments you are working on. Now you just want to post a selection of the entries in the of the journal batch, and continue working on the rest.

As there is only a “Post” option on the menu bar, its not obvious how you can achieve this, however this can be done using filtering on the journal lines.

Filtering in a Journal

Below is a journal batch that contains a depreciation entry, an accrual and a journal for bad debt that hasn’t yet been finalised.

In this scenario, I only want to post the depreciation entry, and continue working on the other journals in the batch. To do this I can click the “Filter” option and filter the lines to my depreciation journal as per below.

Now, when I click “Post”, Business Central honours the filter and only posts what is currently filtered. As you can see below only two GL entries have been created. (and in fact the journal wouldn’t have posted without the filter as it didn’t fully balance)

Conclusion

Its common to advise users to create a journal batch per task in Business Central. For example, a journal batch for Adjustments, Accruals etc however you can use one batch and use filters to post just what you need.

Thanks for reading!

Enjoyed this post? Subscribe below

Need help with Business Central? Contact me

Dynamics 365 Business Central – How to automatically block all new customers

Introduction

When creating new Customers it may be necessary to automatically set them as “Blocked” to prevent them from being immediately used. Additionally, this would give you the option to create a workflow that is triggered when a user changes the status from “Blocked” to “Unblocked” (blank).

This post will show how you can automatically set any new Customers to “Blocked” using Customer Templates and a Number Series.

Step 1 – Create a Customer Template

To streamline the creation of new customers, Business Central provides the capability to create “Customer Templates”. You can set certain defaults on a Customer Template, like Posting Groups, Currencies, payment terms, and notably the “Blocked” status along with a Number series.

To implement this solution we need at least one Customer Template, so I’ll create one called “DEFAULT”. I’ll also set the Blocked status to “ALL” and a Number Series of “CUST” as per below

Step 2 – Number Series

Next, we need to ensure “Default Nos” is switched ON on the Number Series we selected on the Customer Template above.

Step 3 – Test Creating a New Customer

With all the components configured, we can now test the creation of a new customer. Since the customer template includes a number series with default numbers, the template will be applied automatically, resulting in the customer being blocked.

Conclusion

In summary, two key factors are enabling the functionality. Firstly, you need a number series with the “Default Nos” option activated. If default numbers aren’t activated the template won’t be applied automatically. Secondly, a customer template is required, configured to automatically set the “Blocked” option to “All.”

You could now improve the customer onboarding process by implementing an approval workflow that triggers when the status changes from “All” to blank, allowing you to enforce customer approval.

Thanks for reading!

Need help with Business Central? You can subscribe or contact me below

← Back

Thank you for your response. ✨