Recently I needed to find out when an environment had been created in Business Central. In this post I’ll explain how this can be achieved via the “Operations” page in the Business Central Admin Centre.
The Admin Centre
The Business Central Admin Centre allows you to perform various administrative tasks on your Business Central environments, including creating new ones.
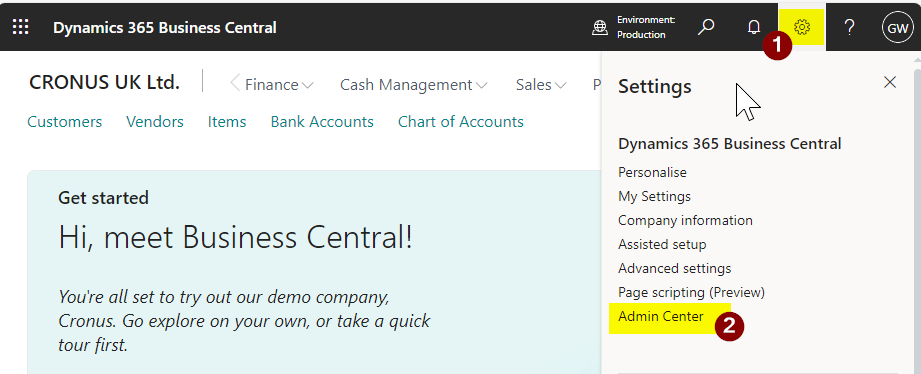
You can access this several ways, with the most common methods being via the “Settings” option in Business Central as per below
Alternatively you can add the word “Admin” to the end of the Business Central URL as shown below:
Please note in both cases you need special permissions to be able to access the Business Central Admin Centre. I explain more about this and the Admin Centre in general in this post and YouTube video
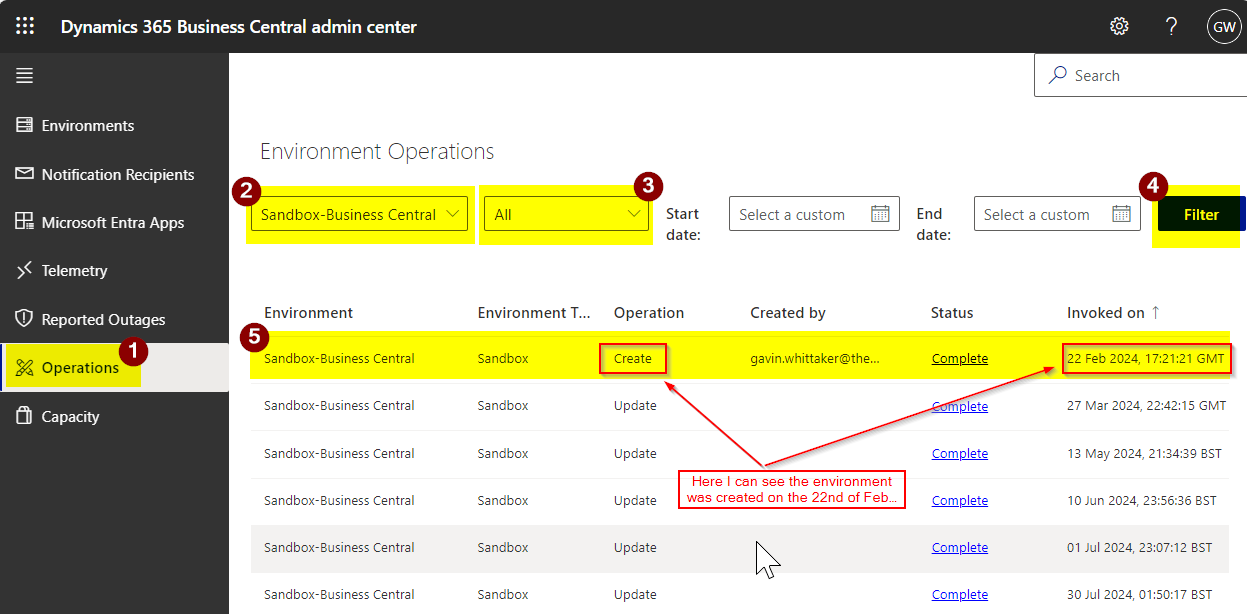
Once in the Admin Centre you can find out when an environment was created by clicking “Operations” (1), then selecting the environment you are interested in (2), next selecting “All” (3), and finally clicking “Filter” (4) as per below
Here I can now see that the environment was created on the 22nd of February 2024 and also which user created the environment.
You can also see other useful information like when the environment has been updated, when an app was installed, or an environment copied etc
Conclusion
This is a quick method for checking when an environment was created. Its also a great example of Microsoft responding to community input through the Microsoft Ideas site, where this idea was originally proposed. You can find the idea and Microsoft’s response here.
At the end of a period it maybe necessary to split the balance of an General Ledger account across dimensions. This might be useful if you accumulate costs in a General Ledger account and only split those across cost centres at the period end.
In this post I’ll go through how this can be achieved quickly and easily using the Recurring Journal.
Recurring Journal
The recurring journal in Business Central provides the means of handling repetitive journals that occur on a regular basis.
One example might be a monthly depreciation journal or recurring revenue and expenses. (although I’d hope anyone would be using the Fixed Assets module for monthly depreciation 😊). Typically you’d be using the same or very similar amounts so would use a “Recurring Method” of “Fixed” or “Variable” for those journals.
However there is a “Recurring Method” of “Balance” that provides the ability to transfer the balance of an General Ledger account to another General Ledger account, or more interestingly, split the balance of an account across dimension values.
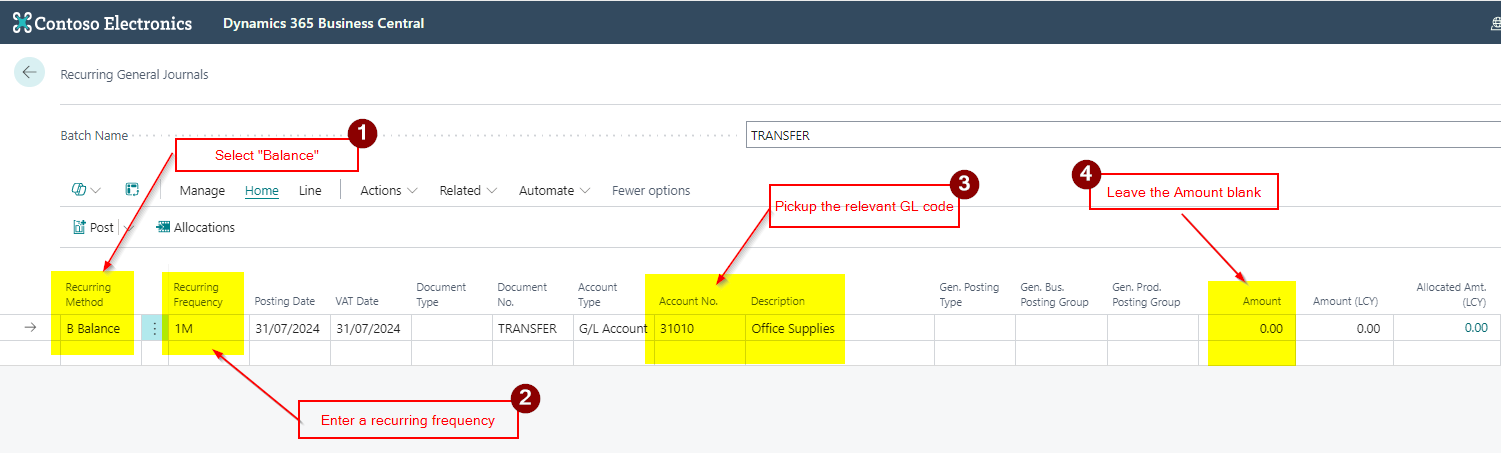
For example, let’s say I’ve been accumulating “Office Supplies” expenses under one General Ledger code and at the end of the month I want to split this by departmental cost centres.
This see how this works with a Recurring General Journal.
Worked Example
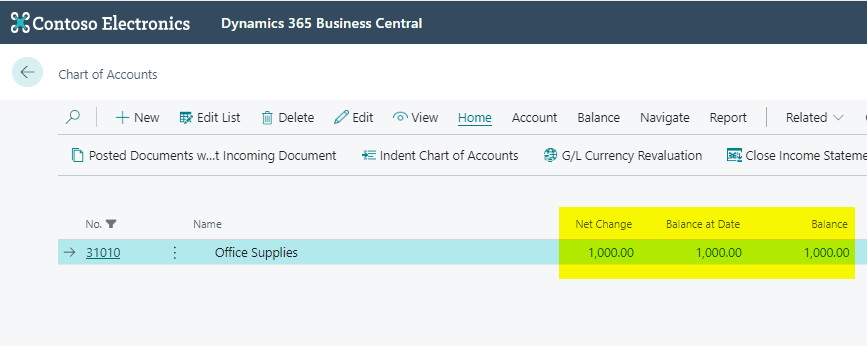
Through the month I’ve accumulated £1000 worth of costs in the “Office Supplies” account.
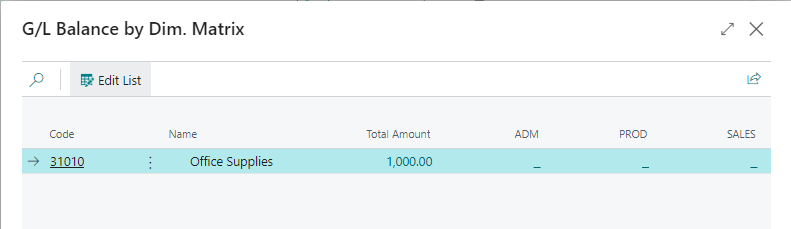
If I look at a “G/L Balance by Dimension” you can see I have no Dimensional analysis.
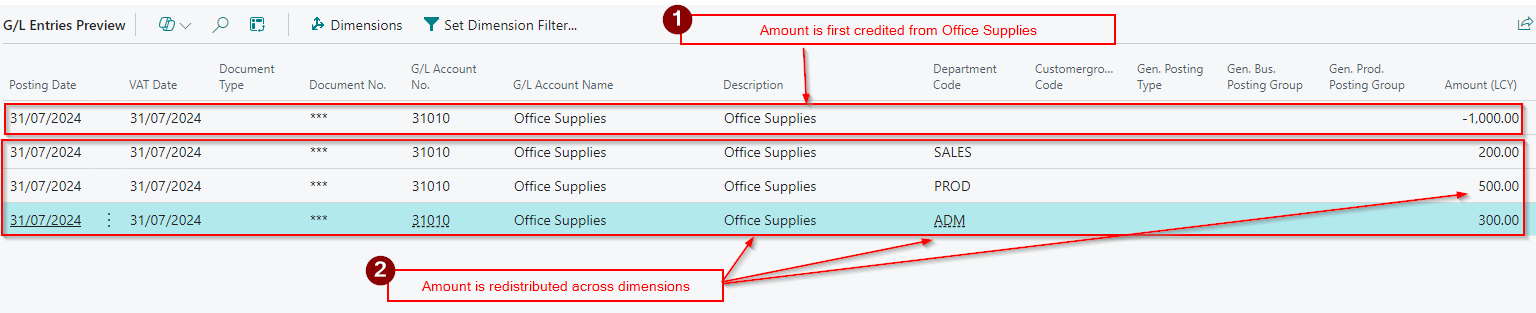
At month end I now want to split these costs across my departments. To do this I open the “Recurring General Journal” page, select the “Balance” recurring method, and pickup the “Office Supplies” account. (Note I don’t enter any amount in the journal)
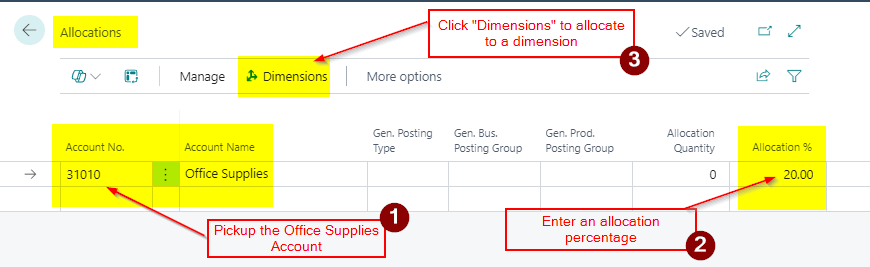
Next we’ll allocate the balance across the “Department” dimension. I want to allocate 20% to the Sales department, 50% to Production and 30% to Admin.
To do this click “Allocations” in the ribbon and pickup the Office Supplies General Ledger account and enter 20% percentage and click “Dimensions”
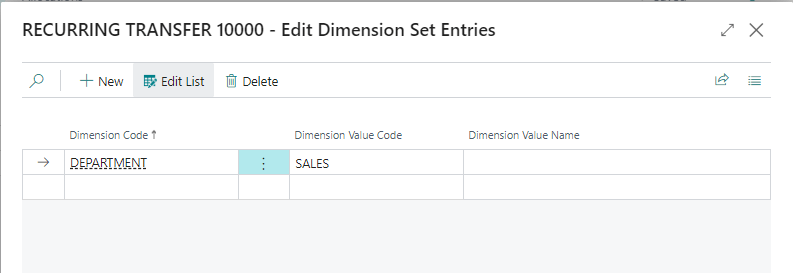
I then select “Department” as the Dimension Code and “SALES” as the Dimension Value.
I repeat this for Dimension Values “ADM” and “PRODUCTION”, each time entering the Office Supplies General Ledger account, then clicking “Dimension” in the ribbon, and picking up the relevant dimension value.
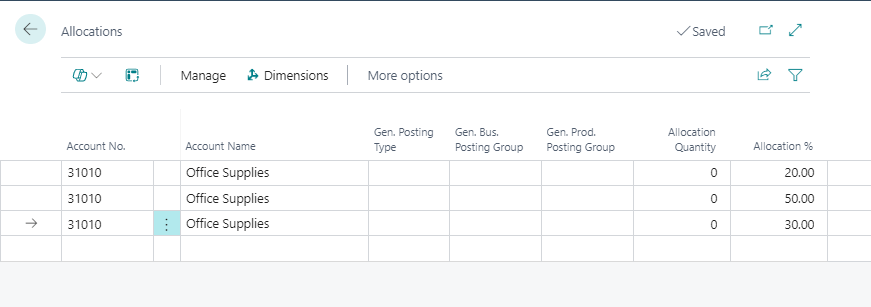
I now have the allocations I require as per below.
Now when I preview post the journal I can see how this will now be split over the various departments
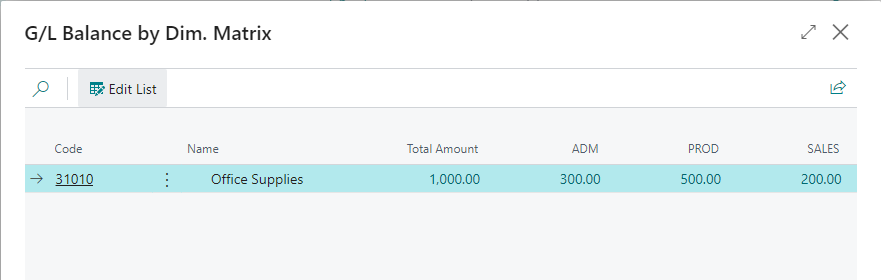
Finally when I view the “G/L Balance by Dimension” I can see the split across my Department dimension
Conclusion
Although I could have used a normal “General Journal” for this entry, this method shows how you can utilise the “Recurring General Journal” to split costs across dimensions, without needing to know the actual balance of the account therefore reducing errors and saving time.
In Business Central you can post a Sales Prepayment Invoice if you want to raise an invoice before shipping the goods or supplying a service.
Its therefore used when you require your customers to pay up front or pay a deposit before you supply the goods and services.
For this to work you specify a Sales Prepayment General Ledger code for the posting group combination in “General Posting Setup”. (this tends to be a Balance Sheet Liability account). The system then posts to this General Ledger code when you raise the Sales Prepayment Invoice. (incidentally this entry is reversed when you post the Sales Invoice and the relevant Income code is updated)
However this poses a problem if the goods or services you sell have different VAT rates, as when you raise the Sales Prepayment Invoice it uses the “VAT Product Posting Group” on the Sales Prepayment GL Account for VAT calculation purposes.
In this post I’ll go through the issue in more detail and also the solution I’ve used to resolve this.
Sales Prepayment Setup
Please note this doesn’t cover all of the Sales Prepayment Setup. You can find that in the Microsoft Learn site here
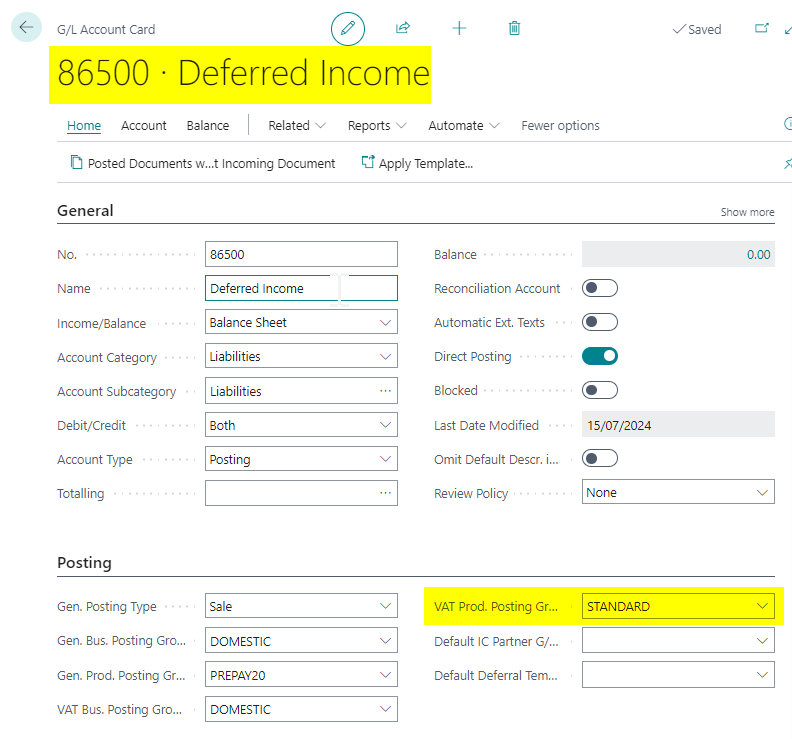
First I’ll create a General Ledger Code which we’ll then select in the “General Posting Setup” as the Sales Prepayment Account. When setting up the General Ledger Code, you specify the relevant posting groups, including the VAT Posting Groups. As the vast majority of the time it will be using standard VAT this is the posting group I’ll select as per below:
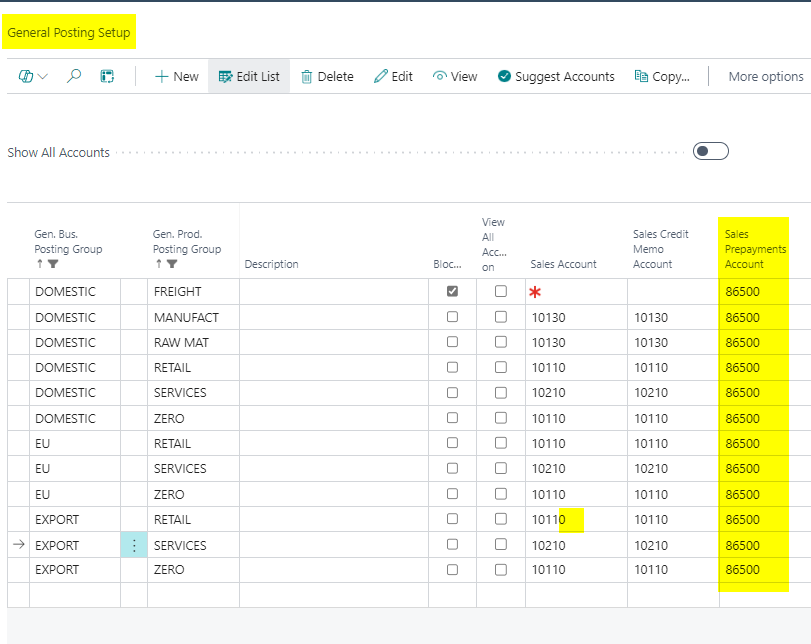
I’ll then select this in my “General Posting Setup” as the “Sales Prepayment Account” for all my posting combinations
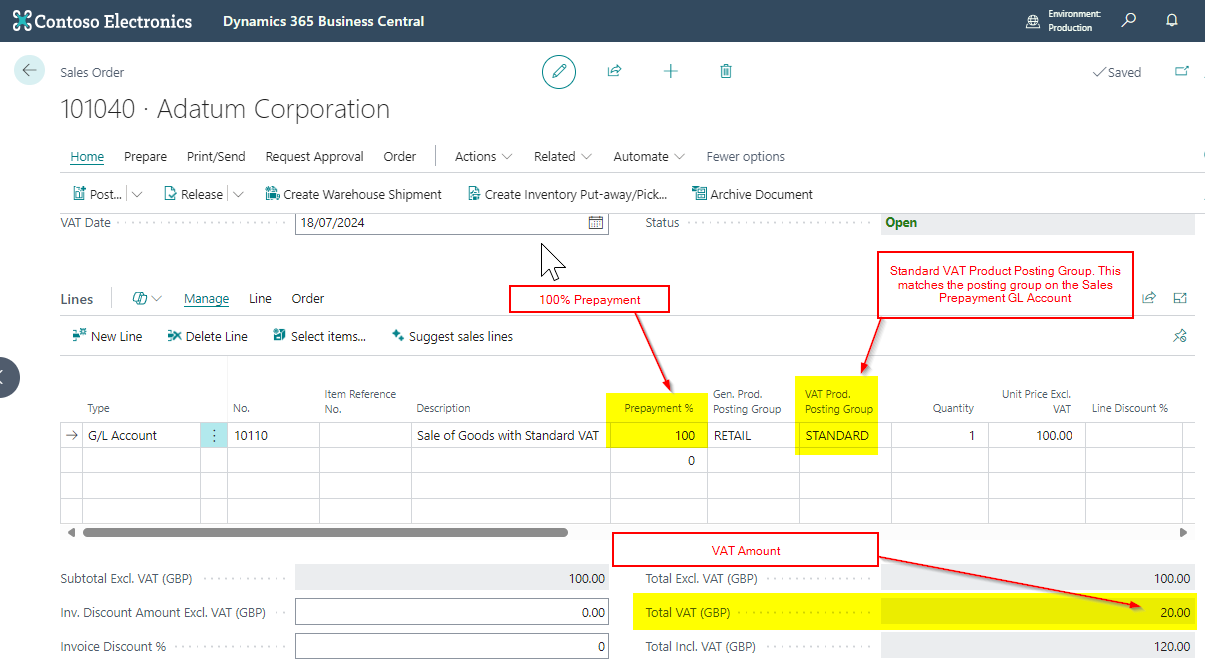
I’ll now raise a Sales Order with 100% prepayment with Standard VAT and this works fine:
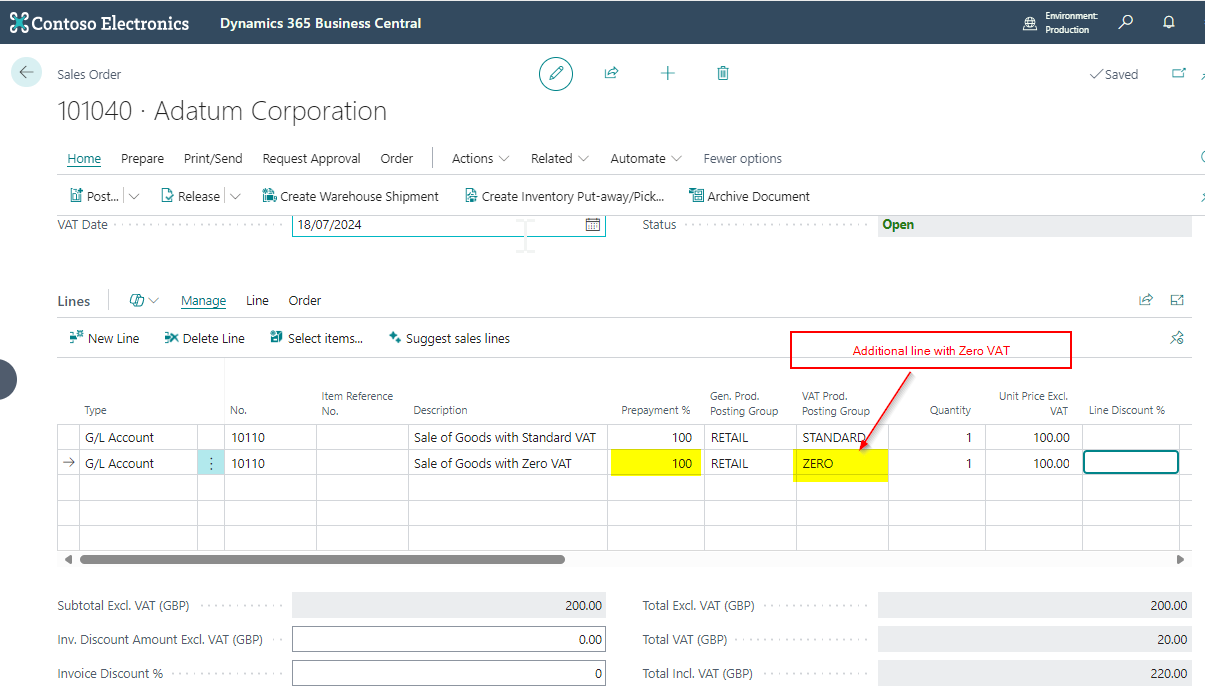
However what if I’m selling another line with a Zero VAT Product Posting Group:
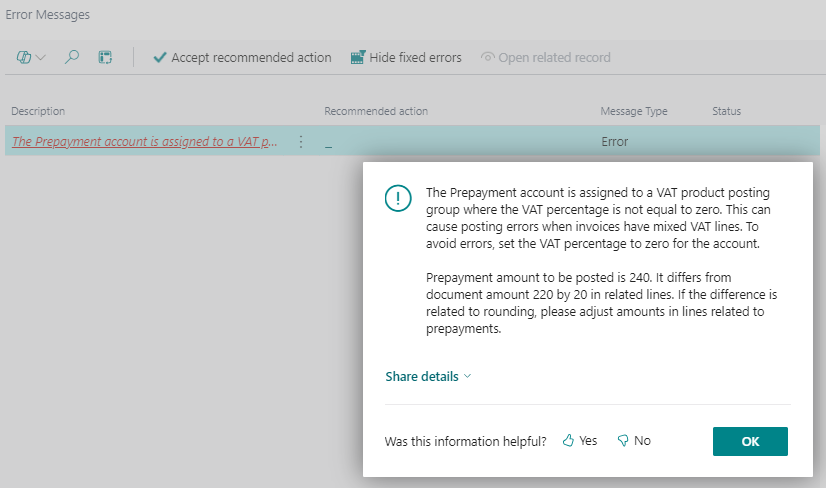
When I try creating the Sales Prepayment Invoice I now get the message “The Prepayment account is assigned to a VAT Product Posting Group where the VAT percentage is not equal to zero….” as shown below:
I’m getting this error because there is now a mismatch between the VAT Product Posting Group we assigned to the Sales Prepayment General Ledger Account, and the VAT Product Posting Group on the Sales Line.
Incidentally you would also get this error message if you had one single line item on the Sales Invoice with a VAT Product Posting Group of ZERO.
A Workaround
You can workaround this error by creating a second Sales Prepayment General Account and assigning it a VAT Product Posting Group of ZERO and then tweaking the General Posting Setup as I’ll demonstrate below.
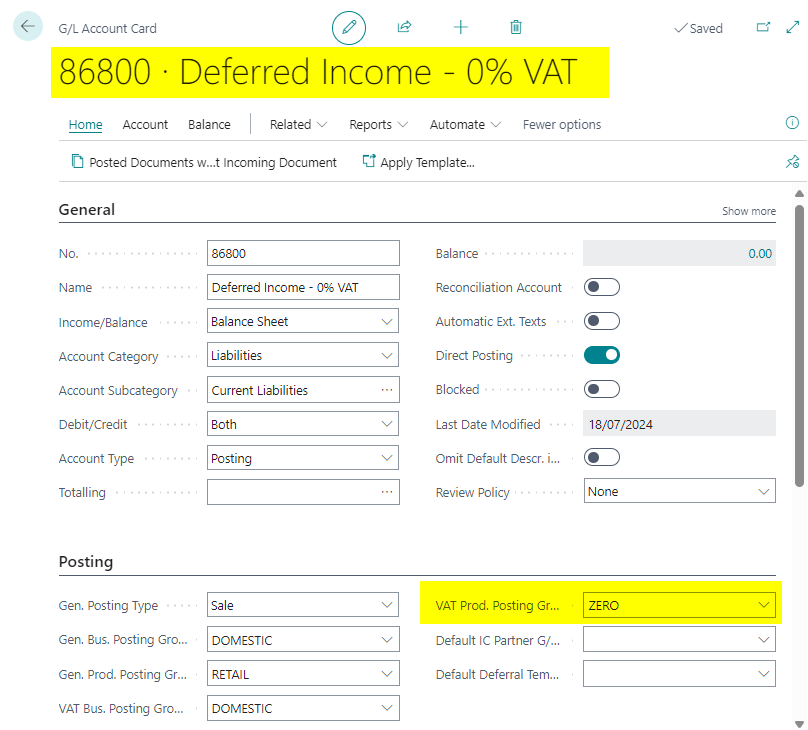
I’ll therefore create another Sales Prepayment General Ledger Code with a VAT Product Posting Group of ZERO
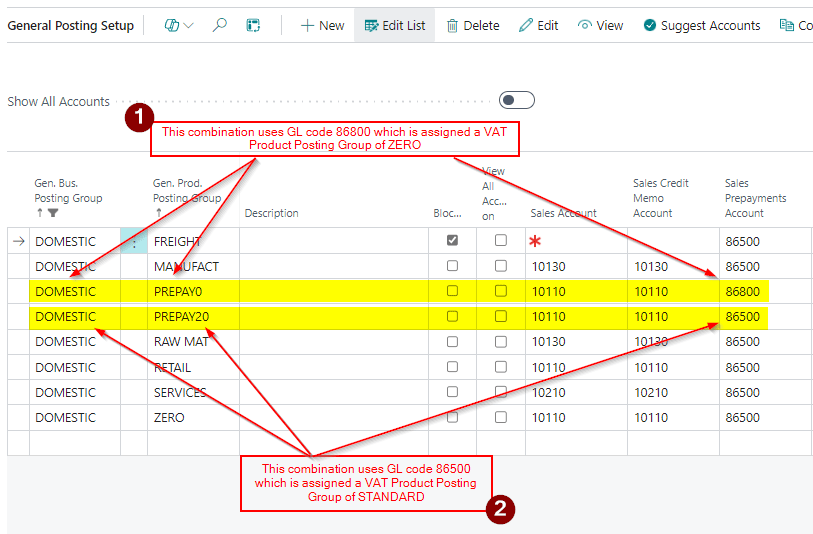
Next I create two new General Product Posting Groups called PREPAY0 and PREPAY20 and then set their combinations in the General Posting Setup page up as per below:
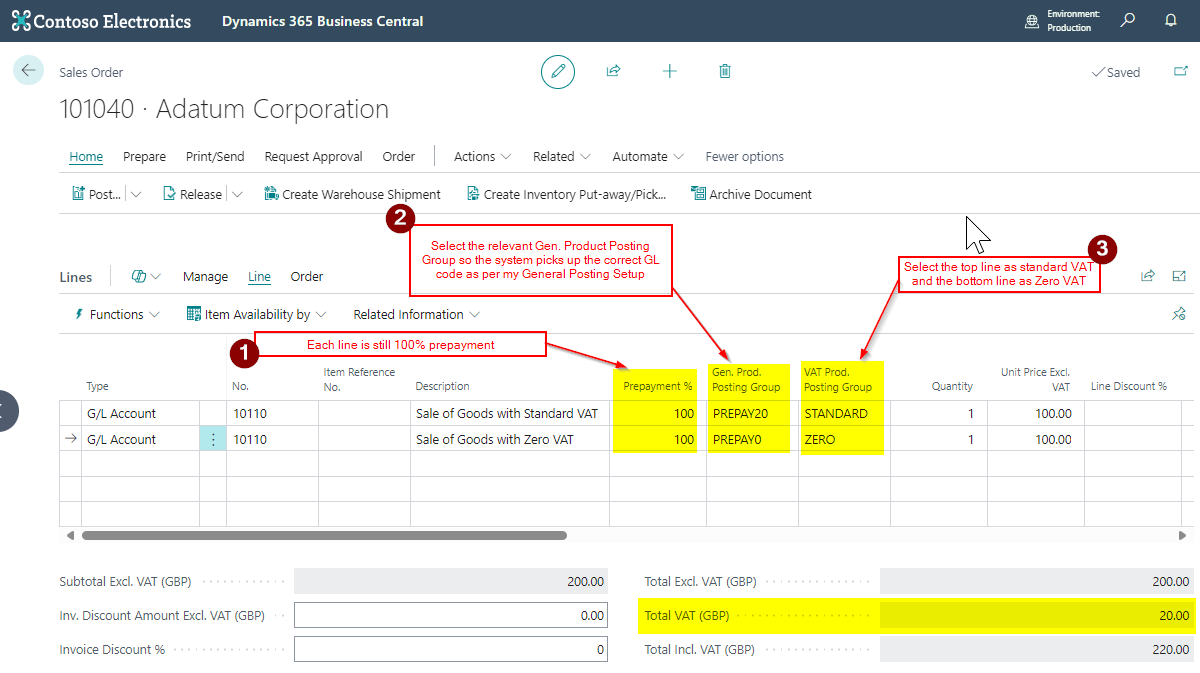
Now when I raise the Sales Order I just need to select the correct “General Product Posting Groups” for each line so they use the relevant Sales Prepayment Account.
I’ll therefore select “PREPAY20” for the line that has VAT and PREPAY0 for the line that has ZERO VAT.
When I try and post this it works, and when I look at the General Ledger Entries I can see both my Sales Prepayment General Ledger accounts are being used.
Conclusion
Although I’ve had to create an additional Sales Prepayment Account this does provide a method of posting Sales Prepayment Invoices for items with differing VAT Amounts. (I could also post a journal at month end to transfer the balance from account to another using a journal)
It also solves the need to have to change the “VAT Product Posting Group” on a Sales Prepayment General Ledger account if you post Sales Prepayment invoices with different VAT amounts.