This is the first video in a series I’m planning on “Getting Started with Business Central”.
This video series is intended to help new users on their journey with Business Central. It follows on from a previous video series I created called “Making the most of the Business Central Trial” which you can watch here.
In this video series, I aim is to give both prospective and new users a glimpse of what to expect as they begin their Business Central implementation journey.
I thought there is no better place to start than “what you can expect from a Business Central project“.
This video goes through the different phases of a Business Central project, and what you can expect in each of these. I also give some general considerations and things to think about at the end of the video.
This is all caveated with the fact that no one project is ever the same. All projects differ, just like all businesses differ, however how a project is approached is generally the same barring some terminology differences.
I’m often asked what the “Balance” and “Total Balance” fields represent on the General Journal page (or any journal page). Since its something I go through regularly I thought I’d take the opportunity to make it into a blog post 😊 . (I also love revisiting some of the basics of journal functionality)
Therefore in this post we’ll walk through how the “Balance” and “Total Balance” fields are calculated and why I often refer to them as the “unbalanced” amounts.
Its also nice as it gives us the opportunity to highlight some of the basic functionality in the journal like how you can “Balance” a line using the “Bal. Account No”.
General Journal Example
To demonstrate how the balance and total balance fields are calculating, I’ve created a four line journal in the General Journal page. Crucially on the third line I’ll enter a “Balancing” general ledger account in the “Bal. Account No” field. (more on why later)
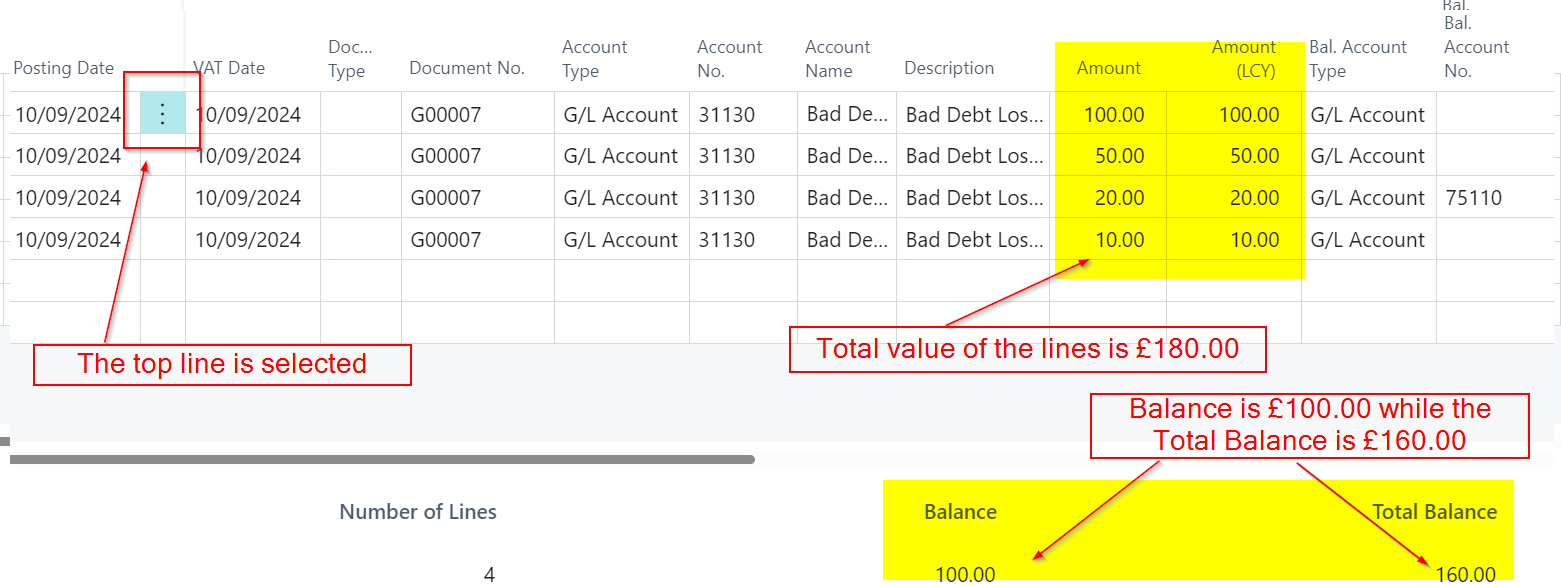
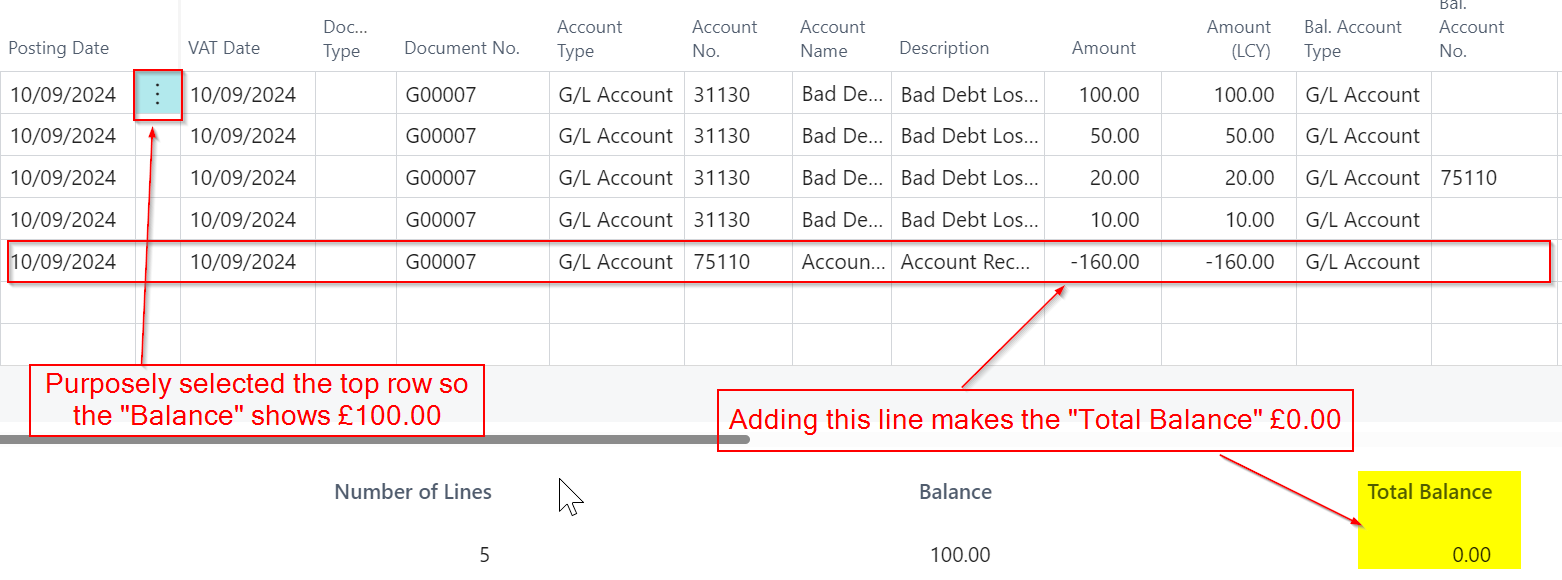
The journal I’ve entered is below with the balance and total balance highlighted:
At this point, I have a four-line journal with a total amount of the lines is £180.00. The “Balance” field currently shows £100.00, while the “Total Balance” shows £160.00. As a result, all three values differ from one another.
Now let’s break this down and first look at how the “Balance” field is being calculated.
The Balance Field (or is it the unbalanced field?)
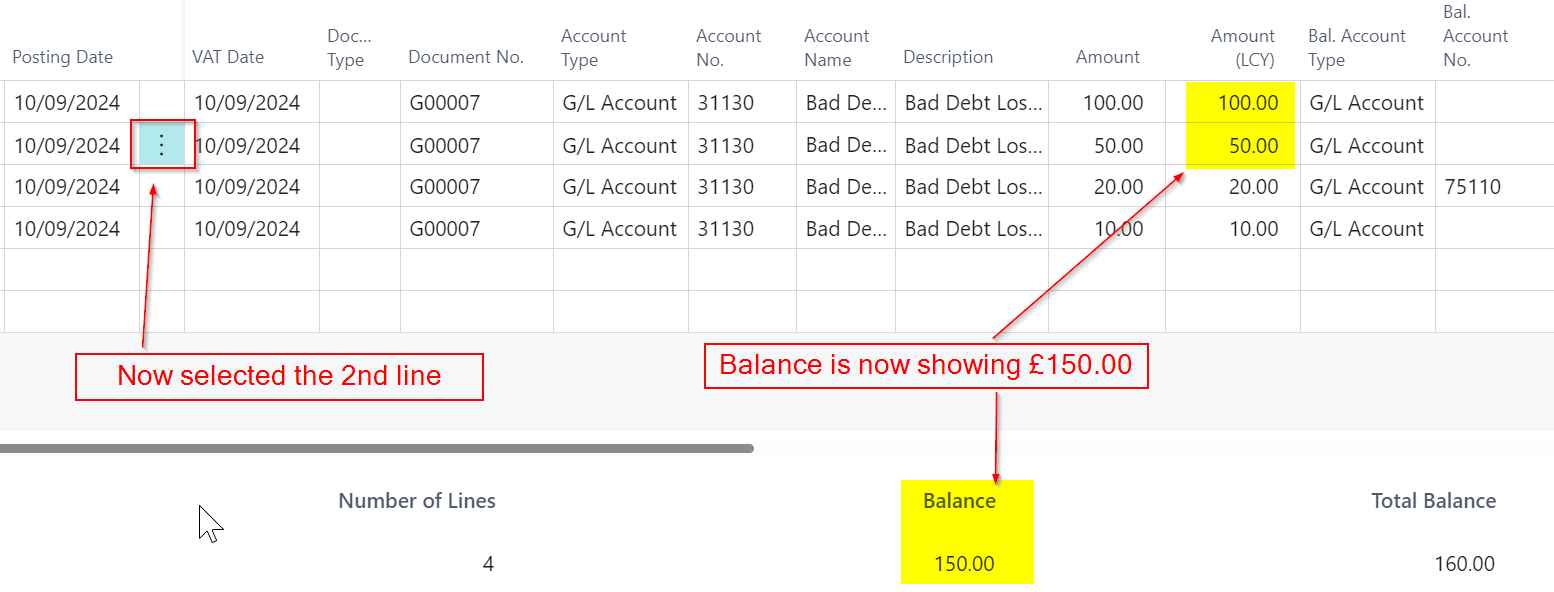
The “Balance” field represents the running total of the journal lines based on the line you have selected in the journal. For example, in the screenshot above, I’ve selected the top line, so the “Balance” field shows £100.00, as this is the value of the first line. If I were to click on the second line, the “Balance” would change to £150.00 as per below.
However this isn’t where the story ends with the “Balance” total😉.
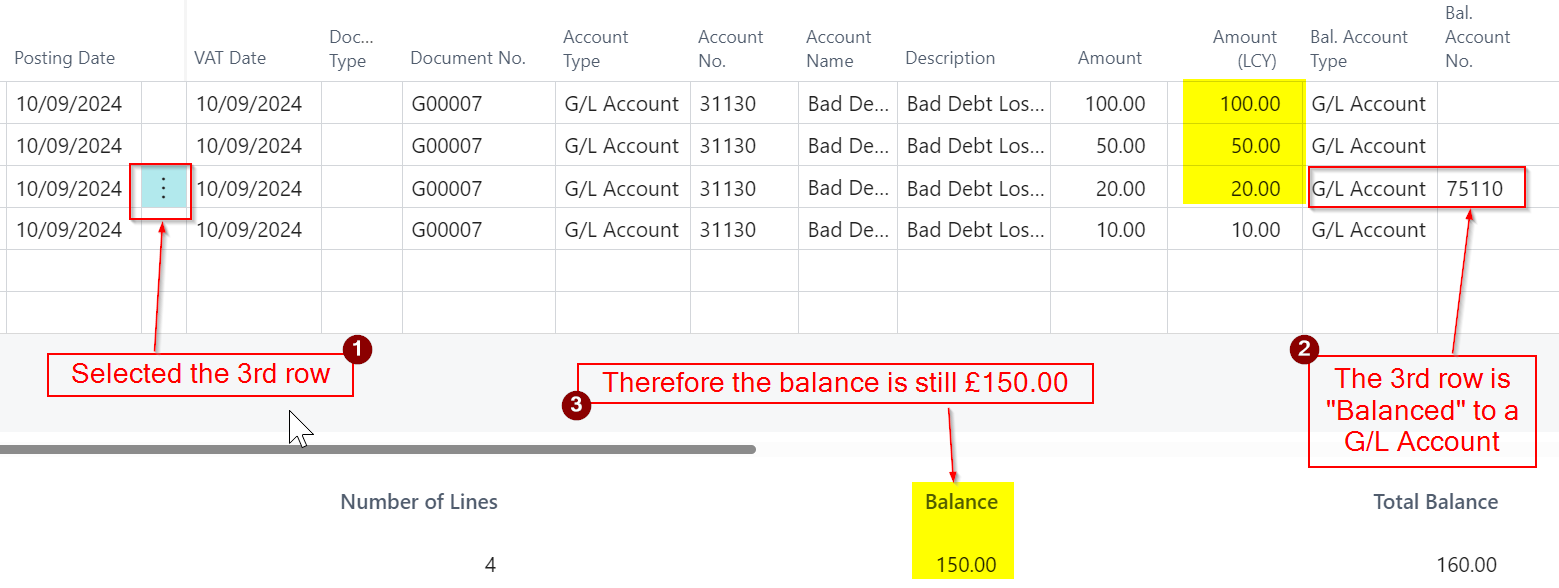
If I click on the 3rd line the “Balance” will remain at £150.00, but why is this? Why hasn’t the balance field changed to £170.00? If you look closely its because the 3rd line has been balanced with a G/L Account. Therefore the “Balance” of the journal on the 3rd line remains at £150.00.
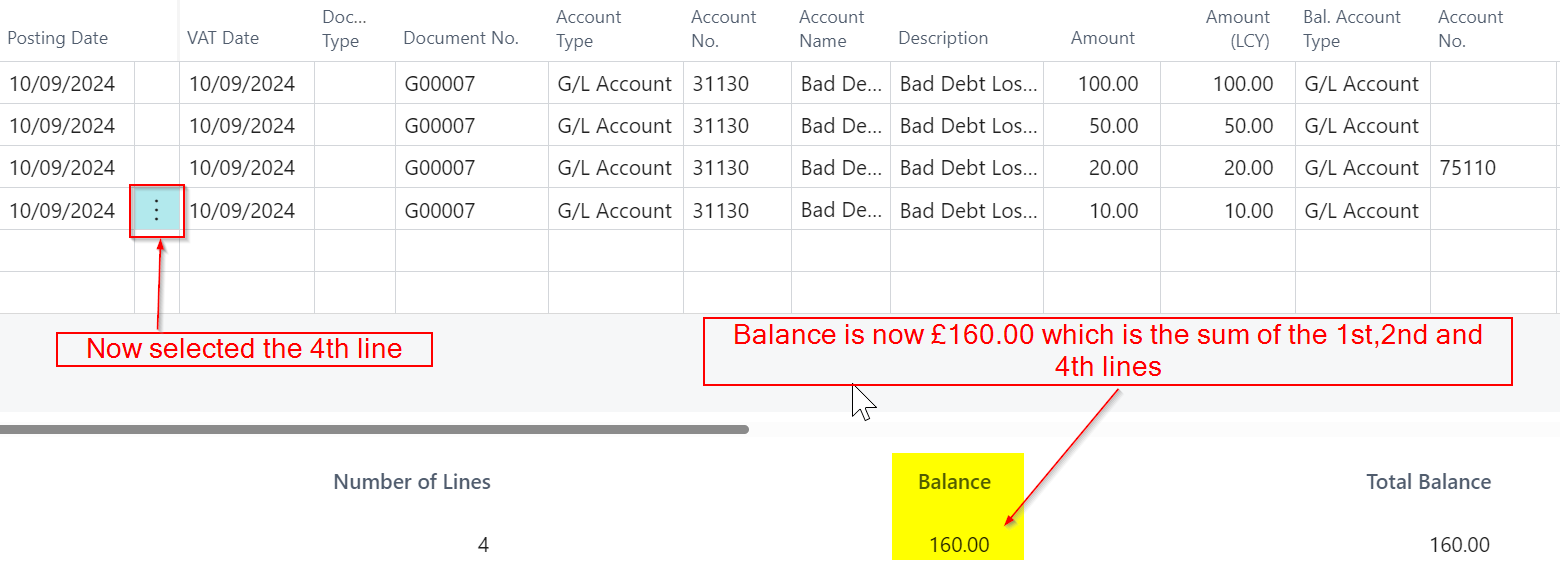
Finally if I click on the 4th line of the journal the balance will change to £160.00 as this is the sum of 1st, 2nd and 4th lines of the journal. (its the sum of the unbalanced lines of the journal)
Total Balance
The “Total Balance” field disregards which line you’ve selected in the journal and shows the “Total Balance” of the unbalanced lines. In this case, it’s £160.00.
To wrap this up, if I add a fifth line that “balances” the lines that are unbalanced, the “Total Balance” changes to £0.00 (and would show £0.00 regardless of where you click in the journal).
Its also important to note you can only post the batch when the “Total Balance” is zero.
Conclusion
The “Balance” field provides a running total based on your selected line, while the “Total Balance” reflects the sum of all unbalanced lines in the journal. Recognising how these fields work not only helps in verifying your entries, but also ensures your journal is correctly balanced before posting.
A common conversation when showing users Sales Orders in Business Central revolves around the importance of updating the Document Date and Posting Date prior to posting the Sales Invoice from the Sales Order. In the early stages when going live with Business Central, it’s also a common mistake not to change these dates, which often leads to reconciliation issues and can potentially require corrections.
In this post I’ll go through why its essential those dates are updated if there is a delay from the time of creating the Sales Order, to Shipping and Invoicing. I’ll also point out some settings that can help prevent posting errors with dates, and other methods for posting Sales Invoices if users keep forgetting to change them causing issues with incorrect entries being posted.
The role of Document Date and Posting Date on a Sales Order
The Document Date and Posting Date are two key dates on a Sales Order. Let’s first look at each of these individually.
Document Date
The Document Date on the Sales Order is used as the Document Date of the Invoice when you post the Sales Invoice. It also determines the Due Date, which is calculated based on the payment terms specified in the Sales Order.
Posting Date
This date is used for the ledger entries that are created when you ship and/or invoice the Sales Order. For example it will be used on the G/L Entries, Customer Ledger Entries and also the Item Ledger Entries and Value Entries.
Now we know how important these dates are, let’s take a look at the common issue users encounter when posting Sales Orders.
The Common Issue – Defaulting Dates
When you create a Sales Order its not only the “Order Date” that defaults to your Work Date but also the “Document Date” and “Posting Date” (you can can change the behaviour of how the Posting Date defaults but more on that later 😊)
This creates a problem if there’s a time delay from the point of raising the Sales Order to the point when you will ship and invoice the Sales Order. When a delay occurs you must manually change the Document Date and Posting Date when you come to ship and invoice the Sales Order, or the ledger entries that are created will have the wrong dates.
Let’s look at this more closely with an example.
Walkthrough Sales Order to Sales Invoice
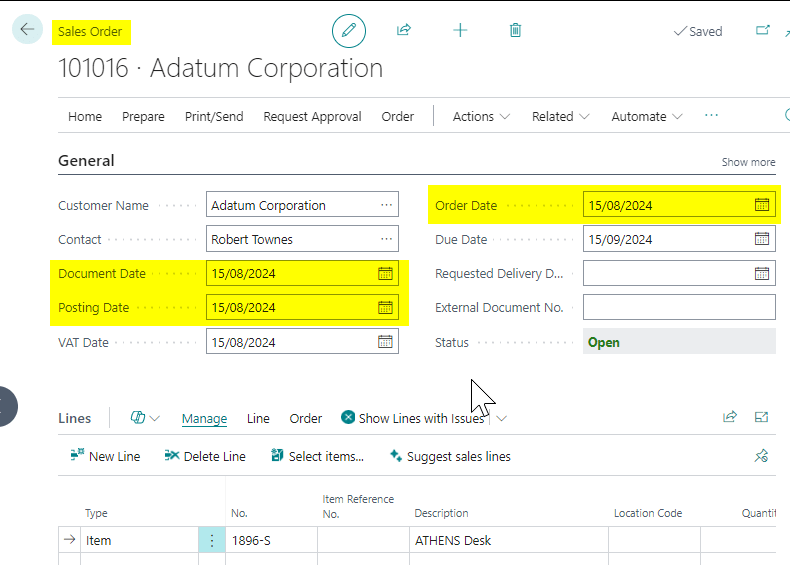
Here we have a Sales Order that was created on the 15th of August. As you can see the Order Date, Document Date and Posting Date all reflect the 15th of August.
Let’s say we are waiting on more stock of this item, and therefore we aren’t ready to deliver this item on the day of the Sales Order. Then, a few weeks pass, the goods arrive at our location, and we are ready to ship and invoice the Sales Order.
Although my Work Date in Business Central is now the 29th of August (two weeks after the Sales Order was created), the Document Date and Posting Date remain set to the 15th of August when I created the Sales Order. As a result, it’s easy to ship and invoice the Sales Order without remembering to update the dates, as shown in the demonstration below.
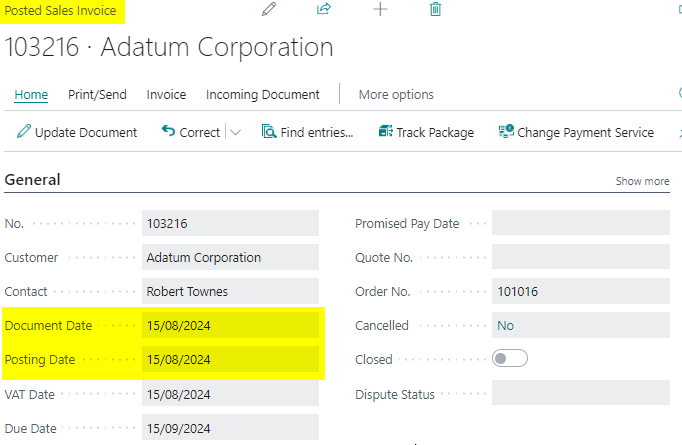
As you can see below the Posted Sales Invoice has the incorrect Document and Posting Date of the 15th of August
Therefore, if we were to look at the ledger entries we’d see they were incorrect, as they have posted with the date of 15th of August rather than the 29th of August.
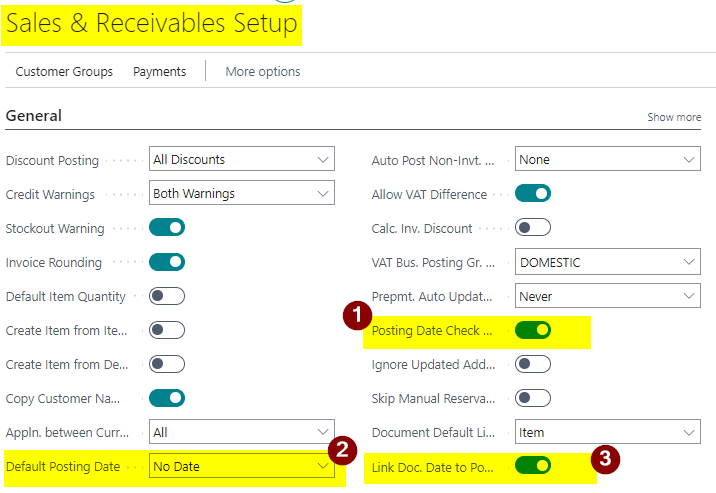
Some Sales Setup options to help
There are built in features to help mitigate these errors. These are located in the “Sales and Receivables Setup” page and are highlighted below
Lets go through each one in turn:
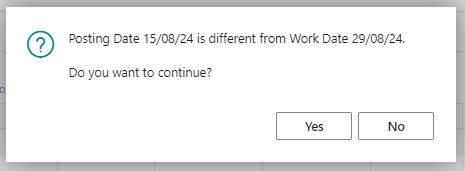
Option 1: Posting Date Check on Posting
With this option selected the user will be warned when posting the Sales Order if your Work Date differs from the Posting Date. For example, I’d receive the message below if I’d have tried to post a Sales Order with a date of the 15th of August while having a work date of the 29th of August
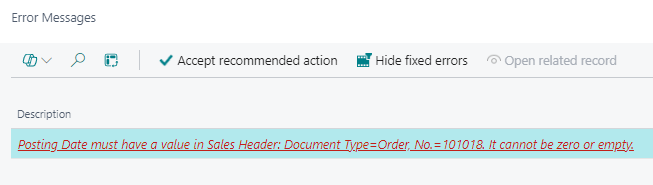
Option 2: Default Posting Date
With this option selected the Posting Date is left blank meaning it must be populated prior to posting. If you try and post without a posting date you are presented with the following error:
Forcing the user to enter the correct date should help reduce errors
Option 3: Link Doc Date to Posting Date
I’ve included this one because it can be used in conjunction with the second option. For example, when this option is selected and you change the Posting Date on the Sales Order, the Document Date automatically changes as well.
This is demonstrated below where the Document Date is automatically updated when I populate the blank Posting Date
This means that by being forced to change the Posting Date, because its blank, I’m automatically changing the Document Date 😊.
Some Invoicing Alternatives
Another option might be to Invoice using the “Sales Invoice” page rather than from the Sales Order.
When using the Sales Invoice page, the invoice is created based on your Work Date, reducing the likelihood of errors with the Document Date and Posting Date. This method also offers additional functionality, such as the ability to consolidate multiple Sales Orders (or more accurately, Shipments) into a single Sales Invoice.
You can also use the “Combine Shipments” feature which gives the option of entering a Posting Date which is defaulted from the Work Date.
Both of these options require you to have posted the Sales Shipment as the “Sales Invoice” using the “Get Shipment Lines” feature to invoice Sales Orders and the Combine Shipments also looks at Shipment Lines from Sales Orders.
Conclusion
This post goes through how important the Document Date and Posting Date are on a Sales Order and how to avoid pitfalls of posting with them set incorrectly.
It outlines a couple of standard features you can use to prevent those errors and also how other features such as invoicing from a Sales Invoice rather than the Sales Order might be more useful in some cases.