Introduction
A common query I see when migrating Dynamics GP users to Business Central is “how can I view my General Ledger balances, like I can in Dynamics GP using the Summary Enquiry window“
In this post, I’ll first outline the key differences between the account structures in Dynamics GP and Business Central. Then, I’ll explain what happens to your GL account structure during migration if you use the Microsoft migration tools. Finally, I’ll share three methods to view your GL balances in Business Central in a way that feels familiar to Dynamics GP users.
Spoiler: in one of the methods we use Copilot and natural language to create the view 😊
Dynamics GP Account Code Structure Vs Business Central Dimensions
First lets take a step back, and look at how Dynamics GP and Business Central differ when it comes to the structure of the Chart of Accounts.
In Dynamics GP the GL account code is segmented, whereas Business Central uses a single GL code and dimensions.
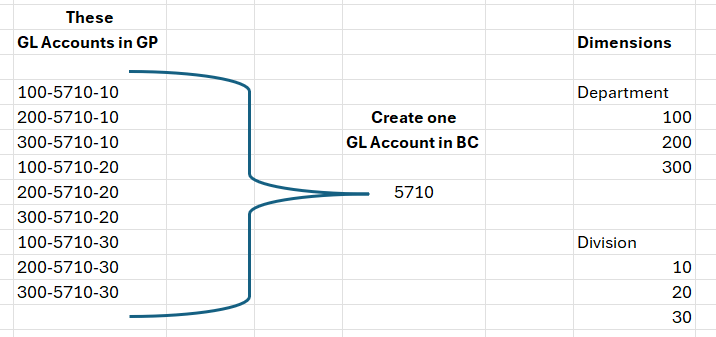
For instance, in Dynamics GP, a GL code for Payroll Taxes in the admin department of the north division might look like 200-5170-00. Here, 5170 represents Payroll Taxes, 200 is the admin department, and 00 is the north division. If you have 10 departments and 5 divisions, you could end up with 50 separate GL codes for Payroll Taxes alone.
Given the same scenario in Business Central, you’d just have one GL code for Payroll Taxes, a Dimension called “Department” with your departments, and a Dimension called “Division” with your divisions. This means we’ll only ever have one GL account, but can still analyse to department and division by selecting the dimensions and the relevant dimension values.
Coming from a Dynamics GP background myself, I love this about Business Central 😊. That said, it can create challenges for GP users transitioning to BC, especially when viewing data, as we’ll explore next.
Now we know how the Chart of Accounts structures differ, lets look at the what happens when you migrate the Chart of Accounts from Dynamics GP to Business Central using the Microsoft migration tools.
What happens when you migrate your Chart of Accounts from Dynamics GP to Business Central
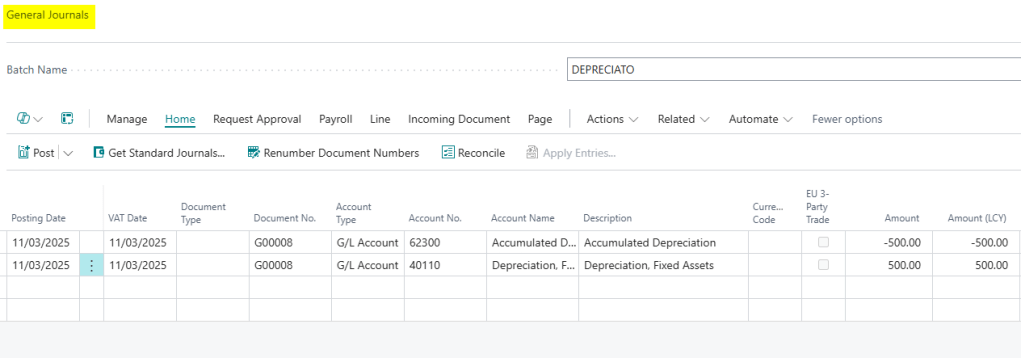
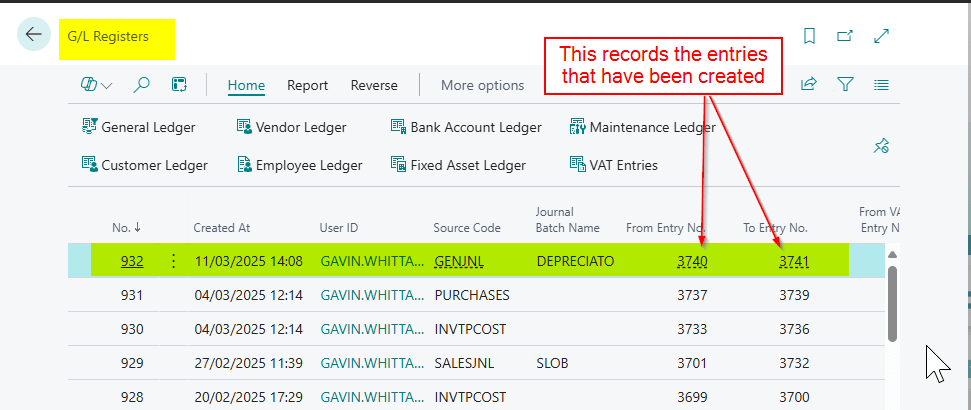
When you migrate your Dynamics GP Chart of Accounts and transactional data to Business Central using Microsoft’s migration tools, the process consolidates your GL codes based on the natural account segment. So in our earlier example , if I did have 50 Payroll Taxes codes for the various department and division combinations, I’d be left with just one GL code called 5170. We would then get Department and Division created as Dimensions. I’ve shown how this works below:
Now when posting transactions for Payroll Taxes in Business Central, I’d pick GL code 5710 and then the Department dimension and the Division dimension.
This consolidation can drastically simplify and shorten the Chart of Accounts, but it can make viewing GL balances “by dimension” a bit trickier, as we’ll see.
Viewing the General Ledger balances in Dynamics GP and Business Central
Now we know how the GL account is structured in Dynamics GP, and how its then migrated to Business Central, let’s take a look at the Summary Enquiry window for one GL code.
Since Dynamics GP’s GL code includes the natural account, department, and division, selecting a code like 200-5170-00 lets you quickly view its balance
For example, below I can see the period balances of my Payroll Taxes GL account (5170) for my Accounting department (200) for my North division (00) very easily

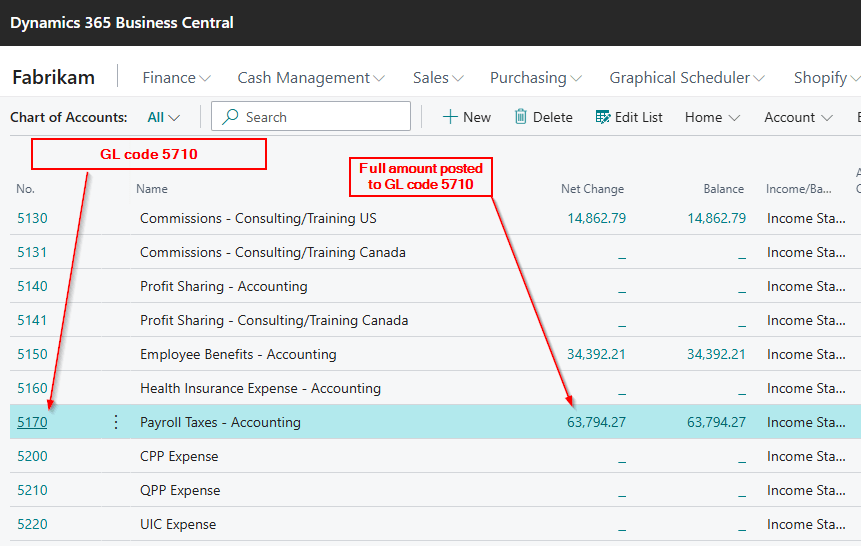
After migrating to Business Central, if you check the Chart of Accounts page, you’ll only see the total balance for GL code 5170. This is because the migration consolidates all amounts into one GL code, combining balances across all departments and divisions. (at transaction level the entries have the GL code, department and division, however the Chart of Accounts shows just the balance at GL code level)
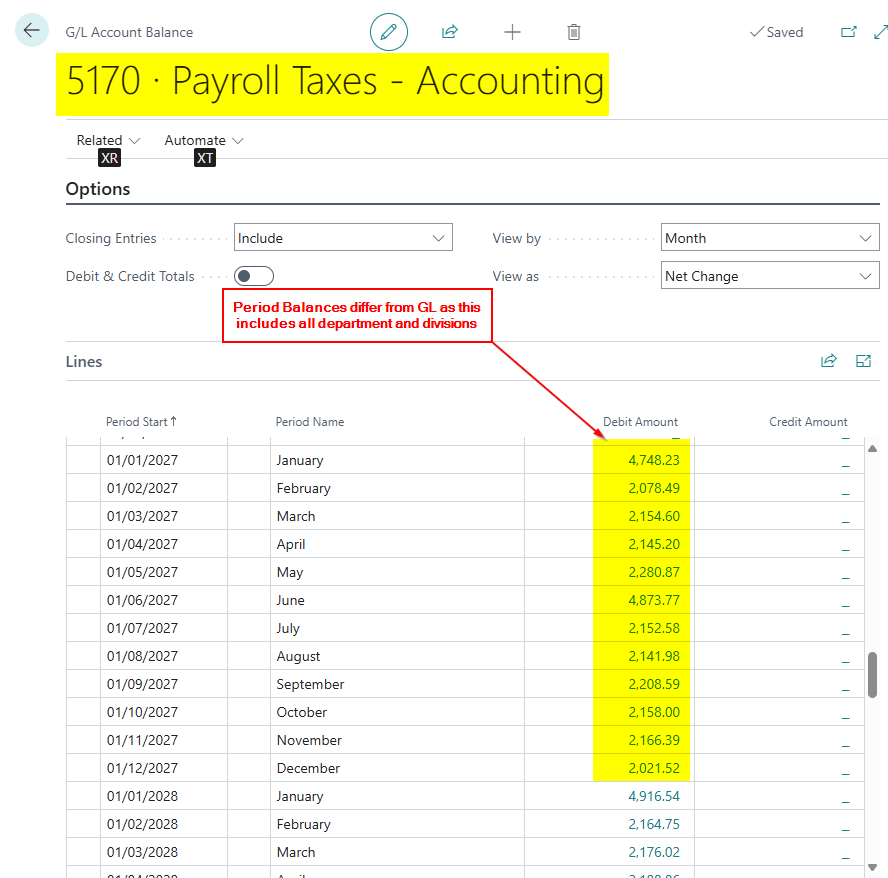
Therefore if I now use the “G/L Account Balance” page in Business Central to view period balances they differ from Dynamics GP as they include balances for all Departments and Divisions
How can I view the GL Balances by period like Dynamics GP?
Fortunately, there are several ways to achieve a Dynamics GP-like view in Business Central. I’ll walk through three methods below
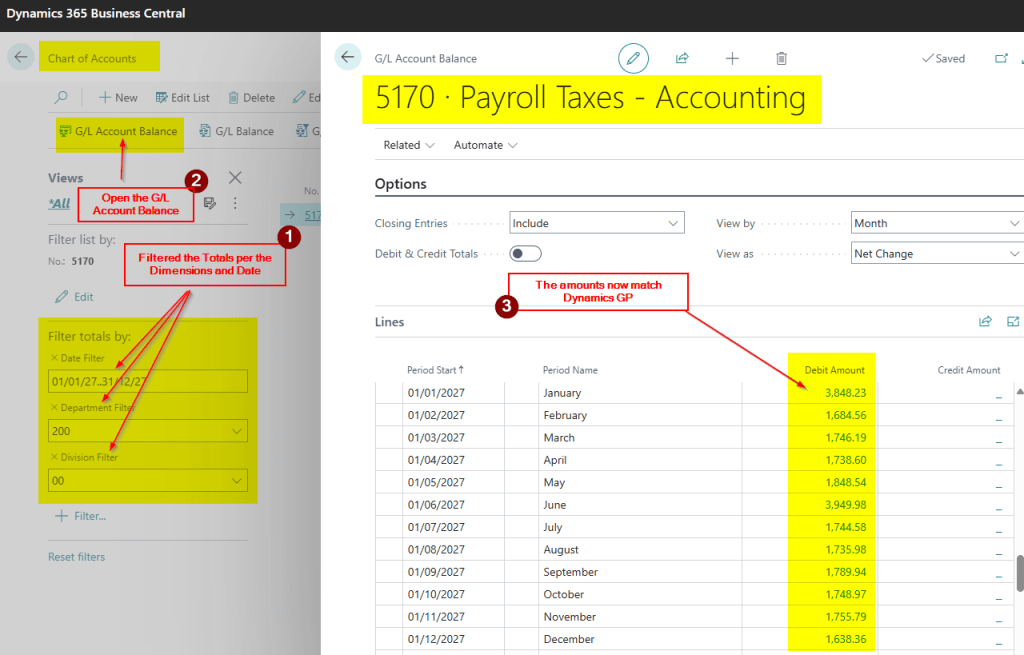
1. Filter the Chart of Accounts page prior to opening the G/L Account Balance page
At first glance it looks like you can’t filter the “G/L Account Balance” page however if you filter the “Chart of Accounts” page first, this is carried through to the “G/L Account Balance” page.
For example below I’ve prefiltered the totals of the Chart of Accounts page and then when I open the “G/L Account Balance” page the amounts are filtered and match Dynamics GP summary enquiry
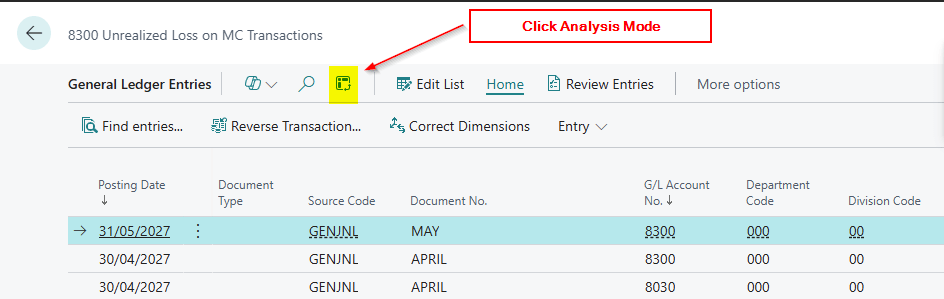
2. Use Analysis Mode from the General Ledger Entry page
With the new(ish) Analysis Mode available on List Pages we can filter and pivot data. We can utilise this feature to present the data just like Dynamics GP
First go to the “General Ledger Entries” and then click “Analysis Mode”
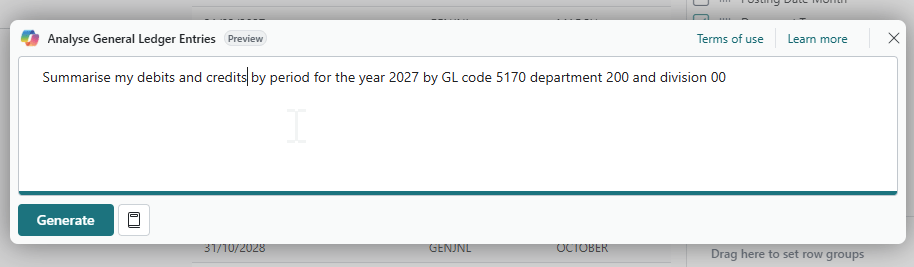
Then enter the criteria as per below:

The great thing about this is I can use natural language in Copilot to create the View. For example I entered the text below:
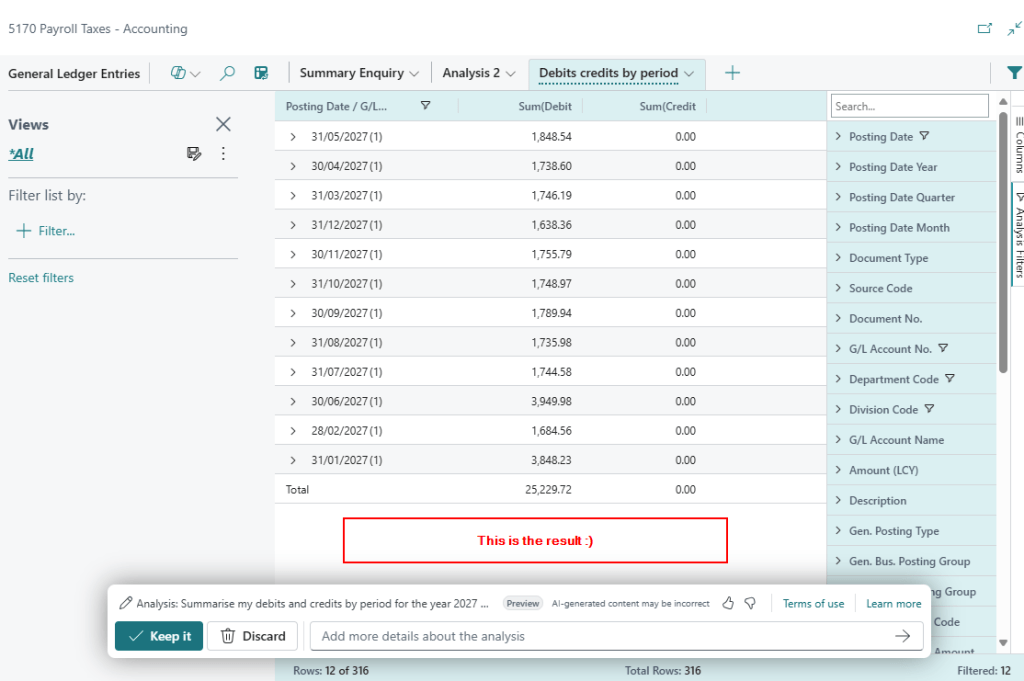
And this is the result. Now that is pretty cool 😊
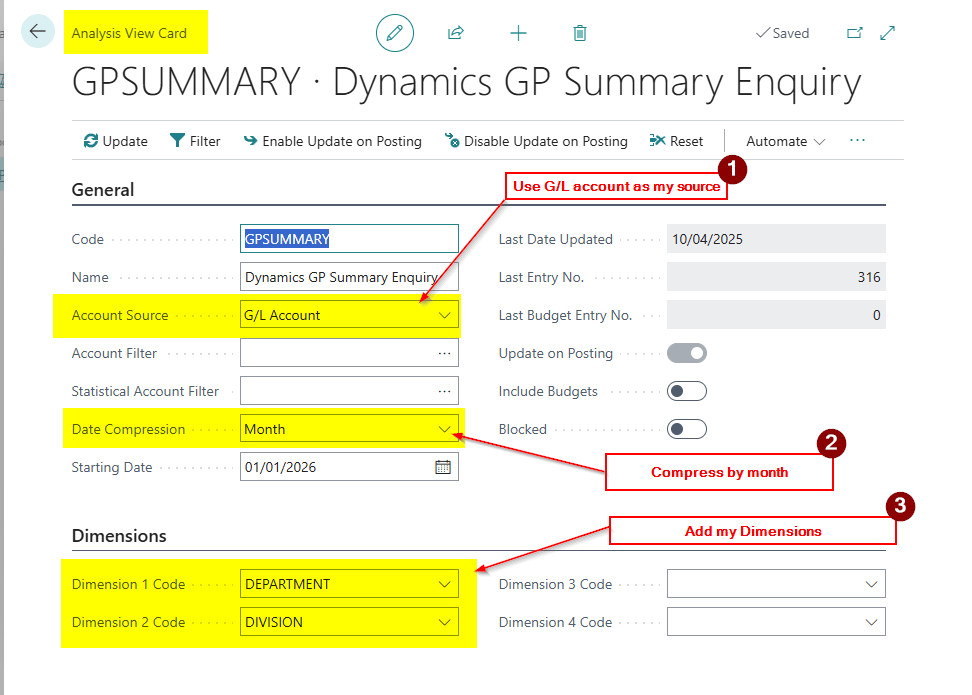
3. Use an Analysis View
The final way I’ve found to do this is by utilising an Analysis View.
I configure it as per below setting the compression by month and dimensions
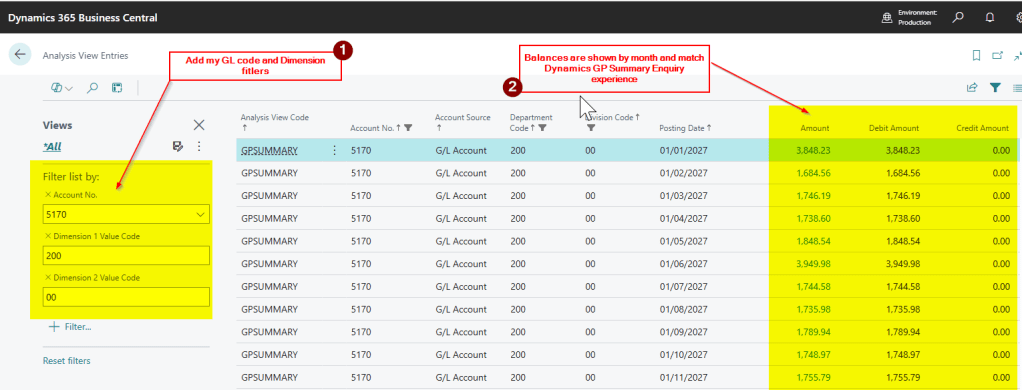
Now when I go to “Analysis View Entries” I can filter and show the balances just like the Dynamics GP summary enquiry
Conclusion
This post highlights all the great features we have in Business Central to filter and slice and dice our data to match our experience’s in Dynamics GP.
In my opinion Business Central is giving you the best for both worlds. You can easily see the balances by GL Code or any combination of dimension.
In Dynamics GP to get a summary total at GL account level (i.e. the balance in 5170 for Payroll Taxes) you need to use “Account Rollup” or export the data and summarise it.
Thanks for reading!