Dynamics GP – How to Unapply a Payables Invoice in HISTORY that’s applied to a OPEN Credit Document

Scenario

I often see this request via support so thought I’d document it on my blog. The question varies however it usually goes something like this:

“I’ve accidentally applied an invoice to a Payment and now I need to unapply this however when I select the Payment in the “Transactions > Purchasing > Apply Payables Document” window the Invoice isn’t available to unapply? How can I unapply the invoice?”

The issue here is the “Apply Payables Document” window only shows OPEN documents and as the invoice has been fully applied its now in HISTORY. Therefore you can’t unapply it via this window.

Please note if both documents were in OPEN you could use the “Transactions > Purchasing > Apply Payables Documents” window to unapply it.

The solution in summary

Unfortunately there’s no easy way to unapply the invoice in this situation.

The fix I often suggest is to apply a dummy transaction to the payment so that it’s also transferred to HISTORY. You can then void the payment, which will unapply the Invoice.

Therefore, in summary, the steps would be:

  1. Post a dummy invoice (or debit note) for the amount remaining on the payment.
  2. Apply the dummy invoice to the payment which will send the payment to HISTORY.
  3. Void the payment via “Transactions > Purchasing > Void Historical Transactions”. This will unapply the Invoice.
  4. Void the dummy invoice via “Transactions > Purchasing > Void Open Transactions”
  5. Post the voided Payment back onto the system.

Detailed solution with an example

I’ve also described the scenario and solution in detail below.

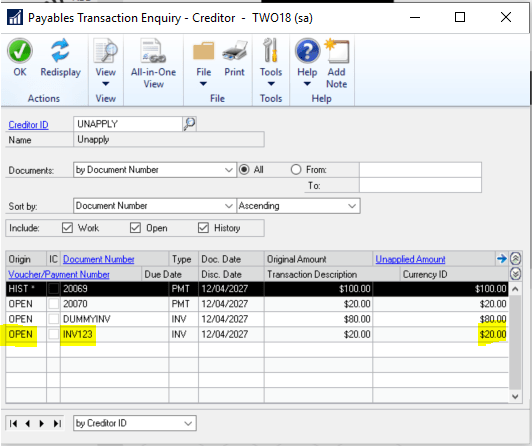
Invoice INV123 has been accidentally applied to Payment 20069 when it should have been applied to Payment 20070. As a consequence Invoice INV123 is in HISTORY but Payment 20069 is still in OPEN meaning the invoice can’t be easily unapplied

This image has an empty alt attribute; its file name is image.png

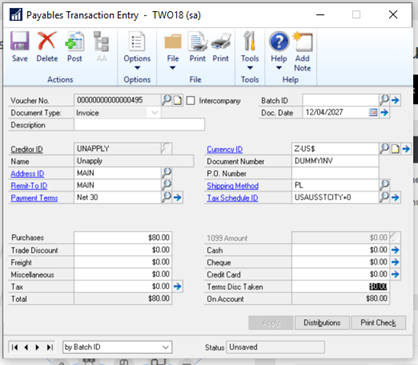
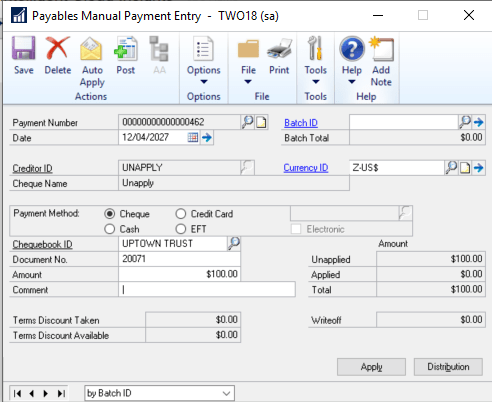
To fix this we first post a dummy invoice for $80.00 (the remaining amount of payment 20069):

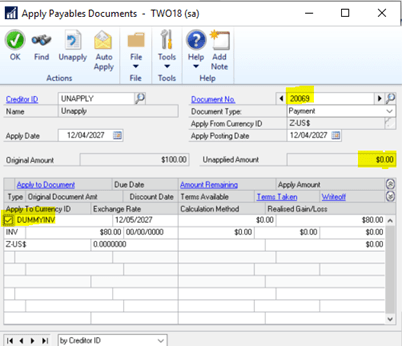
Next we apply this to the Payment via “Transactions > Purchasing > Apply Payables Documents”:

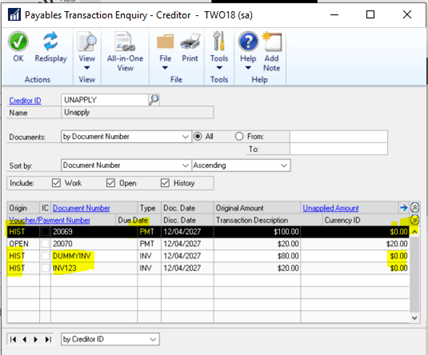
Now the Payment and invoices all show in History:

Next we void the payment via “Transactions > Purchasing > Void Historical Transactions”

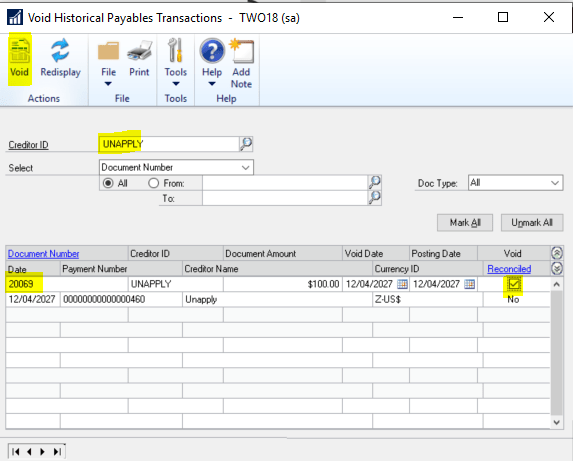
Invoice INV123 is now showing as unapplied (as is the dummy invoice):

We now void the dummy invoice via “Transactions > Purchasing > Void Open Transactions”

And finally post the payment back onto the system

Once this has been done you can go ahead and apply invoice INV123 to the correct payment.

Conclusion

Although there are many steps to unapply the invoice using this process, it does provide a way of unapplying the invoice.

I hope this helps someone in the future.

Thanks for reading!

Thinking of making the move to Business Central? We can help

Dynamics 365 Business Central – How to Post a VAT only Invoice

Although not a regular occurrence, from time to time users need to post a VAT only invoice onto the sales or purchase ledger. If this happens below are the steps you can take to do this:

Please note these steps are specifically for a Purchase Invoice however it should work the same for a Sales Invoice.

Step 1: Add a new VAT Product Posting Group

First go to “VAT Product Posting Group” and add a new VAT Product Posting group for FULL VAT as per below

Step 2: Configure VAT Posting Setup

Next we need an additional FULL VAT entry in the “VAT Posting Setup” matrix as per the screen shot below. I’ve included FULL VAT twice, once with a blank “VAT Bus. Posting Group”, and once with a “VAT Bus. Posting Group” of DOMESTIC.

Please note I’ve set the system up this way so if entering a VAT only invoice via a “Purchase Journal” I only have to populate the “VAT Prod. Posting Group” whereas if I were to enter the invoice via “Purchase Invoice” its likely the supplier would have a “VAT Bus. Posting Group” of DOMESTIC. Setting the system up this way covers both scenarios.

Step 3: Entering the VAT only invoice via a “Purchase Journal” window.

In this example I’m entering a £100.00 VAT only invoice via the “Purchase Journal” window.

To do this I’ve entered the invoice details as follows:

Just to confirm, I’ve selected a document type of “Invoice” and the Vendor account of “1000”. Then for the “VAT only” element to work I’ve selected the following for the various columns:

Bal. Account Type = G/L Account

Bal Account No. = 46330 (this is the VAT account specified in the VAT Posting Setup)

Bal. Gen Posting Type = Purchase

Bal. VAT Bus. Posting Group = BLANK (I could select DOMESTIC as well if I like)

Bal. VAT Prod. Posting Group = FULL VAT

Please note using the “VAT Posting Group” setup outlined in my screen shot above a combination of a blank “VAT Bus. Posting Group” and a “VAT Prod. Posting Group” of “FULL VAT” equates to 100% full VAT

If I now preview the posting on this transaction I can see 3 G/L Entries and one VAT entry:

If I drill down on the G/L Entries this shows the full amount posting to the VAT control account specified in the VAT Posting Setup. (as this is a Purchase Invoice the credit side goes to the Creditors Control Account):

And when I drill back on the VAT entries I can see a VAT entry for the full amount:

Step 4: Entering the VAT only invoice via the “Purchase Invoice” option

Once in the “Purchase Invoice” page I enter the invoice line as per below.

To confirm, I’ve entered the line as per below:

Type = G/L Account

No. = 46330 (this is the VAT account specified in the VAT Posting Setup)

Vat Prod. Posting Group = FULL VAT

Now when I check the “Statistics” on the invoice it shows the full amount to VAT:

Also, when I preview the posting I can see G/L entries to the VAT account and a VAT Entry of the full amount:

Step 5: Ensure FULL VAT is included on the VAT Statement

Once you have posted the transaction you should also ensure the new “VAT Prod. Posting Group” (i.e. FULL VAT) is included on the VAT statement so any transactions posted to this are picked up correctly when reporting the VAT.

As you can see below I’ve included this in the Purchases section:

I hope this helps anyone who needs to post a VAT only invoice in Dynamics 365 Business Central.

Thanks for reading!

Dynamics GP – What are the P/L Source Document entries on the year end journal?

When you run the year end routine on the General Ledger in Dynamics GP the system automatically creates a journal to bring forward the balances for the Balance Sheet codes and it also closes all the profit and loss codes to the retained earnings account.

When you look at the header of the year end journal that’s created it shows a source document of BBF (Balance Brought Forward)

However if you take a closer look at the year end journal in smartlist you can see that some of the lines have a source document of “P/L”.

So why the mixture of BBF and P/L source documents for the year end journal?

The BBF entries are created to bring forward the balances of the “Balance Sheet” accounts and the “P/L” entries are created by closing the profit and loss accounts to the retained earnings account. As my demo data has multi currency postings to various profit and loss codes I get one entry per currency.

To confirm the correct amounts have been posted to the retained earnings account I can run the query below in SQL that sums all the amounts posted to the profit and loss accounts for the year 2024, and this reconciles back to the amounts posted to the retained earnings account on the year end journal:

The BBF entries are quite well known but I couldn’t find much information on the P/L source document which is why I created this post.

Thanks for reading!

Thinking of making the move to Business Central? We can help