This is the second in a two part series looking at what your Dynamics GP data looks like when its migrated into Business Central.
In the first part we explored how opening balances are migrated and how they appear in Dynamics GP. We also looked at some of the options you have when migrating the opening balances, like preventing them auto posting so you can make changes if you were thinking of modifying the Chart of Accounts or adding dimensions. You can read the full post here.
In this post I want to look at how the Historical data migrates and where you can find the historical transactions in Dynamics GP. We’ll specifically look at Sales and Financial transactions.
Please note the migrated historical Purchasing data can be found in the same place as the Sales data you just select the Vendor List rather than Sales List
In my opinion this is one of the main reasons you might consider using the Microsoft tools to migrate your Dynamics GP data to Business Central. The migration of the Historical transactions is one of the first questions you I’m asked on almost every Business Central project, regardless of whether the client is moving from Dynamics GP. Normally the answer is no, or you can but it will involved lots of work and expense. This isn’t the case when moving from Dynamics GP to Business Central. The migration tooling does all the hard work for us and we can reap all the benefits.
Just like the previous post I’ll be using a migrated copy of the Dynamics GP “Fabrikam” text company I’ve migrated into my demo Business Central environment.
Options for Migrating Historical Data
Before we look at the migrated data let’s have a quick look at the options available when migrating the data.
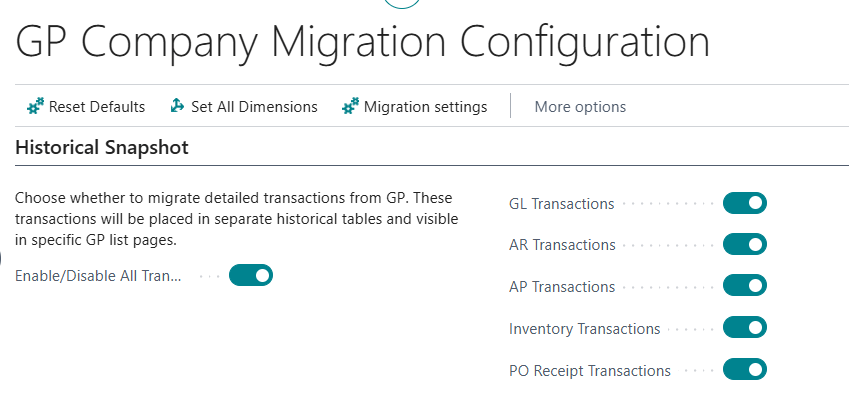
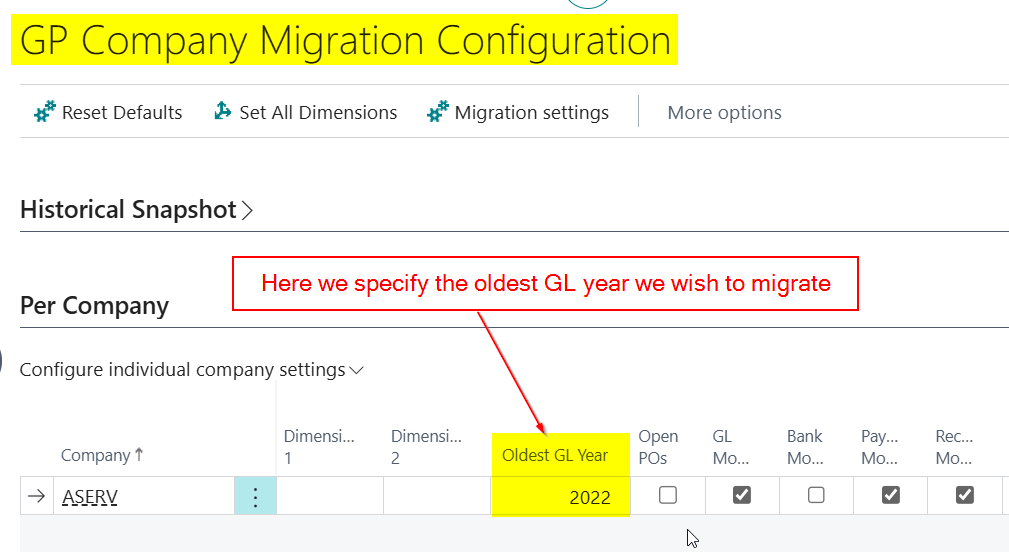
In the “GP Company Migration Configuration” page we are offered the option to migrate the following modules:
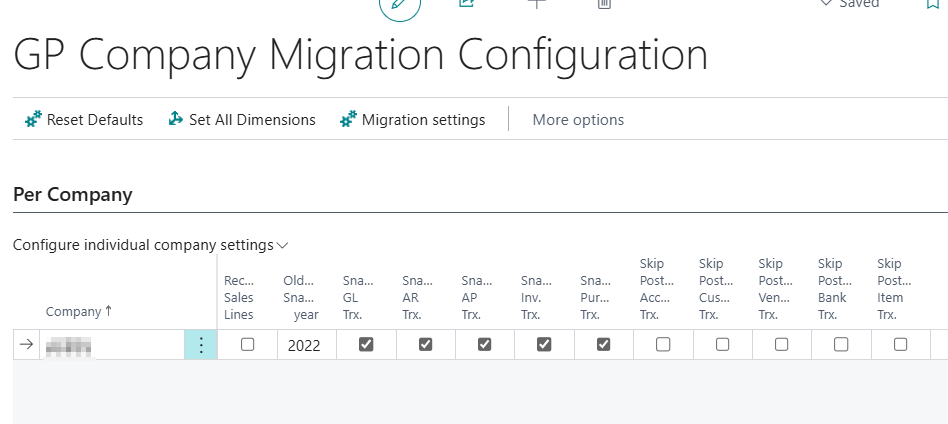
We can also specify how many years of history you can migrate using the setting below:
I tend to select all modules and set the history to around 6 years.
Now we know what we can migrate, let’s take a look at where we can find the historical transactions in Business Central, and what they look like 😊.
What do my Historical Sales and Receivables Transactions look like and where can I find them?
Let’s first take a look at some Sales Transactions.
The historical data doesn’t create Customer Ledger Entries, as they have already been fully paid. The historical transactions are migrated into special tables, which can be accessed in various areas of Business Central.
There are a few places you can see your migrated Sales historical transactions however my favourite place is via the “Factbox” on the Customer List Page.
Here I’ve opened the Customer List page and you can see the tiles on the Factbox I can use to see my Dynamics GP transactions
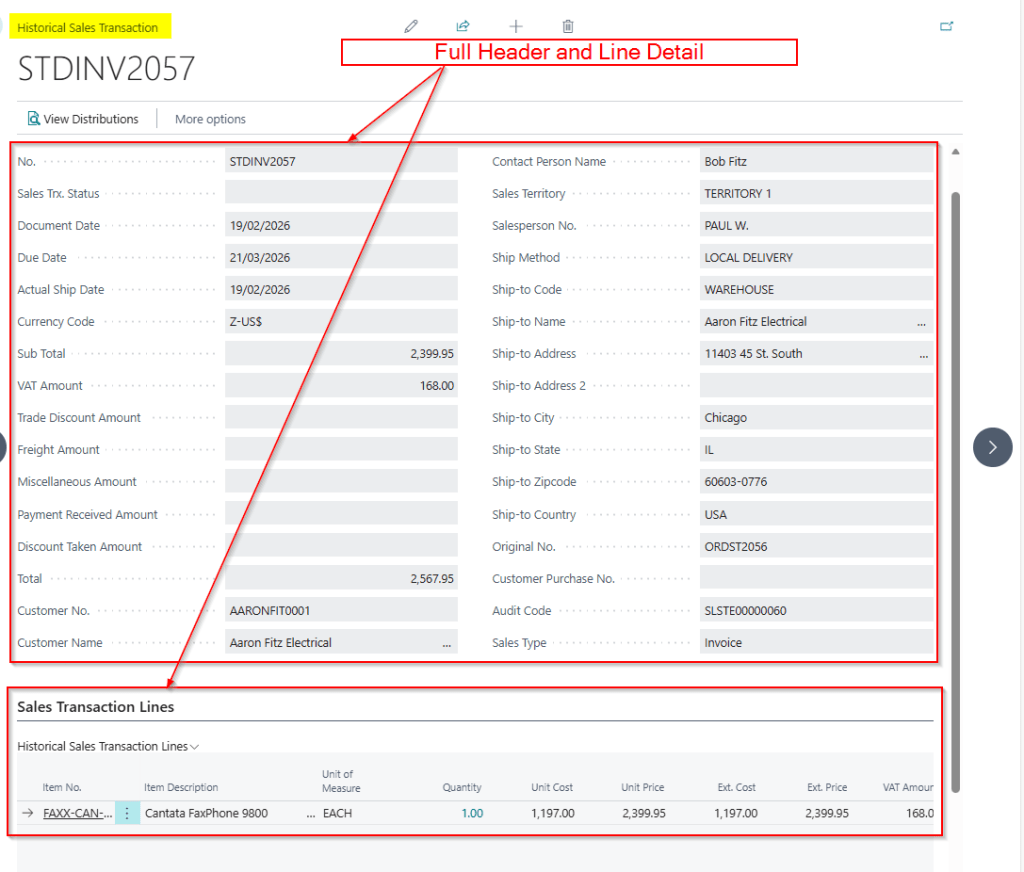
If I click on the “GP Sales Transactions” tile I can see a full list of the “Sales Order Processing” transactions that have migrated from Dynamics GP:
From here I can drill down onto them and see “Distributions” and the Sales Lines
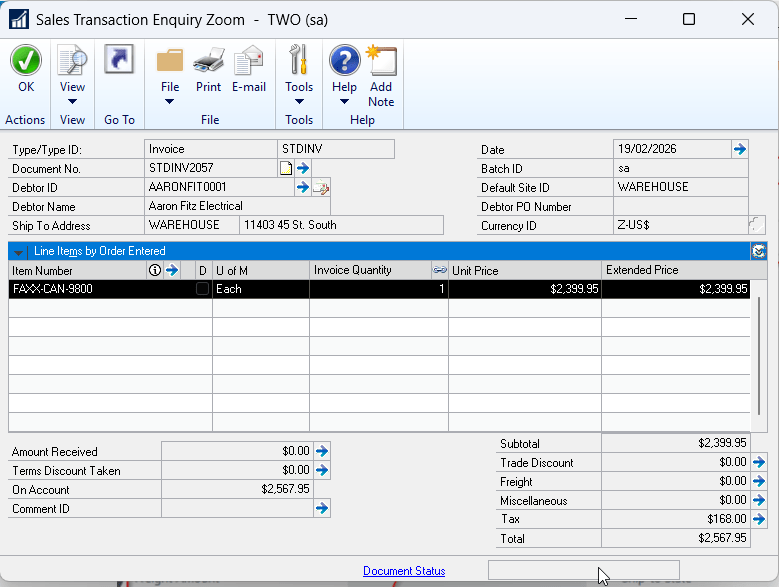
Here’s the same transaction in Dynamics GP. You can see all the detail has migrated
This information being available in Business Central is incredibly useful.
For example I can view the detail on previous Sales Orders and Sales Invoices I’ve sent to my customers. I no longer have to keep referencing my legacy Dynamics GP system for this type of information. Its seamlessly at my finger tips right in Business Central.
But wait it gets better!! Let’s now have a look at the information in the “GP Receivables Transactions” tile.
Note that when you post a Sales Invoice in Dynamics GP, as well as the Posted Sales Invoice, you also get a RM (Receivables Management) type transaction which is a little like the “Customer Ledger Entry” in Business Central. By drilling down on the “GP Receivables Transactions” we are looking at this RM transaction. This is what you apply cash receipts to and what Debtors reports are based off.
After selecting the “GP Receivables Transactions” tile we can see a list of all the fully paid migrated historical transactions:
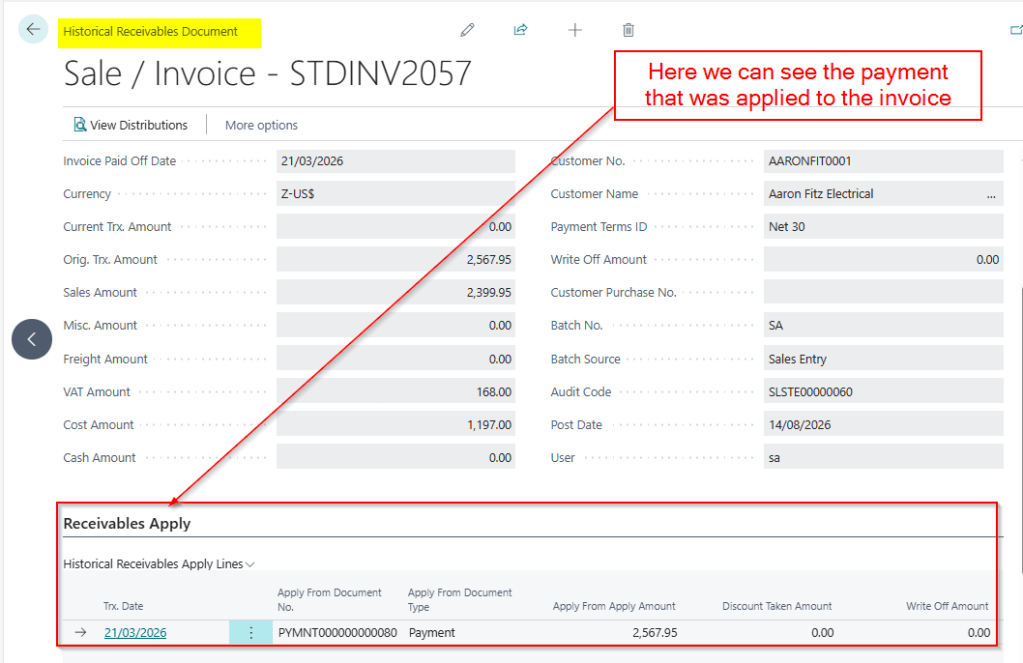
If I drill down on our invoice from the earlier example, STDINV2057, we can now see the Payment that was applied to it.
Amazing! We can see the exact payment that paid the invoice.
This gives me lots of advantages. For example, if I have credit control queries from my customers, I can answer them from right inside Business Central. No need to switch between systems, its right here at my finger tips.
What do my historical Financial Journals look like and where can I find them?
Now let’s take a look at the historical financial data that is migrated.
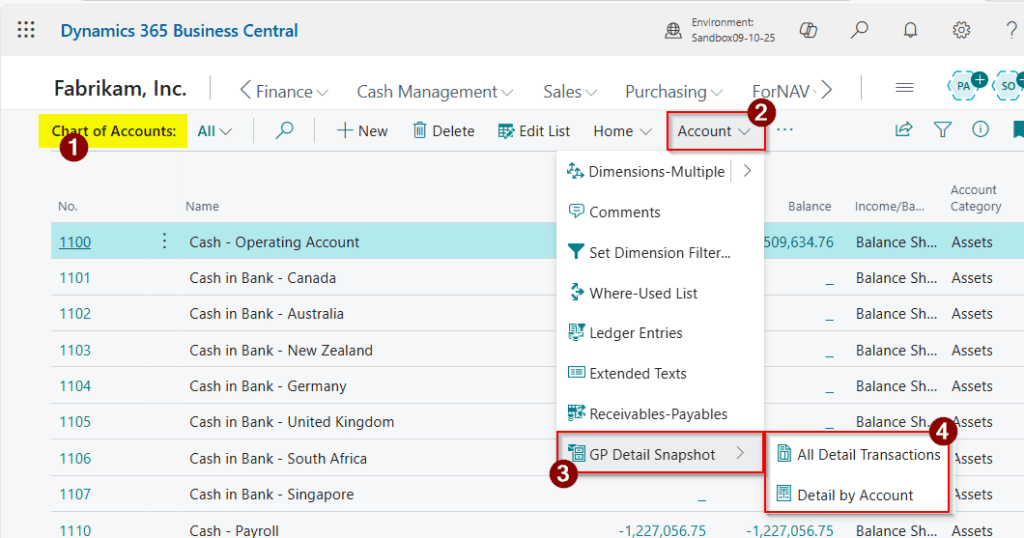
To find the historical Financial data you first go to the “Chart of Accounts” page and from here I can select “Account > GP Detail Snaphot” to get the various options as per below:
I’ll first click “All Detail Transactions” and this takes us to a full list of all the journals that have migrated.
If you are missing you’re old segmented GL structure you can see it here 😊.
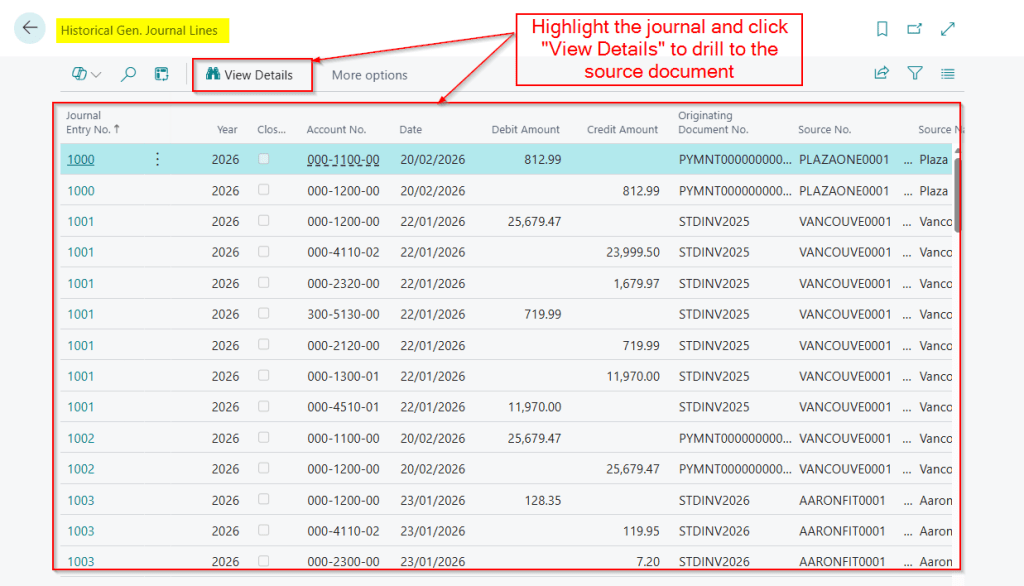
What’s absolutely fantastic is you can highlight a journal and click “View Details” to view the originating transaction. For example if I highlight the payment above and click “View Details” it shows me the payment.
I can even see the Invoice that the payment paid 😊.
If I now click the “Detail by Account” option I can see my whole GL account structure and I’m able to drill down and view the journals per account:
Again this is amazing information that I no longer have to go into Dynamics GP to view.
Now if I have queries on balances or I make regular journal adjustments I can view the historical entries right inside of Business Central.
Conclusion
In this post, we’ve explored how historical data from Dynamics GP is migrated into Business Central using Microsoft’s Cloud Migration tools, and how that data can be accessed for day-to-day reference.
Being able to view historical sales transactions, applied payments, and detailed financial journals directly inside Business Central provides massive value when migrating from Dynamics GP to Business Central.
I would even argue that even if you decide not to go live using a migrated GP company, there can still be significant benefit in migrating your historical data into Business Central as a separate reference company. This allows users to access GP history in a familiar Business Central interface, without impacting the live transactional company. This could strike a nice balance between keeping historical information accessible and starting fresh.
Ultimately, having historical GP data available inside Business Central helps make the new system a true single point of reference.
If you are thinking of moving from Dynamics GP to Business Central, Microsoft provide an absolutely amazing tool that can migrate your Dynamics GP data to Business Central 😊
This tool will not only migrate your master data, but also some opening balances, and crucially your historical data.
In this two part blog series, we’ll take a closer look at what gets migrated and how it appears in Business Central.
In Part 1 (this post) we’ll focus on opening balances, in particular your Customer and Vendor transactions and your General Ledger opening balance.
In Part 2 will take a look at how the historical data is migrated, and what it looks like once it’s in Business Central.
What do my Sales and Purchasing Opening Balances look like in Business Central?
The migration will transfer Customer and Vendor unapplied transactions currently in the OPEN tables in Dynamics GP.
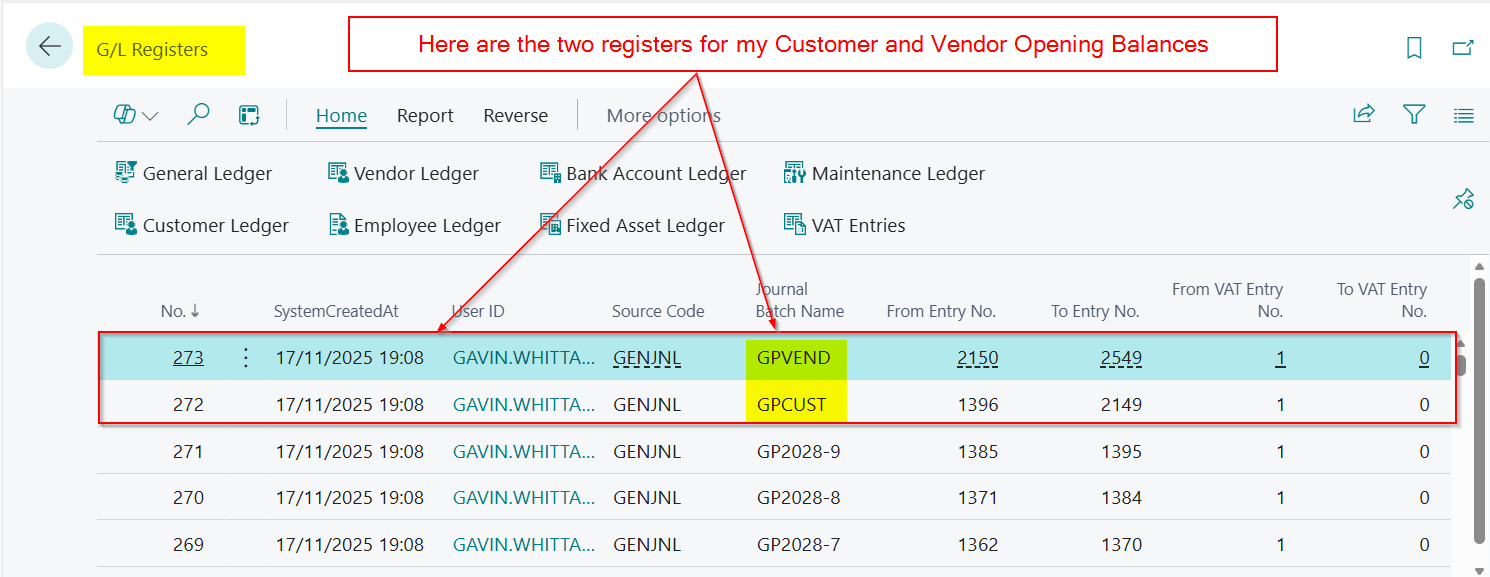
Customer and Vendor opening balances are posted in separate batches during the migration. After the migration has finished, The first place I usually review them is on the G/L Register page, which provides a complete view of all the opening balance G/L Registers.
You can learn more about Registers and how they function in Business Central in my blog post here
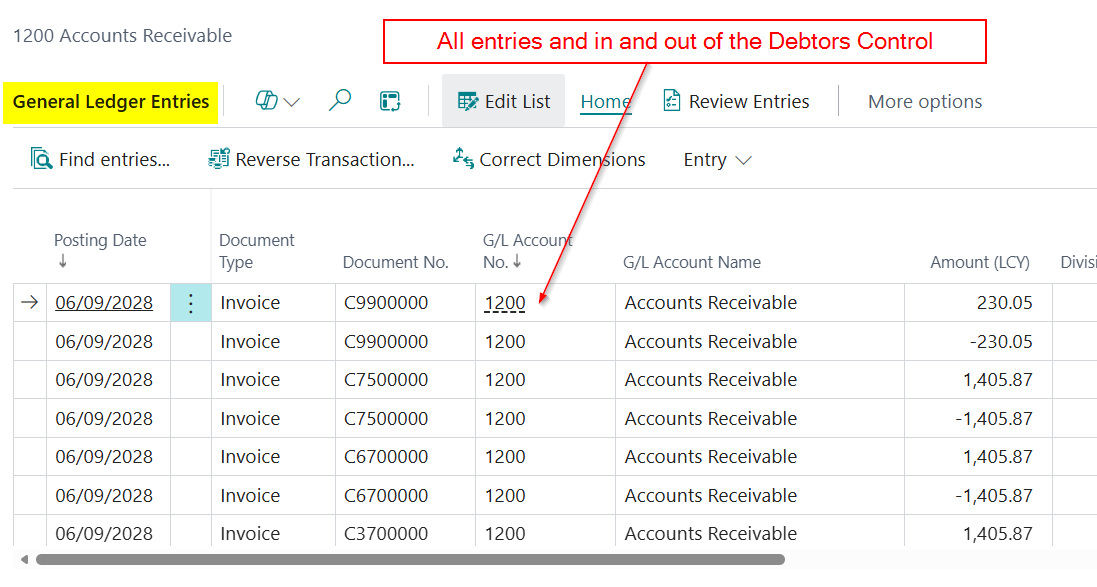
From here I can I highlight one of the batches and click the “General Ledger Entries” button which will show me the General Ledger Entries for the highlighted batch.
As you can see the General Ledger Entries post in and out of the Debtors Control account. This is because the balance for the Debtors and Creditors is migrated as part of the General Ledger Opening Balance.
I can follow the same steps to view the General Ledger entries related to the Vendors by simply highlighting the G/L Register from the Vendors
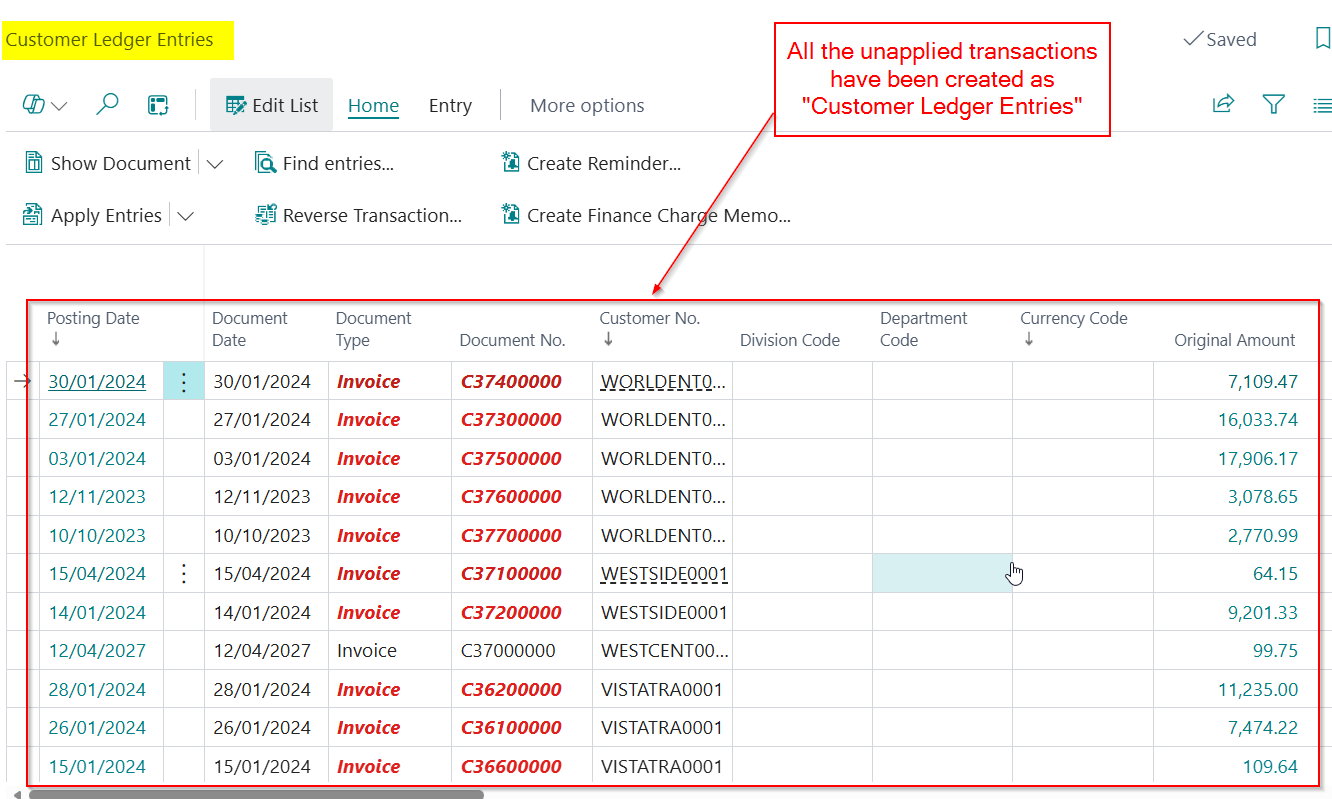
You can then click “Customer Ledger Entries” to view a list of the OPEN unapplied Sales transactions. The sum of this should match your outstanding Sales transactions in Dynamics GP.
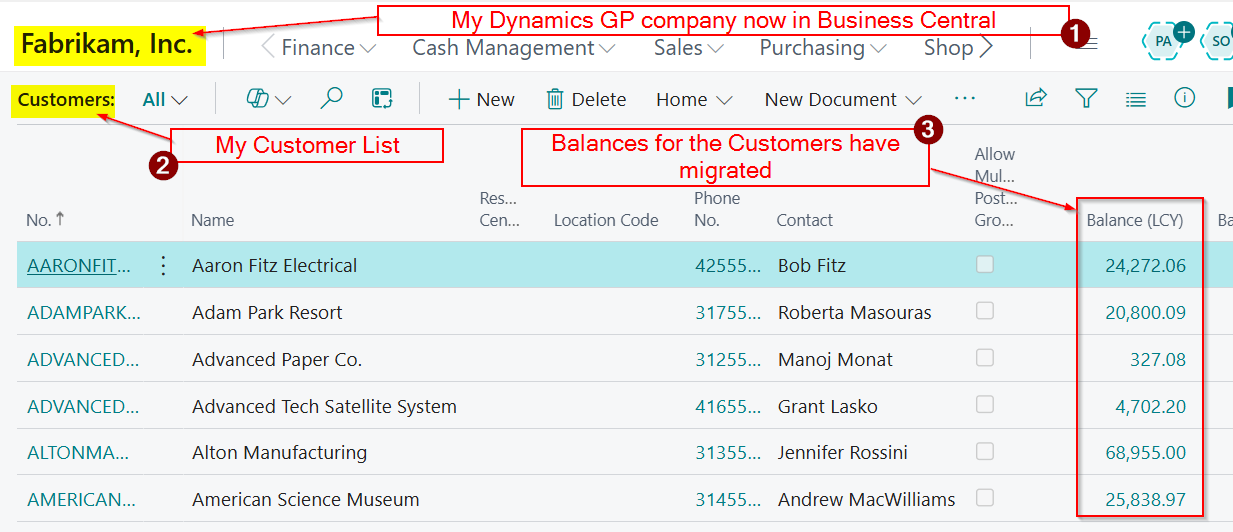
If I want to see the “Customer Ledger Entries” on the actual Customer, I can simply go to the Customer List and drill down on the Balance as per below
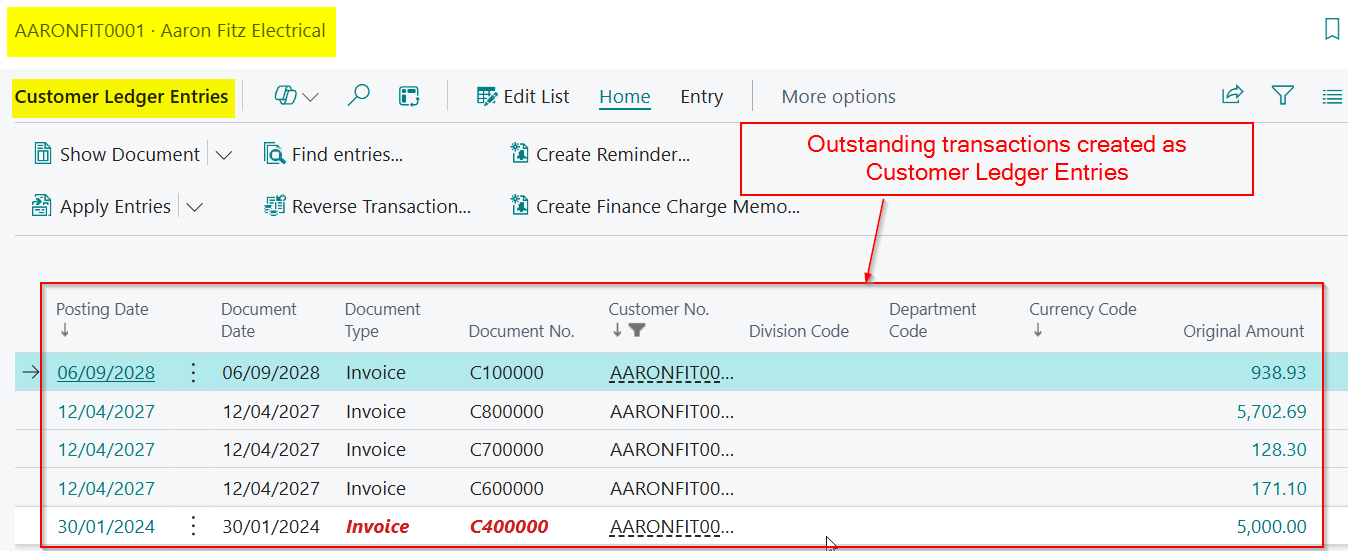
If I then drill down on the balance for “Adam Park Resort” I can see how the OPEN transactions in Dynamics GP have created Customer Ledger Entries in Business Central
When you go live with Business Central these entries will show on the “Aged Accounts Receivable” report that you should reconcile back to the “Historical Aged Trial Balance” in Dynamics GP.
If can follow the same process to view my migrated purchasing transactions. In this case the General Ledger Entries will have posted in and out of the Creditors control account and I can view and total my Vendor Ledger Entries as well.
Please note you can also migrate paid transactions however this is performed as part of the historical data migration which we’ll cover in Part 2
What do my General Ledger Opening Balances look like in Business Central?
Now we have seen the Customer and Vendor opening balances, let’s have a look at the General Ledger opening balances.
The first thing to note is that you can specify how many years of General Ledger opening balances you wish to migrate via the “GP Company Migration Configuration”. A screen shot of this is below:
Please note that every single year will then be migrated as an Open Year. So you’ll have to run the “Close Income Statement”, which is Business Central General Ledger Year End process, for those years that have been closed. This will close the Income Statement General Ledger balances to the retained earnings account.
Now we know we can migrate multiple years, lets have a look at how this appears in Business Central 😊.
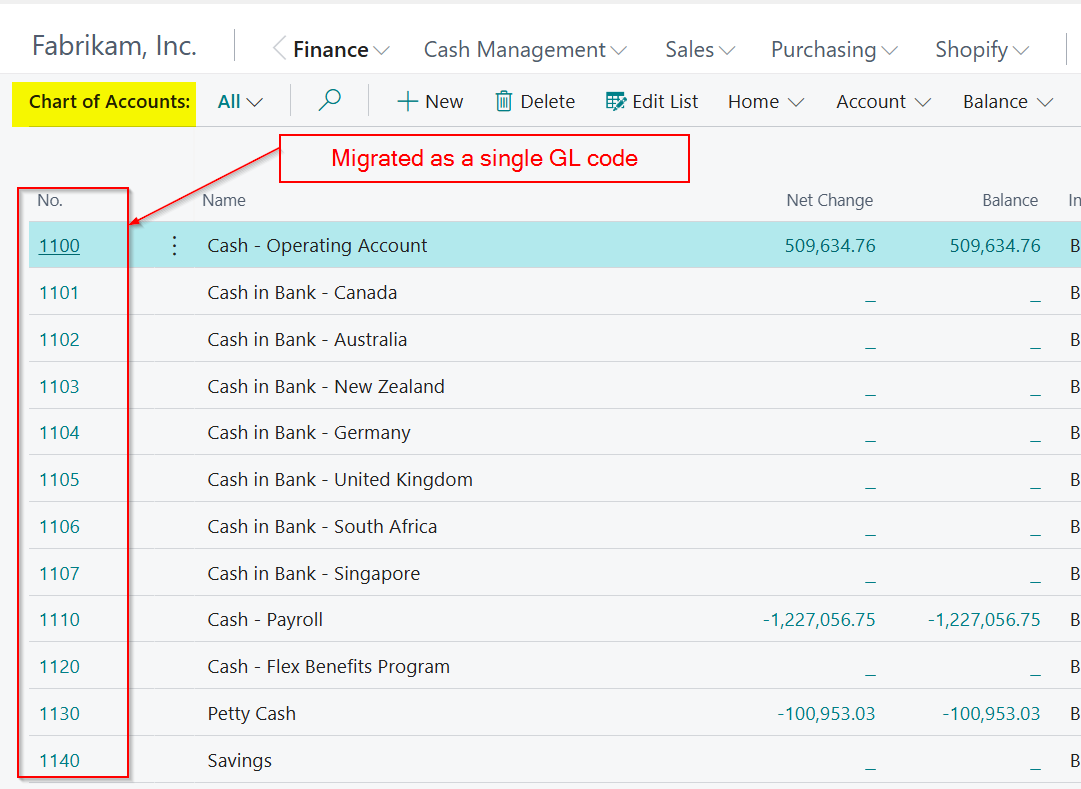
Before we look at the opening balances its important to understand how the Chart of Accounts differ between Dynamics GP and Business Central.
Dynamics GP uses a segmented General Ledger account, whereas Business Central uses a single General Ledger account and Dimensions for extra analysis. Therefore the migration splits the Dynamics GP General Ledger code and uses the “Main Segment” for the General Ledger code and the other segments as dimensions. You can read more about this in my blog post here and here.
Therefore my migrated Fabrikam Chart of Accounts appears as per below in Business Central.
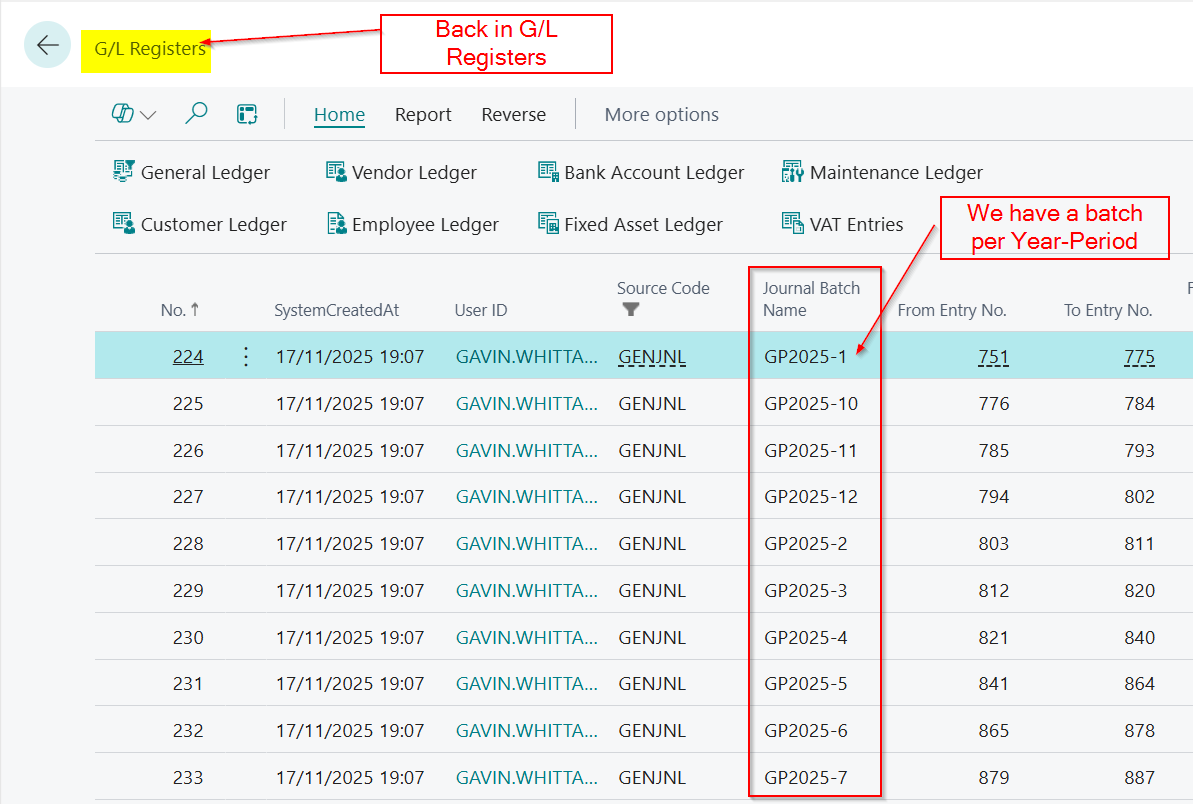
Again, I find the best place to start to look at how the balances have transferred, is the G/L Register page.
Here we can see that we have a register per Year-Period.
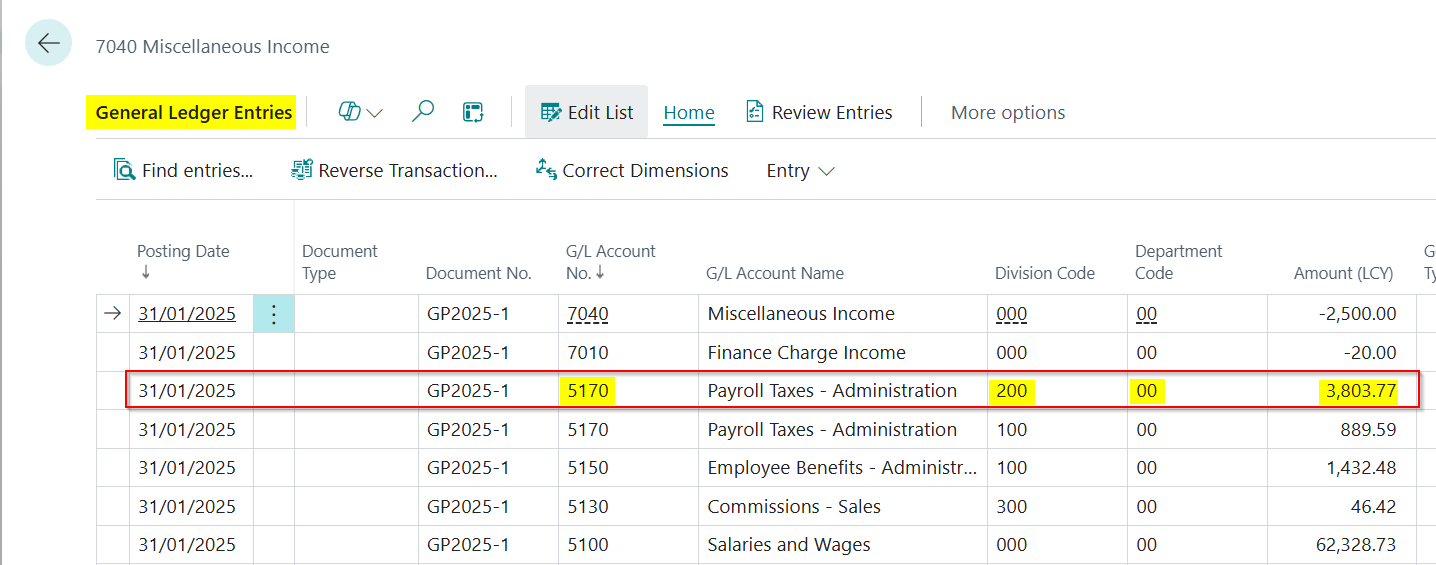
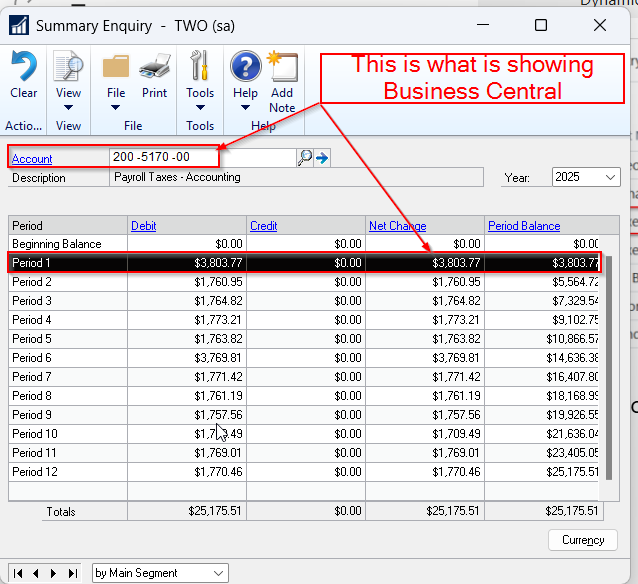
If I drill down on the “General Ledger Entries” for GP2025-1, you can see that we get a summarised total for each Dynamics GP General Ledger Code, rather than the individual detailed entries for the period.
Furthermore, we can match this back to Dynamics GP. So taking the highlighted row below for GL Code 5170 and Division Code 200 and Department Code 00, which is 200-5170-00 in Dynamics GP, we can see we have a balance that has migrated of £3,803.77.
If we have a look in Dynamics GP at code 200-5170-00 we can see the same monthly balance for period 1 of 2025
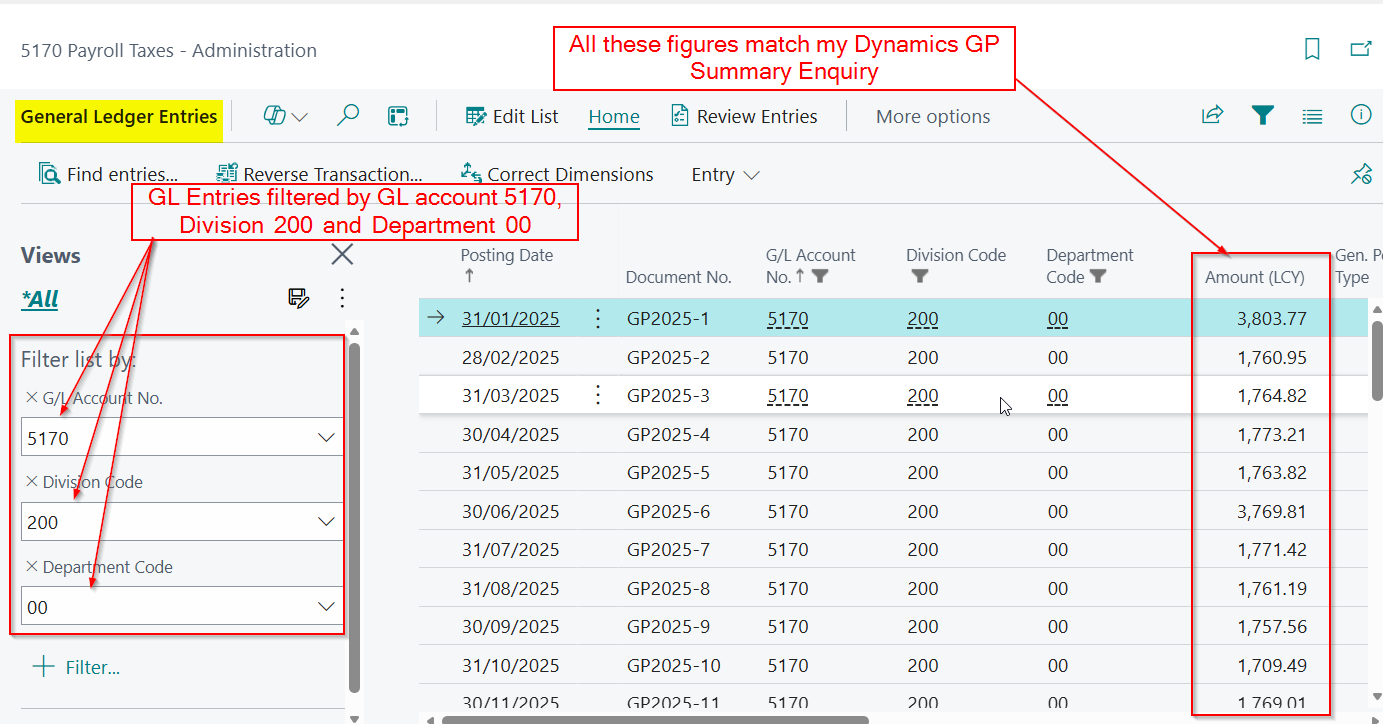
Taking this a step further, if I go straight to the “General Ledger Entries” page to see all migrated entries, and then filter to the GL code 5170, Division of 200 and Department 00, I can match every single period amount to that Dynamics GP summary shown above:
This proves that my migration has worked. All balances have been migrated on a month by month basis.
Whats also great, is now my GL code is seperate from my Division and Department, I can easily get a sum total at GL Code level and dimension level 😊
Conclusion
As we have seen, your opening balances from Dynamics GP migrate cleanly into Business Central, with Customer and Vendor OPEN transactions and summarised General Ledger balances brought across in a clear and reconcilable way.
In Part 2, we’ll take a closer look at historical data and how it appears in Business Central after migration.
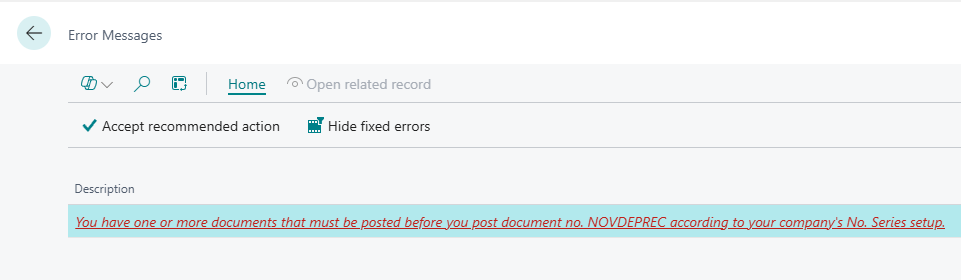
When posting a Journal in Business Central you receive the message “You have one or more documents that must be posted before you post document no..<docno>..according to your company’s No. Series setup”.
In this post we’ll look at why this error occurs and how it can be resolved.
First, let’s recreate the error
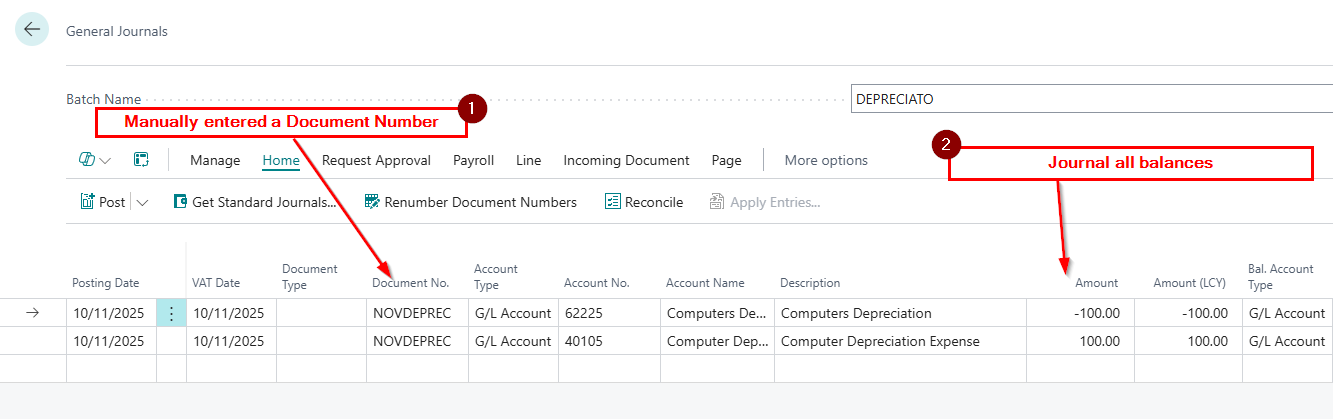
Here I have a journal batch for Depreciation. Everything looks fine, I’ve entered a Document Number and the journal balances.
The system will allow me to “Preview Post” however when I try and post the batch I’m presented with the error below:
I’m unable to post the batch?
Before we discuss the solution, let’s take a closer look at the configuration.
Journal Batch Configuration
The error is giving me some clues to the issue. Part of the error is saying “according to your company’s No. series setup”. I know that a No. Series in a Journal comes from the batch itself, so let’s have a look at that.
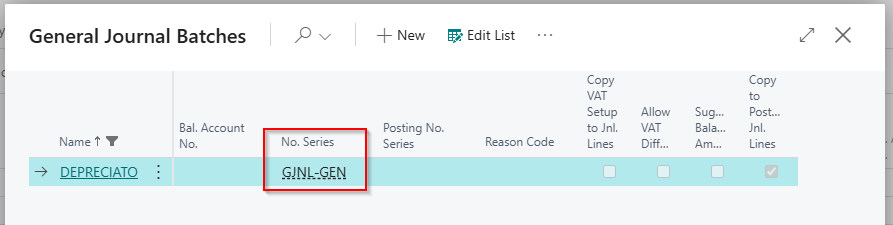
Below is a screen shot of my “DEPRECIATO” batch when contains my journal.
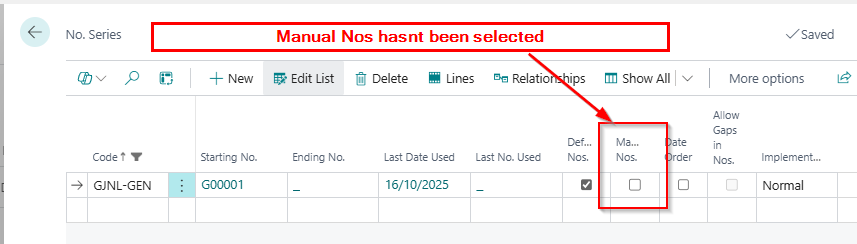
Here we can see that the batch has been assigned the No. Series “GJNL-GEN” so let’s go to the “No. Series” page and take a closer look at its configuration.
Straight away I’m seeing that “Manual No’s” has been switched OFF on the batch. This means that as this Number Series is assigned to my batch, I can’t enter my own number in journals in this batch.
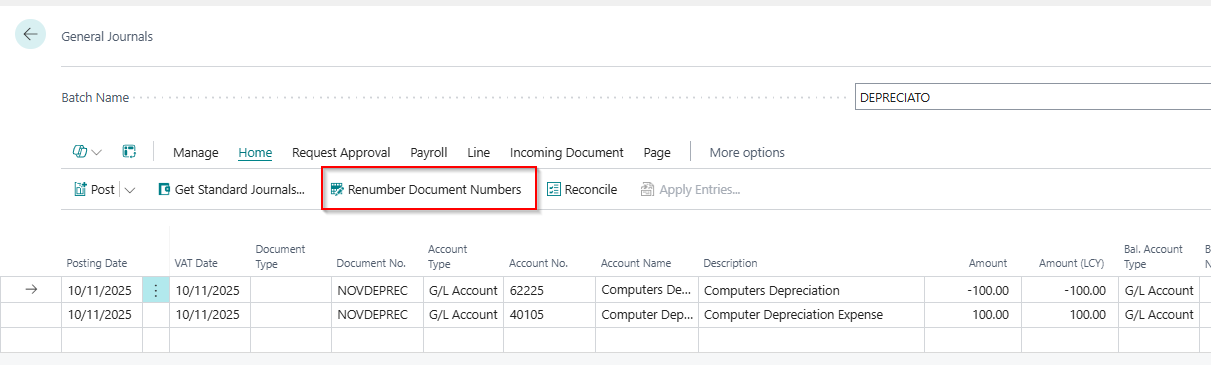
Going back to my batch, I’ve explicitly given the journal my own Document Number of “NOVDEPREC”. However, as we have seen, the Number Series assigned to my batch doesn’t allow Manual No’s.
Therefore, this must be my issue 😊.
The Solutions
Now we know the issue, let’s think of some potential solutions.
Switch ON Manual Numbers on the Number Series
The most obvious solution is to go to my Number Series and switch ON manual numbers. This would enable me to use my own document number of NOVDEPREC and the journal should post.
However this means that if the number series is assigned to any other batches, users would now be able to enter their own document numbers, and this might not be a good idea.
Remove the Number Series from the Batch
I could also remove the “Number Series” from my batch. I could then use any document number I like on the journal lines.
This would be fine is this is my personal batch, and the controller is happy for manual numbers to be used on journals.
Click “Renumber Document Numbers” on the menu
Finally, I could click “Renumber Document Numbers” from the function menu on the journal page as per below:
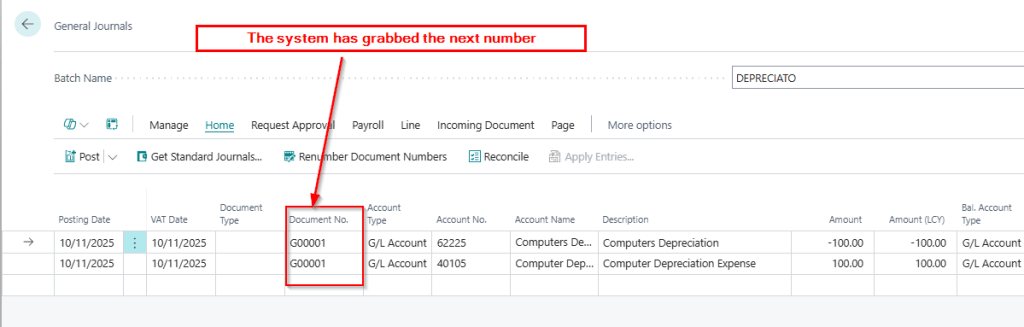
This will automatically fetch the next number from the Number Series and the batch should now post
Conclusion
This post has shown why the error “you have one or more documents that must be posted before you post document no..<docno>..according to your company’s No. Series setup” occurs, and gives a number of solutions.
I tend to use the last option when fixing this, as I assume the user what’s a sequential number for their journals. Having that configuration also ensures you always have a sequential journal number which most users want.