Dynamics 365 Business Central – How to manually reconcile the Bank Account without a Bank Statement in the Bank Reconciliation page

Introduction

This post was inspired by a forum question I responded to a few weeks ago. You can find the community thread here.

In the thread the poster was looking for a way to manually reconcile the bank account in Business Central without importing a Bank Statement. They mentioned how they could do this in Dynamics GP and wanted to know if similar functionality existed in Business Central.

In this post I’ll go through how this is possible using the “Suggest Lines” functionality in the Bank Reconciliation page.

Bank Reconciliation

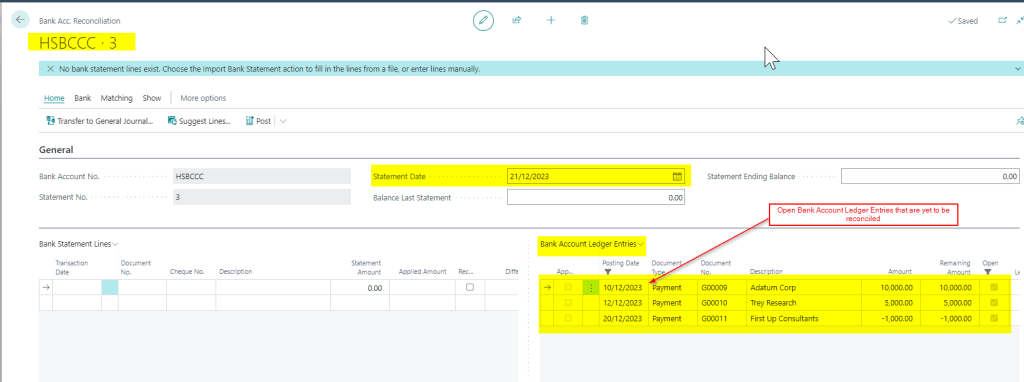
When you open the Bank Reconciliation page in Business Central, and enter a Bank Account No. and Statement Date, the unreconciled Bank Account Ledger Entries are automatically pulled into the page on the right hand pane, ready to reconcile. See below:

You can then either import the bank statement to populate the left hand pane, or manually key in each entry on your bank statement into the left hand pane. Once this has been done you can reconcile the items in each pane.

However, if you don’t want to import your Bank Statement, or the import Bank Statement functionality hasn’t been configured, how do you manually reconcile these Bank Account Ledger Entries?

Suggest Lines

In order to manually reconcile the Bank Account Ledger entries you can use the “Suggest Lines” function on the ribbon as shown below:

This will open the dialog below which you can complete with the relevant dates

When you click OK the Bank Statement Lines pane is populated with the Bank Account Ledger Entries and automatically matched.

If necessary you can then remove any lines you don’t want to reconcile and when you’re happy click post to reconcile the bank and close the Bank Account Ledger Entries.

Conclusion

If you don’t want to import a bank statement but still wish to reconcile your bank accounts this is quick and easy solution to manually reconcile your bank.

Thanks for reading!

Dynamics 365 Business Central – How to cancel a full month of Depreciation in the Fixed Assets module

Introduction

I recently encountered an issue where the fixed assets depreciation had been ran incorrectly and therefore it all had to be cancelled.

In this post, I’ll show a couple of ways you can cancel all depreciation in a given time frame or filter. These include using the “Cancel Entries” on the “FA Ledger Entries” page, and my preferred option, the “Cancel FA Entries” function on the Deprecation Book.

Scenario

In this scenario, I’ve posted depreciation for the month of August, impacting more than 300 assets. However, I’ve identified an error and now wish to cancel all depreciation for August.

There are a couple of approaches I could use to address this issue.

Option 1:- Multi select in the FA Ledger Entries Page

One way I could resolve this is to go the “FA Ledger Entries” page and filter for the entries I wish to cancel and click “Cancel Entries”.

For example, below I’ve filtered on the “AUGUSTDEPREC” document number and then selected all the entries and clicked “Cancel Entries”.

Although this would create me a Fixed Assets G/L Journal to cancel the entries, it wouldn’t automatically populate the balancing account. I’d then have to open the “Fixed Asset G/L Journal” page and highlight all the rows and click “Insert FA Bal Account”

I could then post the journal which would cancel the entries.

Option 2 – Use “Cancel FA Ledger Entries” on the Depreciation Book

I find that another, more efficient way of doing this, would be to use the “Cancel FA Ledger Entries” function on the Depreciation Book.

To do this search “Depreciation Book”, select the relevant Depreciation Book, and then click to edit it. Next, select the option “Actions > Functions > Cancel FA Ledger Entries”

This will open a dialog box with various options for cancelling different types of Fixed Assets transactions including Depreciation.

I’ll therefore choose the options below and click OK.

Using this method, I’m sure to cancel all depreciation entries within the specified date range. Additionally, it allows me to include the balancing account and specify a document date, all conveniently on a single page.

This will then create the relevant Fixed Asset G/L Journal I can post to cancel the entries

Final Note

When you choose to “Cancel” entries although all entries are reversed, including GL entries, they don’t appear in the “FA Ledger Entries” page. (this includes the FA Ledger Entry you cancelled). They can be viewed via the “FA Error Ledger Entries” page. This is by design as the entries have been cancelled.

Conclusion

There are various methods available for cancelling Fixed Assets entries. However, when I need to cancel multiple entries simultaneously, such as monthly depreciation, I prefer using the “Cancel FA Ledger Entries” page. When cancelling individual entries, I find the “Cancel FA Entries” option on the “FA Ledger Entries” page to be more convenient.

Thanks for reading!

Dynamics 365 Business Central – How to selectively post part of a Journal batch using filters

Introduction

There might be situations when you only want to post part of a Journal batch, rather than the whole batch. For example, if you have several monthly adjustment journals in one batch, you might only want to post a selection of the entries, rather than the whole batch. In this post I’ll walk through how this can be achieved using filters.

Scenario

Let’s say you have a month end journal batch that contains several monthly adjustments you are working on. Now you just want to post a selection of the entries in the of the journal batch, and continue working on the rest.

As there is only a “Post” option on the menu bar, its not obvious how you can achieve this, however this can be done using filtering on the journal lines.

Filtering in a Journal

Below is a journal batch that contains a depreciation entry, an accrual and a journal for bad debt that hasn’t yet been finalised.

In this scenario, I only want to post the depreciation entry, and continue working on the other journals in the batch. To do this I can click the “Filter” option and filter the lines to my depreciation journal as per below.

Now, when I click “Post”, Business Central honours the filter and only posts what is currently filtered. As you can see below only two GL entries have been created. (and in fact the journal wouldn’t have posted without the filter as it didn’t fully balance)

Conclusion

Its common to advise users to create a journal batch per task in Business Central. For example, a journal batch for Adjustments, Accruals etc however you can use one batch and use filters to post just what you need.

Thanks for reading!

Enjoyed this post? Subscribe below

Need help with Business Central? Contact me