There might be situations when you only want to post part of a Journal batch, rather than the whole batch. For example, if you have several monthly adjustment journals in one batch, you might only want to post a selection of the entries, rather than the whole batch. In this post I’ll walk through how this can be achieved using filters.
Scenario
Let’s say you have a month end journal batch that contains several monthly adjustments you are working on. Now you just want to post a selection of the entries in the of the journal batch, and continue working on the rest.
As there is only a “Post” option on the menu bar, its not obvious how you can achieve this, however this can be done using filtering on the journal lines.
Filtering in a Journal
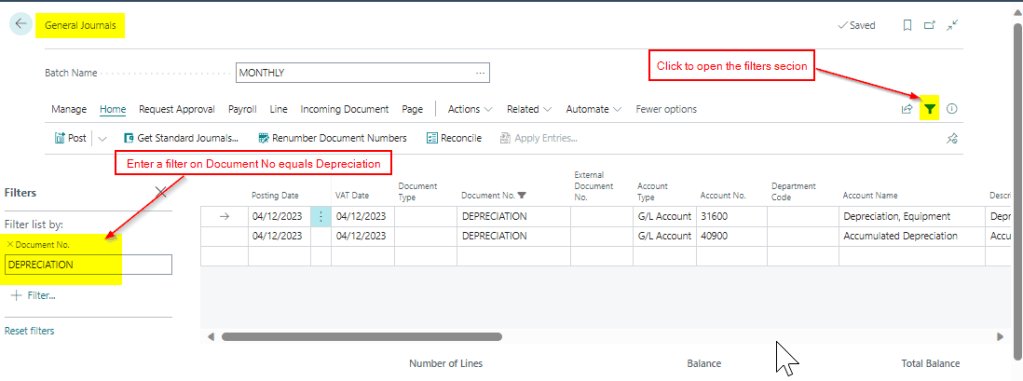
Below is a journal batch that contains a depreciation entry, an accrual and a journal for bad debt that hasn’t yet been finalised.
In this scenario, I only want to post the depreciation entry, and continue working on the other journals in the batch. To do this I can click the “Filter” option and filter the lines to my depreciation journal as per below.
Now, when I click “Post”, Business Central honours the filter and only posts what is currently filtered. As you can see below only two GL entries have been created. (and in fact the journal wouldn’t have posted without the filter as it didn’t fully balance)
Conclusion
Its common to advise users to create a journal batch per task in Business Central. For example, a journal batch for Adjustments, Accruals etc however you can use one batch and use filters to post just what you need.
When creating new Customers it may be necessary to automatically set them as “Blocked” to prevent them from being immediately used. Additionally, this would give you the option to create a workflow that is triggered when a user changes the status from “Blocked” to “Unblocked” (blank).
This post will show how you can automatically set any new Customers to “Blocked” using Customer Templates and a Number Series.
Step 1 – Create a Customer Template
To streamline the creation of new customers, Business Central provides the capability to create “Customer Templates”. You can set certain defaults on a Customer Template, like Posting Groups, Currencies, payment terms, and notably the “Blocked” status along with a Number series.
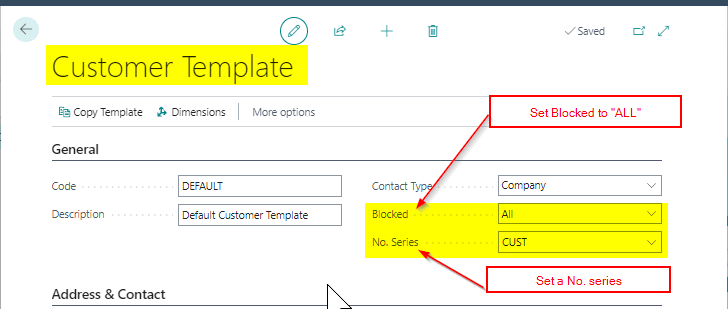
To implement this solution we need at least one Customer Template, so I’ll create one called “DEFAULT”. I’ll also set the Blocked status to “ALL” and a Number Series of “CUST” as per below
Step 2 – Number Series
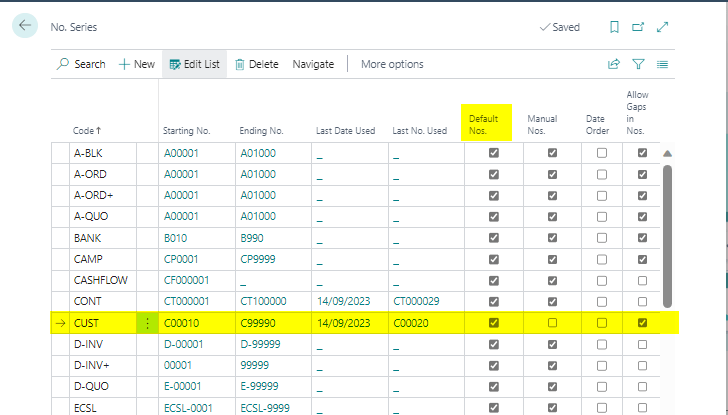
Next, we need to ensure “Default Nos” is switched ON on the Number Series we selected on the Customer Template above.
Step 3 – Test Creating a New Customer
With all the components configured, we can now test the creation of a new customer. Since the customer template includes a number series with default numbers, the template will be applied automatically, resulting in the customer being blocked.
Conclusion
In summary, two key factors are enabling the functionality. Firstly, you need a number series with the “Default Nos” option activated. If default numbers aren’t activated the template won’t be applied automatically. Secondly, a customer template is required, configured to automatically set the “Blocked” option to “All.”
You could now improve the customer onboarding process by implementing an approval workflow that triggers when the status changes from “All” to blank, allowing you to enforce customer approval.
Thanks for reading!
Need help with Business Central? You can subscribe or contact me below
A key process in any new Business Central implementation is posting and reconciling the opening balances.
While some opening balances, such as those in the General Ledger, Sales Ledger, and Purchase Ledger, are straightforward, others, like Fixed Assets and Goods Received Not Invoiced (GRNI), present unique challenges. (I’ve written about Fixed Assets opening balances here)
In this post I’ll go through the problem goods received not invoiced poses, and how I post the opening balances for Goods Received Not Invoiced (expected costs) in Business Central.
The Scenario
When going LIVE with Business Central it’s possible they’ll be a value on the Goods Received Not Invoiced (GRNI) general ledger account on the opening trial balance. This balance typically consists of pending Purchase Orders for Inventory that have been received but not yet invoiced.
For instance, a Purchase Order for 1000 units at £5 per unit, though received, remains un-invoiced, resulting in a credit balance of £5000 on the GRNI General Ledger Account (referred to as the “Inventory Interim Accrual Account” in Business Central).
As Inventory opening balances are usually brought in separately its usually not possible to enter those Purchase Orders manually in Business Central, or we would double count the Inventory value, therefore ideally we need a method to record the “in-flight” purchase order and also a way to “draw down” the existing balance on the GRNI account when the Vendor Invoice does arrive.
There are a couple of ways you can deal with this which I’ll outline below.
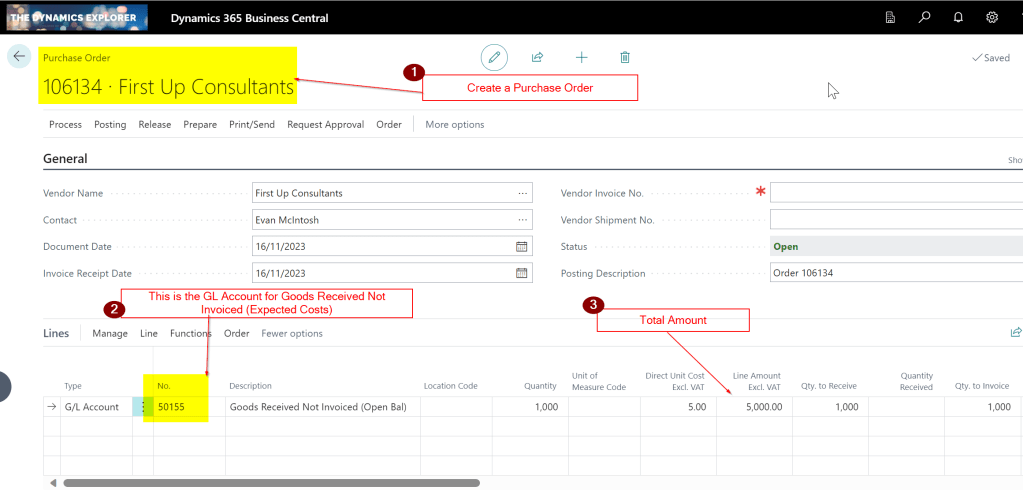
Solution 1 – Create Purchase Orders using a G/L Account
One approach involves creating a Purchase Order with a line item directed to the GRNI General Ledger Account for each pending Purchase Order. Using the earlier example, an in-flight purchase order for 1000 units at a unit cost of £5 would result in a credit balance of £5000 on the GRNI General Ledger account.
Therefore you’d create a Purchase Order as per below to record this in Business Central:
Then, when the Vendor Invoice for the goods arrives, you can invoice this Purchase Order which would Debit the Goods Received Not Invoiced account leaving a zero balance on the GRNI account.
Solution 2 – Create a Purchase Invoice using a G/L Account
Alternatively, you can bypass creating Purchase Orders and directly raise a Purchase Invoice against the GRNI account when the vendor invoice is received. Posting this Purchase Invoice would debit the GRNI account, again leaving a zero balance.
For example when the Vendor Invoice arrived you would raise and post this as per below
Other Considerations
In both scenario’s I find it best to create a separate GRNI account for the existing opening balance and have a new GRNI account for any GRNI (Expected Costs) postings when Purchase Orders are received in Business Central when the system goes LIVE. This separation makes reconciliation easier and you can also monitor the “drawing down” of the original GRNI balance separately from expected cost entries made from Purchase Orders received in Business Central.
Conclusion
This highlights a couple of methods that can be used to post opening balances for Goods Received Not Invoiced in Business Central.
While both approaches have their advantages, I do edge towards creating Purchase Orders with a line item pointing to a dedicated GRNI account for each in flight Purchase Order. This method helps with reconciliation both when the opening balances are posted and after go live. (you can monitor the balance in the GRNI account to the number of unposted Purchase Orders with G/L accounts pointing at the GRNI account).
Thanks for reading!
Want further help with Business Central?
If you’d like more help with Business Central, I also run Rapid365, which provides Business Central implementation and support services for UK businesses, supporting you through setup and go-live.