Introduction
It’s common for users to overlook a crucial step when setting up new Dimensions in Business Central, which can result in the Dimensions not being easily visible or accessible in various documents and journals pages.
This post will guide you through the process of adding a new Dimension and explain the final, often overlooked step that makes your Dimensions easily accessible.
As a side note, I think it also explains why these dimensions are referred to as “Shortcut” dimensions 😉
Create a new Dimension
One of the things I love most about Business Central is how simple it is to gain additional financial insights by adding additional Dimensions, without the need to create new General Ledger accounts. (this harks back to my Dynamics GP days 😊)
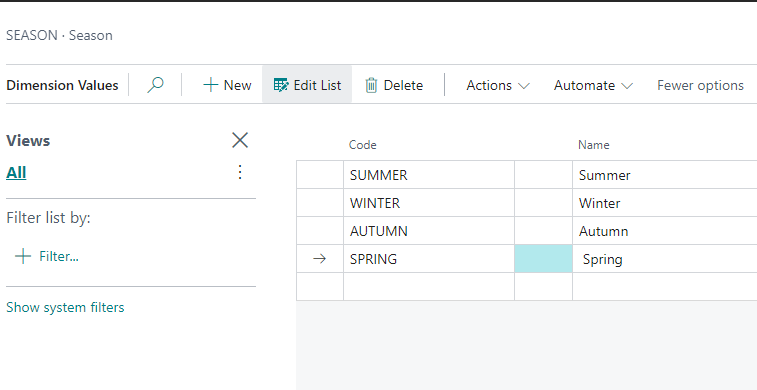
In this instance I want to start analysing my financial data by SEASON, so I’ll go to “Dimensions” and create the new Dimension and Dimension Values. (note how I already have lots of other dimensions i.e. AREA and BUSINESSGROUP etc)

I’ll now add the Dimension Values I want to analyse to:
Lets use it in a General Journal
Now I’ve created the new Dimension, I’ll use it in a General Journal, however on first inspection its not available as a column for me to use?

In fact, as you can see from my screen shot above, the only dimensions I have available are “DEPARTMENT” and “CUSTOMERGROUP”? Why can’t I post to my other dimensions like my new SEASON dimension and the other existing dimensions like AREA and BUSINESSGROUP etc?
The simple answer is that I can – it’s just not immediately obvious. By clicking “Line > Dimensions”, as shown below, I can access all my dimensions.


This is great, but I want to be able to enter them easily, right on the journal line, just like I can with “DEPARTMENT” and “CUSTOMERGROUP”.
Essentially, I want these dimensions to be more accessible – to be “shortcuts”, if you will. (Hold that thought 😉)
Let’s make them “shortcuts”
The solution to this issue is found on the “General Ledger Setup” page.
After creating a new Dimension, the final step is to add it as a “Shortcut” dimension on the “General Ledger Setup” page.
In my company, I’ve only added DEPARTMENT and CUSTOMERGROUP as shortcut dimensions, which is why those are the only ones I can see on the journal lines:

When you designate a dimension as a “Shortcut” dimension in the General Ledger Setup, it becomes available on the lines of Journals and Documents.
I’ll therefore add my new Dimension, SEASON, as my “Shortcut Dimension 3 Code”
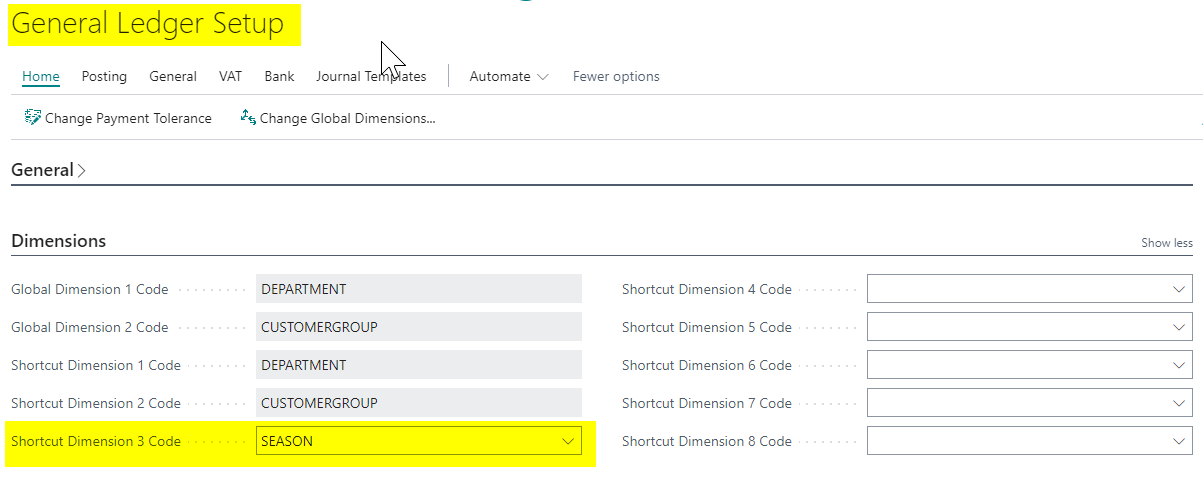
Now, when I open my General Journal page, I can see the SEASON dimension alongside the DEPARTMENT and CUSTOMERGROUP dimensions.
I no longer have to click “Line > Dimensions”, its available as a “shortcut” right on the journal line 😊

Conclusion
This post highlights the importance of completing the final configuration step when creating Dimensions: adding them to your General Ledger Setup. Without this step, using the dimensions in Journals and Documents requires more clicks and is therefore more difficult.
It’s also clear now that, although you can create an unlimited number of dimensions, you can only have a maximum of eight shortcut dimensions. Any additional dimensions will need to be accessed through the menu bar options.
Thanks for reading!
