Dynamics 365 Business Central – How to close reversed Bank Account Ledger Entries that have been automatically removed from the bank reconciliation

Introduction

I’ve noticed that when you reverse a bank account ledger entry its removed from the “Bank Account Ledger Entries” (right hand pane) in the Bank Account Reconciliation window however the entries remain “Open”.

To close the bank account ledger entries I’ve found you have to run the “Suggest Lines” function to populate the “Bank Statement Lines” (left hand pane) with the entries and reconcile them.

In this article I’ll walk through this whole process

The Scenario

Below I’ve posted a payment journal entry for £50.00 which is correctly appearing on the “Bank Account Ledger Entries” side for reconciliation.

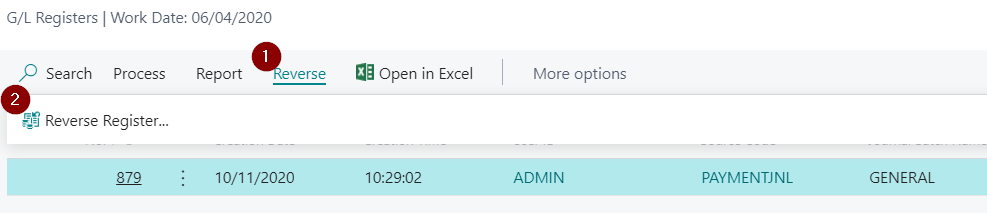
However I realised I’ve posted this incorrectly and therefore I navigate to G/L Registers, find the register, and select to reverse it:

Once this has all been reversed I return to the bank account reconciliation and the entry has disappeared, which is correct, as there won’t be a reconciling entry on the imported bank statement:

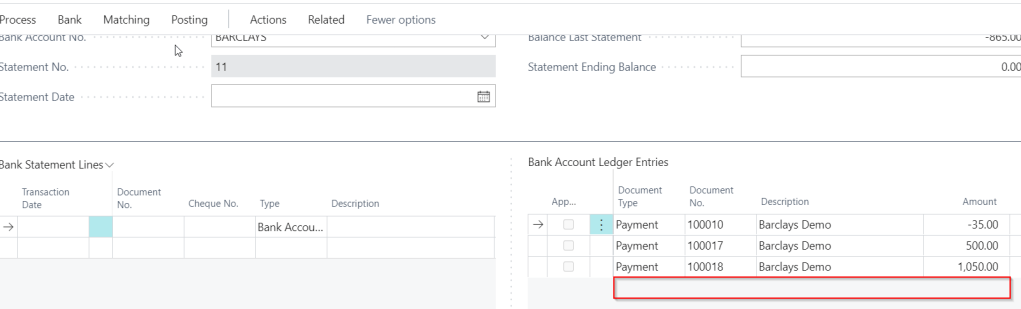
However when I check the “Bank Account Ledger Entries” both entries are showing as “Open”

So the question is, as these items will never be reconciled to a genuine imported bank statement entry, how do we close the bank account ledger entries?

The Fix

In order to close the bank account ledger entries I found I had to pull them into the “Bank Statement Lines” pane using the “Suggest Lines” function.

**Please note you would normally use the “Suggest Lines” function for your reconciliation if you don’t import a bank statement downloaded from your bank

To do this, from within the “Bank Account Reconciliation” page, I selected “Suggest Lines” as per below:

I then selected my date range and clicked OK which pulls all open bank account ledger entries into the “Bank Statement Lines” pane.

Now, along with other open bank account ledger entries which were also pulled through, I can see the incorrect payment and the corresponding reversal in the “Bank Statement Lines” pane.

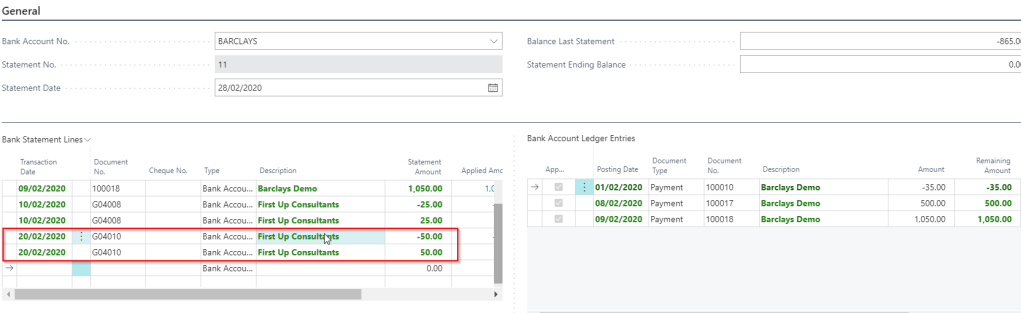
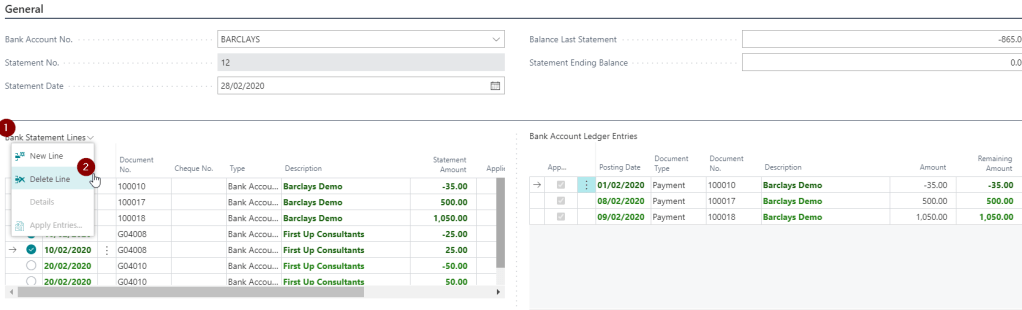
So, in order to close these entries I need to reconcile them. To do this I first delete all other entries from the “Bank Statement Lines” pane. To do this I multi select them and click “Bank Statement Lines > Delete Line”

I’m now left with the two entries I wish to close in the “Bank Statement Lines” pane (and no other reconciled items):

Next I populate the “Bank Ending Balance” which is identical to the “Bank Last Statement” as nothing has changed with the balance, and post the reconciliation

Now, when I check the “Bank Account Ledger Entries” I can see both entries have been closed.

Conclusion

This does seem like a fairly long winded way of closing the bank account ledger entries that have been reversed. If anyone knows of a quicker way please let me know 🙂

Thanks for reading!

GP to BC Fundamentals Video – Defaulting VAT using VAT Posting Setup

This is the second video in a series I’ve called GP to BC Fundamentals.

The videos hope to give anyone moving from GP to BC a good understanding of some key concepts in Business Central.

This video focuses on how Business Central defaults VAT onto transactions using VAT Posting Groups.

Hopefully new GP to BC users will find it useful. (or anyone new to BC for that matter)

Happy watching 🙂

Dynamics 365 Business Central – How to post a contra to a Customer and Vendor using one General Journal

Introduction

You may have situation where you have an outstanding customer invoice, and an outstanding purchase invoice for the same company. (i.e. the company is both a customer and a supplier)

In this scenario you may come to an agreement that instead of you paying the outstanding purchase invoice, and them paying you the outstanding sales invoice, its more efficient to “contra” the entries off. In other words, raise a Sales Credit document to apply to the Sales Invoice they owe you, and raise a Purchase Credit document to apply to the Purchase Invoice you owe them.

With Dynamics 365 Business Central there’s a way to raise both of these entries in one single journal rather than creating separate Sales and Purchase Documents.

The Scenario

Here I have an outstanding Customer Ledger Entry for £100.00 owed to me by a customer who is also my supplier.

And here I have an outstanding Vendor Ledger Entry for (£100.00) that I owe to the same company.

We have agreed that rather than pay each other we’ll “contra” the entries off.

The “Contra” Journal

To create the contra I’m going to use the “General Journal” shown below:

In this one journal entry I’ve left the “Bal. Account No” blank (see highlighted above) as I’m balancing a Customer entry (first line) to a Vendor Entry (second line).

In the first line I’ve selected “Customer” as the “Account Type” and an “Amount” of -100.00. This will create a negative customer ledger entry I can apply to the outstanding invoice. I can apply this to the outstanding invoice from within the journal by selecting the line and clicking “Process > Apply Entries”

I can then apply in the usual way:

For the second line in the journal I’ve selected an “Account Type” of “Vendor” and entered an amount of 100.00 which balances the first line. This will create a positive “Vendor Ledger Entry”. I can also apply this line to the outstanding Invoice by selecting “Process > Apply Entries” in the same manner I applied the first entry.

Now if I click preview postings I can see exactly what is going to post:

As shown above when I post this journal I’m going to get one Customer Ledger Entry and one Vendor Ledger Entry. I also get additional Detailed Customer and Vendor Ledger entries as I applied the transactions as well.

If we drill down to the “G/L Entries” we can see a Credit to the Debtors account and a Debit to the Payables account.

Conclusion

I’ve found Journals can be a very powerful tool in Dynamics 365 Business Central enabling users to post all manner of transactions.

Thanks for reading!